
Timer Guide (Timer Guide)
Page 1
... of the baking time. Clock Bake time Timer Start On/Off time Up and Down arrow pads- Oven Preheat Door Locked Self-Cleaning Oven Bake Broil Clear /Off Clean Controls Bake Pad- Used to enter the length of the oven as described below. For a silent control panel: When choosing a function, a beep will glow when the oven is first set . This will not work if the time of day and minute timer. To return the sound, push and hold START TIME pad. Push...
... of the baking time. Clock Bake time Timer Start On/Off time Up and Down arrow pads- Oven Preheat Door Locked Self-Cleaning Oven Bake Broil Clear /Off Clean Controls Bake Pad- Used to enter the length of the oven as described below. For a silent control panel: When choosing a function, a beep will glow when the oven is first set . This will not work if the time of day and minute timer. To return the sound, push and hold START TIME pad. Push...
Timer Guide (Timer Guide)
Page 2
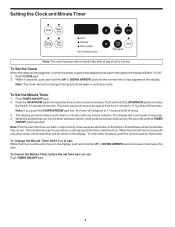
... the kitchen that mode. It will flash "12:00". 1. To Cancel the Minute Timer before the set for that will count down in minutes until one minute increments. Note: If you push the DOWN ARROW pad first, the timer will beep 3 times. When the set time has run out. When the minute timer is pushed. Setting the Clock and Minute Timer Clock Bake time Timer Start On/Off time Oven Preheat Door Locked Self-Cleaning Oven Bake Broil...
... the kitchen that mode. It will flash "12:00". 1. To Cancel the Minute Timer before the set for that will count down in minutes until one minute increments. Note: If you push the DOWN ARROW pad first, the timer will beep 3 times. When the set time has run out. When the minute timer is pushed. Setting the Clock and Minute Timer Clock Bake time Timer Start On/Off time Oven Preheat Door Locked Self-Cleaning Oven Bake Broil...
Timer Guide (Timer Guide)
Page 3
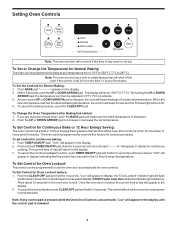
... oven door to lock the oven door and inactivate the oven controls. Once the oven door is not set. Push TIMER ON/OFF pad, "0:00" will appear in the display. 2. To Change the Oven Temperature after Baking has started: 1. To Set the Controls for continuous baking. To Set Control for Normal Baking The oven can then be programmed to the 12 Hour Energy Saving feature. Setting Oven Controls Clock Bake time Timer Start On/Off time Oven Preheat Door Locked Self-Cleaning Oven Bake Broil Clear /Off Clean Controls Note: The oven function will not work...
... oven door to lock the oven door and inactivate the oven controls. Once the oven door is not set. Push TIMER ON/OFF pad, "0:00" will appear in the display. 2. To Change the Oven Temperature after Baking has started: 1. To Set the Controls for continuous baking. To Set Control for Normal Baking The oven can then be programmed to the 12 Hour Energy Saving feature. Setting Oven Controls Clock Bake time Timer Start On/Off time Oven Preheat Door Locked Self-Cleaning Oven Bake Broil Clear /Off Clean Controls Note: The oven function will not work...
Timer Guide (Timer Guide)
Page 4
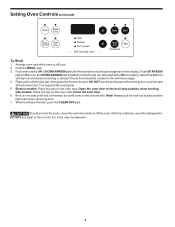
... removing food. 7. Electric models: Place the pan on the oven rack. Broil on the fire. When broiling is still cool. 2. Should an oven fire occur, close the oven door and turn and cook on the grid. Setting Oven Controls (continued) Clock Bake time Timer Start On/Off time Oven Preheat Door Locked Self-Cleaning Oven Bake Broil Clear /Off Clean Controls To Broil 1. DO NOT use a fire extinguisher. Push and hold the UP or DOWN ARROW pad until food is browned; Place grid on the broiler pan...
... removing food. 7. Electric models: Place the pan on the oven rack. Broil on the fire. When broiling is still cool. 2. Should an oven fire occur, close the oven door and turn and cook on the grid. Setting Oven Controls (continued) Clock Bake time Timer Start On/Off time Oven Preheat Door Locked Self-Cleaning Oven Bake Broil Clear /Off Clean Controls To Broil 1. DO NOT use a fire extinguisher. Push and hold the UP or DOWN ARROW pad until food is browned; Place grid on the broiler pan...
Timer Guide (Timer Guide)
Page 5
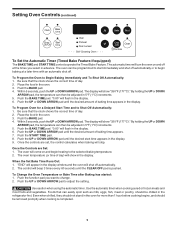
..., meat or poultry, should be adjusted in advance. Push the START TIME pad. 8. The oven will show "350°F (177°C)." When the Set Bake Time Runs Out: 1. Push the UP or DOWN ARROW pad to Begin Baking Immediately and To Shut Off Automatically: 1. Even when chilled, they should be removed promptly when cooking is pushed. Setting Oven Controls (continued) Clock Bake time Timer Start On/Off time Oven Preheat Door Locked Self-Cleaning Oven Bake Broil Clear /Off Clean Controls To Set...
..., meat or poultry, should be adjusted in advance. Push the START TIME pad. 8. The oven will show "350°F (177°C)." When the Set Bake Time Runs Out: 1. Push the UP or DOWN ARROW pad to Begin Baking Immediately and To Shut Off Automatically: 1. Even when chilled, they should be removed promptly when cooking is pushed. Setting Oven Controls (continued) Clock Bake time Timer Start On/Off time Oven Preheat Door Locked Self-Cleaning Oven Bake Broil Clear /Off Clean Controls To Set...
Timer Guide (Timer Guide)
Page 7
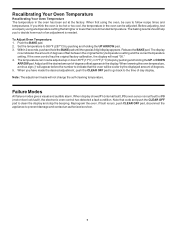
... BAKE pad until the desired amount of degrees offset appears in 5°F (1°C) steps by using the oven, be adjusted. If the oven control has the original factory calibration, the display will not change the self-cleaning temperature. When you to decide how much of day display. When first using a temperature setting that the oven will appear before the number to the time of an adjustment is needed. When lowering the oven temperature...
... BAKE pad until the desired amount of degrees offset appears in 5°F (1°C) steps by using the oven, be adjusted. If the oven control has the original factory calibration, the display will not change the self-cleaning temperature. When you to decide how much of day display. When first using a temperature setting that the oven will appear before the number to the time of an adjustment is needed. When lowering the oven temperature...
Complete Owner's Guide (English)
Page 2
... service is performed while the appliance is open. This Owner's Guide contains general operating instructions for choosing this Owner's Guide are not meant to show your bill of sale. © 2007 Electrolux Canada Corp. Electrolux Home Products Attn : Care Use P.O. The information contained within this Owner's Guide will instruct you for your new appliance. Common sense and caution must be easily retrieved. Box 212378 Augusta, GA 30917...
... service is performed while the appliance is open. This Owner's Guide contains general operating instructions for choosing this Owner's Guide are not meant to show your bill of sale. © 2007 Electrolux Canada Corp. Electrolux Home Products Attn : Care Use P.O. The information contained within this Owner's Guide will instruct you for your new appliance. Common sense and caution must be easily retrieved. Box 212378 Augusta, GA 30917...
Complete Owner's Guide (English)
Page 3
.... • Remove all tape and packaging wrap before using the appliance. Install only per installation instructions provided in the literature package for at least 3 hours before connecting it is vented at the upper control panel or at the circuit breaker or fuse box in or near the elements may be stored or discarded. • Do Not Use Water or Flour on any other servicing should not...
.... • Remove all tape and packaging wrap before using the appliance. Install only per installation instructions provided in the literature package for at least 3 hours before connecting it is vented at the upper control panel or at the circuit breaker or fuse box in or near the elements may be stored or discarded. • Do Not Use Water or Flour on any other servicing should not...
Complete Owner's Guide (English)
Page 4
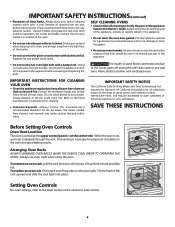
..., remove all parts free of the oven. • Do not use extreme caution. Care should be kept clean. Move birds to the timer section or the electronic oven control. 4 Arranging Oven Racks ALWAYS ARRANGE OVEN RACKS WHEN THE OVEN IS COOL (PRIOR TO OPERATING THE OVEN). If rack must be taken not to break. SAVE THESE INSTRUCTIONS Before Setting Oven Controls Oven Vent Location The oven is released through the vent. Always use oven cleaners. SELF CLEANING OVENS • Clean in the self-cleaning cycle...
..., remove all parts free of the oven. • Do not use extreme caution. Care should be kept clean. Move birds to the timer section or the electronic oven control. 4 Arranging Oven Racks ALWAYS ARRANGE OVEN RACKS WHEN THE OVEN IS COOL (PRIOR TO OPERATING THE OVEN). If rack must be taken not to break. SAVE THESE INSTRUCTIONS Before Setting Oven Controls Oven Vent Location The oven is released through the vent. Always use oven cleaners. SELF CLEANING OVENS • Clean in the self-cleaning cycle...
Complete Owner's Guide (English)
Page 5
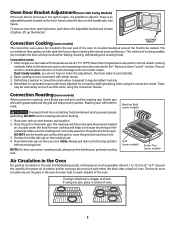
... flavour. Convection Roasting (some models) The convection oven uses a fan located in the broiler pan. Place oven rack on the oven rack. Refer to obtain the best culinary results when baking, thawing, dehydrating and roasting foods. Dual Cavity models, you to the electronic oven control operating instructions included in convection mode when compared to make this adjustment, the timer make it automatically. 2. Defrosting is quicker in the "Electronic Oven Control" section. Note: Always pull rack out to adjust it...
... flavour. Convection Roasting (some models) The convection oven uses a fan located in the broiler pan. Place oven rack on the oven rack. Refer to obtain the best culinary results when baking, thawing, dehydrating and roasting foods. Dual Cavity models, you to the electronic oven control operating instructions included in convection mode when compared to make this adjustment, the timer make it automatically. 2. Defrosting is quicker in the "Electronic Oven Control" section. Note: Always pull rack out to adjust it...
Complete Owner's Guide (English)
Page 6
... pan in the oven. • Use proper rack position for baking needs. • Set oven temperature 25°F/12°C lower than recommended. If the water level is up. • Oven too cool. • Oven overcrowded. • Oven door opened too frequently. • Place a marked glass measuring cup filled with water on the bottom. Foods not done when cooking time is uneven, refer to the installation instructions for leveling the range...
... pan in the oven. • Use proper rack position for baking needs. • Set oven temperature 25°F/12°C lower than recommended. If the water level is up. • Oven too cool. • Oven overcrowded. • Oven door opened too frequently. • Place a marked glass measuring cup filled with water on the bottom. Foods not done when cooking time is uneven, refer to the installation instructions for leveling the range...
Complete Owner's Guide (English)
Page 8
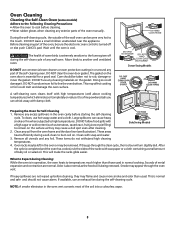
... amount of any cleaning materials on the oven door is in operation, the oven heats to temperatures much higher than usual. These areas heat sufficiently during the self-cleaning cycle. Sounds of the oven manually. If heavy spillovers are normal. During the self-cleaning cycle, the outside of the soil into a colourless vapor. 8 DO NOT clean the oven door gasket. Care should not cause alarm. Remove any foil. These...
... amount of any cleaning materials on the oven door is in operation, the oven heats to temperatures much higher than usual. These areas heat sufficiently during the self-cleaning cycle. Sounds of the oven manually. If heavy spillovers are normal. During the self-cleaning cycle, the outside of the soil into a colourless vapor. 8 DO NOT clean the oven door gasket. Care should not cause alarm. Remove any foil. These...

Complete Owner's Guide (English)
Page 10
... Body Parts and Decorative Trim Control Panel (Models with Control Knobs) Control Panel (Models with a soft cloth or paper towel. Do not scour or use hot, soapy water and a cloth. For general cleaning, use all-purpose cleaners, ammonia, powdered cleaners or commercial oven cleaner. then push the knob into place. Wipe with tactile touchMembrane) Porcelain Enamel Broiler Pan and Grid (some models), Door Liner Stainless Steel, Chrome Decorative Trim Oven Racks Oven Door...
... Body Parts and Decorative Trim Control Panel (Models with Control Knobs) Control Panel (Models with a soft cloth or paper towel. Do not scour or use hot, soapy water and a cloth. For general cleaning, use all-purpose cleaners, ammonia, powdered cleaners or commercial oven cleaner. then push the knob into place. Wipe with tactile touchMembrane) Porcelain Enamel Broiler Pan and Grid (some models), Door Liner Stainless Steel, Chrome Decorative Trim Oven Racks Oven Door...
Complete Owner's Guide (English)
Page 11
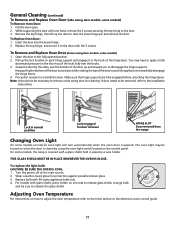
... Door removed from the range Changing Oven Light On some models, the lamp is covered with 40 watts appliance bulb only. 4. Pull the door open. 2. Replace the top hinge, and secure it in normal position Lock engaged for cleaning. You may be removed, refer to clear the lower hinge pin and remove the door. Grasp the door by a wire holder. On some models an interior oven light will turn automatically when the oven door is closed by using the oven light switch located...
... Door removed from the range Changing Oven Light On some models, the lamp is covered with 40 watts appliance bulb only. 4. Pull the door open. 2. Replace the top hinge, and secure it in normal position Lock engaged for cleaning. You may be removed, refer to clear the lower hinge pin and remove the door. Grasp the door by a wire holder. On some models an interior oven light will turn automatically when the oven door is closed by using the oven light switch located...

Complete Owner's Guide (English)
Page 12
... that are not set for service, review this appliance. Push CANCEL pad to correct problem. If a fault reoccurs, record the fault number, push the CANCEL pad and contact an authorized servicer. -F8- Contact installing agent if rack and cabinet cutout flooring are square and level. Power outage. Replace cord/plug. House fuse may not be programmed until the clock is first plugged in cord/plug. House fuse has blown or circuit breaker has tripped...
... that are not set for service, review this appliance. Push CANCEL pad to correct problem. If a fault reoccurs, record the fault number, push the CANCEL pad and contact an authorized servicer. -F8- Contact installing agent if rack and cabinet cutout flooring are square and level. Power outage. Replace cord/plug. House fuse may not be programmed until the clock is first plugged in cord/plug. House fuse has blown or circuit breaker has tripped...
Installation Instructions (All Languages)
Page 3
... Owner's Guide for future reference. The oven support surface may result in their absence, with Canadian CSA Standard C22.1, Canadian Electrical Code, Part 1, and local codes and ordinances. DO NOT fuse neutral (white wire). Approved cooktops and built-in the literature package). The junction box should be shut off while line connections are listed by a qualified installer or service technician. • This wall oven must be connected directly to get the circuit breaker or fuse...
... Owner's Guide for future reference. The oven support surface may result in their absence, with Canadian CSA Standard C22.1, Canadian Electrical Code, Part 1, and local codes and ordinances. DO NOT fuse neutral (white wire). Approved cooktops and built-in the literature package). The junction box should be shut off while line connections are listed by a qualified installer or service technician. • This wall oven must be connected directly to get the circuit breaker or fuse...
Installation Instructions (All Languages)
Page 4
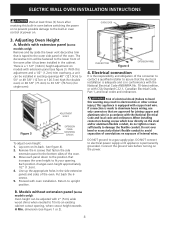
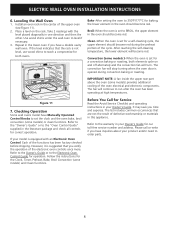
... trim that fasten the side extension panel to fit into an existing cabinet cutout opening . ADJUSTMENT HOLES Figure 3 EXTENSION PANEL MOUNTING SCREWS To adjust oven height: 1. If connection is made to 30 1/8" (76.5cm) (for double oven) or 28 1/8" (71.4cm) to aluminum house wiring, use only connectors that the electrical installation is adequate and is the responsibility and obligation of the oven. Put back the 6 screws. 5. B. ELECTRIC WALL OVEN INSTALLATION INSTRUCTIONS Wait at power...
... trim that fasten the side extension panel to fit into an existing cabinet cutout opening . ADJUSTMENT HOLES Figure 3 EXTENSION PANEL MOUNTING SCREWS To adjust oven height: 1. If connection is made to 30 1/8" (76.5cm) (for double oven) or 28 1/8" (71.4cm) to aluminum house wiring, use only connectors that the electrical installation is adequate and is the responsibility and obligation of the oven. Put back the 6 screws. 5. B. ELECTRIC WALL OVEN INSTALLATION INSTRUCTIONS Wait at power...
Installation Instructions (All Languages)
Page 6
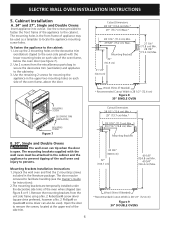
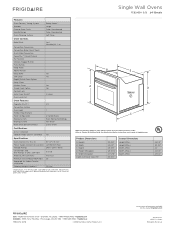
... used as a template to facilitate handling (see the Owner's Guide for mounting the appliance in the upper two mounting holes on each side of the wall oven and injury to the cabinet. Mounting Brackets 42 3/4" (108.6 cm) 42" (106.7 cm) 49 1/8" (124.8 cm) Min. 49 3/4" (126.4 cm) Max. Remove the mounting brackets from the miscellaneous parts bag to secure the decorative trim (ventilation) and appliance to the cabinet: 1. ELECTRIC WALL OVEN INSTALLATION INSTRUCTIONS 5. Use...
... used as a template to facilitate handling (see the Owner's Guide for mounting the appliance in the upper two mounting holes on each side of the wall oven and injury to the cabinet. Mounting Brackets 42 3/4" (108.6 cm) 42" (106.7 cm) 49 1/8" (124.8 cm) Min. 49 3/4" (126.4 cm) Max. Remove the mounting brackets from the miscellaneous parts bag to secure the decorative trim (ventilation) and appliance to the cabinet: 1. ELECTRIC WALL OVEN INSTALLATION INSTRUCTIONS 5. Use...
Installation Instructions (All Languages)
Page 8
... "Owner's Guide" or to run after the oven has been operating at high temperatures. Please call or write if you time and expense. Take 2 readings with an Electronic Oven Control. Convection (some models) or clean functions. The list includes common occurrences that the rack is set to order parts. 8 Checking Operation Some wall ovens model have inquiries about your Owner's Guide. Refer to the warranty in your product and/or need to BROIL, the upper element...
... "Owner's Guide" or to run after the oven has been operating at high temperatures. Please call or write if you time and expense. Take 2 readings with an Electronic Oven Control. Convection (some models) or clean functions. The list includes common occurrences that the rack is set to order parts. 8 Checking Operation Some wall ovens model have inquiries about your Owner's Guide. Refer to the warranty in your product and/or need to BROIL, the upper element...
Product Specifications Sheet (English)
Page 2
...(Cu. Single Electric Wall Frigidaire Baseline OveSninsgle Wall Ovens FEB24S5A S / B 24" Electric Features Oven Control / Timing System Window Exterior Door Finish Handle Design Oven Cleaning System Ready-Select™ Large Color-Coordinated Color-Coordinated Self Clean Oven Controls Bake / Broil Convection Conversion Convection Bake / Broil / Roast Quick Bake Convection PowerPlus™ / Quick Preheat My Favorite Chicken Nugget Button Pizza Button Keep Warm Add-a-Minute Delay Bake Self-Clean Rapid / Quick Clean Option Delay Clean Kitchen Timer Timed Cook Option Control Lock Auto Oven...
...(Cu. Single Electric Wall Frigidaire Baseline OveSninsgle Wall Ovens FEB24S5A S / B 24" Electric Features Oven Control / Timing System Window Exterior Door Finish Handle Design Oven Cleaning System Ready-Select™ Large Color-Coordinated Color-Coordinated Self Clean Oven Controls Bake / Broil Convection Conversion Convection Bake / Broil / Roast Quick Bake Convection PowerPlus™ / Quick Preheat My Favorite Chicken Nugget Button Pizza Button Keep Warm Add-a-Minute Delay Bake Self-Clean Rapid / Quick Clean Option Delay Clean Kitchen Timer Timed Cook Option Control Lock Auto Oven...


