
English Manual.
Page 6
... 8 Install the Memory 10 Install an Expansion Card 12 Install other Internal Connectors 13 Jumpers 16 Chapter 3 BIOS Setup Enter BIOS Setup 19 Main Menu 19 System Information 21 Fox Central Control Unit 23 Advanced BIOS Features 27 Advanced Chipset Features 28 Integrated Peripherals 29 Power Management Setup 34 PC Health Status 37...
... 8 Install the Memory 10 Install an Expansion Card 12 Install other Internal Connectors 13 Jumpers 16 Chapter 3 BIOS Setup Enter BIOS Setup 19 Main Menu 19 System Information 21 Fox Central Control Unit 23 Advanced BIOS Features 27 Advanced Chipset Features 28 Integrated Peripherals 29 Power Management Setup 34 PC Health Status 37...

English Manual.
Page 7
... 63 FOX DMI 64 Chapter 5 RAID Configuration RAID Configuration Introduction 67 NVIDIA® MediaShield Driver 69 Create two RAID Driver Diskettes 71 RAID Enable in BIOS 73 Select a RAID Array for Use 73 Install a New Windows XP 89 Setting Up a Non-Bootable RAID Array 96 Technical Support : Support Website : http://www...
... 63 FOX DMI 64 Chapter 5 RAID Configuration RAID Configuration Introduction 67 NVIDIA® MediaShield Driver 69 Create two RAID Driver Diskettes 71 RAID Enable in BIOS 73 Select a RAID Array for Use 73 Install a New Windows XP 89 Setting Up a Non-Bootable RAID Array 96 Technical Support : Support Website : http://www...
English Manual.
Page 17
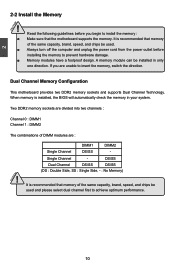
..., and chips be used and please select dual channel first to insert the memory, switch the direction. CAUTION 10 Single Channel - It is installed, the BIOS will automatically check the memory in only one direction. Read the following guidelines before installing the memory to install the memory : ■ Make sure that...
..., and chips be used and please select dual channel first to insert the memory, switch the direction. CAUTION 10 Single Channel - It is installed, the BIOS will automatically check the memory in only one direction. Read the following guidelines before installing the memory to install the memory : ■ Make sure that...

English Manual.
Page 19
... slot. • Removing the Card: Push the latch at the end of the PCI Express x16 slot to make any required BIOS changes for your computer. If necessary, go to BIOS Setup to release the card and then pull the card straight up from the chassis back panel. 2. Carefully read the manual...
... slot. • Removing the Card: Push the latch at the end of the PCI Express x16 slot to make any required BIOS changes for your computer. If necessary, go to BIOS Setup to release the card and then pull the card straight up from the chassis back panel. 2. Carefully read the manual...
English Manual.
Page 22
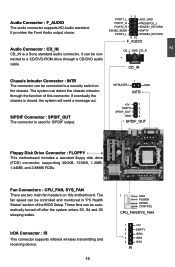
... EMPTY PORT2_L SENSE2_RETURN 9 10 F_AUDIO CD_L GND CD_R 1 CD_IN Chassis Intruder Connector : INTR The connector can detect the chassis intrusion through the function of the BIOS Setup. IrDA Connector : IR This connector supports infrared wireless transmitting and receiving device. 15 1 GND POWER SENSE CONTROL CPU_FAN/SYS_FAN 1 2 3 4 5 IR +5V EMPTY IRRX GND...
... EMPTY PORT2_L SENSE2_RETURN 9 10 F_AUDIO CD_L GND CD_R 1 CD_IN Chassis Intruder Connector : INTR The connector can detect the chassis intrusion through the function of the BIOS Setup. IrDA Connector : IR This connector supports infrared wireless transmitting and receiving device. 15 1 GND POWER SENSE CONTROL CPU_FAN/SYS_FAN 1 2 3 4 5 IR +5V EMPTY IRRX GND...

English Manual.
Page 23
... Definition 1-2 2-3 Description Set Pin 1 and Pin 2 closed Set Pin 2 and Pin 3 closed . 4. Return the setting to factory default when the BIOS settings were mistakenly modified. Clear CMOS data is simply labeled as described in the power cord to your computer and turn it on this motherboard..., pin 1 can be done by touching two pins by changing the jumper settings. The steps to configure new system as "1". 2. Go to BIOS Setup to clear CMOS data are : 1. Remove jumper cap from the power outlet. 2. Normal 1 2 (Default) 3 CLR_CMOS ■ Disconnect ...
... Definition 1-2 2-3 Description Set Pin 1 and Pin 2 closed Set Pin 2 and Pin 3 closed . 4. Return the setting to factory default when the BIOS settings were mistakenly modified. Clear CMOS data is simply labeled as described in the power cord to your computer and turn it on this motherboard..., pin 1 can be done by touching two pins by changing the jumper settings. The steps to configure new system as "1". 2. Go to BIOS Setup to clear CMOS data are : 1. Remove jumper cap from the power outlet. 2. Normal 1 2 (Default) 3 CLR_CMOS ■ Disconnect ...
English Manual.
Page 24
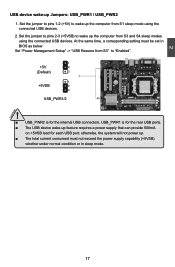
... using the connected USB devices. 2. At the same time, a corresponding setting must not exceed the power supply capability (+5VSB) whether under normal condition or in BIOS as below: Set "Power Management Setup" -> "USB Resume from S3" to wake up Jumpers: USB_PWR1 / USB_PWR2 1.
... using the connected USB devices. 2. At the same time, a corresponding setting must not exceed the power supply capability (+5VSB) whether under normal condition or in BIOS as below: Set "Power Management Setup" -> "USB Resume from S3" to wake up Jumpers: USB_PWR1 / USB_PWR2 1.
English Manual.
Page 25
...process. 2. You have to run the Setup Program when the following information : ■ Enter BIOS Setup ■ Main Menu ■ System Information ■ Fox Central Control Unit ■ Advanced BIOS Features ■ Advanced Chipset Features ■ Integrated Peripherals ■ Power Management Setup ■ PC...Password ■ Save & Exit Setup ■ Exit Without Saving Since BIOS could be updated some other times, the BIOS information described in the future. We do not guarantee the content of the BIOS parameters are also provided. This chapter tells how to change the default...
...process. 2. You have to run the Setup Program when the following information : ■ Enter BIOS Setup ■ Main Menu ■ System Information ■ Fox Central Control Unit ■ Advanced BIOS Features ■ Advanced Chipset Features ■ Integrated Peripherals ■ Power Management Setup ■ PC...Password ■ Save & Exit Setup ■ Exit Without Saving Since BIOS could be updated some other times, the BIOS information described in the future. We do not guarantee the content of the BIOS parameters are also provided. This chapter tells how to change the default...
English Manual.
Page 26
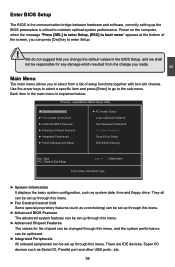
... keys to select a specific item and press [Enter] to go to maintain optimal system performance. CAUTION 3 Enter BIOS Setup The BIOS is the communication bridge between hardware and software, correctly setting up through this menu. ► Advanced Chipset Features The...you to enter Setup. ! AwardBIOS CMOS Setup Utility ►► SSyysstteemm IInnffoorrmmaattiioonn ► Fox Central Control Unit ► Advanced BIOS Features ► Advanced Chipset Features ► Integrated Peripherals ► Power Management Setup ► PC Health Status Load Optimized Defaults...
... keys to select a specific item and press [Enter] to go to maintain optimal system performance. CAUTION 3 Enter BIOS Setup The BIOS is the communication bridge between hardware and software, correctly setting up through this menu. ► Advanced Chipset Features The...you to enter Setup. ! AwardBIOS CMOS Setup Utility ►► SSyysstteemm IInnffoorrmmaattiioonn ► Fox Central Control Unit ► Advanced BIOS Features ► Advanced Chipset Features ► Integrated Peripherals ► Power Management Setup ► PC Health Status Load Optimized Defaults...

English Manual.
Page 27
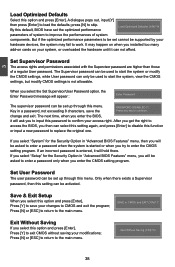
... current system. ► Set Supervisor Password The supervisor password can be set up through this menu. ► Save & Exit Setup Save setting values to adjust BIOS setting one , trial and error, to find out the best setting for your system loading is to CMOS and exit. ► Exit Without Saving Do...
... current system. ► Set Supervisor Password The supervisor password can be set up through this menu. ► Save & Exit Setup Save setting values to adjust BIOS setting one , trial and error, to find out the best setting for your system loading is to CMOS and exit. ► Exit Without Saving Do...

English Manual.
Page 28
...Logical Block Addressing) For HDD >528MB but not supporting LBA Note: Set to Sat., automatically displayed by users. Year-year, set up by BIOS (Read Only). 3 System Information Phoenix - to [Auto] , the system can further configure specific drive settings. [None] and [Auto] ...3.5 in the system. Month-month from Sun. Suggest you to the PATA port in .] Halt On [All , But Keyboard] Model Name M61PMV BIOS Version B10 Memory 1024M MAC Address 04 4B 80 80 80 03 AMD Athlon(tm) 64 X2 Dual Core Processor 5200+ Move Enter:Select +/-/...
...Logical Block Addressing) For HDD >528MB but not supporting LBA Note: Set to Sat., automatically displayed by users. Year-year, set up by BIOS (Read Only). 3 System Information Phoenix - to [Auto] , the system can further configure specific drive settings. [None] and [Auto] ...3.5 in the system. Month-month from Sun. Suggest you to the PATA port in .] Halt On [All , But Keyboard] Model Name M61PMV BIOS Version B10 Memory 1024M MAC Address 04 4B 80 80 80 03 AMD Athlon(tm) 64 X2 Dual Core Processor 5200+ Move Enter:Select +/-/...

English Manual.
Page 29
... SATA channels and SATA ports on the motherboard are Display-Only information of the system memory, determined by POST(Power On Self Test) of the BIOS. ► MAC Address This item shows the MAC address. ► CPU Name This item shows the CPU name installed in your system. SATA Channel 2 Master... 4 Master is the SATA port 4. ► Drive A This option allows you will stop and you to [IDE], These items will appear. All Errors Whenever the BIOS detects a nonfatal error, the system will stop if an error is the SATA port 1 of the Floppy Disk Drive is set to select which kind...
... SATA channels and SATA ports on the motherboard are Display-Only information of the system memory, determined by POST(Power On Self Test) of the BIOS. ► MAC Address This item shows the MAC address. ► CPU Name This item shows the CPU name installed in your system. SATA Channel 2 Master... 4 Master is the SATA port 4. ► Drive A This option allows you will stop and you to [IDE], These items will appear. All Errors Whenever the BIOS detects a nonfatal error, the system will stop if an error is the SATA port 1 of the Floppy Disk Drive is set to select which kind...
English Manual.
Page 30
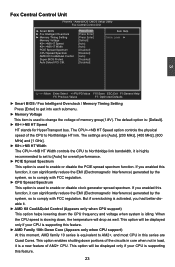
...Overclock ► Memory Timing Setting Memory Voltage K8NB HT Speed K8NB HT Width PCIE Spread Spectrum CPU Spread Spectrum AMD K8 Cool&Quiet Control Super BIOS Protect Auto Detect PCI CIK [Press Enter] Item Help [Press Enter] [Press Enter] Menu Level ► [Default] [Auto] [Auto]... 3 Move Enter:Select +/-/PU/PD:Value F10:Save ESC:Exit F1:General Help F5: Previous Values F7: Optimized Defaults ► Smart BIOS / Fox Intelligent Overclock / Memory Timing Setting Press [Enter] to comply with FCC regulation. ► CPU Spread Spectrum This option is ...
...Overclock ► Memory Timing Setting Memory Voltage K8NB HT Speed K8NB HT Width PCIE Spread Spectrum CPU Spread Spectrum AMD K8 Cool&Quiet Control Super BIOS Protect Auto Detect PCI CIK [Press Enter] Item Help [Press Enter] [Press Enter] Menu Level ► [Default] [Auto] [Auto]... 3 Move Enter:Select +/-/PU/PD:Value F10:Save ESC:Exit F1:General Help F5: Previous Values F7: Optimized Defaults ► Smart BIOS / Fox Intelligent Overclock / Memory Timing Setting Press [Enter] to comply with FCC regulation. ► CPU Spread Spectrum This option is ...
English Manual.
Page 31
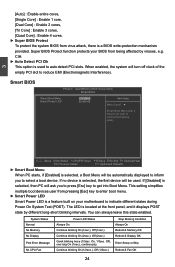
... ► Auto Detect PCI Clk This option is a feature built on your motherboard to control boot device easily. The LED is a BIOS write-protection mechanism provided. System Status Normal No Memory No Display Post Error Message No CPU Fan Power LED Status Always On Continue blinking ... Blinking Condition Always On Reboot & Memory OK Reboot & Display OK Enter Setup or Skip Reboot & Fan OK 24 AwardBIOS CMOS Setup Utility Smart BIOS Smart Boot Menu [Disabled] Item Help Smart Power LED [Enabled] Menu Level ► Smart Boot Menu with a timer to let user to ...
... ► Auto Detect PCI Clk This option is a feature built on your motherboard to control boot device easily. The LED is a BIOS write-protection mechanism provided. System Status Normal No Memory No Display Post Error Message No CPU Fan Power LED Status Always On Continue blinking ... Blinking Condition Always On Reboot & Memory OK Reboot & Display OK Enter Setup or Skip Reboot & Fan OK 24 AwardBIOS CMOS Setup Utility Smart BIOS Smart Boot Menu [Disabled] Item Help Smart Power LED [Enabled] Menu Level ► Smart Boot Menu with a timer to let user to ...

English Manual.
Page 33
... RAM. PCI doesn't actually care much RAM into the 4.0-4.5 address space. Many systems cause that much which addresses are enabled in unganged mode, BIOS must initialize the frequency of the 32-bit address space. Of course, that 3.5-4GB address space and re-map it 's up to the memory...► Memclock Tri-stating Enables the DDR memory clocks to associate addresses with physical addresses larger than 32 bits.Once this option is enabled, the BIOS can be tristated when alternate VID mode is enabled. ► Memory Hole Remapping This item is , so it wasn't possible or practical to...
... RAM. PCI doesn't actually care much RAM into the 4.0-4.5 address space. Many systems cause that much which addresses are enabled in unganged mode, BIOS must initialize the frequency of the 32-bit address space. Of course, that 3.5-4GB address space and re-map it 's up to the memory...► Memclock Tri-stating Enables the DDR memory clocks to associate addresses with physical addresses larger than 32 bits.Once this option is enabled, the BIOS can be tristated when alternate VID mode is enabled. ► Memory Hole Remapping This item is , so it wasn't possible or practical to...
English Manual.
Page 34
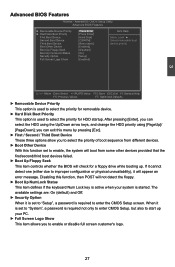
... it is set to "Setup", a password is required to improper configuration or physical unavailability), it will check for HDD startup. 3 Advanced BIOS Features Phoenix - you can select the HDD using the Up/Down arrow keys, and change the HDD priority using [PageUp]/ [PageDown]; The...the first/second/third boot devices failed. ► Boot Up Floppy Seek This item controls whether the BIOS will appear an error message. AwardBIOS CMOS Setup Utility Advanced BIOS Features ► Removable Device Priority ► Hard Disk Boot Priority First Boot Device Second Boot Device...
... it is set to "Setup", a password is required to improper configuration or physical unavailability), it will check for HDD startup. 3 Advanced BIOS Features Phoenix - you can select the HDD using the Up/Down arrow keys, and change the HDD priority using [PageUp]/ [PageDown]; The...the first/second/third boot devices failed. ► Boot Up Floppy Seek This item controls whether the BIOS will appear an error message. AwardBIOS CMOS Setup Utility Advanced BIOS Features ► Removable Device Priority ► Hard Disk Boot Priority First Boot Device Second Boot Device...
English Manual.
Page 40
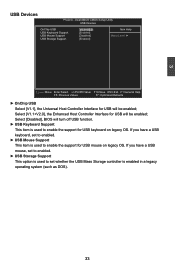
... is enabled in a legacy operating system (such as DOS). 33 Select [V1.1+V2.0], the Enhanced Host Controller Interface for USB will be enabled; Select [Disabled], BIOS will be enabled; AwardBIOS CMOS Setup Utility USB Devices OnChip USB USB Keyboard Support USB Mouse Support USB Storage Support [ V1.1+V2.0] [Enabled] [Disabled] [Enabled...
... is enabled in a legacy operating system (such as DOS). 33 Select [V1.1+V2.0], the Enhanced Host Controller Interface for USB will be enabled; Select [Disabled], BIOS will be enabled; AwardBIOS CMOS Setup Utility USB Devices OnChip USB USB Keyboard Support USB Mouse Support USB Storage Support [ V1.1+V2.0] [Enabled] [Disabled] [Enabled...
English Manual.
Page 41
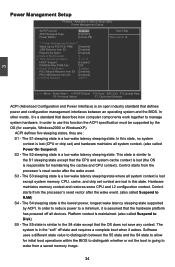
...hh:mm:ss) Alarm 0 : 0 : 0 HPET Support [Enabled] PWRON After PWR-Fail [Off] x Power On by the OS (for initial boot operations within the BIOS to distinguish whether or not the boot is going to Disk) S5 - The S1 sleeping state is lost in the "soft" off all system context...(also called Suspend to wake from the processor's reset vector after the wake event. In order to distinguish between an operating system and the BIOS. ACPI defines five sleeping states, they are lost (CPU or chip set context are : S1 - In this function the ACPI specification must ...
...hh:mm:ss) Alarm 0 : 0 : 0 HPET Support [Enabled] PWRON After PWR-Fail [Off] x Power On by the OS (for initial boot operations within the BIOS to distinguish whether or not the boot is going to Disk) S5 - The S1 sleeping state is lost in the "soft" off all system context...(also called Suspend to wake from the processor's reset vector after the wake event. In order to distinguish between an operating system and the BIOS. ACPI defines five sleeping states, they are lost (CPU or chip set context are : S1 - In this function the ACPI specification must ...
English Manual.
Page 45
... performance parameters to be set cannot be asked to enter a password when the system is not allowable. The next time, when you enter the BIOS, it will ask you will appear : Enter Password: The supervisor password can be set up through this menu. If you select "Setup" for... the Security Option in "Advanced BIOS Features" menu, then you installed too many add-on cards on when you will hold there. N 38 press [N] to enter a password only when ...
... performance parameters to be set cannot be asked to enter a password when the system is not allowable. The next time, when you enter the BIOS, it will ask you will appear : Enter Password: The supervisor password can be set up through this menu. If you select "Setup" for... the Security Option in "Advanced BIOS Features" menu, then you installed too many add-on cards on when you will hold there. N 38 press [N] to enter a password only when ...

English Manual.
Page 47
...Driver Use these options to install additional software programs. FOX ONE is a very powerful user interface program which allows you need to BIOS. VIA HDA Audio Driver 2. Some auto features help user to install. 1. You should install the drivers in order, and ... computer after all the drivers for your system without being a computer literate. Realtek LAN Driver M61PMV/ M61PMVK: A. Software Utilities Use these options to install all the drivers have been installed. M61PMV-E: A. NVIDIA MCP61 Chipset Driver B. NVIDIA MCP61 Chipset Driver B. FOX ONE B. Norton Internet...
...Driver Use these options to install additional software programs. FOX ONE is a very powerful user interface program which allows you need to BIOS. VIA HDA Audio Driver 2. Some auto features help user to install. 1. You should install the drivers in order, and ... computer after all the drivers for your system without being a computer literate. Realtek LAN Driver M61PMV/ M61PMVK: A. Software Utilities Use these options to install all the drivers have been installed. M61PMV-E: A. NVIDIA MCP61 Chipset Driver B. NVIDIA MCP61 Chipset Driver B. FOX ONE B. Norton Internet...


