Product Support Bulletin(s)
Page 1
A Total Pages: R-D1 Digital Rangefinder Camera R-D1 Firmware version 2.0 Upgrade Service Information TC/AP 9 This bulletin was created to inform you of the release of the major service release firmware update to ... SUPPORT BULLETIN Date: PSB #: Reference: Product(s): Subject: 06/01/2006 Originator: PSB.2006.06.001 Authorization: TE 06-0051 Rev. Page 1 of your Epson R-D1 Digital Rangefinder Camera. Significant added functions: ! Color Space change . This function records a picture simultaneously in full release mode. ! The Noise Reduction setting is reduced. ! Auto white ...
A Total Pages: R-D1 Digital Rangefinder Camera R-D1 Firmware version 2.0 Upgrade Service Information TC/AP 9 This bulletin was created to inform you of the release of the major service release firmware update to ... SUPPORT BULLETIN Date: PSB #: Reference: Product(s): Subject: 06/01/2006 Originator: PSB.2006.06.001 Authorization: TE 06-0051 Rev. Page 1 of your Epson R-D1 Digital Rangefinder Camera. Significant added functions: ! Color Space change . This function records a picture simultaneously in full release mode. ! The Noise Reduction setting is reduced. ! Auto white ...
Product Support Bulletin(s)
Page 2
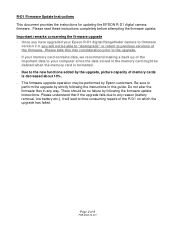
...completely before attempting the firmware update. If your memory card contains data, we recommend making a back up of the important data to your Epson R-D1 digital Rangefinder camera to firmware version 2.0, you have upgraded your computer since the data stored in any reason (battery removal, low battery etc.), it will... may be no failure by following the instructions in this into consideration prior to the new functions added by Epson customers. R-D1 Firmware Update Instructions This document provides the instructions for updating the EPSON R-D1 digital camera firmware.
...completely before attempting the firmware update. If your memory card contains data, we recommend making a back up of the important data to your Epson R-D1 digital Rangefinder camera to firmware version 2.0, you have upgraded your computer since the data stored in any reason (battery removal, low battery etc.), it will... may be no failure by following the instructions in this into consideration prior to the new functions added by Epson customers. R-D1 Firmware Update Instructions This document provides the instructions for updating the EPSON R-D1 digital camera firmware.
Product Support Bulletin(s)
Page 3
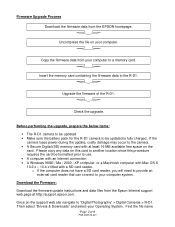
... Upgrade Process Download the firmware data from the Epson Internet support web page at least 16 MB available free space on the support web site navigate to "Digital Photography" > Digital Cameras > R-D1. If the camera loses power during the update, costly damage may occur to the camera. • A Secure Digital (SD) memory card with a SD card reader. Insert...
... Upgrade Process Download the firmware data from the Epson Internet support web page at least 16 MB available free space on the support web site navigate to "Digital Photography" > Digital Cameras > R-D1. If the camera loses power during the update, costly damage may occur to the camera. • A Secure Digital (SD) memory card with a SD card reader. Insert...

Product Support Bulletin(s)
Page 5
...press and hold the MENU and the USER button then turn the JOG dial (see image above into the RD1 memory card slot. (See the R-D1 manual for more information on the memory card insertion) Perform the firmware upgrade 1. When the screen below is highlighted, then press the ENTER button Page... 5 of 9 PSB.2006.06.001 Insert the memory card containing the firmware data described above ) until "OK" is displayed, turn ON the R-D1 power switch. With the R-D1 turned off the power switch during the firmware upgrade process! This will cause an upgrade failure, and may render the...
...press and hold the MENU and the USER button then turn the JOG dial (see image above into the RD1 memory card slot. (See the R-D1 manual for more information on the memory card insertion) Perform the firmware upgrade 1. When the screen below is highlighted, then press the ENTER button Page... 5 of 9 PSB.2006.06.001 Insert the memory card containing the firmware data described above ) until "OK" is displayed, turn ON the R-D1 power switch. With the R-D1 turned off the power switch during the firmware upgrade process! This will cause an upgrade failure, and may render the...

Product Support Bulletin(s)
Page 6
When the screen below is displayed, the firmware upgrade has successfully completed. Check that the firmware has been properly upgraded Turn on the R-D1 with the power switch, turn the JOG Dial to select "LCD Brightness" and press the ENTER Page 6 of 9 PSB.2006.06.001 Confirm that the ...Version is "2.0", and then turn off the camera with the MENU Button Select "Settings" (you may need to use the JOG Dial if you have images on the SD Card) and press the...
When the screen below is displayed, the firmware upgrade has successfully completed. Check that the firmware has been properly upgraded Turn on the R-D1 with the power switch, turn the JOG Dial to select "LCD Brightness" and press the ENTER Page 6 of 9 PSB.2006.06.001 Confirm that the ...Version is "2.0", and then turn off the camera with the MENU Button Select "Settings" (you may need to use the JOG Dial if you have images on the SD Card) and press the...

Product Support Bulletin(s)
Page 7
... to reset the Film Settings back to the camera default set-up, you will , however, also reset all user selectable camera settings back to "Initialize Settings" is correct. The exception to default set -up . If the screen displays "R-D1 Ver. 2.0" as in the screen below, the... upgrade is the camera's language, date and time, these settings will be maintained. LCD Brightness R-D1 Ver. 2.0 Set Back Attention! After the Firmware upgrade, the user's "Film ...
... to reset the Film Settings back to the camera default set-up, you will , however, also reset all user selectable camera settings back to "Initialize Settings" is correct. The exception to default set -up . If the screen displays "R-D1 Ver. 2.0" as in the screen below, the... upgrade is the camera's language, date and time, these settings will be maintained. LCD Brightness R-D1 Ver. 2.0 Set Back Attention! After the Firmware upgrade, the user's "Film ...

Product Support Bulletin(s)
Page 8
Turn the camera off the camera with the power switch, install a fully charged battery and do the procedure again starting from Perform the firmware upgrade. Other errors Page 8 of 9 PSB.2006....
Turn the camera off the camera with the power switch, install a fully charged battery and do the procedure again starting from Perform the firmware upgrade. Other errors Page 8 of 9 PSB.2006....
Product Support Bulletin(s)
Page 10
...Subject: 11/4/2005 PSB.2005.11.001 N/A Epson R-D1 Digital Rangefinder Camera Information on Cleaning the CCD Sensor Originator: TC/JQ Authorization: Total Pages: 1 This bulletin was created to provide information on position. If dust cannot be removed from the camera. Operate the shutter charge lever to B (...shutter, and then remove the lens or the lens mount cover. 5. It may be billed for the Epson R-D1 Digital Rangefinder Camera. Open the shutter using the camera blower carefully. 7. Cleaning is why we only recommend the use air compressors or canned air (air dusters)...
...Subject: 11/4/2005 PSB.2005.11.001 N/A Epson R-D1 Digital Rangefinder Camera Information on Cleaning the CCD Sensor Originator: TC/JQ Authorization: Total Pages: 1 This bulletin was created to provide information on position. If dust cannot be removed from the camera. Operate the shutter charge lever to B (...shutter, and then remove the lens or the lens mount cover. 5. It may be billed for the Epson R-D1 Digital Rangefinder Camera. Open the shutter using the camera blower carefully. 7. Cleaning is why we only recommend the use air compressors or canned air (air dusters)...
User Manual
Page 3
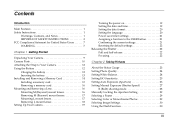
... 1 IMPORTANT SAFETY INSTRUCTIONS 3 FCC Compliance Statement for United States Users 7 WARNING 7 Chapter 1 Getting Started Unpacking Your Camera 9 Camera Parts 10 Attaching the Strap to Your Camera 12 Using the Battery 12 Charging the battery 12 Inserting the battery 13 Installing and Removing a Memory Card 14 Installing ...) mount lenses 16 Removing M (Bayonet) mount lenses 17 Mounting L mount lenses 17 Removing L mount lenses 18 Setting Up Your Camera 19 Turning the power on 19 Setting the date and time 19 Setting the date format 20 Setting the language 20 Power save timer...
... 1 IMPORTANT SAFETY INSTRUCTIONS 3 FCC Compliance Statement for United States Users 7 WARNING 7 Chapter 1 Getting Started Unpacking Your Camera 9 Camera Parts 10 Attaching the Strap to Your Camera 12 Using the Battery 12 Charging the battery 12 Inserting the battery 13 Installing and Removing a Memory Card 14 Installing ...) mount lenses 16 Removing M (Bayonet) mount lenses 17 Mounting L mount lenses 17 Removing L mount lenses 18 Setting Up Your Camera 19 Turning the power on 19 Setting the date and time 19 Setting the date format 20 Setting the language 20 Power save timer...
User Manual
Page 4
... Processing Software Overview 43 System Requirements 43 Installing the Software 44 EPSON PhotoRAW 44 EPSON RAW Plug-In 44 Starting the Software 45 EPSON PhotoRAW 45 EPSON RAW Plug-In 45 Finding More Information 45 Chapter 6 Maintenance and Troubleshooting Cleaning the Camera 46 Storing the Camera 46 Troubleshooting 46 Contacting Customer Support 47 For users in...
... Processing Software Overview 43 System Requirements 43 Installing the Software 44 EPSON PhotoRAW 44 EPSON RAW Plug-In 44 Starting the Software 45 EPSON PhotoRAW 45 EPSON RAW Plug-In 45 Finding More Information 45 Chapter 6 Maintenance and Troubleshooting Cleaning the Camera 46 Storing the Camera 46 Troubleshooting 46 Contacting Customer Support 47 For users in...

User Manual
Page 6
... components inside this product with a bright rangefinder. ❏ Supports CCD-RAW data, saved in the user documentation. Data can damage it off a static electric shock. ❏ To prevent fire or electric shock, do so in ERF (EPSON RAW File) format. Safety Instructions Read all... lenses. Follow all warnings and instructions marked on the HDD. Introduction Main Features The main features of the camera are described below. ❏ The world's first rangefinder digital camera. ❏ Capable of data on this product where flammable or volatile gas is stored. ❏ Do ...
... components inside this product with a bright rangefinder. ❏ Supports CCD-RAW data, saved in the user documentation. Data can damage it off a static electric shock. ❏ To prevent fire or electric shock, do so in ERF (EPSON RAW File) format. Safety Instructions Read all... lenses. Follow all warnings and instructions marked on the HDD. Introduction Main Features The main features of the camera are described below. ❏ The world's first rangefinder digital camera. ❏ Capable of data on this product where flammable or volatile gas is stored. ❏ Do ...

User Manual
Page 7
... a battery is not fully charged when you purchase it. The battery is swallowed, seek medical treatment immediately. ❏ Use only an Epson Li-ion battery for this camera, as specified in this manual. ❏ Do not use the battery that comes with this product for other devices. ❏ To protect.... ❏ If charging has not finished after moving it from a cold to anyone's eyes. ❏ Do not insert your finger into the camera or EM mount. ❏ If the liquid crystal solution contained in any other abnormal situations occur, remove the battery from this product and do not...
... a battery is not fully charged when you purchase it. The battery is swallowed, seek medical treatment immediately. ❏ Use only an Epson Li-ion battery for this camera, as specified in this manual. ❏ Do not use the battery that comes with this product for other devices. ❏ To protect.... ❏ If charging has not finished after moving it from a cold to anyone's eyes. ❏ Do not insert your finger into the camera or EM mount. ❏ If the liquid crystal solution contained in any other abnormal situations occur, remove the battery from this product and do not...

User Manual
Page 11
...: The wires in the mains lead fitted to this product in accordance to direct sunlight or strong light sources. When storing, maintaining, or transporting the camera ❏ Do not store this product outdoors. ❏ Do not store this product near water. ❏ Do not store this product in a location subject to...
...: The wires in the mains lead fitted to this product in accordance to direct sunlight or strong light sources. When storing, maintaining, or transporting the camera ❏ Do not store this product outdoors. ❏ Do not store this product near water. ❏ Do not store this product in a location subject to...
User Manual
Page 13
...marketed, is subject to be within the variation accepted, due to quantity production and testing on a statistical basis as a Class B digital device. Trade Name: Type of the FCC rules as required by 47CFR §2.909 Operation is identical to the representative unit tested ...any interference received, including interference that the product identified herein, complies with 47CFR Part 2 and 15 of Product: Model: EPSON Digital Still Camera G911A Introduction 8 Records maintained continue to reflect the equipment being produced can be expected to be compliant with the standards.
...marketed, is subject to be within the variation accepted, due to quantity production and testing on a statistical basis as a Class B digital device. Trade Name: Type of the FCC rules as required by 47CFR §2.909 Operation is identical to the representative unit tested ...any interference received, including interference that the product identified herein, complies with 47CFR Part 2 and 15 of Product: Model: EPSON Digital Still Camera G911A Introduction 8 Records maintained continue to reflect the equipment being produced can be expected to be compliant with the standards.

User Manual
Page 14
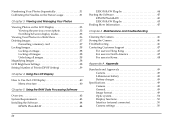
Battery charger Power cord (for battery charger) Camera body Li-ion battery Lens cap Strap User's guide CD-ROM (EPSON PhotoRAW/EPSON RAW Plug-In, Adobe Photoshop Elements 2.0*) * Adobe Photoshop Elements 2.0 may not be included in some countries. 9 Getting Started Chapter 1 Getting Started Unpacking Your Camera Make sure that your camera box contains all of the items shown below.
Battery charger Power cord (for battery charger) Camera body Li-ion battery Lens cap Strap User's guide CD-ROM (EPSON PhotoRAW/EPSON RAW Plug-In, Adobe Photoshop Elements 2.0*) * Adobe Photoshop Elements 2.0 may not be included in some countries. 9 Getting Started Chapter 1 Getting Started Unpacking Your Camera Make sure that your camera box contains all of the items shown below.

User Manual
Page 15
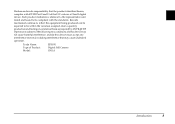
Camera Parts Front view X contact Lens release button 1 Top view Shutter button 1 Accessory shoe Status gauge 1 1 Back view AE-lock button Photo quality/WB lever JOG dial Frame selector Power switch 1 lever Shutter speed Lock-release button /ISO speed dial 1 SD card access LED LCD button Shutter charge lever 1 1 MENU button ENTER button 1 LCD display CANCEL button USER button 1 Getting Started 10
Camera Parts Front view X contact Lens release button 1 Top view Shutter button 1 Accessory shoe Status gauge 1 1 Back view AE-lock button Photo quality/WB lever JOG dial Frame selector Power switch 1 lever Shutter speed Lock-release button /ISO speed dial 1 SD card access LED LCD button Shutter charge lever 1 1 MENU button ENTER button 1 LCD display CANCEL button USER button 1 Getting Started 10

User Manual
Page 16
... this button fully down to it to the previous menu without making any settings (available in playback mode or Power Save Timer mode returns the camera to picture-taking mode and playback mode. Used to take a photo. Indicates the following statuses of remaining photos, photo quality, remaining battery power, and white...
... this button fully down to it to the previous menu without making any settings (available in playback mode or Power Save Timer mode returns the camera to picture-taking mode and playback mode. Used to take a photo. Indicates the following statuses of remaining photos, photo quality, remaining battery power, and white...

User Manual
Page 17
... the metal ring. 4. Lace the strap end through the two plastic fasteners. 1 Follow the steps below to the camera. 1. Attach the protective pad and the metal ring to 1 charge the battery before using the camera for the other end of the strap. 1 Using the Battery 1 Charging the battery Your... camera comes with a lithium-ion battery (EU-85). Be sure to one side of disuse. Attaching the Strap to 3 for...
... the metal ring. 4. Lace the strap end through the two plastic fasteners. 1 Follow the steps below to the camera. 1. Attach the protective pad and the metal ring to 1 charge the battery before using the camera for the other end of the strap. 1 Using the Battery 1 Charging the battery Your... camera comes with a lithium-ion battery (EU-85). Be sure to one side of disuse. Attaching the Strap to 3 for...

User Manual
Page 18
... charging the battery, unplug the battery charger's plug from the outlet. 2. Only use an Epson Li-ion EU-85 battery with the camera to the battery charger, then plug it into the battery charger. 13 Getting Started Note: ❏ The charging time for the battery may differ...; During charging, the red lamp indicates the following status: On: Indicates the battery is not fully seated in the battery charger. Inserting the battery Your camera uses the lithium-ion battery (EU-85) provided. Take the battery out when the charge lamp turns off. 1. Place the battery into a power outlet. ...
... charging the battery, unplug the battery charger's plug from the outlet. 2. Only use an Epson Li-ion EU-85 battery with the camera to the battery charger, then plug it into the battery charger. 13 Getting Started Note: ❏ The charging time for the battery may differ...; During charging, the red lamp indicates the following status: On: Indicates the battery is not fully seated in the battery charger. Inserting the battery Your camera uses the lithium-ion battery (EU-85) provided. Take the battery out when the charge lamp turns off. 1. Place the battery into a power outlet. ...

User Manual
Page 19
Insert the battery into the camera until it clicks, making sure the orientation of the battery is off, and then open the...10063; Keep the memory card slot cover closed while the memory card is on page 23. ❏ If you find that the camera is correct. This protects the memory card and the slot from the card. 1 ❏ Never insert or remove a memory ... the card in direct sunlight, or in places that case, replace it . Make sure that your camera. Note: 1 ❏ To check the battery's remaining charge, see "Remaining battery power" on . otherwise data on the terminal.
Insert the battery into the camera until it clicks, making sure the orientation of the battery is off, and then open the...10063; Keep the memory card slot cover closed while the memory card is on page 23. ❏ If you find that the camera is correct. This protects the memory card and the slot from the card. 1 ❏ Never insert or remove a memory ... the card in direct sunlight, or in places that case, replace it . Make sure that your camera. Note: 1 ❏ To check the battery's remaining charge, see "Remaining battery power" on . otherwise data on the terminal.

