User Manual
Page 1
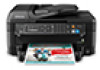
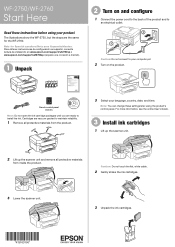
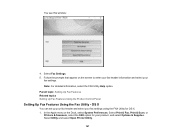
...cartridges. *413163100* *413163100* For more information, see the online User's Guide. 3 Install ink cartridges 1 Lift up the scanner unit. 2 Lift up the scanner unit and remove all protective materials from inside the product. French control panel stickers Note: Do not open the ink cartridge packages... español, consulte la Guía de instalación en www.epson.com/support/wf2750sp o www.epson.com/support/wf2760sp (requiere una conexión a Inernet). 1 Unpack 2 Turn on the product. WF-2750/WF-2760 Start Here Read these settings later using your product. Caution: Do not...
...cartridges. *413163100* *413163100* For more information, see the online User's Guide. 3 Install ink cartridges 1 Lift up the scanner unit. 2 Lift up the scanner unit and remove all protective materials from inside the product. French control panel stickers Note: Do not open the ink cartridge packages... español, consulte la Guía de instalación en www.epson.com/support/wf2750sp o www.epson.com/support/wf2760sp (requiere una conexión a Inernet). 1 Unpack 2 Turn on the product. WF-2750/WF-2760 Start Here Read these settings later using your product. Caution: Do not...
User Manual
Page 2
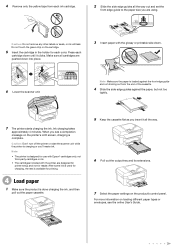
...After some ink is used for charging, the rest is available for printing. 4 Load paper 1 Make sure the product is designed for use with Epson® cartridges only, not third-party cartridges or ink. • The cartridges included with the glossy or printable side down until it all the ... different paper types or envelopes, see a completion message on the cartridge. 5 Insert the cartridge in the holder for each cartridge down . 6 Lower the scanner unit. 4 Remove only the yellow tape from the end of the cassette. 4 Slide the side edge guides against the front edge guide and not sticking...
...After some ink is used for charging, the rest is available for printing. 4 Load paper 1 Make sure the product is designed for use with Epson® cartridges only, not third-party cartridges or ink. • The cartridges included with the glossy or printable side down until it all the ... different paper types or envelopes, see a completion message on the cartridge. 5 Insert the cartridge in the holder for each cartridge down . 6 Lower the scanner unit. 4 Remove only the yellow tape from the end of the cassette. 4 Slide the side edge guides against the front edge guide and not sticking...

User Manual
Page 4
Using Windows 10 Mobile Printing ...34 Using Epson Print and Scan App with Windows Tablets 34 Wi-Fi Networking ...36 Wi-Fi Infrastructure Mode Setup...36 Selecting Wireless Network Settings From the Control ... 66 Paper Source Options ...67 Selecting Universal Print Settings ...67 Universal Print Settings Options ...68 Placing Originals on the Product ...70 Placing Originals on the Scanner Glass 70 Placing Originals in the Cassette ...58 Paper Loading Capacity ...61 Available Epson Papers ...62 Borderless Paper Type Compatibility 64 Paper or Media Type Settings -
Using Windows 10 Mobile Printing ...34 Using Epson Print and Scan App with Windows Tablets 34 Wi-Fi Networking ...36 Wi-Fi Infrastructure Mode Setup...36 Selecting Wireless Network Settings From the Control ... 66 Paper Source Options ...67 Selecting Universal Print Settings ...67 Universal Print Settings Options ...68 Placing Originals on the Product ...70 Placing Originals on the Scanner Glass 70 Placing Originals in the Cassette ...58 Paper Loading Capacity ...61 Available Epson Papers ...62 Borderless Paper Type Compatibility 64 Paper or Media Type Settings -

User Manual
Page 70
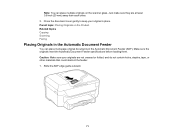
... on top of the indicated corner. 70 Placing Originals on the Product Follow the instructions here to place your original documents or photos on the scanner glass: Letter (8.5 × 11 inches [216 × 279 mm]) or A4 (8.3 × 11.7 inches [210 × 297 mm]). 1. Slide the original to the edges of... your product or use its cover as a writing surface to this size on the product. Open the document cover. 2. Placing Originals on the Scanner Glass Placing Originals in the Automatic Document Feeder Placing Originals on the...
... on top of the indicated corner. 70 Placing Originals on the Product Follow the instructions here to place your original documents or photos on the scanner glass: Letter (8.5 × 11 inches [216 × 279 mm]) or A4 (8.3 × 11.7 inches [210 × 297 mm]). 1. Slide the original to the edges of... your product or use its cover as a writing surface to this size on the product. Open the document cover. 2. Placing Originals on the Scanner Glass Placing Originals in the Automatic Document Feeder Placing Originals on the...
User Manual
Page 71
... keep your originals are at least 0.8 inch (20 mm) away from each other materials that could obstruct the feeder. 1. Parent topic: Placing Originals on the scanner glass. Note: You can place multiple originals on the Product Related topics Copying Scanning Faxing Placing Originals in the Automatic Document Feeder You can place...
... keep your originals are at least 0.8 inch (20 mm) away from each other materials that could obstruct the feeder. 1. Parent topic: Placing Originals on the scanner glass. Note: You can place multiple originals on the Product Related topics Copying Scanning Faxing Placing Originals in the Automatic Document Feeder You can place...
User Manual
Page 74
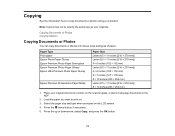
...the up or down arrow, select Copy, and press the OK button. 74 Select the paper size and type when prompted on the scanner glass, or place multi-page documents in the ADF. 2. Copying Documents or Photos Copying Options Copying Documents or Photos You can copy documents... or photos onto these sizes and types of paper: Paper Type Plain paper Epson Photo Paper Glossy Epson Premium Photo Paper Semi-gloss Epson Premium Photo Paper Glossy Epson Ultra Premium Photo Paper Glossy Epson Premium Presentation Paper Matte Paper Size Letter (8.5 × 11 inches [216 × 279 ...
...the up or down arrow, select Copy, and press the OK button. 74 Select the paper size and type when prompted on the scanner glass, or place multi-page documents in the ADF. 2. Copying Documents or Photos Copying Options Copying Documents or Photos You can copy documents... or photos onto these sizes and types of paper: Paper Type Plain paper Epson Photo Paper Glossy Epson Premium Photo Paper Semi-gloss Epson Premium Photo Paper Glossy Epson Ultra Premium Photo Paper Glossy Epson Premium Presentation Paper Matte Paper Size Letter (8.5 × 11 inches [216 × 279 ...
User Manual
Page 110
... your application software. Parent topic: Managing Color - Fix Photo Improves the color, contrast, and sharpness of flawed photos. Select Print & Fax, Print & Scan, or Printers & Scanners, select your photo includes a face with an intentional color cast, such as a statue, you may want to all the print jobs you can also select...
... your application software. Parent topic: Managing Color - Fix Photo Improves the color, contrast, and sharpness of flawed photos. Select Print & Fax, Print & Scan, or Printers & Scanners, select your photo includes a face with an intentional color cast, such as a statue, you may want to all the print jobs you can also select...
User Manual
Page 116
...Scanner (OS X) drop-down list and select the scan button settings you scan to your product, if necessary. 3. Click Make Job Settings. 4. Open the Edit Job Settings drop-down list and select your computer using the Event Manager program. 1. Click Close to the Apps screen and select EPSON Scan under EPSON or EPSON...Click and select All apps. Do one of the following to open Event Manager: • Windows 10: Click , select All apps, select EPSON Software, and select Event Manager. • Windows 8.x: Navigate to the Apps screen and select Event Manager. • Windows (other versions): ...
...Scanner (OS X) drop-down list and select the scan button settings you scan to your product, if necessary. 3. Click Make Job Settings. 4. Open the Edit Job Settings drop-down list and select your computer using the Event Manager program. 1. Click Close to the Apps screen and select EPSON Scan under EPSON or EPSON...Click and select All apps. Do one of the following to open Event Manager: • Windows 10: Click , select All apps, select EPSON Software, and select Event Manager. • Windows 8.x: Navigate to the Apps screen and select Event Manager. • Windows (other versions): ...
User Manual
Page 123
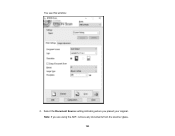
Note: If you placed your original. Select the Document Source setting indicating where you are using the ADF, remove any documents from the scanner glass. 123 You see this window: 2.
Note: If you placed your original. Select the Document Source setting indicating where you are using the ADF, remove any documents from the scanner glass. 123 You see this window: 2.
User Manual
Page 125
... your product for scanning. Office Mode You can even select multiple scan areas to click inside the scan area before selecting the settings. 125 Scanner Glass Selects the scanner glass as the location where the originals are placed on your product for scanning. You can select the entire image area or a portion...
... your product for scanning. Office Mode You can even select multiple scan areas to click inside the scan area before selecting the settings. 125 Scanner Glass Selects the scanner glass as the location where the originals are placed on your product for scanning. You can select the entire image area or a portion...
User Manual
Page 131
... Type setting that you can view and print the image, if desired. Note: If you are using the ADF, reinsert your scan. 7. Epson Scan previews your original, such as the Auto Exposure Type setting: Document or Photo. 5. Select any of original you are scanning as Reflective ... Change any of your original and how you want to use. Select the Resolution setting you are using the ADF, remove any documents from the scanner glass. 4. If you want to use . 12. Professional Mode Selecting a Scan Size - Available Document Source Settings - Select the Document Source ...
... Type setting that you can view and print the image, if desired. Note: If you are using the ADF, reinsert your scan. 7. Epson Scan previews your original, such as the Auto Exposure Type setting: Document or Photo. 5. Select any of original you are scanning as Reflective ... Change any of your original and how you want to use. Select the Resolution setting you are using the ADF, remove any documents from the scanner glass. 4. If you want to use . 12. Professional Mode Selecting a Scan Size - Available Document Source Settings - Select the Document Source ...

User Manual
Page 132
... tab. 132 Professional Mode You can select a specific area in your product for black-and-white photos. Parent topic: Scanning in Epson Scan Professional Mode. Color Smoothing Select this setting for scanning. Professional Mode You can select these Image Type options in your product for... area or a portion of different areas (Normal Preview mode only). Scanner Glass Selects the scanner glass as the location where the originals are placed on your scanned image. Just be sure to include in Epson Scan Professional Mode. 24-bit Color Select this setting for color photos...
... tab. 132 Professional Mode You can select a specific area in your product for black-and-white photos. Parent topic: Scanning in Epson Scan Professional Mode. Color Smoothing Select this setting for scanning. Professional Mode You can select these Image Type options in your product for... area or a portion of different areas (Normal Preview mode only). Scanner Glass Selects the scanner glass as the location where the originals are placed on your scanned image. Just be sure to include in Epson Scan Professional Mode. 24-bit Color Select this setting for color photos...
User Manual
Page 145
... hover over the DEVICES or SHARED list, click Show, and select your product begins a preview scan. 145 To download Epson Scan, visit Epson's driver download site (U.S. If you are scanning an item on the scanner glass, your product.) 3. downloads or Canadian downloads). 1. Parent topic: Selecting Scan File Settings Scanning with OS X Using Image...
... hover over the DEVICES or SHARED list, click Show, and select your product begins a preview scan. 145 To download Epson Scan, visit Epson's driver download site (U.S. If you are scanning an item on the scanner glass, your product.) 3. downloads or Canadian downloads). 1. Parent topic: Selecting Scan File Settings Scanning with OS X Using Image...
User Manual
Page 148
Save your original. 5. Select the scan settings and scan your scanned image to a file or cloud location. Place your device's app store or from your original on the scanner. 3. 1. Parent topic: Scanning Related tasks Using the Epson iPrint Mobile App 148 Download the Epson iPrint app from Epson's website. 2. Open the Epson iPrint app and select your product. 4.
Save your original. 5. Select the scan settings and scan your scanned image to a file or cloud location. Place your device's app store or from your original on the scanner. 3. 1. Parent topic: Scanning Related tasks Using the Epson iPrint Mobile App 148 Download the Epson iPrint app from Epson's website. 2. Open the Epson iPrint app and select your product. 4.
User Manual
Page 167
... topics Setting Up Fax Features Using the Product Control Panel Setting Up Fax Features Using the Fax Utility - Select Print & Fax, Print & Scan, or Printers & Scanners, select the FAX option for your fax settings using the FAX Utility for OS X. 1. OS X You can set up your fax header and select your...
... topics Setting Up Fax Features Using the Product Control Panel Setting Up Fax Features Using the Fax Utility - Select Print & Fax, Print & Scan, or Printers & Scanners, select the FAX option for your fax settings using the FAX Utility for OS X. 1. OS X You can set up your fax header and select your...
User Manual
Page 180
... using the FAX Utility. In the Apple menu or the Dock, select System Preferences. You see this window: 3. Select Print & Fax, Print & Scan, or Printers & Scanners, select the FAX option for your FAX product in the Printer list. 4. Select Speed Dial/Group Dial List. 180 Note: You can set up your...
... using the FAX Utility. In the Apple menu or the Dock, select System Preferences. You see this window: 3. Select Print & Fax, Print & Scan, or Printers & Scanners, select the FAX option for your FAX product in the Printer list. 4. Select Speed Dial/Group Dial List. 180 Note: You can set up your...

User Manual
Page 200
Checking Cartridge Status with OS X You can check your cartridge status using a utility on your product, and select Options & Supplies. Select Utility and select Open Printer Utility. 2. You see a window like this: 3. Do the following as necessary: • To update the ink cartridge status, click Update. 200 Select Print & Fax, Print & Scan, or Printers & Scanners, select your Mac. 1. In the Apple menu or the Dock, select System Preferences. Select EPSON Status Monitor.
Checking Cartridge Status with OS X You can check your cartridge status using a utility on your product, and select Options & Supplies. Select Utility and select Open Printer Utility. 2. You see a window like this: 3. Do the following as necessary: • To update the ink cartridge status, click Update. 200 Select Print & Fax, Print & Scan, or Printers & Scanners, select your Mac. 1. In the Apple menu or the Dock, select System Preferences. Select EPSON Status Monitor.
User Manual
Page 203
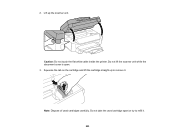
2. Lift up to refill it . Do not lift the scanner unit while the document cover is open. 3. Do not take the used cartridges carefully. Squeeze the tab on the cartridge and lift the cartridge straight up the scanner unit. Note: Dispose of used cartridge apart or try to remove it . 203 Caution: Do not touch the flat white cable inside the printer.
2. Lift up to refill it . Do not lift the scanner unit while the document cover is open. 3. Do not take the used cartridges carefully. Squeeze the tab on the cartridge and lift the cartridge straight up the scanner unit. Note: Dispose of used cartridge apart or try to remove it . 203 Caution: Do not touch the flat white cable inside the printer.
User Manual
Page 205
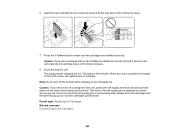
... supply port is complete. Always store ink cartridges with the label facing up the scanner unit, and press the ink cartridge down until it clicks into place. 7. Close the scanner unit. Parent topic: Replacing Ink Cartridges Related concepts Purchase Epson Ink Cartridges 205 When you see a completion message on the LCD screen, ink...
... supply port is complete. Always store ink cartridges with the label facing up the scanner unit, and press the ink cartridge down until it clicks into place. 7. Close the scanner unit. Parent topic: Replacing Ink Cartridges Related concepts Purchase Epson Ink Cartridges 205 When you see a completion message on the LCD screen, ink...

User Manual
Page 207
... to temporarily print with Expended Color Cartridges - Select Driver or Options. Click the printer icon in the Dock. 2. Select Print & Fax, Print & Scan, or Printers & Scanners, select your print job and select settings to cancel your print job.
... to temporarily print with Expended Color Cartridges - Select Driver or Options. Click the printer icon in the Dock. 2. Select Print & Fax, Print & Scan, or Printers & Scanners, select your print job and select settings to cancel your print job.


