User Manual
Page 3
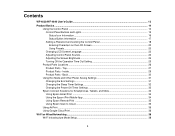
Contents WF-4630/WF-4640 User's Guide ...13 Product Basics ...14 Using the Control Panel ...14 Control Panel Buttons and Lights 15 Status Icon Information ...16 Status Button Information ...... Timer Settings 32 Changing the Power Off Timer Settings 33 Epson Connect Solutions for Smartphones, Tablets, and More 34 Using Epson Email Print ...34 Using the Epson iPrint Mobile App 34 Using Epson Remote Print ...35 Using Epson Scan to Cloud...35 Using AirPrint ...36 Using Google Cloud Print ...36 Wi-Fi or Wired Networking...38 Wi-Fi...
Contents WF-4630/WF-4640 User's Guide ...13 Product Basics ...14 Using the Control Panel ...14 Control Panel Buttons and Lights 15 Status Icon Information ...16 Status Button Information ...... Timer Settings 32 Changing the Power Off Timer Settings 33 Epson Connect Solutions for Smartphones, Tablets, and More 34 Using Epson Email Print ...34 Using the Epson iPrint Mobile App 34 Using Epson Remote Print ...35 Using Epson Scan to Cloud...35 Using AirPrint ...36 Using Google Cloud Print ...36 Wi-Fi or Wired Networking...38 Wi-Fi...

User Manual
Page 4
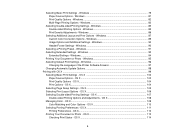
...Mode ...43 Wi-Fi Protected Setup (WPS)...45 Using WPS to Connect to a Network 46 Printing a Network Status Sheet...47 Changing or Updating Network Connections 49 Accessing the Web Config Utility 49 ... Copying ...75 Copying Documents or Photos...75 Copying Options...76 Printing From a Computer ...79 Printing with Windows ...79 4 Administrator 66 Selecting the Default Printer Settings 66 Paper ...Source Settings Options 68 Setting the Universal Print Settings 68 Universal Print Settings Options 70 Placing Originals on the Product ...71 Placing Originals ...
...Mode ...43 Wi-Fi Protected Setup (WPS)...45 Using WPS to Connect to a Network 46 Printing a Network Status Sheet...47 Changing or Updating Network Connections 49 Accessing the Web Config Utility 49 ... Copying ...75 Copying Documents or Photos...75 Copying Options...76 Printing From a Computer ...79 Printing with Windows ...79 4 Administrator 66 Selecting the Default Printer Settings 66 Paper ...Source Settings Options 68 Setting the Universal Print Settings 68 Universal Print Settings Options 70 Placing Originals on the Product ...71 Placing Originals ...
User Manual
Page 5
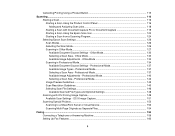
... Software Screens 97 Changing Automatic Update Options 98 Printing with OS X ...99 Selecting Basic Print Settings - OS X 103 Print Quality Options - OS X 105 Selecting Print Layout Options - OS X 106 Selecting Double-sided Printing Settings - OS X 110 Selecting Printing Preferences - OS X...112 Printing Your Document or Photo - Windows 82 Multi-Page Printing Options - Windows 86 Selecting Additional Layout and...
... Software Screens 97 Changing Automatic Update Options 98 Printing with OS X ...99 Selecting Basic Print Settings - OS X 103 Print Quality Options - OS X 105 Selecting Print Layout Options - OS X 106 Selecting Double-sided Printing Settings - OS X 110 Selecting Printing Preferences - OS X...112 Printing Your Document or Photo - Windows 82 Multi-Page Printing Options - Windows 86 Selecting Additional Layout and...
User Manual
Page 6
Office Mode 133 Scanning in Office Mode...127 Available Document Source Settings - Professional Mode 137 Selecting a Scan Area - Cancelling Printing Using a Product Button 115 Scanning ...116 Starting a Scan...116 Starting a Scan Using the Product Control Panel 116 Adding and ......146 Available Scanned File Types and Optional Settings 148 Scanning with Document Capture Pro or Document Capture 119 Starting a Scan Using the Epson Scan Icon 122 Starting a Scan from a Scanning Program 124 Selecting Epson Scan Settings ...126 Scan Modes...126 Selecting the Scan Mode...126 Scanning in...
Office Mode 133 Scanning in Office Mode...127 Available Document Source Settings - Professional Mode 137 Selecting a Scan Area - Cancelling Printing Using a Product Button 115 Scanning ...116 Starting a Scan...116 Starting a Scan Using the Product Control Panel 116 Adding and ......146 Available Scanned File Types and Optional Settings 148 Scanning with Document Capture Pro or Document Capture 119 Starting a Scan Using the Epson Scan Icon 122 Starting a Scan from a Scanning Program 124 Selecting Epson Scan Settings ...126 Scan Modes...126 Selecting the Scan Mode...126 Scanning in...

User Manual
Page 8
... Conserving Low Black Ink with OS X 229 Purchase Epson Ink Cartridges and Maintenance Box 230 Ink Cartridge and Maintenance Box Part Numbers 230 Removing and Installing Ink Cartridges 231 Printing With Black Ink and Expended Color Cartridges 235 Printing With Expended Color Cartridges - Device Mode 221 Transferring ... Boxes 225 Check Cartridge and Maintenance Box Status 225 Checking Cartridge Status on the LCD Screen 213 Checking Fax Status ...214 Printing Fax Reports...215 Fax Report Options ...216 Using USB Flash Drives With Your Product 217 Inserting a USB Flash Drive ...217...
... Conserving Low Black Ink with OS X 229 Purchase Epson Ink Cartridges and Maintenance Box 230 Ink Cartridge and Maintenance Box Part Numbers 230 Removing and Installing Ink Cartridges 231 Printing With Black Ink and Expended Color Cartridges 235 Printing With Expended Color Cartridges - Device Mode 221 Transferring ... Boxes 225 Check Cartridge and Maintenance Box Status 225 Checking Cartridge Status on the LCD Screen 213 Checking Fax Status ...214 Printing Fax Reports...215 Fax Report Options ...216 Using USB Flash Drives With Your Product 217 Inserting a USB Flash Drive ...217...
User Manual
Page 9
...the Nozzles Using a Computer Utility 244 Print Head Cleaning ...246 Cleaning the Print Head Using the Product Control Panel 246 Cleaning the Print Head Using a Computer Utility 248 Print Head Alignment ...250 Aligning the Print Head Using the Product Control Panel 251 Aligning the Print Head Using a Computer Utility 253 ...Access Point 269 Network Software Cannot Find Product on a Network 270 Product Does Not Appear in OS X Printer Window 271 Cannot Print Over a Network...271 Cannot Scan Over a Network ...273 Solving Copying Problems ...274 Product Makes Noise, But Nothing Copies 274 9
...the Nozzles Using a Computer Utility 244 Print Head Cleaning ...246 Cleaning the Print Head Using the Product Control Panel 246 Cleaning the Print Head Using a Computer Utility 248 Print Head Alignment ...250 Aligning the Print Head Using the Product Control Panel 251 Aligning the Print Head Using a Computer Utility 253 ...Access Point 269 Network Software Cannot Find Product on a Network 270 Product Does Not Appear in OS X Printer Window 271 Cannot Print Over a Network...271 Cannot Scan Over a Network ...273 Solving Copying Problems ...274 Product Makes Noise, But Nothing Copies 274 9

User Manual
Page 10
...and Content Problems 287 Inverted Image...287 Too Many Copies Print ...288 Blank Pages Print ...288 Incorrect Margins on Printout...288 Incorrect Characters Print...289 Incorrect Image Size or Position 290 Slanted Printout ...290 Solving Print Quality Problems ...290 White or Dark Lines in Printout ......291 Blurry or Smeared Printout ...291 Faint Printout or Printout Has Gaps 293 Grainy Printout...293 Incorrect Colors ...294 Solving Scanning Problems ...295 Scanning Software Does Not Operate Correctly 295 Cannot Start Epson ...
...and Content Problems 287 Inverted Image...287 Too Many Copies Print ...288 Blank Pages Print ...288 Incorrect Margins on Printout...288 Incorrect Characters Print...289 Incorrect Image Size or Position 290 Slanted Printout ...290 Solving Print Quality Problems ...290 White or Dark Lines in Printout ......291 Blurry or Smeared Printout ...291 Faint Printout or Printout Has Gaps 293 Grainy Printout...293 Incorrect Colors ...294 Solving Scanning Problems ...295 Scanning Software Does Not Operate Correctly 295 Cannot Start Epson ...

User Manual
Page 11
... Receive Faxes with a Telephone Connected to Your Product 302 When to Get Help...304 Technical Specifications ...306 Windows System Requirements ...306 OS X System Requirements...307 Printing Specifications ...307 Scanning Specifications ...308 Automatic Document Feeder (ADF) Specifications 308 Fax Specifications ...309 Paper Specifications ...309 Printable Area Specifications ...310 Ink Cartridge Specifications...312...
... Receive Faxes with a Telephone Connected to Your Product 302 When to Get Help...304 Technical Specifications ...306 Windows System Requirements ...306 OS X System Requirements...307 Printing Specifications ...307 Scanning Specifications ...308 Automatic Document Feeder (ADF) Specifications 308 Fax Specifications ...309 Paper Specifications ...309 Printable Area Specifications ...310 Ink Cartridge Specifications...312...

User Manual
Page 14
... features of your product. Using the Control Panel Product Parts Locations Using Eco Mode and Other Power Saving Settings Epson Connect Solutions for Smartphones, Tablets, and More Using AirPrint Using Google Cloud Print Using the Control Panel See these sections to learn about the control panel and select control panel settings. Control...
... features of your product. Using the Control Panel Product Parts Locations Using Eco Mode and Other Power Saving Settings Epson Connect Solutions for Smartphones, Tablets, and More Using AirPrint Using Google Cloud Print Using the Control Panel See these sections to learn about the control panel and select control panel settings. Control...

User Manual
Page 16
... ink or the maintenance box is full. Press the Status button to view or change the current network settings. If you have already read or printed. Fax memory is stored in the Automatic Document Feeder (ADF). Unread or unprinted fax data is full. An Ethernet connection has been established. 16...
... ink or the maintenance box is full. Press the Status button to view or change the current network settings. If you have already read or printed. Fax memory is stored in the Automatic Document Feeder (ADF). Unread or unprinted fax data is full. An Ethernet connection has been established. 16...
User Manual
Page 30
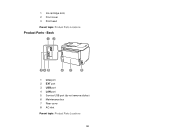
Back 1 Line port 2 EXT port 3 USB port 4 LAN port 5 Service USB port (do not remove sticker) 6 Maintenance box 7 Rear cover 8 AC inlet Parent topic: Product Parts Locations 30 1 Ink cartridge slots 2 Front cover 3 Print head Parent topic: Product Parts Locations Product Parts -
Back 1 Line port 2 EXT port 3 USB port 4 LAN port 5 Service USB port (do not remove sticker) 6 Maintenance box 7 Rear cover 8 AC inlet Parent topic: Product Parts Locations 30 1 Ink cartridge slots 2 Front cover 3 Print head Parent topic: Product Parts Locations Product Parts -

User Manual
Page 34
... the globe. Set up your product for Smartphones, Tablets, and More You can change these solutions to print and scan from anywhere: Epson Email Print, Epson iPrint Mobile App, Epson Remote Print, and Epson Scan to Cloud Parent topic: Product Basics Using Epson Email Print With Epson Email Print, you print PDFs, Microsoft Office documents, photos, and web pages over a wireless network...
... the globe. Set up your product for Smartphones, Tablets, and More You can change these solutions to print and scan from anywhere: Epson Email Print, Epson iPrint Mobile App, Epson Remote Print, and Epson Scan to Cloud Parent topic: Product Basics Using Epson Email Print With Epson Email Print, you print PDFs, Microsoft Office documents, photos, and web pages over a wireless network...
User Manual
Page 35
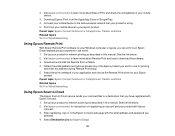
... Wi-Fi or Wired Networking Using Epson Scan to Cloud The Epson Scan to a destination that your Epson product. Select the print command in this address during Remote Print setup. 5. After registering, sign in the world. 1. Parent topic: Epson Connect Solutions for instructions on your... Wi-Fi or Wired Networking Using Epson Remote Print With Epson Remote Print software on registering an account and your mobile device. 3. Visit epson.com/connect to learn more about Remote Print and how to your product is using. 5. 2. Download Epson iPrint from your mobile device to ...
... Wi-Fi or Wired Networking Using Epson Scan to Cloud The Epson Scan to a destination that your Epson product. Select the print command in this address during Remote Print setup. 5. After registering, sign in the world. 1. Parent topic: Epson Connect Solutions for instructions on your... Wi-Fi or Wired Networking Using Epson Remote Print With Epson Remote Print software on registering an account and your mobile device. 3. Visit epson.com/connect to learn more about Remote Print and how to your product is using. 5. 2. Download Epson iPrint from your mobile device to ...

User Manual
Page 36
..., Tablets, and More Related topics Wi-Fi or Wired Networking Using AirPrint AirPrint allows you to wirelessly print to your AirPrint-enabled product from your Apple or Android device to your Epson product. See the link below . Note: Make sure your destination list. 6. 5. Parent topic: ... that your product is already on your network, follow the instructions on your Epson product for wireless printing as described in this manual. See the link below . 2. Set up your product for network printing as described in this manual. Connect your device to the same network before...
..., Tablets, and More Related topics Wi-Fi or Wired Networking Using AirPrint AirPrint allows you to wirelessly print to your AirPrint-enabled product from your Apple or Android device to your Epson product. See the link below . Note: Make sure your destination list. 6. 5. Parent topic: ... that your product is already on your network, follow the instructions on your Epson product for wireless printing as described in this manual. See the link below . 2. Set up your product for network printing as described in this manual. Connect your device to the same network before...

User Manual
Page 37
... your product. 6. Your product is now linked to update your product off and back on using Google Cloud Print, or the Google Cloud Print website for more information on . Select the Google Cloud Print Services option. If the option still doesn't appear, select the Firmware Update option and follow the on the network... an account, click Sign up for a new Google Account and follow the on-screen instructions to your product's IP address on -screen instructions. 10. Visit Epson Support for a list of a web browser. 5. Select the check box to agree to complete setup and...
... your product. 6. Your product is now linked to update your product off and back on using Google Cloud Print, or the Google Cloud Print website for more information on . Select the Google Cloud Print Services option. If the option still doesn't appear, select the Firmware Update option and follow the on the network... an account, click Sign up for a new Google Account and follow the on-screen instructions to your product's IP address on -screen instructions. 10. Visit Epson Support for a list of a web browser. 5. Select the check box to agree to complete setup and...
User Manual
Page 38
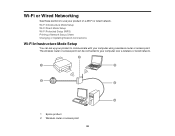
Wi-Fi Infrastructure Mode Setup Wi-Fi Direct Mode Setup Wi-Fi Protected Setup (WPS) Printing a Network Status Sheet Changing or Updating Network Connections Wi-Fi Infrastructure Mode Setup You can be connected to your computer over a wireless or wired network. 1 Epson product 2 Wireless router or access point 38 Wi-Fi or Wired Networking See these sections to communicate with your computer using a wireless router or access point. The wireless router or access point can set up your product to use your product on a Wi-Fi or wired network.
Wi-Fi Infrastructure Mode Setup Wi-Fi Direct Mode Setup Wi-Fi Protected Setup (WPS) Printing a Network Status Sheet Changing or Updating Network Connections Wi-Fi Infrastructure Mode Setup You can be connected to your computer over a wireless or wired network. 1 Epson product 2 Wireless router or access point 38 Wi-Fi or Wired Networking See these sections to communicate with your computer using a wireless router or access point. The wireless router or access point can set up your product to use your product on a Wi-Fi or wired network.

User Manual
Page 41
... and select Proceed. 8. Press the home button to return to change a setting, press the back button. 9. Confirm the displayed network settings and select OK to print a network setup report, press one of the LCD screen is lit as shown. If the network connection is successful, the Wi-Fi icon in the...
... and select Proceed. 8. Press the home button to return to change a setting, press the back button. 9. Confirm the displayed network settings and select OK to print a network setup report, press one of the LCD screen is lit as shown. If the network connection is successful, the Wi-Fi icon in the...

User Manual
Page 45
You see a screen like this: 9. Note: To check if your router is no hardware button, there may be able to print directly to the network using Wi-Fi Protected Setup (WPS). Check your computer or wireless device to view the SSID (Wi-Fi network name) and ...
You see a screen like this: 9. Note: To check if your router is no hardware button, there may be able to print directly to the network using Wi-Fi Protected Setup (WPS). Check your computer or wireless device to view the SSID (Wi-Fi network name) and ...

User Manual
Page 47
Press the home button, if necessary. 2. Parent topic: Wi-Fi Protected Setup (WPS) Printing a Network Status Sheet You can print a network status sheet to help you determine the causes of the LCD screen is lit as shown. If the network connection is successful, the Wi-Fi icon in the upper-right corner of any problems you may have using your product on a network. 1. Select Setup. 47
Press the home button, if necessary. 2. Parent topic: Wi-Fi Protected Setup (WPS) Printing a Network Status Sheet You can print a network status sheet to help you determine the causes of the LCD screen is lit as shown. If the network connection is successful, the Wi-Fi icon in the upper-right corner of any problems you may have using your product on a network. 1. Select Setup. 47

User Manual
Page 48
You see a screen like this : Note: If you are connected to print the network status sheet. 48 You see a screen like this : 3. Press one of the buttons to a wireless network, the signal strength is also displayed. 5. Select Wi-Fi/Network Status. Select Print. 6. Select Network Status. 4.
You see a screen like this : Note: If you are connected to print the network status sheet. 48 You see a screen like this : 3. Press one of the buttons to a wireless network, the signal strength is also displayed. 5. Select Wi-Fi/Network Status. Select Print. 6. Select Network Status. 4.


