
Users Guide
Page 3
Contents ES-200/ES-300W User's Guide ...7 Scanner Basics...8 Scanner Parts Locations ...8 Scanner Parts...8 Scanner Buttons and Lights...12 User Replaceable Epson Scanner Parts and Accessories 14 Changing the Power Save Settings...14 Charging the Battery (ES-300W)...15 Loading Originals...18 Loading Originals in the Input Tray...18 Original Document ... Wi-Fi Network 45 Manually Connecting to a Wi-Fi Router Using EpsonNet Config 46 Setting Up Network Scanning...49 Determining the Scanner's IP Address 50 Direct Wi-Fi Mode (AP Mode) Setup 51 Enabling a Direct Wi-Fi (AP Mode) Connection 52...
Contents ES-200/ES-300W User's Guide ...7 Scanner Basics...8 Scanner Parts Locations ...8 Scanner Parts...8 Scanner Buttons and Lights...12 User Replaceable Epson Scanner Parts and Accessories 14 Changing the Power Save Settings...14 Charging the Battery (ES-300W)...15 Loading Originals...18 Loading Originals in the Input Tray...18 Original Document ... Wi-Fi Network 45 Manually Connecting to a Wi-Fi Router Using EpsonNet Config 46 Setting Up Network Scanning...49 Determining the Scanner's IP Address 50 Direct Wi-Fi Mode (AP Mode) Setup 51 Enabling a Direct Wi-Fi (AP Mode) Connection 52...
Users Guide
Page 4
... (OCR 85 Scanning Using OCR - Restoring Default Network Settings...63 Scanning ...65 Starting a Scan...65 Starting a Scan from a Scanner Button 65 Assigning Start Button Settings or Scan Jobs 66 Starting a Scan Using the Epson Scan 2 Icon 67 Starting a Scan from a Scanning Program 69 Scanning with Document Capture Pro and Document Capture 71...
... (OCR 85 Scanning Using OCR - Restoring Default Network Settings...63 Scanning ...65 Starting a Scan...65 Starting a Scan from a Scanner Button 65 Assigning Start Button Settings or Scan Jobs 66 Starting a Scan Using the Epson Scan 2 Icon 67 Starting a Scan from a Scanning Program 69 Scanning with Document Capture Pro and Document Capture 71...
Users Guide
Page 5
... Interface Specifications (ES-300W 142 Safety and Approvals Specifications 142 Notices ...144 Important Safety Instructions...144 5 Scanner Does Not Turn On or Turns Off Unexpectedly 121 Scanner Button Does Not Work as Expected 122 Scanning Software Does Not Operate Correctly 123 Cannot Start Epson Scan 2 ......124 Original Feeds Incorrectly in Scanner 124 Original Jams in Scanner...125 Scanning is Slow ...127 Solving Network Scanning Problems 128 Cannot Scan Over a Network ...128 Scanner Cannot Connect to a Wireless Router or ...
... Interface Specifications (ES-300W 142 Safety and Approvals Specifications 142 Notices ...144 Important Safety Instructions...144 5 Scanner Does Not Turn On or Turns Off Unexpectedly 121 Scanner Button Does Not Work as Expected 122 Scanning Software Does Not Operate Correctly 123 Cannot Start Epson Scan 2 ......124 Original Feeds Incorrectly in Scanner 124 Original Jams in Scanner...125 Scanning is Slow ...127 Solving Network Scanning Problems 128 Cannot Scan Over a Network ...128 Scanner Cannot Connect to a Wireless Router or ...

Users Guide
Page 8
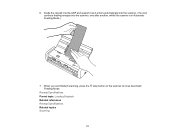
Scanner Parts Scanner Buttons and Lights User Replaceable Epson Scanner Parts and Accessories Parent topic: Scanner Basics Scanner Parts Note: The illustrations show the ES-300W, but the parts are the same for the ES-200. 1 Input tray 8 Scanner Parts Locations Changing the Power Save Settings Charging the Battery (ES-300W) Scanner Parts Locations See these sections to identify the parts on your scanner. Scanner Basics See these sections to learn about the basic features of your scanner.
Scanner Parts Scanner Buttons and Lights User Replaceable Epson Scanner Parts and Accessories Parent topic: Scanner Basics Scanner Parts Note: The illustrations show the ES-300W, but the parts are the same for the ES-200. 1 Input tray 8 Scanner Parts Locations Changing the Power Save Settings Charging the Battery (ES-300W) Scanner Parts Locations See these sections to identify the parts on your scanner. Scanner Basics See these sections to learn about the basic features of your scanner.

Users Guide
Page 12
2 Power cord 3 SuperSpeed USB 3.0 cable Parent topic: Scanner Parts Locations Scanner Buttons and Lights ES-200 1 power button 2 ! error light 3 automatic feeding mode light 4 stop button 5 Ready light 6 start button 12
2 Power cord 3 SuperSpeed USB 3.0 cable Parent topic: Scanner Parts Locations Scanner Buttons and Lights ES-200 1 power button 2 ! error light 3 automatic feeding mode light 4 stop button 5 Ready light 6 start button 12

Users Guide
Page 13
ES-300W 1 power button 2 ! error light 3 automatic feeding mode light 4 stop button 5 Ready light 6 start button 7 Wi-Fi connect button 8 Wi-Fi on/off light 9 battery light Parent topic: Scanner Parts Locations 13
ES-300W 1 power button 2 ! error light 3 automatic feeding mode light 4 stop button 5 Ready light 6 start button 7 Wi-Fi connect button 8 Wi-Fi on/off light 9 battery light Parent topic: Scanner Parts Locations 13

Users Guide
Page 14
... Part Pickup roller Separation pad Part number B12B819251 B12B819271 Parent topic: Scanner Parts Locations Changing the Power Save Settings You can use the Epson Scan 2 Utility to the Apps screen and select Epson Scan 2 Utility. • Windows (other versions): Click or Start...Programs. Select EPSON > Epson Scan 2 > Epson Scan 2 Utility. • Mac: Open the Applications folder, open the Epson Software folder, and select Epson Scan 2 Utility. 14 sales) or epson.ca (Canadian sales). Do one , call 800GO-EPSON (800-463-7766) in Canada. User Replaceable Epson Scanner Parts and ...
... Part Pickup roller Separation pad Part number B12B819251 B12B819271 Parent topic: Scanner Parts Locations Changing the Power Save Settings You can use the Epson Scan 2 Utility to the Apps screen and select Epson Scan 2 Utility. • Windows (other versions): Click or Start...Programs. Select EPSON > Epson Scan 2 > Epson Scan 2 Utility. • Mac: Open the Applications folder, open the Epson Software folder, and select Epson Scan 2 Utility. 14 sales) or epson.ca (Canadian sales). Do one , call 800GO-EPSON (800-463-7766) in Canada. User Replaceable Epson Scanner Parts and ...

Users Guide
Page 15
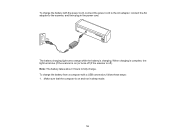
Close the Epson Scan 2 Utility. You can charge the battery from a computer with a USB connection or by connecting a power cord and AC adapter to the computer with a USB cable or WiFi. Select a power off timer setting for the AC power or AC adapter and Battery or USB power settings. 5. Parent topic: Scanner Basics Charging the Battery (ES-300W) The scanner runs on battery power when it is connected to the scanner. 15 Click the Power Save tab. 3. 2. Select the length of time after which you want the scanner to go to sleep as the Sleep Timer setting. 4.
Close the Epson Scan 2 Utility. You can charge the battery from a computer with a USB connection or by connecting a power cord and AC adapter to the computer with a USB cable or WiFi. Select a power off timer setting for the AC power or AC adapter and Battery or USB power settings. 5. Parent topic: Scanner Basics Charging the Battery (ES-300W) The scanner runs on battery power when it is connected to the scanner. 15 Click the Power Save tab. 3. 2. Select the length of time after which you want the scanner to go to sleep as the Sleep Timer setting. 4.
Users Guide
Page 16
Note: The battery takes about 3 hours to the scanner, and then plug in sleep mode. 16 To charge the battery from a computer with the power cord, connect the power cord to the AC adapter, connect the AC adapter to fully charge. To charge the battery with a USB connection, follow these steps: 1. Make sure that the computer is on ) or turns off (if the scanner is off). When charging is complete, the light turns blue (if the scanner is charging. The battery charging light turns orange while the battery is on and not in the power cord.
Note: The battery takes about 3 hours to the scanner, and then plug in sleep mode. 16 To charge the battery from a computer with the power cord, connect the power cord to the AC adapter, connect the AC adapter to fully charge. To charge the battery with a USB connection, follow these steps: 1. Make sure that the computer is on ) or turns off (if the scanner is off). When charging is complete, the light turns blue (if the scanner is charging. The battery charging light turns orange while the battery is on and not in the power cord.

Users Guide
Page 17
Press the power button to turn on ) or turns off (if the scanner is off during the charging process. The battery charging light turns orange while the battery is off ). When charging is complete, the light turns blue (if the scanner is about 4 hours when connected to a USB 3.0 port and about 20 hours when connected to the computer using the micro USB cable. 3. Parent topic: Scanner Basics 17 2. Connect the scanner to a USB 2.0 port. Note: Battery charging time when the scanner is on is on the scanner. Charging times increase if the scanner is charging.
Press the power button to turn on ) or turns off (if the scanner is off during the charging process. The battery charging light turns orange while the battery is off ). When charging is complete, the light turns blue (if the scanner is about 4 hours when connected to a USB 3.0 port and about 20 hours when connected to the computer using the micro USB cable. 3. Parent topic: Scanner Basics 17 2. Connect the scanner to a USB 2.0 port. Note: Battery charging time when the scanner is on is on the scanner. Charging times increase if the scanner is charging.
Users Guide
Page 18
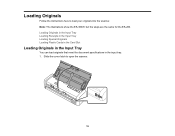
Loading Originals Follow the instructions here to open the scanner. 18 Slide the cover latch to load your originals into the scanner. Loading Originals in the Input Tray Loading Receipts in the Input Tray Loading Special Originals Loading Plastic Cards in the Card Slot Loading Originals in the Input Tray You can load originals that meet the document specifications in the input tray. 1. Note: The illustrations show the ES-300W, but the steps are the same for the ES-200.
Loading Originals Follow the instructions here to open the scanner. 18 Slide the cover latch to load your originals into the scanner. Loading Originals in the Input Tray Loading Receipts in the Input Tray Loading Special Originals Loading Plastic Cards in the Card Slot Loading Originals in the Input Tray You can load originals that meet the document specifications in the input tray. 1. Note: The illustrations show the ES-300W, but the steps are the same for the ES-200.

Users Guide
Page 19
Press the power button to turn on the scanner, if necessary. 19 2.
Press the power button to turn on the scanner, if necessary. 19 2.
Users Guide
Page 24
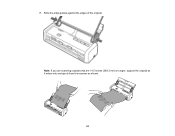
Slide the edge guides against the edges of the original. 8. Note: If you are scanning originals that are 14.5 inches (368.3 mm) or longer, support the original as it enters into and ejects from the scanner as shown. 24
Slide the edge guides against the edges of the original. 8. Note: If you are scanning originals that are 14.5 inches (368.3 mm) or longer, support the original as it enters into and ejects from the scanner as shown. 24
Users Guide
Page 25
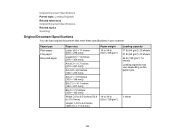
... topic: Loading Originals Related references Original Document Specifications Related topics Scanning Original Document Specifications You can load original documents that meet these specifications in your scanner.
... topic: Loading Originals Related references Original Document Specifications Related topics Scanning Original Document Specifications You can load original documents that meet these specifications in your scanner.

Users Guide
Page 26
... 51 lb (190 g/m²): 8 cards 58 lb (220 g/m²): 6 cards Caution: Do not load the following types of originals in the scanner, or they may be damaged or may damage the scanner: • Photos • Thermal paper • Coated paper • Glossy originals • Fabric or other non-paper originals • Originals...
... 51 lb (190 g/m²): 8 cards 58 lb (220 g/m²): 6 cards Caution: Do not load the following types of originals in the scanner, or they may be damaged or may damage the scanner: • Photos • Thermal paper • Coated paper • Glossy originals • Fabric or other non-paper originals • Originals...

Users Guide
Page 27
Note: Do not extend the paper guide. 2. Press the power button to open the scanner. Slide the cover latch to turn on the scanner, if necessary. 27 1.
Note: Do not extend the paper guide. 2. Press the power button to open the scanner. Slide the cover latch to turn on the scanner, if necessary. 27 1.
Users Guide
Page 28
Note: Make sure to detect the size automatically. If the receipt length is 34 inches (863.6 mm) or less, select Auto Detect (Long Paper) to specify the correct Document Size in Epson Scan 2. The Automatic Feeding Mode light on the scanner turns on the Main Settings tab, then click Scan. 3. If the receipt length is more than 34 inches (863.6 mm), select Customize and enter the paper size. 28 Start the Epson Scan 2 program, select the Automatic Feeding Mode checkbox on .
Note: Make sure to detect the size automatically. If the receipt length is 34 inches (863.6 mm) or less, select Auto Detect (Long Paper) to specify the correct Document Size in Epson Scan 2. The Automatic Feeding Mode light on the scanner turns on the Main Settings tab, then click Scan. 3. If the receipt length is more than 34 inches (863.6 mm), select Customize and enter the paper size. 28 Start the Epson Scan 2 program, select the Automatic Feeding Mode checkbox on .
Users Guide
Page 31
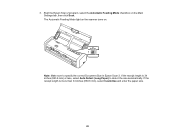
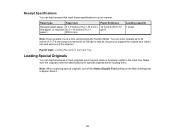
When you are finished scanning, press the Feeding Mode. Guide the receipt into the ADF and support it as it enters automatically into the scanner. (You can continue feeding receipts into the scanner, one after another, while the scanner is in Automatic Feeding Mode.) 7. 6. Receipt Specifications Parent topic: Loading Originals Related references Receipt Specifications Related topics Scanning stop button on the scanner to close Automatic 31
When you are finished scanning, press the Feeding Mode. Guide the receipt into the ADF and support it as it enters automatically into the scanner. (You can continue feeding receipts into the scanner, one after another, while the scanner is in Automatic Feeding Mode.) 7. 6. Receipt Specifications Parent topic: Loading Originals Related references Receipt Specifications Related topics Scanning stop button on the scanner to close Automatic 31
Users Guide
Page 32
... turn off the Detect Double Feed setting on the Main Settings tab in the input tray. Make sure the originals meet these specifications in your scanner. Parent topic: Loading Receipts in the Input Tray Loading Special Originals You can scan receipts up to 77 g/m²) Loading capacity 1 sheet Note...: Scan receipts one at a resolution of 300 dpi or less as long as you support the original as post cards or business cards) in Epson Scan 2. 32 Paper type Paper size Receipts (plain paper, 3 × 3 inches (76.2 × 76.2 mm) fine paper, or recycled to 3 × 14 inches...
... turn off the Detect Double Feed setting on the Main Settings tab in the input tray. Make sure the originals meet these specifications in your scanner. Parent topic: Loading Receipts in the Input Tray Loading Special Originals You can scan receipts up to 77 g/m²) Loading capacity 1 sheet Note...: Scan receipts one at a resolution of 300 dpi or less as long as you support the original as post cards or business cards) in Epson Scan 2. 32 Paper type Paper size Receipts (plain paper, 3 × 3 inches (76.2 × 76.2 mm) fine paper, or recycled to 3 × 14 inches...

Users Guide
Page 33
Press the power button to open the scanner. 2. Slide the cover latch to turn on the scanner, if necessary. 33 1.
Press the power button to open the scanner. 2. Slide the cover latch to turn on the scanner, if necessary. 33 1.


