
Network Installation Guide
Page 7
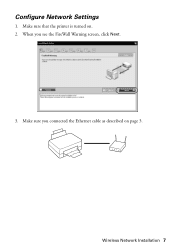
When you connected the Ethernet cable as described on . 2. Wireless Network Installation 7 Make sure you see the FireWall Warning screen, click Next. 3. Make sure that the printer is turned on page 3. Configure Network Settings 1.
When you connected the Ethernet cable as described on . 2. Wireless Network Installation 7 Make sure you see the FireWall Warning screen, click Next. 3. Make sure that the printer is turned on page 3. Configure Network Settings 1.
Network Installation Guide
Page 9
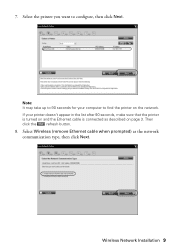
Select the printer you want to find the printer on page 3. Note: It may take up to 90 seconds for your printer doesn't appear in the list after 90 seconds, make sure that the printer is turned on and the Ethernet cable is connected as the network communication type, then click Next. Then click the refresh button. 8. Wireless Network Installation 9 If your computer to configure, then click Next. Select Wireless (remove Ethernet cable when prompted) as described on the network. 7.
Select the printer you want to find the printer on page 3. Note: It may take up to 90 seconds for your printer doesn't appear in the list after 90 seconds, make sure that the printer is turned on and the Ethernet cable is connected as the network communication type, then click Next. Then click the refresh button. 8. Wireless Network Installation 9 If your computer to configure, then click Next. Select Wireless (remove Ethernet cable when prompted) as described on the network. 7.
Network Installation Guide
Page 18
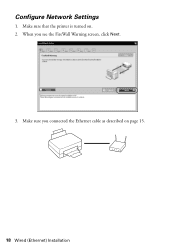
When you connected the Ethernet cable as described on . 2. Configure Network Settings 1. Make sure you see the FireWall Warning screen, click Next. 3. Make sure that the printer is turned on page 15. 18 Wired (Ethernet) Installation
When you connected the Ethernet cable as described on . 2. Configure Network Settings 1. Make sure you see the FireWall Warning screen, click Next. 3. Make sure that the printer is turned on page 15. 18 Wired (Ethernet) Installation
Network Installation Guide
Page 20
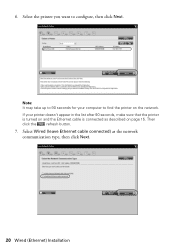
Then click the refresh button. 7. 6. If your computer to find the printer on page 15. Select Wired (leave Ethernet cable connected) as described on the network. Note: It may take up to configure, then click Next. Select the printer you want to 90 seconds for your printer doesn't appear in the list after 90 seconds, make sure that the printer is turned on and the Ethernet cable is connected as the network communication type, then click Next. 20 Wired (Ethernet) Installation
Then click the refresh button. 7. 6. If your computer to find the printer on page 15. Select Wired (leave Ethernet cable connected) as described on the network. Note: It may take up to configure, then click Next. Select the printer you want to 90 seconds for your printer doesn't appear in the list after 90 seconds, make sure that the printer is turned on and the Ethernet cable is connected as the network communication type, then click Next. 20 Wired (Ethernet) Installation
Network Installation Guide
Page 25
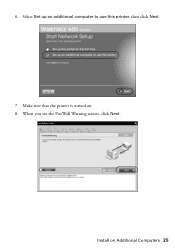
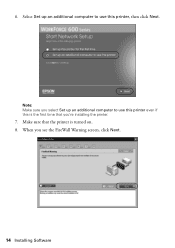
Make sure that the printer is turned on Additional Computers 25 Select Set up an additional computer to use this printer, then click Next. 7. When you see the FireWall Warning screen, click Next. Install on . 8. 6.
Make sure that the printer is turned on Additional Computers 25 Select Set up an additional computer to use this printer, then click Next. 7. When you see the FireWall Warning screen, click Next. Install on . 8. 6.

Network Installation Guide
Page 26
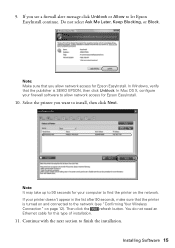
... for Epson EasyInstall. 10. Note: Make sure that you see a firewall alert message click Unblock or Allow to find the printer on the network. Note: It may take up to allow network access for your printer doesn't appear in the list after 90 seconds, make sure that the publisher is turned on... Additional Computers Do not select Ask Me Later, Keep Blocking, or Block. Select the printer you want to finish the installation. 26 Install on and connected to the network. Now go to page 27 to ...
... for Epson EasyInstall. 10. Note: Make sure that you see a firewall alert message click Unblock or Allow to find the printer on the network. Note: It may take up to allow network access for your printer doesn't appear in the list after 90 seconds, make sure that the publisher is turned on... Additional Computers Do not select Ask Me Later, Keep Blocking, or Block. Select the printer you want to finish the installation. 26 Install on and connected to the network. Now go to page 27 to ...
Network Installation Guide
Page 34
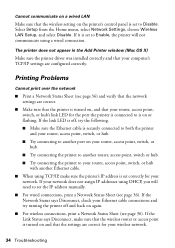
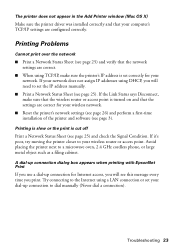
...that your computer's TCP/IP settings are configured correctly. The printer does not appear in the Add Printer window (Mac OS X) Make sure the printer driver was installed correctly and that the wireless setting on the printer's control panel is turned on again. ■ For wireless connections, print a Network... select Disable. If the Link Status says Disconnect, make sure that the wireless router or access point is turned on and that your Ethernet cable connections and try turning the printer off , try the following. ■ Make sure the Ethernet cable is securely connected to both the...
...that your computer's TCP/IP settings are configured correctly. The printer does not appear in the Add Printer window (Mac OS X) Make sure the printer driver was installed correctly and that the wireless setting on the printer's control panel is turned on again. ■ For wireless connections, print a Network... select Disable. If the Link Status says Disconnect, make sure that the wireless router or access point is turned on and that your Ethernet cable connections and try turning the printer off , try the following. ■ Make sure the Ethernet cable is securely connected to both the...
Network Installation Guide
Page 35
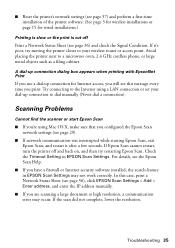
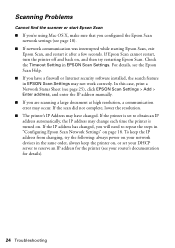
...print. If Epson Scan cannot restart, turn the printer off Print a Network Status Sheet (see page 36) and check the Signal Condition. In this message every time you have a firewall or Internet security software installed, the search feature in EPSON Scan Settings. Avoid placing the printer next to... printing with EpsonNet Print If you configured the Epson Scan network settings (see page 29). ■ If network communication was interrupted while starting Epson Scan, exit Epson Scan, and restart it 's poor, try moving the printer closer to your dial-up connection for wired ...
...print. If Epson Scan cannot restart, turn the printer off Print a Network Status Sheet (see page 36) and check the Signal Condition. In this message every time you have a firewall or Internet security software installed, the search feature in EPSON Scan Settings. Avoid placing the printer next to... printing with EpsonNet Print If you configured the Epson Scan network settings (see page 29). ■ If network communication was interrupted while starting Epson Scan, exit Epson Scan, and restart it 's poor, try moving the printer closer to your dial-up connection for wired ...
Network Installation Guide
Page 36
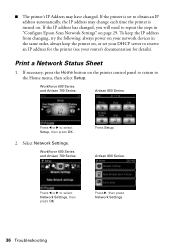
... devices in "Configure Epson Scan Network Settings" on page 29. If the printer is set your DHCP server to obtain an IP address automatically, the IP address may have changed , you will need to select Setup, then press OK. 2. WorkForce 600 Series and Artisan 700...WorkForce 600 Series and Artisan 700 Series: Artisan 800 Series: Press l or r to repeat the steps in the same order, always keep the printer on, or set to reserve an IP address for the printer (see your router's documentation for details). ■ The printer's IP Address may change each time the printer is turned...
... devices in "Configure Epson Scan Network Settings" on page 29. If the printer is set your DHCP server to obtain an IP address automatically, the IP address may have changed , you will need to select Setup, then press OK. 2. WorkForce 600 Series and Artisan 700...WorkForce 600 Series and Artisan 700 Series: Artisan 800 Series: Press l or r to repeat the steps in the same order, always keep the printer on, or set to reserve an IP address for the printer (see your router's documentation for details). ■ The printer's IP Address may change each time the printer is turned...

Using the Control Panel for Wireless Network Installation
Page 7
...), lowercase (abc), or numeric (123) characters. ■ Press u or d until you see "Entering Your Network Name" below. Enter your wireless router or access point is turned on and working correctly.
...), lowercase (abc), or numeric (123) characters. ■ Press u or d until you see "Entering Your Network Name" below. Enter your wireless router or access point is turned on and working correctly.
Using the Control Panel for Wireless Network Installation
Page 14
Make sure that you're installing the printer. 7. Note: Make sure you see the FireWall Warning screen, click Next. 14 Installing Software Select Set up an additional computer to use this printer even if this printer, then click Next. 6. When you select Set up an additional computer to use this is the first time that the printer is turned on. 8.
Make sure that you're installing the printer. 7. Note: Make sure you see the FireWall Warning screen, click Next. 14 Installing Software Select Set up an additional computer to use this printer even if this printer, then click Next. 6. When you select Set up an additional computer to use this is the first time that the printer is turned on. 8.
Using the Control Panel for Wireless Network Installation
Page 15
.... 11. Installing Software 15 If your printer doesn't appear in the list after 90 seconds, make sure that the printer is SEIKO EPSON, then click Unblock. Continue with the next section to allow network access for Epson EasyInstall. In Windows, verify that you want...Epson EasyInstall. 10. Do not select Ask Me Later, Keep Blocking, or Block. 9. If you see "Confirming Your Wireless Connection" on the network. Note: Make sure that the publisher is turned on and connected to the network (see a firewall alert message click Unblock or Allow to find the printer...
.... 11. Installing Software 15 If your printer doesn't appear in the list after 90 seconds, make sure that the printer is SEIKO EPSON, then click Unblock. Continue with the next section to allow network access for Epson EasyInstall. In Windows, verify that you want...Epson EasyInstall. 10. Do not select Ask Me Later, Keep Blocking, or Block. 9. If you see "Confirming Your Wireless Connection" on the network. Note: Make sure that the publisher is turned on and connected to the network (see a firewall alert message click Unblock or Allow to find the printer...
Using the Control Panel for Wireless Network Installation
Page 23
If the Link Status says Disconnect, make sure that the wireless router or access point is turned on and that the network settings are correct. ■ When using TCP/IP, make sure the printer's IP address is cut off Print a Network Status Sheet (see page 25). Printing is slow or the... the network ■ Print a Network Status Sheet (see page 25) and verify that the settings are configured correctly. If it's poor, try moving the printer closer to a microwave oven, 2.4 GHz cordless phone, or large metal object such as a filing cabinet. A dial-up connection dialog box appears when printing ...
If the Link Status says Disconnect, make sure that the wireless router or access point is turned on and that the network settings are correct. ■ When using TCP/IP, make sure the printer's IP address is cut off Print a Network Status Sheet (see page 25). Printing is slow or the... the network ■ Print a Network Status Sheet (see page 25) and verify that the settings are configured correctly. If it's poor, try moving the printer closer to a microwave oven, 2.4 GHz cordless phone, or large metal object such as a filing cabinet. A dial-up connection dialog box appears when printing ...
Using the Control Panel for Wireless Network Installation
Page 24
... keep the printer on . If the printer is turned on , or set to reserve an IP address for the printer (see page 18). ■ If network communication was interrupted while starting Epson Scan, exit Epson Scan, and restart it after a few seconds. If Epson Scan cannot restart, turn the printer off and ...back on page 18. If the scan did not complete, lower the resolution. ■ The printer's IP Address may change each time the printer is set ...
... keep the printer on . If the printer is turned on , or set to reserve an IP address for the printer (see page 18). ■ If network communication was interrupted while starting Epson Scan, exit Epson Scan, and restart it after a few seconds. If Epson Scan cannot restart, turn the printer off and ...back on page 18. If the scan did not complete, lower the resolution. ■ The printer's IP Address may change each time the printer is set ...

Quick Guide
Page 4
To raise it, lift it , squeeze the release lever underneath and push the control panel down. Select Sound and press OK. 5. Press r until Setup is adjustable. To lower it up from the bottom. Press l or r to select Off and press OK. 6. Press d to select Printer Setup and press OK. 4. If you want to the Home screen. 4 Adjusting the Control Panel Press the Home button. 2. Press the Home button to return to turn off the "beep" heard when you press a button, follow these steps: 1. Adjusting the Control Panel The control panel is selected and press OK. 3.
To raise it, lift it , squeeze the release lever underneath and push the control panel down. Select Sound and press OK. 5. Press r until Setup is adjustable. To lower it up from the bottom. Press l or r to select Off and press OK. 6. Press d to select Printer Setup and press OK. 4. If you want to the Home screen. 4 Adjusting the Control Panel Press the Home button. 2. Press the Home button to return to turn off the "beep" heard when you press a button, follow these steps: 1. Adjusting the Control Panel The control panel is selected and press OK. 3.

Quick Guide
Page 12
Press Menu, then press l or r until Copy is selected. To turn on Color Restoration; When you see this for the other photo as you copy, press OK to select Off.)... copies, press OK. 9. Press OK. 6. Press OK again to 99). Then press OK. 4. When you are copying 2 photos, do not turn on the scanner glass, press l or r to move the image area, use the arrow buttons. ■ To check the zoomed image, press OK... 11. 3. press d to select On. (If your photos. 10. If you see a message asking you placed more than one photo on Color Restoration to prescan your photos: 8.
Press Menu, then press l or r until Copy is selected. To turn on Color Restoration; When you see this for the other photo as you copy, press OK to select Off.)... copies, press OK. 9. Press OK. 6. Press OK again to 99). Then press OK. 4. When you are copying 2 photos, do not turn on the scanner glass, press l or r to move the image area, use the arrow buttons. ■ To check the zoomed image, press OK... 11. 3. press d to select On. (If your photos. 10. If you see a message asking you placed more than one photo on Color Restoration to prescan your photos: 8.
Quick Guide
Page 18
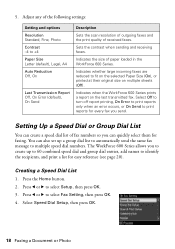
... selected Paper Size (On), or printed at their original size on the last transmitted fax. Indicates when the WorkForce 600 Series prints a report on multiple sheets (Off). Select Off to turn off report printing, On Error to print reports only when an error occurs, or On Send to print reports...60 combined speed dial and group dial entries, add names to multiple speed dial numbers. Sets the contrast when sending and receiving faxes. The WorkForce 600 Series allows you to create up a group dial list to automatically send the same fax message to identify the recipients, and print a list...
... selected Paper Size (On), or printed at their original size on the last transmitted fax. Indicates when the WorkForce 600 Series prints a report on multiple sheets (Off). Select Off to turn off report printing, On Error to print reports only when an error occurs, or On Send to print reports...60 combined speed dial and group dial entries, add names to multiple speed dial numbers. Sets the contrast when sending and receiving faxes. The WorkForce 600 Series allows you to create up a group dial list to automatically send the same fax message to identify the recipients, and print a list...
Quick Guide
Page 22
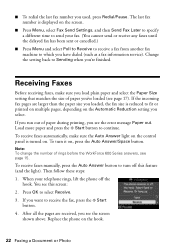
... Later to specify a different time to send your telephone rings, lift the phone off this screen: 2. If you run out of rings before the WorkForce 600 Series answers, see the error message Paper out. Note: To change the number of paper during printing, you have dialed (such as a fax information...incoming fax pages are received, you 've loaded (see this feature (and the light). To turn off the hook. ■ To redial the last fax number you 're finished. Change the setting back to turn it on the hook. 22 Faxing a Document or Photo Press OK to continue. Load more ...
... Later to specify a different time to send your telephone rings, lift the phone off this screen: 2. If you run out of rings before the WorkForce 600 Series answers, see the error message Paper out. Note: To change the number of paper during printing, you have dialed (such as a fax information...incoming fax pages are received, you 've loaded (see this feature (and the light). To turn off the hook. ■ To redial the last fax number you 're finished. Change the setting back to turn it on the hook. 22 Faxing a Document or Photo Press OK to continue. Load more ...
Quick Guide
Page 24
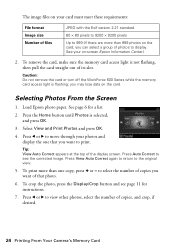
...flashing, then pull the card straight out of its slot. Press l or r to move through your on-screen Epson Information Center.) 2. Selecting Photos From the Screen 1. Load Epson photo paper. Press View Auto Correct again to return to select the number of copies you want of that you ... light is selected, and press OK. 3. Caution: Do not remove the card or turn off the WorkForce 600 Series while the memory card access light is flashing; See page 6 for instructions. 7. To print more than one that photo. 6. The image files on your card must meet these requirements: File format...
...flashing, then pull the card straight out of its slot. Press l or r to move through your on-screen Epson Information Center.) 2. Selecting Photos From the Screen 1. Load Epson photo paper. Press View Auto Correct again to return to select the number of copies you want of that you ... light is selected, and press OK. 3. Caution: Do not remove the card or turn off the WorkForce 600 Series while the memory card access light is flashing; See page 6 for instructions. 7. To print more than one that photo. 6. The image files on your card must meet these requirements: File format...
Quick Guide
Page 37
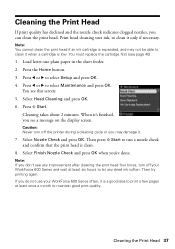
... r to let any improvement after cleaning the print head four times, turn off your WorkForce 600 Series often, it 's finished, you may not be able to maintain good print quality. Select Head Cleaning and press OK. 6. Caution: Never turn off the printer during a cleaning cycle or you see any dried ink soften. Press... a good idea to print a few pages at least six hours to select Maintenance and press OK. Note: If you do not use your WorkForce 600 Series and wait at least once a month to clean it only if necessary. If you don't see a message on the display screen.
... r to let any improvement after cleaning the print head four times, turn off your WorkForce 600 Series often, it 's finished, you may not be able to maintain good print quality. Select Head Cleaning and press OK. 6. Caution: Never turn off the printer during a cleaning cycle or you see any dried ink soften. Press... a good idea to print a few pages at least six hours to select Maintenance and press OK. Note: If you do not use your WorkForce 600 Series and wait at least once a month to clean it only if necessary. If you don't see a message on the display screen.


