
Quick Guide
Page 2
... Network Setup 4 Wired (Ethernet) Network Setup 18 Loading Paper 25 Using Special Papers 26 Placing Originals for Copying, Scanning, or Faxing 28 Using the Scanner Glass 28 Using the Automatic Document Feeder 28 Copying a Document or Photo 30 Copying a Document or Photo ...Selecting the Correct Paper Type 35 Faxing a Document 36 Connecting a Phone or Answering Machine 36 Setting Up Fax Features 37 Sending a Fax From the Control Panel 39 Receiving Faxes 40 Scanning a Document or Photo 41 Quick Scanning With the Scan Button 41 Scanning With Epson Scan Software 42 Scanning With ...
... Network Setup 4 Wired (Ethernet) Network Setup 18 Loading Paper 25 Using Special Papers 26 Placing Originals for Copying, Scanning, or Faxing 28 Using the Scanner Glass 28 Using the Automatic Document Feeder 28 Copying a Document or Photo 30 Copying a Document or Photo ...Selecting the Correct Paper Type 35 Faxing a Document 36 Connecting a Phone or Answering Machine 36 Setting Up Fax Features 37 Sending a Fax From the Control Panel 39 Receiving Faxes 40 Scanning a Document or Photo 41 Quick Scanning With the Scan Button 41 Scanning With Epson Scan Software 42 Scanning With ...
Quick Guide
Page 37
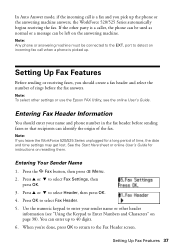
... return to the EXT. Note: If you pick up the phone or the answering machine answers, the WorkForce 520/525 Series automatically begins receiving the fax. Press u or d to select Header, then press OK. 4. Press u or d to select Fax Settings, then press OK. 3. In Auto Answer mode, if the incoming call when a phone is picked...online User's Guide. Entering Your Sender Name 1. Press OK to 40 digits. 6. When you should enter your sender name or other settings or use the Epson FAX Utility, see "Using the Keypad to Enter Numbers and Characters" on the answering machine. Setting Up...
... return to the EXT. Note: If you pick up the phone or the answering machine answers, the WorkForce 520/525 Series automatically begins receiving the fax. Press u or d to select Header, then press OK. 4. Press u or d to select Fax Settings, then press OK. 3. In Auto Answer mode, if the incoming call when a phone is picked...online User's Guide. Entering Your Sender Name 1. Press OK to 40 digits. 6. When you should enter your sender name or other settings or use the Epson FAX Utility, see "Using the Keypad to Enter Numbers and Characters" on the answering machine. Setting Up...
Quick Guide
Page 40
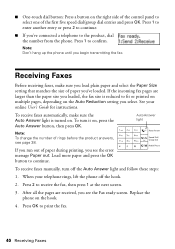
...and follow these steps: 1. Load more paper and press the OK button to receive the fax, then press 1 at the next screen. 3. Replace the phone on the hook. 4. Press 1 to print the fax. 40 Receiving Faxes To receive faxes automatically, make sure you load plain paper and select the Paper Size setting ... side of the control panel to fit or printed on multiple pages, depending on the Auto Reduction setting you see the Fax ready screen. Receiving Faxes Before receiving faxes, make sure the Auto Answer light is reduced to select one of the first five speed dial/group dial entries and ...
...and follow these steps: 1. Load more paper and press the OK button to receive the fax, then press 1 at the next screen. 3. Replace the phone on the hook. 4. Press 1 to print the fax. 40 Receiving Faxes To receive faxes automatically, make sure you load plain paper and select the Paper Size setting ... side of the control panel to fit or printed on multiple pages, depending on the Auto Reduction setting you see the Fax ready screen. Receiving Faxes Before receiving faxes, make sure the Auto Answer light is reduced to select one of the first five speed dial/group dial entries and ...
Quick Guide
Page 53
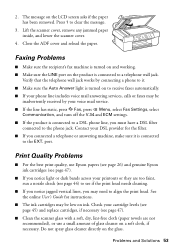
...Lift the scanner cover, remove any jammed paper inside, and lower the scanner cover. 4. Faxing Problems ■ Make sure the recipient's fax machine is turned on and working. ■ Make sure the LINE port on to receive faxes automatically. ■ If your printouts or they are too faint, run a nozzle check ...47). ■ Clean the scanner glass with a soft, dry, lint-free cloth (paper towels are not recommended), or use Epson papers (see page 26) and genuine Epson ink cartridges (see page 47). ■ If you notice light or dark bands across your phone line includes voice mail answering ...
...Lift the scanner cover, remove any jammed paper inside, and lower the scanner cover. 4. Faxing Problems ■ Make sure the recipient's fax machine is turned on and working. ■ Make sure the LINE port on to receive faxes automatically. ■ If your printouts or they are too faint, run a nozzle check ...47). ■ Clean the scanner glass with a soft, dry, lint-free cloth (paper towels are not recommended), or use Epson papers (see page 26) and genuine Epson ink cartridges (see page 47). ■ If you notice light or dark bands across your phone line includes voice mail answering ...
Quick Guide
Page 59
...15 of the following measures: ■ Reorient or relocate the receiving antenna. ■ Increase the separation between the equipment and receiver. ■ Connect the equipment into your fax machine, follow the instructions in "Entering Fax Header Information" on a circuit different from that this product. ...connected to radio and television reception, which this equipment does cause interference to AC power sources and that to which the receiver is connected. If this equipment is connected. ■ Consult the dealer or an experienced radio/TV technician for details...
...15 of the following measures: ■ Reorient or relocate the receiving antenna. ■ Increase the separation between the equipment and receiver. ■ Connect the equipment into your fax machine, follow the instructions in "Entering Fax Header Information" on a circuit different from that this product. ...connected to radio and television reception, which this equipment does cause interference to AC power sources and that to which the receiver is connected. If this equipment is connected. ■ Consult the dealer or an experienced radio/TV technician for details...


