Product Brochure
Page 1
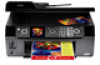
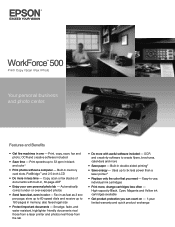
...3 sec per page; OCR and creative software included • Save time - Fax in one - Print, copy, scan, fax and photo; Built-in memory card slots, PictBridge™ and 2.5-... warranty and quick product exchange Uses up to -use, individual ink cartridges • Print more with built-in double-sided printing2 • Save energy - High-capacity Black,...less time - OCR and creativity software to create flyers, brochures, calendars and more in color - WorkForce™ 500 Print | Copy | Scan | Fax | Photo Your personal business and photo center. Automatically correct under...
...3 sec per page; OCR and creative software included • Save time - Fax in one - Print, copy, scan, fax and photo; Built-in memory card slots, PictBridge™ and 2.5-... warranty and quick product exchange Uses up to -use, individual ink cartridges • Print more with built-in double-sided printing2 • Save energy - High-capacity Black,...less time - OCR and creativity software to create flyers, brochures, calendars and more in color - WorkForce™ 500 Print | Copy | Scan | Fax | Photo Your personal business and photo center. Automatically correct under...
Product Brochure
Page 2
...Vista®, XP, XP Professional x64, 2000 Mac OS® X 10.3.9, 10.4.x, and 10.5.x Epson printer driver, Web to Page, Epson Scan, ArcSoft® Print Creations, ABBYY® FineReader® Auto Photo Correction, Epson Vivid Color™, Adobe RGB and ICM 39 dB Operating: 50 ° to 95 °F...media, displayed indoors, under glass. To send faxes, print or copy requires the installation of prints. CPD-26451 8/08 and Canada WorkForce 500 color all -in-one damage. See www.epson.com/ cartridgeinfo for priming the all -in-one 69 standard-capacity Black ink cartridge and three 69 ...
...Vista®, XP, XP Professional x64, 2000 Mac OS® X 10.3.9, 10.4.x, and 10.5.x Epson printer driver, Web to Page, Epson Scan, ArcSoft® Print Creations, ABBYY® FineReader® Auto Photo Correction, Epson Vivid Color™, Adobe RGB and ICM 39 dB Operating: 50 ° to 95 °F...media, displayed indoors, under glass. To send faxes, print or copy requires the installation of prints. CPD-26451 8/08 and Canada WorkForce 500 color all -in-one damage. See www.epson.com/ cartridgeinfo for priming the all -in-one 69 standard-capacity Black ink cartridge and three 69 ...
Quick Guide
Page 1
Epson WorkForce™ 500 Series Quick Guide Basic Printing, Copying, Scanning, and Faxing Maintaining Your All-in-One Solving Problems
Epson WorkForce™ 500 Series Quick Guide Basic Printing, Copying, Scanning, and Faxing Maintaining Your All-in-One Solving Problems
Quick Guide
Page 2
... Connecting a Phone or Answering Machine 13 Setting Up Fax Features 14 Sending a Fax 19 Receiving Faxes 21 Printing From Your Camera's Memory Card 22 Inserting Your Camera's Memory Card 22 Printing From Your Computer 24 Printing in Windows 24 Printing With a Macintosh 26 Selecting the Correct Paper Type 30 Scanning Multiple Pages 31 2 Contents
... Connecting a Phone or Answering Machine 13 Setting Up Fax Features 14 Sending a Fax 19 Receiving Faxes 21 Printing From Your Camera's Memory Card 22 Inserting Your Camera's Memory Card 22 Printing From Your Computer 24 Printing in Windows 24 Printing With a Macintosh 26 Selecting the Correct Paper Type 30 Scanning Multiple Pages 31 2 Contents

Quick Guide
Page 3
Maintaining Your All-in-One 32 Checking the Print Head Nozzles 32 Cleaning the Print Head 33 Checking the Ink Cartridge Status 34 Purchasing Epson Ink Cartridges 35 Replacing Ink Cartridges 36 Solving Problems 38 Checking for Software Updates 38 Problems and Solutions 38 Where To Get Help 41 Notices 42 Contents 3
Maintaining Your All-in-One 32 Checking the Print Head Nozzles 32 Cleaning the Print Head 33 Checking the Ink Cartridge Status 34 Purchasing Epson Ink Cartridges 35 Replacing Ink Cartridges 36 Solving Problems 38 Checking for Software Updates 38 Problems and Solutions 38 Where To Get Help 41 Notices 42 Contents 3

Quick Guide
Page 4
... paper and instructions on loading envelopes, see the on-screen Epson Information Center. 4 Loading Paper Then slide the edge guide against the right side. Load transfer paper and adhesive sheets one sheet at a time. Load letterhead or pre-printed paper top edge first. Insert the paper, glossy or printable... side up to 80 sheets of plain paper or Epson® Bright White Paper, or 100 sheets of...
... paper and instructions on loading envelopes, see the on-screen Epson Information Center. 4 Loading Paper Then slide the edge guide against the right side. Load transfer paper and adhesive sheets one sheet at a time. Load letterhead or pre-printed paper top edge first. Insert the paper, glossy or printable... side up to 80 sheets of plain paper or Epson® Bright White Paper, or 100 sheets of...
Quick Guide
Page 8
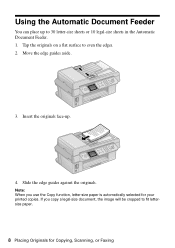
Move the edge guides aside. 3. Slide the edge guides against the originals. If you use the Copy function, letter-size paper is automatically selected for Copying, Scanning, or Faxing Tap the originals on a flat surface to fit lettersize paper. 8 Placing Originals for your printed copies. Insert the originals face-up to 30 letter-size sheets or 10 legal-size sheets in the Automatic Document Feeder. 1. Note: When you copy a legal-size document, the image will be cropped to even the edges. 2. Using the Automatic Document Feeder You can place up . 4.
Move the edge guides aside. 3. Slide the edge guides against the originals. If you use the Copy function, letter-size paper is automatically selected for Copying, Scanning, or Faxing Tap the originals on a flat surface to fit lettersize paper. 8 Placing Originals for your printed copies. Insert the originals face-up to 30 letter-size sheets or 10 legal-size sheets in the Automatic Document Feeder. 1. Note: When you copy a legal-size document, the image will be cropped to even the edges. 2. Using the Automatic Document Feeder You can place up . 4.
Quick Guide
Page 9
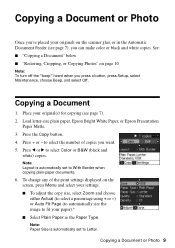
... Fit Page (to automatically size the image to select the number of the print settings displayed on page 10 Note: To turn off the "beep" heard when you want. 5. Load letter-size plain paper, Epson Bright White Paper, or Epson Presentation Paper Matte. 3. to fit your original(s) for copying (see page 7), you can...
... Fit Page (to automatically size the image to select the number of the print settings displayed on page 10 Note: To turn off the "beep" heard when you want. 5. Load letter-size plain paper, Epson Bright White Paper, or Epson Presentation Paper Matte. 3. to fit your original(s) for copying (see page 7), you can...
Quick Guide
Page 10
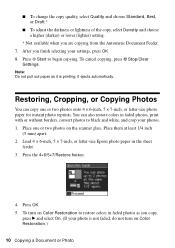
... to restore colors in faded photos as it ejects automatically. Restoring, Cropping, or Copying Photos You can also restore colors in the sheet feeder. 3. Place one or two photos onto 4 × 6-inch, 5 × 7-inch, or letter-size photo paper for instant photo reprints. Place them at least 1/4 inch (5... it is not faded, do not turn on the scanner glass. Load 4 × 6-inch, 5 × 7-inch, or letter-size Epson photo paper in faded photos, print with or without borders, convert photos to black and white, and crop your photos. 1. ■ To change the copy quality, select Quality ...
... to restore colors in faded photos as it ejects automatically. Restoring, Cropping, or Copying Photos You can also restore colors in the sheet feeder. 3. Place one or two photos onto 4 × 6-inch, 5 × 7-inch, or letter-size photo paper for instant photo reprints. Place them at least 1/4 inch (5... it is not faded, do not turn on the scanner glass. Load 4 × 6-inch, 5 × 7-inch, or letter-size Epson photo paper in faded photos, print with or without borders, convert photos to black and white, and crop your photos. 1. ■ To change the copy quality, select Quality ...

Quick Guide
Page 11
... the screen, press Menu and select your paper, press Display/Crop. ■ To resize the image area, press + or - Press OK. 7. To print more than 1 copy of the print settings displayed on the numeric keypad. ■ To move the image area, use the arrow buttons. ■ To check the zoomed image, press...
... the screen, press Menu and select your paper, press Display/Crop. ■ To resize the image area, press + or - Press OK. 7. To print more than 1 copy of the print settings displayed on the numeric keypad. ■ To move the image area, use the arrow buttons. ■ To check the zoomed image, press...
Quick Guide
Page 12
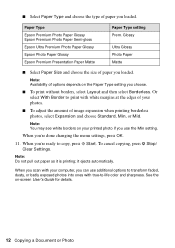
...use additional options to transform faded, dusty, or badly exposed photos into ones with white margins at the edges of your photos. ■ To adjust the amount of paper you choose. ■ To print without borders, select Layout and then select Borderless. To cancel copying, ... expansion when printing borderless photos, select Expansion and choose Standard, Min, or Mid. Or select With Border to copy, press x Start. Paper Type Epson Premium Photo Paper Glossy Epson Premium Photo Paper Semi-gloss Epson Ultra Premium Photo Paper Glossy Epson Photo Paper Glossy Epson Premium Presentation ...
...use additional options to transform faded, dusty, or badly exposed photos into ones with white margins at the edges of your photos. ■ To adjust the amount of paper you choose. ■ To print without borders, select Layout and then select Borderless. To cancel copying, ... expansion when printing borderless photos, select Expansion and choose Standard, Min, or Mid. Or select With Border to copy, press x Start. Paper Type Epson Premium Photo Paper Glossy Epson Premium Photo Paper Semi-gloss Epson Ultra Premium Photo Paper Glossy Epson Photo Paper Glossy Epson Premium Presentation ...
Quick Guide
Page 14
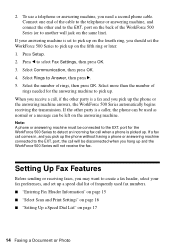
... the telephone or answering machine, and connect the other end to pick up on the answering machine. Connect one end of rings, then press OK. port on the back of rings needed for the WorkForce 500 Series to pick up . Press l to Answer, then press r. 5. When you receive a call when... page 15 ■ "Select Scan and Print Settings" on page 16 ■ "Setting Up a Speed Dial List" on page 17 14 Faxing a Document or Photo If the other party is set up the phone or the answering machine answers, the WorkForce 500 Series automatically begins receiving the transmission. Note:...
... the telephone or answering machine, and connect the other end to pick up on the answering machine. Connect one end of rings, then press OK. port on the back of rings needed for the WorkForce 500 Series to pick up . Press l to Answer, then press r. 5. When you receive a call when... page 15 ■ "Select Scan and Print Settings" on page 16 ■ "Setting Up a Speed Dial List" on page 17 14 Faxing a Document or Photo If the other party is set up the phone or the answering machine answers, the WorkForce 500 Series automatically begins receiving the transmission. Note:...
Quick Guide
Page 15
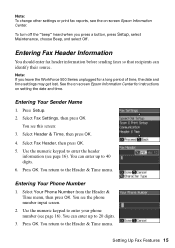
Note: To change other settings or print fax reports, see page 16). Press Setup. 2. Press OK. Use the numeric...then press OK. 5. You see page 16). You can enter up to enter your phone number (see the on-screen Epson Information Center. You return to 40 digits. 6. Entering Your Phone Number 1. Note: If you press a button, press .... 2. You see this screen: 3. To turn off the "beep" heard when you leave the WorkForce 500 Series unplugged for instructions on -screen Epson Information Center for a long period of time, the date and time settings may get lost. Select ...
Note: To change other settings or print fax reports, see page 16). Press Setup. 2. Press OK. Use the numeric...then press OK. 5. You see page 16). You can enter up to enter your phone number (see the on-screen Epson Information Center. You return to 40 digits. 6. Entering Your Phone Number 1. Note: If you press a button, press .... 2. You see this screen: 3. To turn off the "beep" heard when you leave the WorkForce 500 Series unplugged for instructions on -screen Epson Information Center for a long period of time, the date and time settings may get lost. Select ...

Quick Guide
Page 16
...number in your WorkForce 500 Series, select the size at which faxes are printed, and select when you want printed reports. 1. Press the button repeatedly, if necessary, until the character you want displays on the button. You see this screen: 3. Inserts a space and moves the cursor one space to the... left or right. Then use the numeric keypad. Press 1symb to enter these characters Select Scan and Print Settings Use these guidelines to enter numbers and characters. ■ To move the...
...number in your WorkForce 500 Series, select the size at which faxes are printed, and select when you want printed reports. 1. Press the button repeatedly, if necessary, until the character you want displays on the button. You see this screen: 3. Inserts a space and moves the cursor one space to the... left or right. Then use the numeric keypad. Press 1symb to enter these characters Select Scan and Print Settings Use these guidelines to enter numbers and characters. ■ To move the...
Quick Guide
Page 17
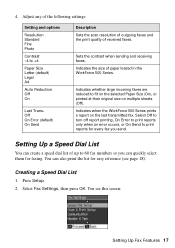
... You see page 18). Sets the contrast when sending and receiving faxes. Indicates the size of received faxes. Adjust any of up to print reports for every fax you can create a speed dial list of the following settings: Setting and options Resolution Standard Fine Photo Contrast -4 ...a Speed Dial List You can quickly select them for easy reference (see this screen: Setting Up Fax Features 17 4. Indicates when the WorkForce 500 Series prints a report on multiple sheets (Off). Select Fax Settings, then press OK. Off On Error (default) On Send Description Sets the scan ...
... You see page 18). Sets the contrast when sending and receiving faxes. Indicates the size of received faxes. Adjust any of up to print reports for every fax you can create a speed dial list of the following settings: Setting and options Resolution Standard Fine Photo Contrast -4 ...a Speed Dial List You can quickly select them for easy reference (see this screen: Setting Up Fax Features 17 4. Indicates when the WorkForce 500 Series prints a report on multiple sheets (Off). Select Fax Settings, then press OK. Off On Error (default) On Send Description Sets the scan ...

Quick Guide
Page 18
... speed dial list, follow these steps: 1. Printing Your Speed Dial List To print your list. 18 Faxing a Document or Photo Select Speed Dial and press OK. 4. Press Display/Crop to the Speed Dial Setup menu. 8. Make sure letter-size paper is loaded in the WorkForce 500 Series, then press x Start to add another speed...
... speed dial list, follow these steps: 1. Printing Your Speed Dial List To print your list. 18 Faxing a Document or Photo Select Speed Dial and press OK. 4. Press Display/Crop to the Speed Dial Setup menu. 8. Make sure letter-size paper is loaded in the WorkForce 500 Series, then press x Start to add another speed...
Quick Guide
Page 19
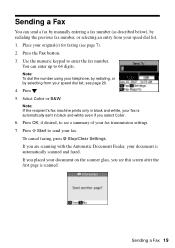
You can send a fax by manually entering a fax number (as described below), by selecting from your speed dial list. 1. Note: If the recipient's fax machine prints only in black and white, your fax is automatically sent in black and white even if you see page 20. 4. Press x Start to 64 digits. ...
You can send a fax by manually entering a fax number (as described below), by selecting from your speed dial list. 1. Note: If the recipient's fax machine prints only in black and white, your fax is automatically sent in black and white even if you see page 20. 4. Press x Start to 64 digits. ...
Quick Guide
Page 21
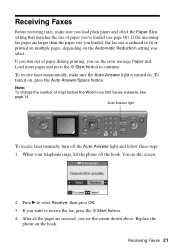
... the number of rings before the WorkForce 500 Series answers, see page 16). Press r to continue. Receiving Faxes Before receiving faxes, make sure the Auto Answer light is reduced to receive the fax, press the x Start button. 4. If you run out of paper during printing, you see the screen shown above... see the error message Paper out. If the incoming fax pages are received, you see this screen: 2. If you want to fit or printed on multiple pages, depending on the Automatic Reduction setting you loaded, the fax size is turned on the hook. After all the pages are larger...
... the number of rings before the WorkForce 500 Series answers, see page 16). Press r to continue. Receiving Faxes Before receiving faxes, make sure the Auto Answer light is reduced to receive the fax, press the x Start button. 4. If you run out of paper during printing, you see the screen shown above... see the error message Paper out. If the incoming fax pages are received, you see this screen: 2. If you want to fit or printed on multiple pages, depending on the Automatic Reduction setting you loaded, the fax size is turned on the hook. After all the pages are larger...

Quick Guide
Page 22
Inserting Your Camera's Memory Card 1. The memory card access light flashes, then stays on -screen Epson Information Center. Left slot: Right slot: Memory card access light SDTM SDHCTM miniSDTM* miniSDHC* microSD* microSDHC* MultiMediaCardTM Memory StickTM Memory Stick DuoTM* ...Insert just one card at a time. Insert the card into the correct slot, as shown. See the on . You can also print photos using an index sheet or your camera's DPOF™ settings, or transfer files to and from your camera directly. Printing From Your Camera's Memory Card The WorkForce 500 Series lets ...
Inserting Your Camera's Memory Card 1. The memory card access light flashes, then stays on -screen Epson Information Center. Left slot: Right slot: Memory card access light SDTM SDHCTM miniSDTM* miniSDHC* microSD* microSDHC* MultiMediaCardTM Memory StickTM Memory Stick DuoTM* ...Insert just one card at a time. Insert the card into the correct slot, as shown. See the on . You can also print photos using an index sheet or your camera's DPOF™ settings, or transfer files to and from your camera directly. Printing From Your Camera's Memory Card The WorkForce 500 Series lets ...
Quick Guide
Page 23
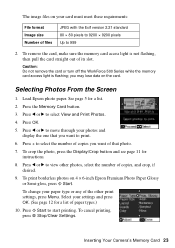
..., press the Display/Crop button and see page 11 for a list. 2. Load Epson photo paper. Inserting Your Camera's Memory Card 23 See page 5 for instructions. 8. Press OK. 5. Press l or r to print. 6. To print borderless photos on the card. To change your card must meet these requirements: File ...12 for a list of that photo. 7. To cancel printing, press y Stop/Clear Settings. Select your photos and display the one that you want of paper types.) 10. Caution: Do not remove the card or turn off the WorkForce 500 Series while the memory card access light is not flashing,...
..., press the Display/Crop button and see page 11 for a list. 2. Load Epson photo paper. Inserting Your Camera's Memory Card 23 See page 5 for instructions. 8. Press OK. 5. Press l or r to print. 6. To print borderless photos on the card. To change your card must meet these requirements: File ...12 for a list of that photo. 7. To cancel printing, press y Stop/Clear Settings. Select your photos and display the one that you want of paper types.) 10. Caution: Do not remove the card or turn off the WorkForce 500 Series while the memory card access light is not flashing,...


