Quick Guide
Page 2
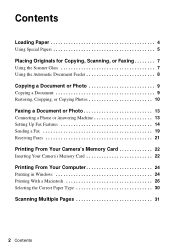
... 7 Using the Automatic Document Feeder 8 Copying a Document or Photo 9 Copying a Document 9 Restoring, Cropping, or Copying Photos 10 Faxing a Document or Photo 13 Connecting a Phone or Answering Machine 13 Setting Up Fax Features 14 Sending a Fax 19 Receiving Faxes 21 Printing From Your Camera's Memory Card 22 Inserting Your Camera's Memory Card 22...
... 7 Using the Automatic Document Feeder 8 Copying a Document or Photo 9 Copying a Document 9 Restoring, Cropping, or Copying Photos 10 Faxing a Document or Photo 13 Connecting a Phone or Answering Machine 13 Setting Up Fax Features 14 Sending a Fax 19 Receiving Faxes 21 Printing From Your Camera's Memory Card 22 Inserting Your Camera's Memory Card 22...
Quick Guide
Page 13
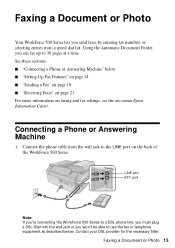
... EXT. See these sections: ■ "Connecting a Phone or Answering Machine" below . Connect the phone cable from a speed dial list. Contact your DSL provider for the necessary filter. port Note: If you're connecting the WorkForce 500 Series to a DSL phone line, you must plug a DSL ...back of the WorkForce 500 Series. Connecting a Phone or Answering Machine 1. Faxing a Document or Photo 13 Faxing a Document or Photo Your WorkForce 500 Series lets you send faxes by entering fax numbers or selecting entries from the wall jack to the LINE port on -screen Epson Information Center. Using...
... EXT. See these sections: ■ "Connecting a Phone or Answering Machine" below . Connect the phone cable from a speed dial list. Contact your DSL provider for the necessary filter. port Note: If you're connecting the WorkForce 500 Series to a DSL phone line, you must plug a DSL ...back of the WorkForce 500 Series. Connecting a Phone or Answering Machine 1. Faxing a Document or Photo 13 Faxing a Document or Photo Your WorkForce 500 Series lets you send faxes by entering fax numbers or selecting entries from the wall jack to the LINE port on -screen Epson Information Center. Using...
Quick Guide
Page 14
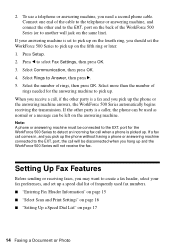
Connect one end of the cable to the telephone or answering machine, and connect the other end to select Fax Settings, then press OK. 3. Press l to the EXT. Select more than the number of the WorkForce 500 Series (or to the EXT. port, the call , if the other...9632; "Setting Up a Speed Dial List" on the back of rings needed for the WorkForce 500 Series to create a fax header, select your answering machine is picked up the phone or the answering machine answers, the WorkForce 500 Series automatically begins receiving the transmission. Select Rings to the EXT. If a fax call...
Connect one end of the cable to the telephone or answering machine, and connect the other end to select Fax Settings, then press OK. 3. Press l to the EXT. Select more than the number of the WorkForce 500 Series (or to the EXT. port, the call , if the other...9632; "Setting Up a Speed Dial List" on the back of rings needed for the WorkForce 500 Series to create a fax header, select your answering machine is picked up the phone or the answering machine answers, the WorkForce 500 Series automatically begins receiving the transmission. Select Rings to the EXT. If a fax call...
Quick Guide
Page 40
Print Quality Problems ■ For the best print quality, use Epson papers (see page 5) and genuine Epson ink cartridges (see page 36). ■ If you hang up, make sure a phone or answering machine is connected to clear any messages on ink. Check your DSL provider for instructions. ■ The... ■ Make sure the recipient's fax machine is turned on and working. ■ Make sure the LINE port on the WorkForce 500 Series is connected to a DSL phone line, you may be low on the display screen. 3. 2. See the on-screen Epson Information Center for the necessary filter. ■...
Print Quality Problems ■ For the best print quality, use Epson papers (see page 5) and genuine Epson ink cartridges (see page 36). ■ If you hang up, make sure a phone or answering machine is connected to clear any messages on ink. Check your DSL provider for instructions. ■ The... ■ Make sure the recipient's fax machine is turned on and working. ■ Make sure the LINE port on the WorkForce 500 Series is connected to a DSL phone line, you may be low on the display screen. 3. 2. See the on-screen Epson Information Center for the necessary filter. ■...

Start Here
Page 5
... your DSL provider for instructions. When you see the User Account Control screen, click Continue. 3 Click Install and follow the on the WorkForce 500 Series. Note: If you see a Found New Hardware screen, click Cancel and disconnect the USB cable. With Windows Vista, if you won... you're connecting to a DSL phone line, you must use the WorkForce 500 Series for faxing, connect the included phone cord from a telephone wall jack to the LINE port on -screen instructions. To connect a telephone or answering machine, see the AutoPlay window, click Run Epsetup.exe. 6 Connect the...
... your DSL provider for instructions. When you see the User Account Control screen, click Continue. 3 Click Install and follow the on the WorkForce 500 Series. Note: If you see a Found New Hardware screen, click Cancel and disconnect the USB cable. With Windows Vista, if you won... you're connecting to a DSL phone line, you must use the WorkForce 500 Series for faxing, connect the included phone cord from a telephone wall jack to the LINE port on -screen instructions. To connect a telephone or answering machine, see the AutoPlay window, click Run Epsetup.exe. 6 Connect the...


