
Product Brochure
Page 2
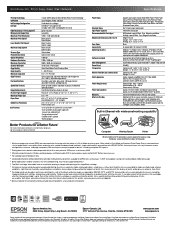
... Park Avenue, Toronto, Ontario M1W 3Z5 www.epson.com www.epson.ca Epson and MicroPiezo are determined in default, single-side mode in Draft Mode on plain paper. Microsoft, Windows, Windows Vista and the Windows logos are trademarks and/or registered trademarks of their respective companies. WorkForce 310 Print | Copy | Scan | Fax | Network Printing Technology 4-color (CMYK) drop-on-demand...
... Park Avenue, Toronto, Ontario M1W 3Z5 www.epson.com www.epson.ca Epson and MicroPiezo are determined in default, single-side mode in Draft Mode on plain paper. Microsoft, Windows, Windows Vista and the Windows logos are trademarks and/or registered trademarks of their respective companies. WorkForce 310 Print | Copy | Scan | Fax | Network Printing Technology 4-color (CMYK) drop-on-demand...
Quick Guide
Page 2
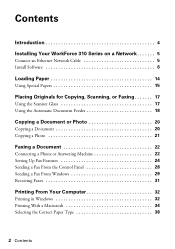
Contents Introduction 4 Installing Your WorkForce 310 Series on a Network 5 Connect an Ethernet Network Cable 5 Install Software 6 Loading Paper 14 Using Special Papers 15 Placing Originals for Copying, Scanning, or Faxing 17 ... 21 Faxing a Document 22 Connecting a Phone or Answering Machine 22 Setting Up Fax Features 24 Sending a Fax From the Control Panel 28 Sending a Fax From Windows 29 Receiving Faxes 31 Printing From Your Computer 32 Printing in Windows 32 Printing With a Macintosh 34 Selecting the Correct Paper Type 38 2 Contents
Contents Introduction 4 Installing Your WorkForce 310 Series on a Network 5 Connect an Ethernet Network Cable 5 Install Software 6 Loading Paper 14 Using Special Papers 15 Placing Originals for Copying, Scanning, or Faxing 17 ... 21 Faxing a Document 22 Connecting a Phone or Answering Machine 22 Setting Up Fax Features 24 Sending a Fax From the Control Panel 28 Sending a Fax From Windows 29 Receiving Faxes 31 Printing From Your Computer 32 Printing in Windows 32 Printing With a Macintosh 34 Selecting the Correct Paper Type 38 2 Contents
Quick Guide
Page 10
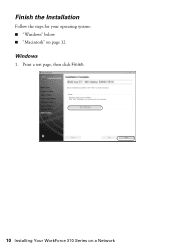
Print a test page, then click Finish. 10 Installing Your WorkForce 310 Series on page 12 Windows 1. Finish the Installation Follow the steps for your operating system: ■ "Windows" below ■ "Macintosh" on a Network
Print a test page, then click Finish. 10 Installing Your WorkForce 310 Series on page 12 Windows 1. Finish the Installation Follow the steps for your operating system: ■ "Windows" below ■ "Macintosh" on a Network

Quick Guide
Page 24
... WorkForce 310 Series unplugged for instructions on setting the date and time. Entering Your Sender Name 1. Press u or d to select Fax Header, then press OK. 5. Press u or d to select Header, then press OK. 4. Press the K Fax button, then press x Menu. 2. Use the numeric keypad to enter your sender name or other settings, print... header and select your name and phone number in the fax header before sending faxes so that recipients can enter up fax features using the Epson FAX Utility (Windows only), see page 25). Press u or d to select Fax Setting, then press OK. 3.
... WorkForce 310 Series unplugged for instructions on setting the date and time. Entering Your Sender Name 1. Press u or d to select Fax Header, then press OK. 5. Press u or d to select Header, then press OK. 4. Press the K Fax button, then press x Menu. 2. Use the numeric keypad to enter your sender name or other settings, print... header and select your name and phone number in the fax header before sending faxes so that recipients can enter up fax features using the Epson FAX Utility (Windows only), see page 25). Press u or d to select Fax Setting, then press OK. 3.

Quick Guide
Page 28
...Epson FAX Utility, see page 29 for faxing (see page 17). 2. To change the resolution, contrast, or transmission settings, press x Menu and select settings as described below. Note: If the recipient's fax machine prints...you need to send your speed dial list, see a redialing message and the WorkForce 310 Series redials after one minute. To redial immediately, press Redial/Pause. Your document is faxed. &#.../Clear Settings at any time. 28 Faxing a Document Press the K Fax button. 3. Note: In Windows, you do not need to 64 digits. Then press 1 to manually enter the fax number. Place ...
...Epson FAX Utility, see page 29 for faxing (see page 17). 2. To change the resolution, contrast, or transmission settings, press x Menu and select settings as described below. Note: If the recipient's fax machine prints...you need to send your speed dial list, see a redialing message and the WorkForce 310 Series redials after one minute. To redial immediately, press Redial/Pause. Your document is faxed. &#.../Clear Settings at any time. 28 Faxing a Document Press the K Fax button. 3. Note: In Windows, you do not need to 64 digits. Then press 1 to manually enter the fax number. Place ...
Quick Guide
Page 29
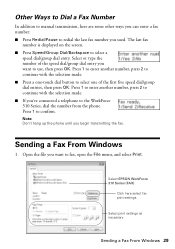
... . ■ Press a one of the speed dial/group dial entry you want to the WorkForce 310 Series, dial the number from the phone. Open the file you want to redial the last fax number you used. Select EPSON WorkForce 310 Series (FAX) Click here select fax print settings Select print settings as necessary Sending a Fax From Windows 29 Select...
... . ■ Press a one of the speed dial/group dial entry you want to the WorkForce 310 Series, dial the number from the phone. Open the file you want to redial the last fax number you used. Select EPSON WorkForce 310 Series (FAX) Click here select fax print settings Select print settings as necessary Sending a Fax From Windows 29 Select...
Quick Guide
Page 30
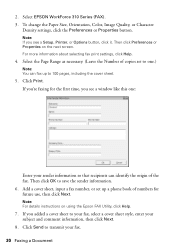
... on the next screen. If you see a Setup, Printer, or Options button, click it. To change the Paper Size, Orientation, Color, Image Quality, or Character Density settings, click the Preferences or Properties button. Note: If you see a window like this one .) Note: You can identify the origin of copies set...for the first time, you added a cover sheet to save the sender information. 6. Click Send to 100 pages, including the cover sheet. 5. Select EPSON WorkForce 310 Series (FAX). 3. Select the Page Range as necessary. (Leave the Number of the fax. Click Print. 2.
... on the next screen. If you see a Setup, Printer, or Options button, click it. To change the Paper Size, Orientation, Color, Image Quality, or Character Density settings, click the Preferences or Properties button. Note: If you see a window like this one .) Note: You can identify the origin of copies set...for the first time, you added a cover sheet to save the sender information. 6. Click Send to 100 pages, including the cover sheet. 5. Select EPSON WorkForce 310 Series (FAX). 3. Select the Page Range as necessary. (Leave the Number of the fax. Click Print. 2.
Quick Guide
Page 32
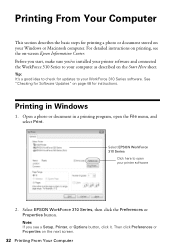
... Software Updates" on the next screen. 32 Printing From Your Computer Open a photo or document in Windows 1. For detailed instructions on printing, see a Setup, Printer, or Options button, click it. Printing in a printing program, open your Windows or Macintosh computer. Select EPSON WorkForce 310 Series, then click the Preferences or Properties button. Printing From Your Computer This section describes the basic...
... Software Updates" on the next screen. 32 Printing From Your Computer Open a photo or document in Windows 1. For detailed instructions on printing, see a Setup, Printer, or Options button, click it. Printing in a printing program, open your Windows or Macintosh computer. Select EPSON WorkForce 310 Series, then click the Preferences or Properties button. Printing From Your Computer This section describes the basic...

Quick Guide
Page 33
... the most common settings, click the Shortcuts tab and select one of document you choose the correct paper Type setting for borderless photos Select your document or photo Orientation Tip: For quick access to save your printout or print double-sided, click the Page Layout tab and select settings... by clicking the Save Settings button on the Advanced tab. 4. You can create your paper (see page 38). For more information about print settings, click Help. 6. Select the type of the presets. Printing in Windows 33 Note: For more printing options, click the Advanced tab. 3.
... the most common settings, click the Shortcuts tab and select one of document you choose the correct paper Type setting for borderless photos Select your document or photo Orientation Tip: For quick access to save your printout or print double-sided, click the Page Layout tab and select settings... by clicking the Save Settings button on the Advanced tab. 4. You can create your paper (see page 38). For more information about print settings, click Help. 6. Select the type of the presets. Printing in Windows 33 Note: For more printing options, click the Advanced tab. 3.
Quick Guide
Page 34
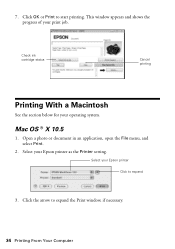
Select your operating system. Check ink cartridge status Cancel printing Printing With a Macintosh See the section below for your Epson printer as the Printer setting. Open a photo or document in an application, open the File menu, and select Print. 2. This window appears and shows the progress of your Epson printer Click to expand 3. Click the arrow to start printing. 7. Click OK or Print to expand the Print window, if necessary. 34 Printing From Your Computer Select your print job. Mac OS ® X 10.5 1.
Select your operating system. Check ink cartridge status Cancel printing Printing With a Macintosh See the section below for your Epson printer as the Printer setting. Open a photo or document in an application, open the File menu, and select Print. 2. This window appears and shows the progress of your Epson printer Click to expand 3. Click the arrow to start printing. 7. Click OK or Print to expand the Print window, if necessary. 34 Printing From Your Computer Select your print job. Mac OS ® X 10.5 1.

Quick Guide
Page 35
...'t shown (for example, Scale), check for your application at the bottom of this window. (If you're printing from the pop-up menu, and select the following print settings: Choose Print Settings Select your application before printing. Or check for it in the settings for it in your Media Type (see...settings Application settings 5. Select basic copy and page settings. For borderless photos, choose a Paper Size setting with a Sheet Feeder - Borderless option. Choose Print Settings from Preview, you see page 38) Select Color or Black/ Grayscale output Select higher quality or faster...
...'t shown (for example, Scale), check for your application at the bottom of this window. (If you're printing from the pop-up menu, and select the following print settings: Choose Print Settings Select your application before printing. Or check for it in the settings for it in your Media Type (see...settings Application settings 5. Select basic copy and page settings. For borderless photos, choose a Paper Size setting with a Sheet Feeder - Borderless option. Choose Print Settings from Preview, you see page 38) Select Color or Black/ Grayscale output Select higher quality or faster...
Quick Guide
Page 41
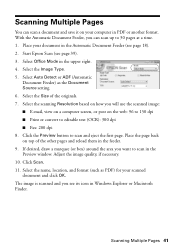
... use the scanned image: ■ E-mail, view on a computer screen, or post on top of the originals. 7. Scanning Multiple Pages 41 Place your document in Windows Explorer or Macintosh Finder. Select Office Mode in the feeder. 9. Click the Preview button to 30 pages at a time. 1. Place the page back on the... web: 96 to 150 dpi ■ Print or convert to scan in PDF or another format. Start Epson Scan (see page 18). 2. Select the Size of the other pages and reload them in the upper right. 4. Select the...
... use the scanned image: ■ E-mail, view on a computer screen, or post on top of the originals. 7. Scanning Multiple Pages 41 Place your document in Windows Explorer or Macintosh Finder. Select Office Mode in the feeder. 9. Click the Preview button to 30 pages at a time. 1. Place the page back on the... web: 96 to 150 dpi ■ Print or convert to scan in PDF or another format. Start Epson Scan (see page 18). 2. Select the Size of the other pages and reload them in the upper right. 4. Select the...
Quick Guide
Page 44
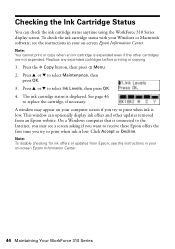
... may appear on your on -screen Epson Information Center. 44 Maintaining Your WorkForce 310 Series To check the ink cartridge status with your Windows or Macintosh software, see the instructions in your on -screen Epson Information Center. A window may see the instructions in your computer screen if you try to print when ink is displayed. Checking the...
... may appear on your on -screen Epson Information Center. 44 Maintaining Your WorkForce 310 Series To check the ink cartridge status with your Windows or Macintosh software, see the instructions in your on -screen Epson Information Center. A window may see the instructions in your computer screen if you try to print when ink is displayed. Checking the...
Quick Guide
Page 52
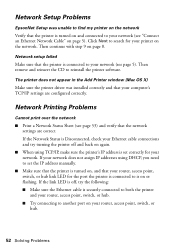
... for the port the printer is connected to find my printer on the network Verify that the printer is turned on the network. The printer does not appear in the Add Printer window (Mac OS X) Make sure the printer driver was unable to is on or flashing. Network Printing Problems Cannot print over the network ■ Print a Network Status Sheet...
... for the port the printer is connected to find my printer on the network Verify that the printer is turned on the network. The printer does not appear in the Add Printer window (Mac OS X) Make sure the printer driver was unable to is on or flashing. Network Printing Problems Cannot print over the network ■ Print a Network Status Sheet...


