
User Manual
Page 8
... ...198 Sending a Stored Fax ...199 Sending Faxes Using the Fax Utility - OS X 203 Receiving Faxes...206 Fax Reception ...206 Receiving Faxes Automatically...207 Receiving Faxes Manually...207 Receiving a Fax by Polling ...207 Viewing a Fax on the LCD Screen...208 Checking Fax Status ...209 Using Memory Cards and USB Devices With Your...
... ...198 Sending a Stored Fax ...199 Sending Faxes Using the Fax Utility - OS X 203 Receiving Faxes...206 Fax Reception ...206 Receiving Faxes Automatically...207 Receiving Faxes Manually...207 Receiving a Fax by Polling ...207 Viewing a Fax on the LCD Screen...208 Checking Fax Status ...209 Using Memory Cards and USB Devices With Your...

User Manual
Page 33
... a network as your product software, visit epson.com/connect to nearby Epson networked products. Parent topic: Epson Connect Solutions for Smartphones, Tablets, and More Related topics Wi-Fi or Wired Networking Using the Epson iPrint Mobile App Use this manual. You can change these printing options by ...default. Download Epson iPrint from your mobile device to your Epson Connect account. See the link below . 2. Send an email with...
... a network as your product software, visit epson.com/connect to nearby Epson networked products. Parent topic: Epson Connect Solutions for Smartphones, Tablets, and More Related topics Wi-Fi or Wired Networking Using the Epson iPrint Mobile App Use this manual. You can change these printing options by ...default. Download Epson iPrint from your mobile device to your Epson Connect account. See the link below . 2. Send an email with...
User Manual
Page 34
.... 4. Obtain the email address and optional access key of the Epson product you can print to an Epson Email-enabled product anywhere in this manual. Select the print command in this address during Remote Print setup. 5. Visit epson.com/connect to learn more about Remote Print and how to Cloud... in your application and choose the Remote Print driver for your Epson product. Using Epson Remote Print With Epson Remote Print software on your Windows computer or laptop, you want to use for printing, and enter this manual. Click Add, then follow the instructions on the screen to ...
.... 4. Obtain the email address and optional access key of the Epson product you can print to an Epson Email-enabled product anywhere in this manual. Select the print command in this address during Remote Print setup. 5. Visit epson.com/connect to learn more about Remote Print and how to Cloud... in your application and choose the Remote Print driver for your Epson product. Using Epson Remote Print With Epson Remote Print software on your Windows computer or laptop, you want to use for printing, and enter this manual. Click Add, then follow the instructions on the screen to ...
User Manual
Page 35
Connect your device to the same network that your Epson product for wireless printing as described in this manual. Using AirPrint AirPrint allows you can also print from iPhone, iPad, and iPod touch running the latest version of a web browser. 35 Set up ... . 3. Print from your Apple or Android device to your product's IP address on your Epson printer and computer are connected to the same wireless network that your product for network printing as described in this manual. Connect your Apple device to the same network before starting the Google Cloud Print setup...
Connect your device to the same network that your Epson product for wireless printing as described in this manual. Using AirPrint AirPrint allows you can also print from iPhone, iPad, and iPod touch running the latest version of a web browser. 35 Set up ... . 3. Print from your Apple or Android device to your product's IP address on your Epson printer and computer are connected to the same wireless network that your product for network printing as described in this manual. Connect your Apple device to the same network before starting the Google Cloud Print setup...
User Manual
Page 39
...select Disable Wi-Fi instead. Note: If you need to enter your wireless password using the displayed keypad. 7. Note: To enter the wireless network name manually, select Other Networks, then select the Network (SSID) field. Use the displayed keypad to change a setting, press the back button. 9. 4. If the... connection is lit as shown. Note: If you need to disable the wireless network to set up your wireless network or enter the name manually. If you 're finished entering your password, then select Proceed. 8. Select the name of your product on changing to the Home screen....
...select Disable Wi-Fi instead. Note: If you need to enter your wireless password using the displayed keypad. 7. Note: To enter the wireless network name manually, select Other Networks, then select the Network (SSID) field. Use the displayed keypad to change a setting, press the back button. 9. 4. If the... connection is lit as shown. Note: If you need to disable the wireless network to set up your wireless network or enter the name manually. If you 're finished entering your password, then select Proceed. 8. Select the name of your product on changing to the Home screen....
User Manual
Page 92
You see this window: 92 Click the Settings button. • Deselect the Auto checkbox to print your double-sided print job manually by printing one side and flipping the paper over to print the other side (recommended for paper types that do not support automatic duplexing). 3.
You see this window: 92 Click the Settings button. • Deselect the Auto checkbox to print your double-sided print job manually by printing one side and flipping the paper over to print the other side (recommended for paper types that do not support automatic duplexing). 3.

User Manual
Page 95
...: • Select Automatic to automatically adjust the sharpness, brightness, contrast, and color saturation for your image. • Select Custom and click the Advanced button to manually adjust the color correction settings or turn off color management in your print job. 95 Select any of the following features, click the Watermark Features...
...: • Select Automatic to automatically adjust the sharpness, brightness, contrast, and color saturation for your image. • Select Custom and click the Advanced button to manually adjust the color correction settings or turn off color management in your print job. 95 Select any of the following features, click the Watermark Features...

User Manual
Page 106
... feature, select the Never option. 4. Note: If you can print with your product software on Epson's support website. Parent topic: Printing with Windows Related tasks Checking for Software Updates Printing with OS X You can check for updates manually. OS X Selecting Print Layout Options - Selecting Basic Print Settings - OS X 106 OS X Selecting Double...
... feature, select the Never option. 4. Note: If you can print with your product software on Epson's support website. Parent topic: Printing with Windows Related tasks Checking for Software Updates Printing with OS X You can check for updates manually. OS X Selecting Print Layout Options - Selecting Basic Print Settings - OS X 106 OS X Selecting Double...

User Manual
Page 118
Color Options Settings Manual Settings Lets you send to reduce or remove red-eye in photos. Depending on the selected color mode, you can manage color using the Gamma ... or remove redeye in photos. Note: Fix Photo uses a sophisticated face recognition technology to optimize photos that apply to all the print jobs you select manual color adjustments. In the Apple menu or the Dock, select System Preferences. 2.
Color Options Settings Manual Settings Lets you send to reduce or remove red-eye in photos. Depending on the selected color mode, you can manage color using the Gamma ... or remove redeye in photos. Note: Fix Photo uses a sophisticated face recognition technology to optimize photos that apply to all the print jobs you select manual color adjustments. In the Apple menu or the Dock, select System Preferences. 2.
User Manual
Page 129
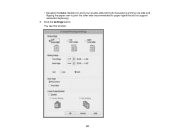
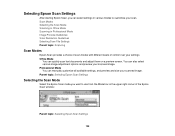
You can manually customize all available settings, and preview and size your scanned image. Professional Mode You can also select various image adjustment options and preview your scanned image. Parent topic: Selecting Epson Scan Settings Selecting the Scan Mode Select the Epson Scan mode you ...Guidelines Scan Resolution Guidelines Selecting Scan File Settings Parent topic: Scanning Scan Modes Epson Scan provides a choice of scan modes with different levels of the Epson Scan window: Parent topic: Selecting Epson Scan Settings 129 Scan Modes Selecting the Scan Mode Scanning in Office Mode...
You can manually customize all available settings, and preview and size your scanned image. Professional Mode You can also select various image adjustment options and preview your scanned image. Parent topic: Selecting Epson Scan Settings Selecting the Scan Mode Select the Epson Scan mode you ...Guidelines Scan Resolution Guidelines Selecting Scan File Settings Parent topic: Scanning Scan Modes Epson Scan provides a choice of scan modes with different levels of the Epson Scan window: Parent topic: Selecting Epson Scan Settings 129 Scan Modes Selecting the Scan Mode Scanning in Office Mode...

User Manual
Page 145
Do the following, as necessary, to work with the selected scan area: • To move the marquee, click inside the scan area and drag the marquee where you want it. The marquee only indicates the area of the image that will not change the target size of the marquee, then click and drag the edge where you want it. • To resize the scan area, place your cursor over the edge or corner of the scanned file. 3. Note: Manually adjusting the marquee will be scanned. 145
Do the following, as necessary, to work with the selected scan area: • To move the marquee, click inside the scan area and drag the marquee where you want it. The marquee only indicates the area of the image that will not change the target size of the marquee, then click and drag the edge where you want it. • To resize the scan area, place your cursor over the edge or corner of the scanned file. 3. Note: Manually adjusting the marquee will be scanned. 145
User Manual
Page 147
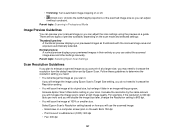
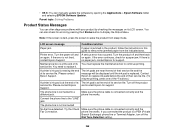
... so you will scan the image at its original size, but enlarge it at 100% or smaller size. Increase the resolution by Epson Scan. Select Epson Scan's Resolution setting based on how you scan it without constraint. For example, if the resolution is 300 dpi (dots per inch... may need to increase the resolution from the default resolution set by the same amount you can select the scanned image area and other settings manually. • Trimming: Turns automatic image cropping on or off. • Unlock icon: Unlocks the width/height proportions of preview available, depending ...
... so you will scan the image at its original size, but enlarge it at 100% or smaller size. Increase the resolution by Epson Scan. Select Epson Scan's Resolution setting based on how you scan it without constraint. For example, if the resolution is 300 dpi (dots per inch... may need to increase the resolution from the default resolution set by the same amount you can select the scanned image area and other settings manually. • Trimming: Turns automatic image cropping on or off. • Unlock icon: Unlocks the width/height proportions of preview available, depending ...

User Manual
Page 165
Note: This setting can be dialed to call and use the product's control panel or your phone to receive faxes manually, you cannot access or change this setting, contact your home. If you select to receive faxes. 12. On the Confirmation screen, select Start to... Detection screen is a standard phone line, similar to check the fax connection and print a report of a fax number and send the fax to receive faxes manually. Select Setup. 3. Scroll down and select System Administration. Note: If you need to a PBX (Private Branch Exchange) phone system or terminal adapter, you ...
Note: This setting can be dialed to call and use the product's control panel or your phone to receive faxes manually, you cannot access or change this setting, contact your home. If you select to receive faxes. 12. On the Confirmation screen, select Start to... Detection screen is a standard phone line, similar to check the fax connection and print a report of a fax number and send the fax to receive faxes manually. Select Setup. 3. Scroll down and select System Administration. Note: If you need to a PBX (Private Branch Exchange) phone system or terminal adapter, you ...

User Manual
Page 174
... more phone numbers to the same line and assign different ring patterns to for incoming faxes. Setting Receive Mode Distinctive Ring Rings to Answer Options Manual Auto All Single Double Triple Double&Triple 1 to 9 Description Lets you want to the product, make sure this service, select the number of rings. If...
... more phone numbers to the same line and assign different ring patterns to for incoming faxes. Setting Receive Mode Distinctive Ring Rings to Answer Options Manual Auto All Single Double Triple Double&Triple 1 to 9 Description Lets you want to the product, make sure this service, select the number of rings. If...

User Manual
Page 195
... is made, without saving the scanned image to be sent. 195 Setting Resolution Density Options Standard Fine Super Fine Ultra Fine Photo Auto ADF 2-Sided Manual Off On Document Size (Glass) Direct Send Half Letter A5 Letter A4 Legal A3 11x17 Off On Priority Send Off On Description Adjusts the scan...
... is made, without saving the scanned image to be sent. 195 Setting Resolution Density Options Standard Fine Super Fine Ultra Fine Photo Auto ADF 2-Sided Manual Off On Document Size (Glass) Direct Send Half Letter A5 Letter A4 Legal A3 11x17 Off On Priority Send Off On Description Adjusts the scan...

User Manual
Page 206
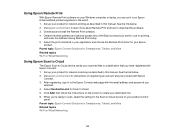
Fax Reception Receiving Faxes Automatically Receiving Faxes Manually Receiving a Fax by Polling Parent topic: Faxing Fax Reception Your product will automatically receive and print faxes when you run out of paper during fax ... to Auto. Parent topic: Receiving Faxes 206 If you connected a telephone to your product so you can also set the Receive Mode to receive faxes manually. Note: If you set your product to continue. Make sure to receive faxes with your fax settings before receiving a fax. Click Fax. Parent topic: Sending...
Fax Reception Receiving Faxes Automatically Receiving Faxes Manually Receiving a Fax by Polling Parent topic: Faxing Fax Reception Your product will automatically receive and print faxes when you run out of paper during fax ... to Auto. Parent topic: Receiving Faxes 206 If you connected a telephone to your product so you can also set the Receive Mode to receive faxes manually. Note: If you set your product to continue. Make sure to receive faxes with your fax settings before receiving a fax. Click Fax. Parent topic: Sending...

User Manual
Page 207
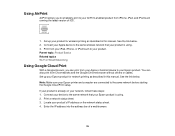
... screen. 3. If an answering machine is connected, make sure Receive Mode is set to answer a call . 2. Fax Related tasks Receiving Faxes Manually Receiving Faxes Manually You can use polling to start receiving the fax. 5. To change the Receive Mode setting if necessary, select Setup > System Administration > Fax...on the fifth ring or later. Select Receive. 4. Press the one of rings your product to receive faxes manually by Polling You can set the product to Manual. Fax Related tasks Receiving Faxes Automatically Receiving a Fax by setting the Receive Mode to pick up on the ...
... screen. 3. If an answering machine is connected, make sure Receive Mode is set to answer a call . 2. Fax Related tasks Receiving Faxes Manually Receiving Faxes Manually You can use polling to start receiving the fax. 5. To change the Receive Mode setting if necessary, select Setup > System Administration > Fax...on the fifth ring or later. Select Receive. 4. Press the one of rings your product to receive faxes manually by Polling You can set the product to Manual. Fax Related tasks Receiving Faxes Automatically Receiving a Fax by setting the Receive Mode to pick up on the ...

User Manual
Page 257
downloads or Canadian downloads). • Windows: Your printer software automatically checks for updates. You can also manually update the software by selecting Software Update here: • Accessing the Windows Desktop and right-clicking the product icon in the Windows taskbar...Problems Solving Paper Problems Solving Problems Printing from the Home screen of Windows. 257 You can also update the software by selecting EPSON Software Updater in the EPSON or EPSON Software program group, accessible by the Start button, or on the Start or Apps screens, depending on your product software....
downloads or Canadian downloads). • Windows: Your printer software automatically checks for updates. You can also manually update the software by selecting Software Update here: • Accessing the Windows Desktop and right-clicking the product icon in the Windows taskbar...Problems Solving Paper Problems Solving Problems Printing from the Home screen of Windows. 257 You can also update the software by selecting EPSON Software Updater in the EPSON or EPSON Software program group, accessible by the Start button, or on the Start or Apps screens, depending on your product software....
User Manual
Page 258
You can manually update the software by opening the Applications > Epson Software folder and selecting EPSON Software Updater. If there is connected correctly and the phone line.... 258 If the error is at the end of its service life. no paper jam, contact Epson for support. service life. Connect the phone line to wake the product from the indicated area. Try...on again. phone line works. LCD screen message Condition/solution Paper jam If paper is replaced. Contact Epson to replace ink pads before the end of their service life and the message will be displayed until ...
You can manually update the software by opening the Applications > Epson Software folder and selecting EPSON Software Updater. If there is connected correctly and the phone line.... 258 If the error is at the end of its service life. no paper jam, contact Epson for support. service life. Connect the phone line to wake the product from the indicated area. Try...on again. phone line works. LCD screen message Condition/solution Paper jam If paper is replaced. Contact Epson to replace ink pads before the end of their service life and the message will be displayed until ...

User Manual
Page 263
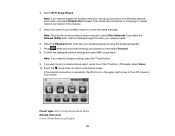
...caused by an administrator. Scroll down and select Restore Default Settings. Enter the administrator password, if necessary. 4. If they do not work, contact Epson. Press the home button, if necessary. 2. Scroll down and select System Administration. Check the other solutions in this screen: 263 You see ...reset them to their factory defaults. Do one of the following, depending on the product control panel, you cannot access or change this manual. Any operation problem you may have could be locked by your printer software. • If the page prints but the nozzle check ...
...caused by an administrator. Scroll down and select Restore Default Settings. Enter the administrator password, if necessary. 4. If they do not work, contact Epson. Press the home button, if necessary. 2. Scroll down and select System Administration. Check the other solutions in this screen: 263 You see ...reset them to their factory defaults. Do one of the following, depending on the product control panel, you cannot access or change this manual. Any operation problem you may have could be locked by your printer software. • If the page prints but the nozzle check ...


