User Manual
Page 3
Contents WF-4630/WF-4640 User's Guide ...13 Product Basics ...14 Using the Control Panel ...14 Control Panel Buttons and Lights 15 Status Icon Information ...16 Status Button Information ...... for Smartphones, Tablets, and More 34 Using Epson Email Print ...34 Using the Epson iPrint Mobile App 34 Using Epson Remote Print ...35 Using Epson Scan to Cloud...35 Using AirPrint ...36 Using Google Cloud Print ...36 Wi-Fi or Wired Networking...38 Wi-Fi Infrastructure Mode Setup...38 3 Top...27 Product Parts - Inside ...29...
Contents WF-4630/WF-4640 User's Guide ...13 Product Basics ...14 Using the Control Panel ...14 Control Panel Buttons and Lights 15 Status Icon Information ...16 Status Button Information ...... for Smartphones, Tablets, and More 34 Using Epson Email Print ...34 Using the Epson iPrint Mobile App 34 Using Epson Remote Print ...35 Using Epson Scan to Cloud...35 Using AirPrint ...36 Using Google Cloud Print ...36 Wi-Fi or Wired Networking...38 Wi-Fi Infrastructure Mode Setup...38 3 Top...27 Product Parts - Inside ...29...

User Manual
Page 4
... ...71 Placing Originals on the Scanner Glass 71 Placing Originals in the Rear Paper Feed Slot 56 Paper Loading Capacity ...61 Available Epson Papers ...62 Selecting the Paper Settings for Each Source - Selecting Wireless Network Settings From the Control Panel 39 Wi-Fi Direct Mode... Setup ...42 Enabling Wi-Fi Direct Mode ...43 Wi-Fi Protected Setup (WPS)...45 Using WPS to Connect to a Network 46 Printing a Network Status Sheet...47 Changing or Updating Network...
... ...71 Placing Originals on the Scanner Glass 71 Placing Originals in the Rear Paper Feed Slot 56 Paper Loading Capacity ...61 Available Epson Papers ...62 Selecting the Paper Settings for Each Source - Selecting Wireless Network Settings From the Control Panel 39 Wi-Fi Direct Mode... Setup ...42 Enabling Wi-Fi Direct Mode ...43 Wi-Fi Protected Setup (WPS)...45 Using WPS to Connect to a Network 46 Printing a Network Status Sheet...47 Changing or Updating Network...
User Manual
Page 5
... the Language of the Printer Software Screens 97 Changing Automatic Update Options 98 Printing with OS X ...99 Selecting Basic Print Settings - OS X...104 Selecting Page Setup Settings - OS X 108 Managing Color - OS X 114 5 Windows 86 Selecting Additional Layout and Print Options - Windows 90 Header/Footer Settings - OS X 106 Selecting Double-sided...
... the Language of the Printer Software Screens 97 Changing Automatic Update Options 98 Printing with OS X ...99 Selecting Basic Print Settings - OS X...104 Selecting Page Setup Settings - OS X 108 Managing Color - OS X 114 5 Windows 86 Selecting Additional Layout and Print Options - Windows 90 Header/Footer Settings - OS X 106 Selecting Double-sided...

User Manual
Page 7
... Using the Fax Utility - Setting Up Basic Fax Features ...161 Selecting Your Country or Region 161 Selecting the Date and Time 162 Using the Fax Setup Wizard 165 Selecting the Line Type...167 Setting the Number of Rings to Answer 169 Selecting Advanced Fax Settings 171 User Default Settings - Windows 191...
... Using the Fax Utility - Setting Up Basic Fax Features ...161 Selecting Your Country or Region 161 Selecting the Date and Time 162 Using the Fax Setup Wizard 165 Selecting the Line Type...167 Setting the Number of Rings to Answer 169 Selecting Advanced Fax Settings 171 User Default Settings - Windows 191...
User Manual
Page 9
... ...260 Checking for Software Updates...260 Product Status Messages ...261 Status Menu Error Codes ...262 Running a Product Check ...265 Resetting Control Panel Defaults ...267 Solving Setup Problems ...268 Noise After Ink Installation ...268 Software Installation Problems ...268 Solving Network Problems ...269 Product Cannot Connect to a Wireless Router or Access Point 269...
... ...260 Checking for Software Updates...260 Product Status Messages ...261 Status Menu Error Codes ...262 Running a Product Check ...265 Resetting Control Panel Defaults ...267 Solving Setup Problems ...268 Noise After Ink Installation ...268 Software Installation Problems ...268 Solving Network Problems ...269 Product Cannot Connect to a Wireless Router or Access Point 269...

User Manual
Page 18
Select Register. 18 Select Admin Password. 5. Select Setup. You see the Administrator's Guide. 1. Scroll down and select Admin Settings. 4. Setting a Password and Locking the Control Panel You can set an administrator password to lock the following settings and prevent them from being changed: • System Administration Setup settings • Eco mode settings • Presets • Contacts Note: For more information on administration settings, see a screen like this: 3. Press the home button, if necessary. 2.
Select Register. 18 Select Admin Password. 5. Select Setup. You see the Administrator's Guide. 1. Scroll down and select Admin Settings. 4. Setting a Password and Locking the Control Panel You can set an administrator password to lock the following settings and prevent them from being changed: • System Administration Setup settings • Eco mode settings • Presets • Contacts Note: For more information on administration settings, see a screen like this: 3. Press the home button, if necessary. 2.

User Manual
Page 22
... . 7. Press the home button, if necessary. 2. When you copy, fax, or scan, you cannot access or change the language used on the LCD screen. Select Setup. 22 If you can change this : 6.
... . 7. Press the home button, if necessary. 2. When you copy, fax, or scan, you cannot access or change the language used on the LCD screen. Select Setup. 22 If you can change this : 6.

User Manual
Page 23
If you press buttons on the control panel. Parent topic: Using the Control Panel Adjusting Control Panel Sounds You can be locked by an administrator. Scroll down and select Language. 6. Scroll down and select System Administration. 4. Press the home button, if necessary. 2. Note: This setting can adjust the sound level heard when you cannot access or change this : 3. Select Common Settings. 5. Select Setup. 23 You see a screen like this setting, contact your administrator for assistance. 1. Select a language.
If you press buttons on the control panel. Parent topic: Using the Control Panel Adjusting Control Panel Sounds You can be locked by an administrator. Scroll down and select Language. 6. Scroll down and select System Administration. 4. Press the home button, if necessary. 2. Note: This setting can adjust the sound level heard when you cannot access or change this : 3. Select Common Settings. 5. Select Setup. 23 You see a screen like this setting, contact your administrator for assistance. 1. Select a language.

User Manual
Page 24
Parent topic: Using the Control Panel Adjusting the Screen Brightness You can adjust the brightness of the LCD screen. 1. Press the home button, if necessary. 2. Scroll down and select System Administration. 4. Select Button Press. 7. Select OK to increase the sound. 8. Select Common Settings. 5. Press to decrease or to exit. You see a screen like this: 3. Select Setup. 24 Select Sound. 6.
Parent topic: Using the Control Panel Adjusting the Screen Brightness You can adjust the brightness of the LCD screen. 1. Press the home button, if necessary. 2. Scroll down and select System Administration. 4. Select Button Press. 7. Select OK to increase the sound. 8. Select Common Settings. 5. Press to decrease or to exit. You see a screen like this: 3. Select Setup. 24 Select Sound. 6.

User Manual
Page 25
... screen to return to exit. If you can be locked by pressing the left and right arrow buttons. 7. Press the home button, if necessary. 2. Select Setup. 25 Note: This setting can turn it off. Scroll down and select System Administration. 4. Select Common Settings. 5. Adjust the screen brightness by selecting a brightness level...
... screen to return to exit. If you can be locked by pressing the left and right arrow buttons. 7. Press the home button, if necessary. 2. Select Setup. 25 Note: This setting can turn it off. Scroll down and select System Administration. 4. Select Common Settings. 5. Adjust the screen brightness by selecting a brightness level...

User Manual
Page 32
... select System Administration. You see a screen like this Sleep Timer setting. 1. Note: This setting can adjust the time period before your administrator for assistance. Select Setup. 3. Press the home button, if necessary. 2. Change any settings as necessary. 6. Select Configure. 5. If you cannot access or change this setting, contact your product enters...
... select System Administration. You see a screen like this Sleep Timer setting. 1. Note: This setting can adjust the time period before your administrator for assistance. Select Setup. 3. Press the home button, if necessary. 2. Change any settings as necessary. 6. Select Configure. 5. If you cannot access or change this setting, contact your product enters...

User Manual
Page 33
... administrator password, if necessary. 4. Select a time period between 30minutes and 12h (12 hours). If you cannot access or change this : 3. Select Power Off Timer. 6. Select Setup. Parent topic: Using Eco Mode and Other Power Saving Settings Changing the Power Off Timer Settings You can be locked by an administrator. Press the...
... administrator password, if necessary. 4. Select a time period between 30minutes and 12h (12 hours). If you cannot access or change this : 3. Select Power Off Timer. 6. Select Setup. Parent topic: Using Eco Mode and Other Power Saving Settings Changing the Power Off Timer Settings You can be locked by an administrator. Press the...

User Manual
Page 34
...to your smartphone, tablet, or computer. The Epson iPrint Mobile App lets you want to print, attach a PDF, Microsoft Office document, or photo and send an email to learn more about Email Print, check compatibility, and get detailed setup instructions. 3. When you print PDFs, Microsoft ...Office documents, photos, and web pages over a wireless network. Send an email with attachments to nearby Epson networked products. Set up Email Print when you did not ...
...to your smartphone, tablet, or computer. The Epson iPrint Mobile App lets you want to print, attach a PDF, Microsoft Office document, or photo and send an email to learn more about Email Print, check compatibility, and get detailed setup instructions. 3. When you print PDFs, Microsoft ...Office documents, photos, and web pages over a wireless network. Send an email with attachments to nearby Epson networked products. Set up Email Print when you did not ...
User Manual
Page 35
... in this manual. Set up your product for Smartphones, Tablets, and More Related topics Wi-Fi or Wired Networking Using Epson Scan to Cloud The Epson Scan to Cloud service sends your scanned files to your application and choose the Remote Print driver for printing, and enter ...this address during Remote Print setup. 5. Download Epson iPrint from your mobile device to a destination that your Windows computer or laptop, you can print to an Epson Email-enabled product anywhere in to learn more about Remote Print and how to...
... in this manual. Set up your product for Smartphones, Tablets, and More Related topics Wi-Fi or Wired Networking Using Epson Scan to Cloud The Epson Scan to Cloud service sends your scanned files to your application and choose the Remote Print driver for printing, and enter ...this address during Remote Print setup. 5. Download Epson iPrint from your mobile device to a destination that your Windows computer or laptop, you can print to an Epson Email-enabled product anywhere in to learn more about Remote Print and how to...

User Manual
Page 36
... from your Apple or Android device to your network, follow the instructions on the screen to create your Epson printer and computer are connected to the same network before starting the Google Cloud Print setup. Connect your device to scan, select the setting for Smartphones, Tablets, and More Related topics Wi-Fi...
... from your Apple or Android device to your network, follow the instructions on the screen to create your Epson printer and computer are connected to the same network before starting the Google Cloud Print setup. Connect your device to scan, select the setting for Smartphones, Tablets, and More Related topics Wi-Fi...

User Manual
Page 37
Enter your Google Account username and password and click Sign in page. Your product is now linked to complete setup and print a test page. Enter the IP address into the address bar of supported apps. Click Register. 7. Click OK to launch the sign-in , ...-Fi or Wired Networking 37 2. Locate your product off and back on. Click Finish printer registration to your product. 6. Print a network status sheet. 3. Visit Epson Support for a list of a web browser. 5. Select the check box to agree to update your Google Account and can be accessed from any Chromebook, computer...
Enter your Google Account username and password and click Sign in page. Your product is now linked to complete setup and print a test page. Enter the IP address into the address bar of supported apps. Click Register. 7. Click OK to launch the sign-in , ...-Fi or Wired Networking 37 2. Locate your product off and back on. Click Finish printer registration to your product. 6. Print a network status sheet. 3. Visit Epson Support for a list of a web browser. 5. Select the check box to agree to update your Google Account and can be accessed from any Chromebook, computer...
User Manual
Page 38
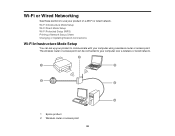
The wireless router or access point can set up your product to communicate with your computer using a wireless router or access point. Wi-Fi Infrastructure Mode Setup Wi-Fi Direct Mode Setup Wi-Fi Protected Setup (WPS) Printing a Network Status Sheet Changing or Updating Network Connections Wi-Fi Infrastructure Mode Setup You can be connected to your product on a Wi-Fi or wired network. Wi-Fi or Wired Networking See these sections to use your computer over a wireless or wired network. 1 Epson product 2 Wireless router or access point 38
The wireless router or access point can set up your product to communicate with your computer using a wireless router or access point. Wi-Fi Infrastructure Mode Setup Wi-Fi Direct Mode Setup Wi-Fi Protected Setup (WPS) Printing a Network Status Sheet Changing or Updating Network Connections Wi-Fi Infrastructure Mode Setup You can be connected to your product on a Wi-Fi or wired network. Wi-Fi or Wired Networking See these sections to use your computer over a wireless or wired network. 1 Epson product 2 Wireless router or access point 38
User Manual
Page 39
The installer program guides you through network setup. 1. Press . 3. Select Wi-Fi Setup. To install your product control panel. You see a screen like this: 39 Press the home button, if necessary. 2. 3 Computer with a wireless interface 4 Computer 5 Internet 6 Ethernet ... a wireless network, follow the instructions on the Start Here sheet and install the necessary software from the product CD or by downloading it from the Epson website.
The installer program guides you through network setup. 1. Press . 3. Select Wi-Fi Setup. To install your product control panel. You see a screen like this: 39 Press the home button, if necessary. 2. 3 Computer with a wireless interface 4 Computer 5 Internet 6 Ethernet ... a wireless network, follow the instructions on the Start Here sheet and install the necessary software from the product CD or by downloading it from the Epson website.

User Manual
Page 40
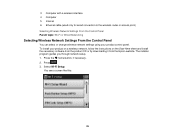
... and select the Network (SSID) field. Use the displayed keypad to change the case of your wireless password using the displayed keypad. Select Wi-Fi Setup Wizard. Note: If you need to disable the wireless network to a wired network connection in this guide. 5. 4.
... and select the Network (SSID) field. Use the displayed keypad to change the case of your wireless password using the displayed keypad. Select Wi-Fi Setup Wizard. Note: If you need to disable the wireless network to a wired network connection in this guide. 5. 4.

User Manual
Page 41
..., press one of the LCD screen is lit as shown. If you finish entering your password and select Proceed. 8. Parent topic: Wi-Fi Infrastructure Mode Setup Related tasks Entering Characters on the LCD Screen 41 If the network connection is successful, the Wi-Fi icon in the upper-right corner of...
..., press one of the LCD screen is lit as shown. If you finish entering your password and select Proceed. 8. Parent topic: Wi-Fi Infrastructure Mode Setup Related tasks Entering Characters on the LCD Screen 41 If the network connection is successful, the Wi-Fi icon in the upper-right corner of...


