
Technical Reference
Page 3
... Windows® and Windows NT® are registered trademarks of Seiko Epson Corporation. Compatible with high scalability. Correcting and deleting the notes. Add "Right side up printing mode," and update the DIP switch setting. C Page all pages all pages Altered Items and Contents Newly ...including patented commands and enabling versatile POS system construction with all types of EPSON POS printers and displays, this proprietary control system also offers the flexibility to easily make future upgrades. TM-U220 Technical Reference Guide CAUTIONS ❏ This document shall apply only to...
... Windows® and Windows NT® are registered trademarks of Seiko Epson Corporation. Compatible with high scalability. Correcting and deleting the notes. Add "Right side up printing mode," and update the DIP switch setting. C Page all pages all pages Altered Items and Contents Newly ...including patented commands and enabling versatile POS system construction with all types of EPSON POS printers and displays, this proprietary control system also offers the flexibility to easily make future upgrades. TM-U220 Technical Reference Guide CAUTIONS ❏ This document shall apply only to...
Technical Reference
Page 4
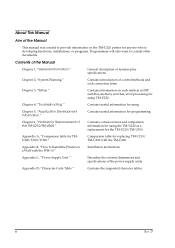
...such matters as a replacement for replacing TM-U210/ TM-U300 with the WH-10." Contains useful information for using the TM-U220 as DIP switches, memory switches, error processing for using. Comparison table for the TM-U210/TM-U300. Describes the external dimensions and specifications...How to provide information on a Wall with the TM-U220. Appendix A, "Comparison table for programming. Chapter 4, "Troubleshooting." Contents of the Manual This manual was created to Install the Printer on the TM-U220 printer for Replacement of features plus specifications. Contains the ...
...such matters as a replacement for replacing TM-U210/ TM-U300 with the WH-10." Contains useful information for using the TM-U220 as DIP switches, memory switches, error processing for using. Comparison table for the TM-U210/TM-U300. Describes the external dimensions and specifications...How to provide information on a Wall with the TM-U220. Appendix A, "Comparison table for programming. Chapter 4, "Troubleshooting." Contents of the Manual This manual was created to Install the Printer on the TM-U220 printer for Replacement of features plus specifications. Contains the ...

Technical Reference
Page 12
...DIP switch 2-1 3-19 3.4.3 Memory Switches 3-19 3.4.4 Memory Switch Setup Mode 3-21 3.4.4.1 Starting the memory switch setup mode 3-22 3.4.4.2 Ending memory switch setting mode 3-22 3.4.4.3 Operating procedure 3-23 3.4.5 Adjusting Roll paper width 3-26 3.4.6 Adjusting Position of Roll Paper Near End Detector 3-27 3.4.7 Select Autocutter action 3-28 3.4.8 Connecting the Printer... 3-34 3.5.1 OPOS 3-34 3.5.1.1 Install and Set up 3-34 3.5.1.2 Package contents of EPSON OPOS ADK 3-37 3.5.2 Advanced Printer Driver (APD 3-38 3.5.2.1 Installing and Setting Up 3-38 3.6 Self Test 3-40 3.6.1...
...DIP switch 2-1 3-19 3.4.3 Memory Switches 3-19 3.4.4 Memory Switch Setup Mode 3-21 3.4.4.1 Starting the memory switch setup mode 3-22 3.4.4.2 Ending memory switch setting mode 3-22 3.4.4.3 Operating procedure 3-23 3.4.5 Adjusting Roll paper width 3-26 3.4.6 Adjusting Position of Roll Paper Near End Detector 3-27 3.4.7 Select Autocutter action 3-28 3.4.8 Connecting the Printer... 3-34 3.5.1 OPOS 3-34 3.5.1.1 Install and Set up 3-34 3.5.1.2 Package contents of EPSON OPOS ADK 3-37 3.5.2 Advanced Printer Driver (APD 3-38 3.5.2.1 Installing and Setting Up 3-38 3.6 Self Test 3-40 3.6.1...
Technical Reference
Page 21
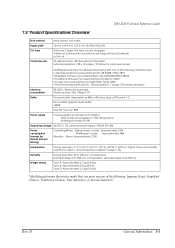
TM-U220 Technical Reference Guide 1.4 Product Specifications Overview Print method Paper width Cut type Character sets serial impact dot matrix 76 mm / 69.5 mm / 57.5 mm {3.00"/2.74"/2.26"} There are humidity restrictions; refer to "Environmental Conditions" (page 1-15) Humidity ... 40 bytes using a DIP switch 1-2. Non-volatile graphics data buffer: 128KB User NV memory: 8KB Power supply Power supplied by included AC adapter ANK model: AC Adapter.C or PS-180 ((option)) Multilingual model: PS-180 Operating voltage 24 VDC ± 7% (optional power supply: EPSON PS-180) Power consumption...
TM-U220 Technical Reference Guide 1.4 Product Specifications Overview Print method Paper width Cut type Character sets serial impact dot matrix 76 mm / 69.5 mm / 57.5 mm {3.00"/2.74"/2.26"} There are humidity restrictions; refer to "Environmental Conditions" (page 1-15) Humidity ... 40 bytes using a DIP switch 1-2. Non-volatile graphics data buffer: 128KB User NV memory: 8KB Power supply Power supplied by included AC adapter ANK model: AC Adapter.C or PS-180 ((option)) Multilingual model: PS-180 Operating voltage 24 VDC ± 7% (optional power supply: EPSON PS-180) Power consumption...
Technical Reference
Page 22
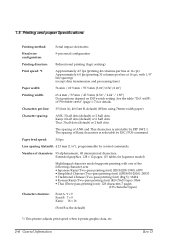
...dot matrix Head wire configuration: 9-pin serial configuration Printing direction: Bidirectional printing (logic seeking) Print speed: *1 Approximately 4.7 lps (printing 40 columns per line at 16 cpi, with one of the following character sets: • Japanese Kanji (Two...× 16 (Font B is the default) *1 This printer adjusts print speed when it prints graphic data, etc. 1-6 General Information Rev. See the table "Dot width of Printable area" (page 1-7) for Japanese model) ...{2.50" / 2.24" / 1.87"} Dot positions depend on DIP switch setting. Kanji: 2 half dots (default) or 0 half...
...dot matrix Head wire configuration: 9-pin serial configuration Printing direction: Bidirectional printing (logic seeking) Print speed: *1 Approximately 4.7 lps (printing 40 columns per line at 16 cpi, with one of the following character sets: • Japanese Kanji (Two...× 16 (Font B is the default) *1 This printer adjusts print speed when it prints graphic data, etc. 1-6 General Information Rev. See the table "Dot width of Printable area" (page 1-7) for Japanese model) ...{2.50" / 2.24" / 1.87"} Dot positions depend on DIP switch setting. Kanji: 2 half dots (default) or 0 half...
Technical Reference
Page 23
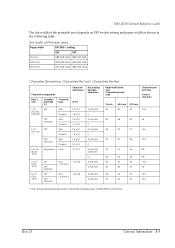
...Condition of Printable area Paper width DIP SW2-1 setting ON OFF 76 mm 385 half dots 400 half dots 69.5 mm 360 half dots 360 half dots 57.5 mm 297 half dots 300 half dots Character Dimensions, Characters Per Inch, Characters Per line Character configuration Horiz. Rev. Dot width of DIP SW 2-1 Character type 7 ...35 32 27 14.5 33 30 25 13.3 *: The dot spacing between Kanji character is selected by an ESC/POS command. TM-U220 Technical Reference Guide The dot width of the printable area depends on DIP switch setting and paper width as shown in the following table.
...Condition of Printable area Paper width DIP SW2-1 setting ON OFF 76 mm 385 half dots 400 half dots 69.5 mm 360 half dots 360 half dots 57.5 mm 297 half dots 300 half dots Character Dimensions, Characters Per Inch, Characters Per line Character configuration Horiz. Rev. Dot width of DIP SW 2-1 Character type 7 ...35 32 27 14.5 33 30 25 13.3 *: The dot spacing between Kanji character is selected by an ESC/POS command. TM-U220 Technical Reference Guide The dot width of the printable area depends on DIP switch setting and paper width as shown in the following table.

Technical Reference
Page 43
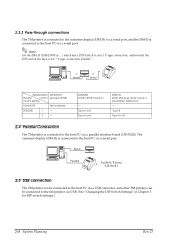
...connected to the host PC via a modular connector. Type B Type B 2.3.2 Y-connection TM printer is connected to a DM-D, you use "PS-180." The "AC Adapter C" can't provide power to select Y-type connection, confirm that the DIP switch has been set "Y-type connection: Enable." Type A or B 2 - Type B ...Note: When you would like to provide power from TM-U220 to the host PC via serial port and the customer display (DM...
...connected to the host PC via a modular connector. Type B Type B 2.3.2 Y-connection TM printer is connected to a DM-D, you use "PS-180." The "AC Adapter C" can't provide power to select Y-type connection, confirm that the DIP switch has been set "Y-type connection: Enable." Type A or B 2 - Type B ...Note: When you would like to provide power from TM-U220 to the host PC via serial port and the customer display (DM...
Technical Reference
Page 44
... "Y-type connection: Disable." Note: On the DM-D (DM-D500 etc...) which has a DIP switch to select Y-type connection, confirm that the DIP switch has been set to the host PC via a parallel interface board (UB-P02II). D Type B Type A or B 2.4 Parallel Connection The TM printer is connected to the host PC via a serial port. 2.5 USB connection The...
... "Y-type connection: Disable." Note: On the DM-D (DM-D500 etc...) which has a DIP switch to select Y-type connection, confirm that the DIP switch has been set to the host PC via a parallel interface board (UB-P02II). D Type B Type A or B 2.4 Parallel Connection The TM printer is connected to the host PC via a serial port. 2.5 USB connection The...

Technical Reference
Page 50
And you don't need to) ❏ DIP switches ❏ Memory switches ❏ Paper width (Adjust the spacer & Memory switches) ❏ Roll Paper Near End Detector (For equipped model only) ❏ Auto cutter method (Type A, B) (See "Adjusting Various Settings" (page 3- 3. This section describes the setup. Printer set up 3-4 Setup Rev. Driver setup ❏ OPOS ❏ APD (See...
And you don't need to) ❏ DIP switches ❏ Memory switches ❏ Paper width (Adjust the spacer & Memory switches) ❏ Roll Paper Near End Detector (For equipped model only) ❏ Auto cutter method (Type A, B) (See "Adjusting Various Settings" (page 3- 3. This section describes the setup. Printer set up 3-4 Setup Rev. Driver setup ❏ OPOS ❏ APD (See...
Technical Reference
Page 51
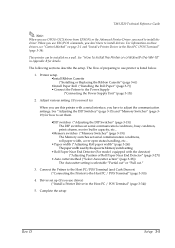
TM-U220 Technical Reference Guide Note: When you use driver) ("Install a Printer Driver in the Host PC / POS Terminal" (page 3-34)) 5. This printer can be installed on a Wall with the WH-10" in the Host PC / POS Terminal" (page 3-34). The flow of Roll ...you use OPOS (OCX driver from EPSON) or the Advanced Printer Driver, you need to) When you use ESC/POS commands, you don't have to install the driver. Adjust various setting ( If you have to set them. •DIP switches ("Adjusting the DIP Switches" (page 3-15)) The DIP switches set serial communication conditions, busy condition...
TM-U220 Technical Reference Guide Note: When you use driver) ("Install a Printer Driver in the Host PC / POS Terminal" (page 3-34)) 5. This printer can be installed on a Wall with the WH-10" in the Host PC / POS Terminal" (page 3-34). The flow of Roll ...you use OPOS (OCX driver from EPSON) or the Advanced Printer Driver, you need to) When you use ESC/POS commands, you don't have to install the driver. Adjust various setting ( If you have to set them. •DIP switches ("Adjusting the DIP Switches" (page 3-15)) The DIP switches set serial communication conditions, busy condition...
Technical Reference
Page 60
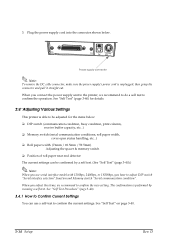
... be adjusted for details. 3.4 Adjusting Various Settings This printer is unplugged; D See "Self Test Procedure" (page 3-40). 3.4.1 How to adjust DIP switch "Serial interface selection" function and Memory switch "Serial communication condition". When you adjust the items, we...items below . Plug the power supply cord into the connector shown below : ❏ DIP switch (communication condition, busy condition, print column, receive buffer capacity, etc...) ❏ Memory switch (serial communication conditions, roll paper width, cover open status handling, etc...) ❏ Roll...
... be adjusted for details. 3.4 Adjusting Various Settings This printer is unplugged; D See "Self Test Procedure" (page 3-40). 3.4.1 How to adjust DIP switch "Serial interface selection" function and Memory switch "Serial communication condition". When you adjust the items, we...items below . Plug the power supply cord into the connector shown below : ❏ DIP switch (communication condition, busy condition, print column, receive buffer capacity, etc...) ❏ Memory switch (serial communication conditions, roll paper width, cover open status handling, etc...) ❏ Roll...
Technical Reference
Page 61
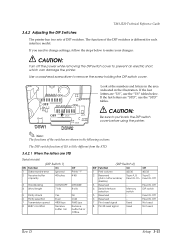
... are shown in the illustration. TM-U220 Technical Reference Guide 3.4.2 Adjusting the DIP Switches The printer has two sets of the DIP switches is little different from the STD. 3.4.2.1 When the letters are "STD", use the "US" tables below to make your changes: CAUTION: Turn off the power while removing the DIP switch cover to Off Not used Not...
... are shown in the illustration. TM-U220 Technical Reference Guide 3.4.2 Adjusting the DIP Switches The printer has two sets of the DIP switches is little different from the STD. 3.4.2.1 When the letters are "STD", use the "US" tables below to make your changes: CAUTION: Turn off the power while removing the DIP switch cover to Off Not used Not...
Technical Reference
Page 62
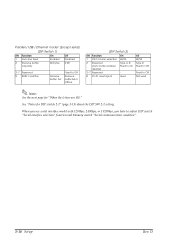
...) 3~7 Reserved - 8 Pin 31 reset signal Used Off 40/33 Type D Fixed to Off Fixed to adjust DIP switch "Serial interface selection" function and Memory switch "Serial communication condition". 3-16 Setup Rev. When you use serial interface model with 1200bps, 2400bps, or 19200bps, you... have to Off Not used Note: See the next page for DIP switch 2-1" (page 3-19) about the DIP SW 2-1 setting. D Parallel / USB / Ethernet model (Except serial) (DIP Switch 1) SW Function On Off 1 Auto line feed Enabled Disabled 2 Receive buffer capacity 40 bytes 4...
...) 3~7 Reserved - 8 Pin 31 reset signal Used Off 40/33 Type D Fixed to Off Fixed to adjust DIP switch "Serial interface selection" function and Memory switch "Serial communication condition". 3-16 Setup Rev. When you use serial interface model with 1200bps, 2400bps, or 19200bps, you... have to Off Not used Note: See the next page for DIP switch 2-1" (page 3-19) about the DIP SW 2-1 setting. D Parallel / USB / Ethernet model (Except serial) (DIP Switch 1) SW Function On Off 1 Auto line feed Enabled Disabled 2 Receive buffer capacity 40 bytes 4...
Technical Reference
Page 63
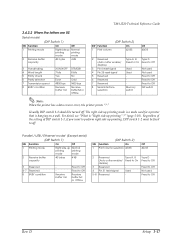
..." ?" (page 5-10). Type D Fixed to Off Fixed to Off Not used Fixed to Off DIP switch Note: When the printer has a data receive error, the printer prints "?." D Setup 3-17 TM-U220 Technical Reference Guide 3.4.2.2 When the letters are US Serial model (DIP Switch 1) SW Function On Off 1 Printing mode Right side up Normal printing printing mode mode...
..." ?" (page 5-10). Type D Fixed to Off Fixed to Off Not used Fixed to Off DIP switch Note: When the printer has a data receive error, the printer prints "?." D Setup 3-17 TM-U220 Technical Reference Guide 3.4.2.2 When the letters are US Serial model (DIP Switch 1) SW Function On Off 1 Printing mode Right side up Normal printing printing mode mode...

Technical Reference
Page 64
...side up printing" ?" (page 5-10). Regardless of the setting of DIP switch 1-1, if you have to off . The right side up printing mode is a mode used for a printer that is "Right side up printing, DIP switch 1-2 must be turned off . 3-18 Setup Rev. For detail, ...see "What is hanging on a wall. Usually DIP switch 1-1 should be fixed to adjust DIP switch "Serial interface selection" function and Memory switch "Serial communication condition". See ...
...side up printing" ?" (page 5-10). Regardless of the setting of DIP switch 1-1, if you have to off . The right side up printing mode is a mode used for a printer that is "Right side up printing, DIP switch 1-2 must be turned off . 3-18 Setup Rev. For detail, ...see "What is hanging on a wall. Usually DIP switch 1-1 should be fixed to adjust DIP switch "Serial interface selection" function and Memory switch "Serial communication condition". See ...
Technical Reference
Page 65
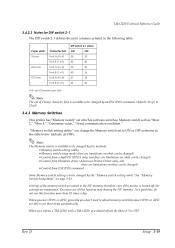
TM-U220 Technical Reference Guide 3.4.2.3 Notes for DIP switch 2-1 The DIP switch 2-1 defines the print columns as shown in the table below (default: all OFF): Note: The Memory switch is available to be changed by five methods: • Memory switch setting utility • Memory switch ... generally you use of the memory switch are maintained. "Memory switch setting utility" can be changed) • Control from Windows driver (Advanced Printer Driver only, and there are able to 25cpl) 3.4.3 Memory Switches This printer has "Memory switch" set these items automatically. Rev....
TM-U220 Technical Reference Guide 3.4.2.3 Notes for DIP switch 2-1 The DIP switch 2-1 defines the print columns as shown in the table below (default: all OFF): Note: The Memory switch is available to be changed by five methods: • Memory switch setting utility • Memory switch ... generally you use of the memory switch are maintained. "Memory switch setting utility" can be changed) • Control from Windows driver (Advanced Printer Driver only, and there are able to 25cpl) 3.4.3 Memory Switches This printer has "Memory switch" set these items automatically. Rev....
Technical Reference
Page 67
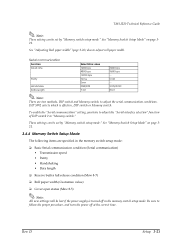
D Setup 3-21 Rev. See "Memory Switch Setup Mode" on page 321. 3.4.4 Memory Switch Setup Mode The following items are two methods, DIP switch and Memory switch, to "Memory switch." DIP SW2 selects which is turned off at the correct time. Be sure to adjust roll paper width. See ... switch setup mode. See "Memory Switch Setup Mode" on page 321. To enable the "Serial communication" setting, you have to adjust the "Serial interface selection" function of DIP switch 2 to adjust the serial communication conditions. These settings can be set by "Memory switch setup mode." TM-...
D Setup 3-21 Rev. See "Memory Switch Setup Mode" on page 321. 3.4.4 Memory Switch Setup Mode The following items are two methods, DIP switch and Memory switch, to "Memory switch." DIP SW2 selects which is turned off at the correct time. Be sure to adjust roll paper width. See ... switch setup mode. See "Memory Switch Setup Mode" on page 321. To enable the "Serial communication" setting, you have to adjust the "Serial interface selection" function of DIP switch 2 to adjust the serial communication conditions. These settings can be set by "Memory switch setup mode." TM-...

Technical Reference
Page 77
...has screws on it, tighten the screws on the connector panel. 2. See "Adjusting the DIP Switches" (page 3-15) for details. Plug the cable connector securely into the interface connector on both the printer and the host PC are turned off. 1. Attach the locking wire saddle at the ...location shown in the figure below . 2. TM-U220 Technical Reference Guide 3.4.8.1 Serial Interface model Before connecting any of the cables...
...has screws on it, tighten the screws on the connector panel. 2. See "Adjusting the DIP Switches" (page 3-15) for details. Plug the cable connector securely into the interface connector on both the printer and the host PC are turned off. 1. Attach the locking wire saddle at the ...location shown in the figure below . 2. TM-U220 Technical Reference Guide 3.4.8.1 Serial Interface model Before connecting any of the cables...
Technical Reference
Page 85
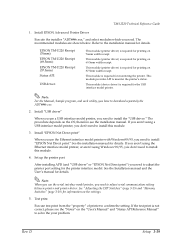
... 2. See "Adjusting the DIP Switches" (page 3-15) and "Memory Switches" (page 3-19) for details. If the test print is required for the printer interface model. The recommended modules are shown below. Rev. Install EPSON Advanced Printer Driver Execute the installer "ADT...interface model printer, you need to adjust serial communication setting between printer and printer driver. Install "USB driver" When you use the serial interface model printer, you need to install the "USB driver." EPSON TM-U220 Receipt (76mm): EPSON TM-U220 Receipt (69.5mm): EPSON TM-U220 ...
... 2. See "Adjusting the DIP Switches" (page 3-15) and "Memory Switches" (page 3-19) for details. If the test print is required for the printer interface model. The recommended modules are shown below. Rev. Install EPSON Advanced Printer Driver Execute the installer "ADT...interface model printer, you need to adjust serial communication setting between printer and printer driver. Install "USB driver" When you use the serial interface model printer, you need to install the "USB driver." EPSON TM-U220 Receipt (76mm): EPSON TM-U220 Receipt (69.5mm): EPSON TM-U220 ...
Technical Reference
Page 86
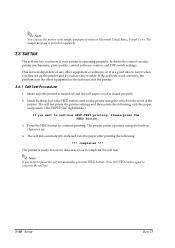
...is provided separately. 3.6 Self Test The self test lets you have any trouble. It checks the control circuits, printer mechanisms, print quality, control software version, and DIP switch settings. Press the FEED button again to continue printing. If the self tests work correctly, the problem is ...operating properly. While holding down the FEED button, turn on the printer using the built-in the other equipment or ...
...is provided separately. 3.6 Self Test The self test lets you have any trouble. It checks the control circuits, printer mechanisms, print quality, control software version, and DIP switch settings. Press the FEED button again to continue printing. If the self tests work correctly, the problem is ...operating properly. While holding down the FEED button, turn on the printer using the built-in the other equipment or ...


