User Manual
Page 2
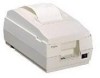
... . 2-8 Type A Pin 31 reset signal Enabled Disabled Types B & D Undefined. Types B & D Internal use . Do not change . 2-6 2-7 Type A Pin 6 reset Enabled signal Disabled Types B & D For internal use . Printer Parts 1 Type A 2 Type B and two color Type D 3 Single color Type D DIP Switch Tables Serial SW Function 1-1 Data reception error 1-2 Receive buffer capacity 1-3 Handshaking 1-4 Word length...
... . 2-8 Type A Pin 31 reset signal Enabled Disabled Types B & D Undefined. Types B & D Internal use . Do not change . 2-6 2-7 Type A Pin 6 reset Enabled signal Disabled Types B & D For internal use . Printer Parts 1 Type A 2 Type B and two color Type D 3 Single color Type D DIP Switch Tables Serial SW Function 1-1 Data reception error 1-2 Receive buffer capacity 1-3 Handshaking 1-4 Word length...
User Manual
Page 3
..., or otherwise, without notice. Operation of this product, or (excluding the U.S.) failure to the printers that are so labeled. (EMC is any liability assumed for damages, losses, costs, or expenses incurred by Seiko Epson Corporation, Nagano, Japan. TM-U200 Series User's Manual 1 English All rights reserved. This equipment generates, uses, and can radiate radio...
..., or otherwise, without notice. Operation of this product, or (excluding the U.S.) failure to the printers that are so labeled. (EMC is any liability assumed for damages, losses, costs, or expenses incurred by Seiko Epson Corporation, Nagano, Japan. TM-U200 Series User's Manual 1 English All rights reserved. This equipment generates, uses, and can radiate radio...
User Manual
Page 5
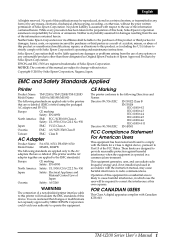
... print alphanumeric characters and one of the instructions if you are using a Type D printer. otherwise, the printer and the telephone line may be damaged. however, the instructions cover all types, except as noted. TM-U200 Series User's Manual 3 Because Type D printers do not have autocutters, skip the autocutter parts of the following: Japanese Kanji, Chinese...
... print alphanumeric characters and one of the instructions if you are using a Type D printer. otherwise, the printer and the telephone line may be damaged. however, the instructions cover all types, except as noted. TM-U200 Series User's Manual 3 Because Type D printers do not have autocutters, skip the autocutter parts of the following: Japanese Kanji, Chinese...
User Manual
Page 6
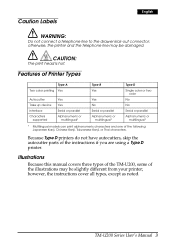
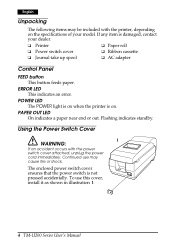
...out. ERROR LED This indicates an error. Using the Power Switch Cover 1 WARNING: If an accident occurs with the printer, depending on the specifications of your dealer. ❏ Printer ❑ Paper roll ❏ Power switch cover ❑ Ribbon cassette ❏ Journal take up spool ❑ ... adapter Control Panel FEED button This button feeds paper. The enclosed power switch cover ensures that the power switch is on when the printer is not pressed accidentally. If any item is damaged, contact your model. POWER LED The POWER light is on . Continued use this...
...out. ERROR LED This indicates an error. Using the Power Switch Cover 1 WARNING: If an accident occurs with the printer, depending on the specifications of your dealer. ❏ Printer ❑ Paper roll ❏ Power switch cover ❑ Ribbon cassette ❏ Journal take up spool ❑ ... adapter Control Panel FEED button This button feeds paper. The enclosed power switch cover ensures that the power switch is on when the printer is not pressed accidentally. If any item is damaged, contact your model. POWER LED The POWER light is on . Continued use this...
User Manual
Page 7
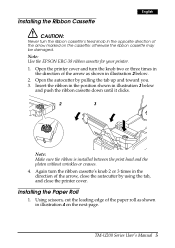
.... Insert the ribbon in the position shown in illustration 3 below . 2. Open the printer cover and turn the knob two or three times in the direction of the arrow, close the autocutter by pulling the tab up and toward you. 3. TM-U200 Series User's Manual 5 otherwise the ribbon cassette may be damaged. Again turn.... 2 3 Note: Make sure the ribbon is installed between the print head and the platen without wrinkles or creases. 4. Installing the Paper Roll 1. Note: Use the EPSON ERC-38 ribbon cassette for your printer. 1.
.... Insert the ribbon in the position shown in illustration 3 below . 2. Open the printer cover and turn the knob two or three times in the direction of the arrow, close the autocutter by pulling the tab up and toward you. 3. TM-U200 Series User's Manual 5 otherwise the ribbon cassette may be damaged. Again turn.... 2 3 Note: Make sure the ribbon is installed between the print head and the platen without wrinkles or creases. 4. Installing the Paper Roll 1. Note: Use the EPSON ERC-38 ribbon cassette for your printer. 1.
User Manual
Page 8
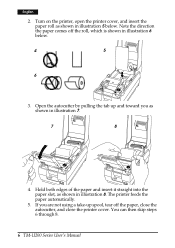
Turn on the printer, open the printer cover, and insert the paper roll as shown in illustration 6 below . English 2. Hold both edges of the paper and insert it straight into the paper ... using a take-up and toward you as shown in illustration 7. 7 8 4. Note the direction the paper comes off the paper, close the autocutter, and close the printer cover. The printer feeds the paper automatically. 5. You can then skip steps 6 through 8. 6 TM-U200 Series User's Manual
Turn on the printer, open the printer cover, and insert the paper roll as shown in illustration 6 below . English 2. Hold both edges of the paper and insert it straight into the paper ... using a take-up and toward you as shown in illustration 7. 7 8 4. Note the direction the paper comes off the paper, close the autocutter, and close the printer cover. The printer feeds the paper automatically. 5. You can then skip steps 6 through 8. 6 TM-U200 Series User's Manual
User Manual
Page 9
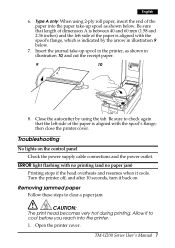
...the spool's flange, which is indicated by using 2-ply roll paper, insert the end of the paper into the printer. 1. Troubleshooting No lights on . Open the printer cover. Be sure that the left side of the paper is aligned with no printing (and no paper jam) ...the autocutter by the arrow in illustration 10, and cut the receipt paper. 9 10 A 8. then close the printer cover. TM-U200 Series User's Manual 7 Insert the journal take -up spool in the printer, as shown below . 7. Removing jammed paper Follow these steps to check again that length of dimension A is between...
...the spool's flange, which is indicated by using 2-ply roll paper, insert the end of the paper into the printer. 1. Troubleshooting No lights on . Open the printer cover. Be sure that the left side of the paper is aligned with no printing (and no paper jam) ...the autocutter by the arrow in illustration 10, and cut the receipt paper. 9 10 A 8. then close the printer cover. TM-U200 Series User's Manual 7 Insert the journal take -up spool in the printer, as shown below . 7. Removing jammed paper Follow these steps to check again that length of dimension A is between...
User Manual
Page 10
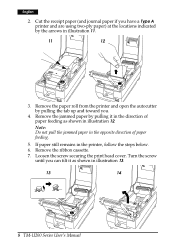
Note: Do not pull the jammed paper in the printer, follow the steps below. 6. Loosen the screw securing the print head cover. Remove the jammed paper by the arrows in illustration 11. 11 12 3. Remove ... are using two-ply paper) at the locations indicated by pulling it as shown in illustration 13. 13 14 8 TM-U200 Series User's Manual English 2. Remove the paper roll from the printer and open the autocutter by pulling the tab up and toward you can tilt it in the direction of paper feeding...
Note: Do not pull the jammed paper in the printer, follow the steps below. 6. Loosen the screw securing the print head cover. Remove the jammed paper by the arrows in illustration 11. 11 12 3. Remove ... are using two-ply paper) at the locations indicated by pulling it as shown in illustration 13. 13 14 8 TM-U200 Series User's Manual English 2. Remove the paper roll from the printer and open the autocutter by pulling the tab up and toward you can tilt it in the direction of paper feeding...

User Manual
Page 11
Remove all the jammed paper. Replace the ribbon cassette and close the printer cover. If the autocutter blade is not in its normal position (if you can see the blade in the autocutter slit, which is indicated by ... inside to move the blade to the right side of paper feeding. 10. English Note: Do not remove the screw from the print head cover. 8. TM-U200 Series User's Manual 9 Note: Do not pull the jammed paper in the normal position), insert a screwdriver to the normal position. 15 13. Replace the print...
Remove all the jammed paper. Replace the ribbon cassette and close the printer cover. If the autocutter blade is not in its normal position (if you can see the blade in the autocutter slit, which is indicated by ... inside to move the blade to the right side of paper feeding. 10. English Note: Do not remove the screw from the print head cover. 8. TM-U200 Series User's Manual 9 Note: Do not pull the jammed paper in the normal position), insert a screwdriver to the normal position. 15 13. Replace the print...


