User Guide
Page 4
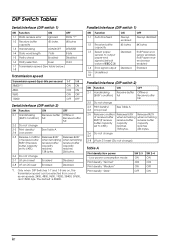
Parallel Interface (DIP switch 1) SW Function 1-1 Auto line feed 1-2 Receive buffer capacity 1-3 Select paper sensors to output paper-end signals (default value of ESC C 3) 1-4 Error signal output 1-5~ Undefined 1-8 ... 6 reset Enabled Disabled 2-8 I/F pin 25 reset Enabled Disabled *1. English DIP Switch Tables Serial Interface (DIP switch 1) SW Function ON OFF 1-1 Data receive error Ignored Prints "?" 1-2 Receive buffer capacity 45 bytes 4K bytes 1-3 Handshaking XON/XOFF DTR/DSR 1-4 Data word length 7 bits 8 bits 1-5 Parity check Enabled Disabled 1-6 Parity selection...
Parallel Interface (DIP switch 1) SW Function 1-1 Auto line feed 1-2 Receive buffer capacity 1-3 Select paper sensors to output paper-end signals (default value of ESC C 3) 1-4 Error signal output 1-5~ Undefined 1-8 ... 6 reset Enabled Disabled 2-8 I/F pin 25 reset Enabled Disabled *1. English DIP Switch Tables Serial Interface (DIP switch 1) SW Function ON OFF 1-1 Data receive error Ignored Prints "?" 1-2 Receive buffer capacity 45 bytes 4K bytes 1-3 Handshaking XON/XOFF DTR/DSR 1-4 Data word length 7 bits 8 bits 1-5 Parity check Enabled Disabled 1-6 Parity selection...
User Guide
Page 5
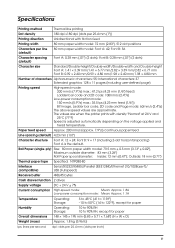
...above speed values are when the printer prints with friction feed Printing width 80 mm paper width model: 72 mm {2.83"}, 512 dot positions Characters per line (default) 80 mm paper width model: Font A: 42; Specifications English Printing method Thermal line printing Dot density 180 dpi ×...180 dpi [dots per 25.4 mm {1"}] Printing direction Unidirectional with density "Normal" at 24 V ...
...above speed values are when the printer prints with friction feed Printing width 80 mm paper width model: 72 mm {2.83"}, 512 dot positions Characters per line (default) 80 mm paper width model: Font A: 42; Specifications English Printing method Thermal line printing Dot density 180 dpi ×...180 dpi [dots per 25.4 mm {1"}] Printing direction Unidirectional with density "Normal" at 24 V ...

User Guide
Page 11
...thermal head because it cools. If paper is shown in illustration J. To attach it as shown in illustration B. See illustration D. ERROR LED on (not flashing) with no printing (and no printing... If PAPER OUT is on, the roll paper is not installed or is not closed properly. See illustration F. 3. The correct direction of the connector cover inward to detach the hooks from the printer case. TM-T88IV...cover ensures that they hook the printer case, as shown in illustration...occurs with your printer to protect your cables. Attaching and...
...thermal head because it cools. If paper is shown in illustration J. To attach it as shown in illustration B. See illustration D. ERROR LED on (not flashing) with no printing (and no printing... If PAPER OUT is on, the roll paper is not installed or is not closed properly. See illustration F. 3. The correct direction of the connector cover inward to detach the hooks from the printer case. TM-T88IV...cover ensures that they hook the printer case, as shown in illustration...occurs with your printer to protect your cables. Attaching and...
User Guide
Page 12
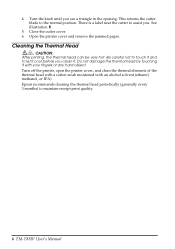
.... Epson recommends cleaning the thermal head periodically (generally every 3 months) to the normal position. Turn off the printer, open the printer cover, and clean the thermal elements of the thermal head with a cotton swab moistened with your fingers or any hard object. Open the printer cover... and remove the jammed paper. This returns the cutter blade to maintain receipt print quality. 6 TM-T88IV User...
.... Epson recommends cleaning the thermal head periodically (generally every 3 months) to the normal position. Turn off the printer, open the printer cover, and clean the thermal elements of the thermal head with a cotton swab moistened with your fingers or any hard object. Open the printer cover... and remove the jammed paper. This returns the cutter blade to maintain receipt print quality. 6 TM-T88IV User...

User Guide
Page 14
Printed on Recycled Paper Printed in China 2005.12
Printed on Recycled Paper Printed in China 2005.12


