
User Manual
Page 1
Contents Unpacking and assembling the printer 2 Assembling the stand ...5 Installing the printer ...8 Installing the auto take-up reel unit 14 Installing the media feeding unit 18 Connecting the cables ...21 Installing the print drying system (included with SC-S60600 25 Installing ink cartridges ...26 Installing the software ...28 Setting an administrative password 29
Contents Unpacking and assembling the printer 2 Assembling the stand ...5 Installing the printer ...8 Installing the auto take-up reel unit 14 Installing the media feeding unit 18 Connecting the cables ...21 Installing the print drying system (included with SC-S60600 25 Installing ink cartridges ...26 Installing the software ...28 Setting an administrative password 29
User Manual
Page 6
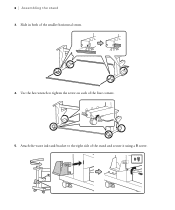
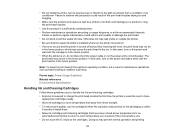
Attach the waste ink tank bracket to tighten the screw on each of the four corners. 5. Slide in both of the stand and secure it using a B screw. 6 | Assembling the stand 3. Use the hex wrench to the right side of the smaller horizontal struts. 4.
Attach the waste ink tank bracket to tighten the screw on each of the four corners. 5. Slide in both of the stand and secure it using a B screw. 6 | Assembling the stand 3. Use the hex wrench to the right side of the smaller horizontal struts. 4.
User Manual
Page 7
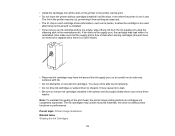
Attach the other waste ink tank bracket and secure it using a B screw. 7. Assembling the stand | 7 6. Insert the three cable support clips into the holes shown. Slide up the adjustable securing plate (shaded part in step 1 below) and secure the waste ink tank bracket to it using two B screws.
Attach the other waste ink tank bracket and secure it using a B screw. 7. Assembling the stand | 7 6. Insert the three cable support clips into the holes shown. Slide up the adjustable securing plate (shaded part in step 1 below) and secure the waste ink tank bracket to it using two B screws.
User Manual
Page 12
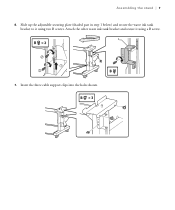
Open the two latches on the tube are below the bottom latch, then close both latches. Note: Make sure the waste ink tube is not pinched in any place to avoid having ink back up in the frame. 10. Make sure the zip ties on the side of the stand and secure the waste ink tube. Remove the protective covering from the waste ink tube and then feed the tube through the hole in it. 12 | Installing the printer 9.
Open the two latches on the tube are below the bottom latch, then close both latches. Note: Make sure the waste ink tube is not pinched in any place to avoid having ink back up in the frame. 10. Make sure the zip ties on the side of the stand and secure the waste ink tube. Remove the protective covering from the waste ink tube and then feed the tube through the hole in it. 12 | Installing the printer 9.
User Manual
Page 13
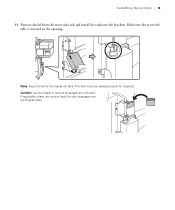
Remove the lid from the waste ink tank and install the tank into the brackets. If applicable, place the caution label for disposal. Make sure the waste ink tube is inserted in various languages are included. The tank must be sealed properly for your language over the English label. Caution: Caution labels in the opening. Note: Keep the lid for the waste ink tank. Installing the printer | 13 11.
Remove the lid from the waste ink tank and install the tank into the brackets. If applicable, place the caution label for disposal. Make sure the waste ink tube is inserted in various languages are included. The tank must be sealed properly for your language over the English label. Caution: Caution labels in the opening. Note: Keep the lid for the waste ink tank. Installing the printer | 13 11.

User Manual
Page 23
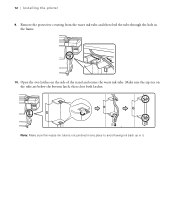
A From the back of the printer, connect the other end of the stand. A B Note: Make sure the waste ink tube is not pinched in any place to avoid having ink back up in it . Connecting the cables | 23 5. From the front of the printer, run the cable through the cable support clips on the side of the communication cable and secure it . 6.
A From the back of the printer, connect the other end of the stand. A B Note: Make sure the waste ink tube is not pinched in any place to avoid having ink back up in it . Connecting the cables | 23 5. From the front of the printer, run the cable through the cable support clips on the side of the communication cable and secure it . 6.
User Manual
Page 26
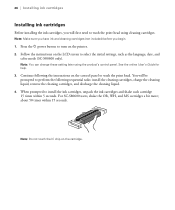
...discharge the cleaning liquid. 4. Press the P power button to select the initial settings, such as the language, date, and color mode (SC-S80600 only). See the online User's Guide for help. 3. Follow the instructions on the LCD screen to turn on the printer. 2. When prompted ...about 50 times within 5 seconds. Note: You can change these setting later using cleaning cartridges. 26 | Installing ink cartridges Installing ink cartridges Before installing the ink cartridges, you begin. 1. For SC-S80600 users, shake the OR, WH, and MS cartridges a bit more; Note: Do not touch the IC chip...
...discharge the cleaning liquid. 4. Press the P power button to select the initial settings, such as the language, date, and color mode (SC-S80600 only). See the online User's Guide for help. 3. Follow the instructions on the LCD screen to turn on the printer. 2. When prompted ...about 50 times within 5 seconds. Note: You can change these setting later using cleaning cartridges. 26 | Installing ink cartridges Installing ink cartridges Before installing the ink cartridges, you begin. 1. For SC-S80600 users, shake the OR, WH, and MS cartridges a bit more; Note: Do not touch the IC chip...
User Manual
Page 27
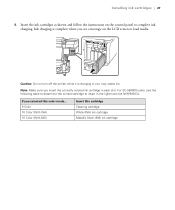
...table to determine the correct cartridge to insert in each slot. Ink charging is charging or you insert the correctly colored ink cartridge in the rightmost slot (WH/MS/CL). Note: Make sure you may waste ink. Caution: Do not turn off the printer while it is ...10 Color (With MS) Insert this cartridge Cleaning cartridge White (WH) ink cartridge Metallic Silver (MS) ink cartridge For SC-S80600 users, see a message on the control panel to load media. Installing ink cartridges | 27 5. Insert the ink cartridges as shown and follow the instructions on the LCD screen to complete...
...table to determine the correct cartridge to insert in each slot. Ink charging is charging or you insert the correctly colored ink cartridge in the rightmost slot (WH/MS/CL). Note: Make sure you may waste ink. Caution: Do not turn off the printer while it is ...10 Color (With MS) Insert this cartridge Cleaning cartridge White (WH) ink cartridge Metallic Silver (MS) ink cartridge For SC-S80600 users, see a message on the control panel to load media. Installing ink cartridges | 27 5. Insert the ink cartridges as shown and follow the instructions on the LCD screen to complete...
User Manual
Page 3
... Product Parts - Back...12 Control Panel...13 Consumables and Replacement Parts 16 Printer Usage Guidelines ...17 Using Your Printer ...17 Handling Ink and Cleaning Cartridges 18 Handling Media...20 Storing Your Printer ...20 Media Handling...22 Media Handling Precautions ...22 Loading Media...23 Saving ...Reel ...48 Attaching the Take-up Roll Core to Your Printer...8 Notations Used in the Documentation 8 Printer Part Locations...8 Product Parts - Contents SureColor S40600/S60600 User's Guide 7 Introduction to the Auto Take-up Reel 48 Take Up with the Printable-Side-In 52 Take Up with the...
... Product Parts - Back...12 Control Panel...13 Consumables and Replacement Parts 16 Printer Usage Guidelines ...17 Using Your Printer ...17 Handling Ink and Cleaning Cartridges 18 Handling Media...20 Storing Your Printer ...20 Media Handling...22 Media Handling Precautions ...22 Loading Media...23 Saving ...Reel ...48 Attaching the Take-up Roll Core to Your Printer...8 Notations Used in the Documentation 8 Printer Part Locations...8 Product Parts - Contents SureColor S40600/S60600 User's Guide 7 Introduction to the Auto Take-up Reel 48 Take Up with the Printable-Side-In 52 Take Up with the...
User Manual
Page 4
......69 Maintenance Supplies ...70 Maintenance Precautions ...71 Cleaning the Platen Heater and Media Edge Plates 72 Perform Regular Cleaning...74 Using Ink Cleaner ...74 Moving the Print Head for Maintenance 75 Cleaning Around the Print Head ...76 Cleaning the Anti-drying Caps ...78 Shaking... and Replacing Ink Cartridges 85 Shaking the Ink Cartridges ...85 Replacing the Ink Cartridges ...86 Replacing the Waste Ink Bottle ...89 Replacing the Maintenance Parts ...91 Replacing the Media Edge Plates ...97 Print Head...
......69 Maintenance Supplies ...70 Maintenance Precautions ...71 Cleaning the Platen Heater and Media Edge Plates 72 Perform Regular Cleaning...74 Using Ink Cleaner ...74 Moving the Print Head for Maintenance 75 Cleaning Around the Print Head ...76 Cleaning the Anti-drying Caps ...78 Shaking... and Replacing Ink Cartridges 85 Shaking the Ink Cartridges ...85 Replacing the Ink Cartridges ...86 Replacing the Waste Ink Bottle ...89 Replacing the Maintenance Parts ...91 Replacing the Media Edge Plates ...97 Print Head...

User Manual
Page 5
... Get Help...130 Technical Specifications ...131 Windows System Requirements ...131 Printing Specifications ...132 Electrical Specifications ...132 Environmental Specifications ...133 Dimension Specifications ...134 Interface Specifications ...135 Ink Cartridge Specifications...135 Media Specifications ...135 Safety and Approvals Specifications 136 Notices ...137 Important Safety Instructions...137 General Product Safety Instructions 137 5
... Get Help...130 Technical Specifications ...131 Windows System Requirements ...131 Printing Specifications ...132 Electrical Specifications ...132 Environmental Specifications ...133 Dimension Specifications ...134 Interface Specifications ...135 Ink Cartridge Specifications...135 Media Specifications ...135 Safety and Approvals Specifications 136 Notices ...137 Important Safety Instructions...137 General Product Safety Instructions 137 5
User Manual
Page 6
Ink Cartridge Safety Instructions 139 FCC Compliance Statement...140 Software License Terms...141 Trademarks ...148 Copyright Notice...149 A Note Concerning Responsible Use of Copyrighted Materials 149 Copyright Attribution ...149 6
Ink Cartridge Safety Instructions 139 FCC Compliance Statement...140 Software License Terms...141 Trademarks ...148 Copyright Notice...149 A Note Concerning Responsible Use of Copyrighted Materials 149 Copyright Attribution ...149 6

User Manual
Page 9
Front 1 Left maintenance cover 2 Print drying system (included with SC-S60600 and optional for SC-S40600) 3 After heater 4 Tension bar 5 Takeup reel roll core holder 6 Takeup roll support 7 Auto switch 8 Manual switch 9 Ink cartridges (one set for SC-S40600) 10 ink cartridge lock levers 11 Cartridge check light 12 Right maintenance cover 13 Media loading lever 14 Alert light 9 Product Parts -
Front 1 Left maintenance cover 2 Print drying system (included with SC-S60600 and optional for SC-S40600) 3 After heater 4 Tension bar 5 Takeup reel roll core holder 6 Takeup roll support 7 Auto switch 8 Manual switch 9 Ink cartridges (one set for SC-S40600) 10 ink cartridge lock levers 11 Cartridge check light 12 Right maintenance cover 13 Media loading lever 14 Alert light 9 Product Parts -
User Manual
Page 15
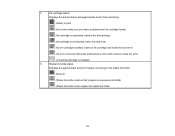
... the lock lever : An error occurred; replace the waste ink bottle 15 make sure you have a replacement ink cartridge handy : Ink cartridge is not latched; lower the lock lever : No ink cartridge installed; replace the ink cartridge : Ink cartridge is expended; prepare a new waste ink bottle : Waste ink bottle is almost full; follow the instructions on the LCD...
... the lock lever : An error occurred; replace the waste ink bottle 15 make sure you have a replacement ink cartridge handy : Ink cartridge is not latched; lower the lock lever : No ink cartridge installed; replace the ink cartridge : Ink cartridge is expended; prepare a new waste ink bottle : Waste ink bottle is almost full; follow the instructions on the LCD...

User Manual
Page 16
... the wiper : No error : Wiper unit is low; To find the nearest reseller, visit proimaging.epson.com (U.S.) or epson.ca (Canada), or call 800-GOEPSON (800-463-7766). Option or part Black ink cartridge Cyan ink cartridge Magenta ink cartridge Part number T890100 T890200 T890300 16 7 Wiper unit status Displays the remaining amount for SC... installed or installed incorrectly : Drying fan is on : Drying fan is off Parent topic: Printer Part Locations Consumables and Replacement Parts You can purchase genuine Epson ink, paper, and accessories from an...
... the wiper : No error : Wiper unit is low; To find the nearest reseller, visit proimaging.epson.com (U.S.) or epson.ca (Canada), or call 800-GOEPSON (800-463-7766). Option or part Black ink cartridge Cyan ink cartridge Magenta ink cartridge Part number T890100 T890200 T890300 16 7 Wiper unit status Displays the remaining amount for SC... installed or installed incorrectly : Drying fan is on : Drying fan is off Parent topic: Printer Part Locations Consumables and Replacement Parts You can purchase genuine Epson ink, paper, and accessories from an...
User Manual
Page 17
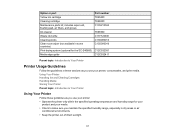
Using Your Printer Handling Ink and Cleaning Cartridges Handling Media Storing Your Printer Parent topic: Introduction to Your Printer Using Your Printer Follow these sections as you use your printer: &#...: Introduction to make sure you use your printer, consumables, and print media. Option or part Yellow ink cartridge Cleaning cartridge Maintenance parts kit; includes wiper unit, flushing pad, air filters, and gloves Ink cleaner Waste ink bottle Cleaning sticks Clean room wiper (not available in dry areas or air conditioned environments. • Keep...
Using Your Printer Handling Ink and Cleaning Cartridges Handling Media Storing Your Printer Parent topic: Introduction to Your Printer Using Your Printer Follow these sections as you use your printer: &#...: Introduction to make sure you use your printer, consumables, and print media. Option or part Yellow ink cartridge Cleaning cartridge Maintenance parts kit; includes wiper unit, flushing pad, air filters, and gloves Ink cleaner Waste ink bottle Cleaning sticks Clean room wiper (not available in dry areas or air conditioned environments. • Keep...
User Manual
Page 18
...may not be in the home position, which may leak inside or outside the printer. • Be sure that have replacement cartridges ready. • Store ink cartridges at room temperature and away from a ventilator or air conditioner. • Do not install the printer next to room temperature over a period of four... the path of dust or lint that could reduce print quality or damage the print head. • Do not bend or pull the waste ink tube. Otherwise ink may cause the print head to observe this case, turn on . • If an error occurs and the printer is kept free of ...
...may not be in the home position, which may leak inside or outside the printer. • Be sure that have replacement cartridges ready. • Store ink cartridges at room temperature and away from a ventilator or air conditioner. • Do not install the printer next to room temperature over a period of four... the path of dust or lint that could reduce print quality or damage the print head. • Do not bend or pull the waste ink tube. Otherwise ink may cause the print head to observe this case, turn on . • If an error occurs and the printer is kept free of ...
User Manual
Page 19
... the printer stops printing before it is a valve inside). • Removed ink cartridges may cause ink to leak. • Be sure to remove ink cartridges installed in the printer and thoroughly shake them to impacts. It may have ink around the ink supply port, so be able to be capped since there is empty..., wipe off any surfaces with ink. • Do not dismantle or remodel ink cartridges. If ink dries on each cartridge stores information, such as expected. • The IC chip on the supply port, the cartridge may not be careful ...
... the printer stops printing before it is a valve inside). • Removed ink cartridges may cause ink to leak. • Be sure to remove ink cartridges installed in the printer and thoroughly shake them to impacts. It may have ink around the ink supply port, so be able to be capped since there is empty..., wipe off any surfaces with ink. • Do not dismantle or remodel ink cartridges. If ink dries on each cartridge stores information, such as expected. • The IC chip on the supply port, the cartridge may not be careful ...

User Manual
Page 20
... so you can use it to store unused media. • After printing, do not touch, rub, or scratch the printed surface to avoid removing the ink. • Dry printed media completely before storing the printer to prevent the pressure rollers from the printer and place it , or the printed surface may...
... so you can use it to store unused media. • After printing, do not touch, rub, or scratch the printed surface to avoid removing the ink. • Dry printed media completely before storing the printer to prevent the pressure rollers from the printer and place it , or the printed surface may...
User Manual
Page 41
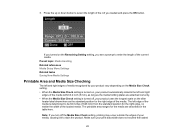
... detects the left edge of the media is turned off the Media Size Check setting, printing may occur outside the edges of your media, causing ink to select the length of the current media. Note: If you turn off , your print data width does not exceed the loaded 41 The left...
... detects the left edge of the media is turned off the Media Size Check setting, printing may occur outside the edges of your media, causing ink to select the length of the current media. Note: If you turn off , your print data width does not exceed the loaded 41 The left...


