User Manual
Page 2
Contents Unpacking and assembling the printer 2 Assembling the stand ...3 Mounting the printer on the stand 6 Attaching the support bar ...9 Attaching the paper basket ...12 Completing setup and connecting the power cord 16 Installing ink ...18 Installing the internal print server 21 Loading roll paper ...23 Loading roll paper in the printer 23 Aligning the print head ...29 Connecting to your system ...29 Installing the software ...31 Updating your printer firmware ...31 Checking the current firmware version 31 Updating the firmware ...31 Configuring the printer for your network 32
Contents Unpacking and assembling the printer 2 Assembling the stand ...3 Mounting the printer on the stand 6 Attaching the support bar ...9 Attaching the paper basket ...12 Completing setup and connecting the power cord 16 Installing ink ...18 Installing the internal print server 21 Loading roll paper ...23 Loading roll paper in the printer 23 Aligning the print head ...29 Connecting to your system ...29 Installing the software ...31 Updating your printer firmware ...31 Checking the current firmware version 31 Updating the firmware ...31 Configuring the printer for your network 32

User Manual
Page 17
... any packing tape and plastic film. Open the roll paper cover and remove the tape and packing material. 4. Check these areas: • front cover • ink compartment covers • maintenance tanks 3. Unlock the casters and move the printer to ship the printer. 5. 16 | Completing setup and connecting the power cord Completing...
... any packing tape and plastic film. Open the roll paper cover and remove the tape and packing material. 4. Check these areas: • front cover • ink compartment covers • maintenance tanks 3. Unlock the casters and move the printer to ship the printer. 5. 16 | Completing setup and connecting the power cord Completing...
User Manual
Page 19
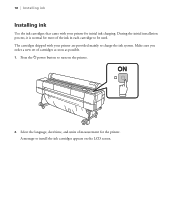
The cartridges shipped with your printer are provided mainly to charge the ink system. A message to turn on the LCD screen. Press the P power button to install the ink cartridges appears on the printer. 2. Make sure you order a new set of the ink in each cartridge to be used. Select the language, date/time, and units of measurement for initial ink charging. 18 | Installing ink Installing ink Use the ink cartridges that came with your printer for the printer. During the initial installation process, it is normal for most of cartridges as soon as possible. 1.
The cartridges shipped with your printer are provided mainly to charge the ink system. A message to turn on the LCD screen. Press the P power button to install the ink cartridges appears on the printer. 2. Make sure you order a new set of the ink in each cartridge to be used. Select the language, date/time, and units of measurement for initial ink charging. 18 | Installing ink Installing ink Use the ink cartridges that came with your printer for the printer. During the initial installation process, it is normal for most of cartridges as soon as possible. 1.
User Manual
Page 20
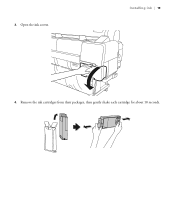
Remove the ink cartridges from their packages, then gently shake each cartridge for about 10 seconds. Installing ink | 19 4. Open the ink covers. 3.
Remove the ink cartridges from their packages, then gently shake each cartridge for about 10 seconds. Installing ink | 19 4. Open the ink covers. 3.
User Manual
Page 21
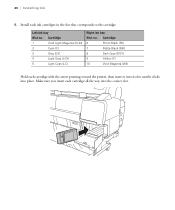
Cartridge 1 Vivid Light Magenta (VLM) 2 Cyan (C) 3 Gray (GY) 4 Light Gray (LGY) 5 Light Cyan (LC) Right ink bay Slot no . 20 | Installing ink 5. Install each cartridge all the way into place. Cartridge 6 Photo Black (PK) 7 Matte Black (MK) 8 Dark Gray (DGY) 9 Yellow (Y) 10 Vivid Magenta (VM) Hold each cartridge with the arrow pointing toward the printer, then insert it into its slot until it clicks into the correct slot. Make sure you insert each ink cartridges in the slot that corresponds to the cartridge. Left ink bay Slot no .
Cartridge 1 Vivid Light Magenta (VLM) 2 Cyan (C) 3 Gray (GY) 4 Light Gray (LGY) 5 Light Cyan (LC) Right ink bay Slot no . 20 | Installing ink 5. Install each cartridge all the way into place. Cartridge 6 Photo Black (PK) 7 Matte Black (MK) 8 Dark Gray (DGY) 9 Yellow (Y) 10 Vivid Magenta (VM) Hold each cartridge with the arrow pointing toward the printer, then insert it into its slot until it clicks into the correct slot. Make sure you insert each ink cartridges in the slot that corresponds to the cartridge. Left ink bay Slot no .
User Manual
Page 22
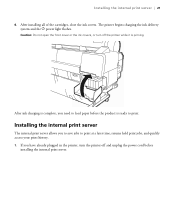
... plugged in the printer, turn off and unplug the power cord before the product is priming. Caution: Do not open the front cover or the ink covers, or turn the printer off the printer while it is ready to print. After installing all of the cartridges, close the... ink covers. Installing the internal print server The internal print server allows you need to print at a later time, resume held print jobs, and quickly access ...
... plugged in the printer, turn off and unplug the power cord before the product is priming. Caution: Do not open the front cover or the ink covers, or turn the printer off the printer while it is ready to print. After installing all of the cartridges, close the... ink covers. Installing the internal print server The internal print server allows you need to print at a later time, resume held print jobs, and quickly access ...
User Manual
Page 5
... Paper Menu Settings...132 Setup Menu Settings ...136 Replacing Ink Cartridges ...145 Checking Ink and Maintenance Box Status With Windows 145 Checking Cartridge Status with OS X 146 Purchase Epson Ink Cartridges and Maintenance Boxes 147 Ink Cartridge and Maintenance Box Part Numbers 147 Removing and Installing Ink Cartridges 148 Replacing Maintenance Boxes...152 Adjusting Print Quality...
... Paper Menu Settings...132 Setup Menu Settings ...136 Replacing Ink Cartridges ...145 Checking Ink and Maintenance Box Status With Windows 145 Checking Cartridge Status with OS X 146 Purchase Epson Ink Cartridges and Maintenance Boxes 147 Ink Cartridge and Maintenance Box Part Numbers 147 Removing and Installing Ink Cartridges 148 Replacing Maintenance Boxes...152 Adjusting Print Quality...
User Manual
Page 6
... 201 Overall Print Quality is Poor...201 Lines Are Misaligned ...203 Prints are Scuffed or Smeared ...203 Margins Appear in Borderless Prints 204 Too Much Ink is Consumed ...204 6
... 201 Overall Print Quality is Poor...201 Lines Are Misaligned ...203 Prints are Scuffed or Smeared ...203 Margins Appear in Borderless Prints 204 Too Much Ink is Consumed ...204 6
User Manual
Page 7
...206 Windows System Requirements ...206 Mac System Requirements ...207 Paper Specifications ...207 Printable Area Specifications ...209 Ink Cartridge Specifications...212 Dimension Specifications ...213 Electrical Specifications ...213 Environmental Specifications ...214 Interface Specifications ...214 Safety... and Approvals Specifications 214 Notices ...215 Important Safety Instructions...215 General Product Safety Instructions 215 Ink Cartridge Safety Instructions 217 FCC Compliance Statement...218 Open Source Software License ...219 Trademarks ...228 Copyright Notice......
...206 Windows System Requirements ...206 Mac System Requirements ...207 Paper Specifications ...207 Printable Area Specifications ...209 Ink Cartridge Specifications...212 Dimension Specifications ...213 Electrical Specifications ...213 Environmental Specifications ...214 Interface Specifications ...214 Safety... and Approvals Specifications 214 Notices ...215 Important Safety Instructions...215 General Product Safety Instructions 215 Ink Cartridge Safety Instructions 217 FCC Compliance Statement...218 Open Source Software License ...219 Trademarks ...228 Copyright Notice......
User Manual
Page 10
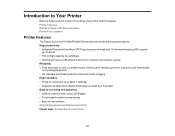
...: High productivity • Advanced PrecisionCore MicroTFP Piezo-based print head with 10 channels featuring 800 nozzles per channel • 700 ml high-capacity ink cartridges • Internal print server offloads print data from computer and network quickly Reliability • Fully automatic or user controlled nozzle checking and cleaning... Introduction to learn more about your printer and this manual. Printer Features Notations Used in the Documentation Printer Part Locations Printer Features The Epson SureColor P10000/P20000 Series printers include these sections to Your Printer 10
...: High productivity • Advanced PrecisionCore MicroTFP Piezo-based print head with 10 channels featuring 800 nozzles per channel • 700 ml high-capacity ink cartridges • Internal print server offloads print data from computer and network quickly Reliability • Fully automatic or user controlled nozzle checking and cleaning... Introduction to learn more about your printer and this manual. Printer Features Notations Used in the Documentation Printer Part Locations Printer Features The Epson SureColor P10000/P20000 Series printers include these sections to Your Printer 10
User Manual
Page 11
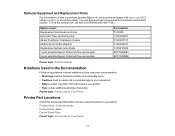
... Parts - Option or part Replacement maintenance ink box Automatic Take-Up Reel system Adobe PostScript 3 hardware module Additional roll media adapters Replacement printer cutter blade 1-year extended Epson Preferred Plus service plan 2-year extended Epson Preferred Plus service plan Part number T619300 ...carefully to avoid bodily injury. • Cautions must be observed to avoid damage to purchase genuine Epson ink, accessories and paper visit epson.com (U.S. Product Parts - To find the nearest one, call 800-GO-EPSON (800-463-7766). You can also purchase accessories from an...
... Parts - Option or part Replacement maintenance ink box Automatic Take-Up Reel system Adobe PostScript 3 hardware module Additional roll media adapters Replacement printer cutter blade 1-year extended Epson Preferred Plus service plan 2-year extended Epson Preferred Plus service plan Part number T619300 ...carefully to avoid bodily injury. • Cautions must be observed to avoid damage to purchase genuine Epson ink, accessories and paper visit epson.com (U.S. Product Parts - To find the nearest one, call 800-GO-EPSON (800-463-7766). You can also purchase accessories from an...
User Manual
Page 12
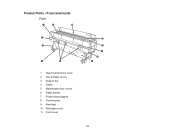
Product Parts - Front and Inside Front 1 Head maintenance cover 2 Ink cartridge covers 3 Support bar 4 Caster 5 Maintenance box covers 6 Paper basket 7 Poster board support 8 Control panel 9 Alert light 10 Roll paper cover 11 Front cover 12
Product Parts - Front and Inside Front 1 Head maintenance cover 2 Ink cartridge covers 3 Support bar 4 Caster 5 Maintenance box covers 6 Paper basket 7 Poster board support 8 Control panel 9 Alert light 10 Roll paper cover 11 Front cover 12

User Manual
Page 17
Press the Menu button to display the Paper menu. 17 Displays information about the print jobs in the print queue. 8 Up and down arrow buttons 9 OK button 10 ink tab info button 11 maintenance button 12 pause/cancel button 13 cut/feed media button LCD Screen Display 1 Status messages 2 Information display area with the 5 tabs described in the next table Print status tab Paper status tab Displays information about the loaded paper, such as roll width and amount of paper remaining. Press the Menu button to display the Print Job menu.
Press the Menu button to display the Paper menu. 17 Displays information about the print jobs in the print queue. 8 Up and down arrow buttons 9 OK button 10 ink tab info button 11 maintenance button 12 pause/cancel button 13 cut/feed media button LCD Screen Display 1 Status messages 2 Information display area with the 5 tabs described in the next table Print status tab Paper status tab Displays information about the loaded paper, such as roll width and amount of paper remaining. Press the Menu button to display the Print Job menu.

User Manual
Page 18
...the Menu button to display the Maintenance menu. : Maintenance box is almost full; check the displayed message and clear the error : Ink cartridge is incompatible, or the printer does not recognize it, or the slider is full; Maintenance tab The maintenance box status indicates ...the maintenance box level and changes from normal to warning or error status if necessary. : Ink cartridge error; Parent topic: Printer Part Locations 18 Ink Cartridge Status The ink cartridge status changes from normal (left) to warning or error status (right) if necessary. prepare a...
...the Menu button to display the Maintenance menu. : Maintenance box is almost full; check the displayed message and clear the error : Ink cartridge is incompatible, or the printer does not recognize it, or the slider is full; Maintenance tab The maintenance box status indicates ...the maintenance box level and changes from normal to warning or error status if necessary. : Ink cartridge error; Parent topic: Printer Part Locations 18 Ink Cartridge Status The ink cartridge status changes from normal (left) to warning or error status (right) if necessary. prepare a...

User Manual
Page 39
... varies by country. You can also purchase accessories from an Epson authorized reseller. To find the nearest one, call 800-GO-EPSON (800-463-7766). Available Epson Papers For information on how to purchase genuine Epson ink, accessories and paper visit epson.com (U.S. Paper Type Size Epson Cold Press Bright 13 × 19 inches (330 × 483...
... varies by country. You can also purchase accessories from an Epson authorized reseller. To find the nearest one, call 800-GO-EPSON (800-463-7766). Available Epson Papers For information on how to purchase genuine Epson ink, accessories and paper visit epson.com (U.S. Paper Type Size Epson Cold Press Bright 13 × 19 inches (330 × 483...

User Manual
Page 82
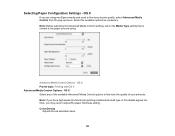
Color Density Adjusts the ink saturation level. This lets you may need to dry. Drying Time per Print Head Pass Pauses print head movement for up to 5 seconds after each pass to allow ink to adjust the Paper Thickness setting. Note: If you have high speed (bi-directional) printing enabled and small type or fine details appear too thick, you print with non-Epson media and avoid smearing the ink. 82
Color Density Adjusts the ink saturation level. This lets you may need to dry. Drying Time per Print Head Pass Pauses print head movement for up to 5 seconds after each pass to allow ink to adjust the Paper Thickness setting. Note: If you have high speed (bi-directional) printing enabled and small type or fine details appear too thick, you print with non-Epson media and avoid smearing the ink. 82
User Manual
Page 102
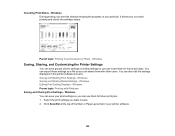
... can share them for future print jobs. 1. Click Save/Del at the top of your print settings so you want to control printing and check ink cartridge status. Saving and Sharing Print Settings - It allows you can also edit the settings displayed in your printer software. 102 Checking Print Status - Windows...
... can share them for future print jobs. 1. Click Save/Del at the top of your print settings so you want to control printing and check ink cartridge status. Saving and Sharing Print Settings - It allows you can also edit the settings displayed in your printer software. 102 Checking Print Status - Windows...

User Manual
Page 114
... does not support this option, print black-and-white photos using the EPSON Precision Dot setting. • Select Grayscale when using plain paper. 114 Note: The setting may change depending on the control panel. 11. Note: The Ink setting may not exactly match the name of photo paper. If your ...paper. See the list of paper you loaded as the Print Mode setting: • Select EPSON Precision Dot for details. Check the media type settings list for ...
... does not support this option, print black-and-white photos using the EPSON Precision Dot setting. • Select Grayscale when using plain paper. 114 Note: The setting may change depending on the control panel. 11. Note: The Ink setting may not exactly match the name of photo paper. If your ...paper. See the list of paper you loaded as the Print Mode setting: • Select EPSON Precision Dot for details. Check the media type settings list for ...
User Manual
Page 123
... the ink saturation level. 123 OS X Parent topic: Printing with OS X Advanced Media Control Options - OS X Select any of your printouts. Note: If you have high speed (bi-directional) printing enabled and small type or fine details appear too thick, you may need to the paper you are using non-Epson media...
... the ink saturation level. 123 OS X Parent topic: Printing with OS X Advanced Media Control Options - OS X Select any of your printouts. Note: If you have high speed (bi-directional) printing enabled and small type or fine details appear too thick, you may need to the paper you are using non-Epson media...
User Manual
Page 124
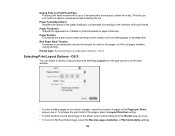
... the print order of the pages, select a Layout Direction setting. • To print borders around each pass to allow ink to dry. This lets you print with non-Epson media and avoid smearing the ink. Parent topic: Selecting Paper Configuration Settings - OS X Selecting Print Layout Options - Drying Time per Print Head Pass Pauses...
... the print order of the pages, select a Layout Direction setting. • To print borders around each pass to allow ink to dry. This lets you print with non-Epson media and avoid smearing the ink. Parent topic: Selecting Paper Configuration Settings - OS X Selecting Print Layout Options - Drying Time per Print Head Pass Pauses...


