User Manual
Page 19
During the initial installation process, it is normal for most of measurement for initial ink charging. Select the language, date/time, and units of the ink in each cartridge to charge the ink system. The cartridges shipped with your printer are provided mainly to be used. A message to turn on the LCD screen. Press the P power button to install the ink cartridges appears on the printer. 2. 18 | Installing ink Installing ink Use the ink cartridges that came with your printer for the printer. Make sure you order a new set of cartridges as soon as possible. 1.
During the initial installation process, it is normal for most of measurement for initial ink charging. Select the language, date/time, and units of the ink in each cartridge to charge the ink system. The cartridges shipped with your printer are provided mainly to be used. A message to turn on the LCD screen. Press the P power button to install the ink cartridges appears on the printer. 2. 18 | Installing ink Installing ink Use the ink cartridges that came with your printer for the printer. Make sure you order a new set of cartridges as soon as possible. 1.
User Manual
Page 20
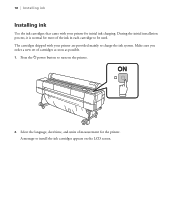
3. Remove the ink cartridges from their packages, then gently shake each cartridge for about 10 seconds. Open the ink covers. Installing ink | 19 4.
3. Remove the ink cartridges from their packages, then gently shake each cartridge for about 10 seconds. Open the ink covers. Installing ink | 19 4.
User Manual
Page 21
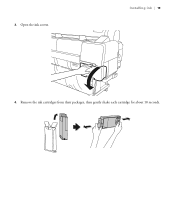
Cartridge 6 Photo Black (PK) 7 Matte Black (MK) 8 Dark Gray (DGY) 9 Yellow (Y) 10 Vivid Magenta (VM) Hold each cartridge with the arrow pointing toward the printer, then insert it into its slot until it clicks into the correct slot. 20 | Installing ink 5. Left ink bay Slot no . Install each cartridge all the way into place. Make sure you insert each ink cartridges in the slot that corresponds to the cartridge. Cartridge 1 Vivid Light Magenta (VLM) 2 Cyan (C) 3 Gray (GY) 4 Light Gray (LGY) 5 Light Cyan (LC) Right ink bay Slot no .
Cartridge 6 Photo Black (PK) 7 Matte Black (MK) 8 Dark Gray (DGY) 9 Yellow (Y) 10 Vivid Magenta (VM) Hold each cartridge with the arrow pointing toward the printer, then insert it into its slot until it clicks into the correct slot. 20 | Installing ink 5. Left ink bay Slot no . Install each cartridge all the way into place. Make sure you insert each ink cartridges in the slot that corresponds to the cartridge. Cartridge 1 Vivid Light Magenta (VLM) 2 Cyan (C) 3 Gray (GY) 4 Light Gray (LGY) 5 Light Cyan (LC) Right ink bay Slot no .
User Manual
Page 5
... Settings...130 Paper Menu Settings...132 Setup Menu Settings ...136 Replacing Ink Cartridges ...145 Checking Ink and Maintenance Box Status With Windows 145 Checking Cartridge Status with OS X 146 Purchase Epson Ink Cartridges and Maintenance Boxes 147 Ink Cartridge and Maintenance Box Part Numbers 147 Removing and Installing Ink Cartridges 148 Replacing Maintenance Boxes...152 Adjusting Print Quality...154 Print Head...
... Settings...130 Paper Menu Settings...132 Setup Menu Settings ...136 Replacing Ink Cartridges ...145 Checking Ink and Maintenance Box Status With Windows 145 Checking Cartridge Status with OS X 146 Purchase Epson Ink Cartridges and Maintenance Boxes 147 Ink Cartridge and Maintenance Box Part Numbers 147 Removing and Installing Ink Cartridges 148 Replacing Maintenance Boxes...152 Adjusting Print Quality...154 Print Head...
User Manual
Page 7
...206 Windows System Requirements ...206 Mac System Requirements ...207 Paper Specifications ...207 Printable Area Specifications ...209 Ink Cartridge Specifications...212 Dimension Specifications ...213 Electrical Specifications ...213 Environmental Specifications ...214 Interface Specifications ...214 Safety ...and Approvals Specifications 214 Notices ...215 Important Safety Instructions...215 General Product Safety Instructions 215 Ink Cartridge Safety Instructions 217 FCC Compliance Statement...218 Open Source Software License ...219 Trademarks ...228 Copyright Notice...229 ...
...206 Windows System Requirements ...206 Mac System Requirements ...207 Paper Specifications ...207 Printable Area Specifications ...209 Ink Cartridge Specifications...212 Dimension Specifications ...213 Electrical Specifications ...213 Environmental Specifications ...214 Interface Specifications ...214 Safety ...and Approvals Specifications 214 Notices ...215 Important Safety Instructions...215 General Product Safety Instructions 215 Ink Cartridge Safety Instructions 217 FCC Compliance Statement...218 Open Source Software License ...219 Trademarks ...228 Copyright Notice...229 ...
User Manual
Page 10
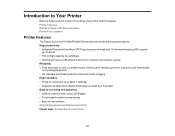
... Locations Printer Features The Epson SureColor P10000/P20000 Series printers include these sections to Your Printer 10 Introduction to Your Printer Refer to these special features: High productivity • Advanced PrecisionCore MicroTFP Piezo-based print head with 10 channels featuring 800 nozzles per channel • 700 ml high-capacity ink cartridges • Internal print server...
... Locations Printer Features The Epson SureColor P10000/P20000 Series printers include these sections to Your Printer 10 Introduction to Your Printer Refer to these special features: High productivity • Advanced PrecisionCore MicroTFP Piezo-based print head with 10 channels featuring 800 nozzles per channel • 700 ml high-capacity ink cartridges • Internal print server...
User Manual
Page 12
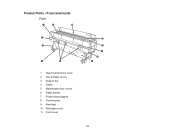
Product Parts - Front and Inside Front 1 Head maintenance cover 2 Ink cartridge covers 3 Support bar 4 Caster 5 Maintenance box covers 6 Paper basket 7 Poster board support 8 Control panel 9 Alert light 10 Roll paper cover 11 Front cover 12
Product Parts - Front and Inside Front 1 Head maintenance cover 2 Ink cartridge covers 3 Support bar 4 Caster 5 Maintenance box covers 6 Paper basket 7 Poster board support 8 Control panel 9 Alert light 10 Roll paper cover 11 Front cover 12

User Manual
Page 18
...various settings. When flashing, replace the ink cartridge. Parent topic: Printer Part Locations 18 Ink Cartridge Status The ink cartridge status changes from normal (left) to warning or error status if necessary. : Ink cartridge error; check the displayed message and clear the error : Ink cartridge is incompatible, or the printer does not...(right) if necessary. prepare a new maintenance box Setup tab : Maintenance box is unlocked : Check the displayed ink cartridge message : When not flashing, check the ink level in the ink cartridge, then replace the cartridge, if necessary.
...various settings. When flashing, replace the ink cartridge. Parent topic: Printer Part Locations 18 Ink Cartridge Status The ink cartridge status changes from normal (left) to warning or error status if necessary. : Ink cartridge error; check the displayed message and clear the error : Ink cartridge is incompatible, or the printer does not...(right) if necessary. prepare a new maintenance box Setup tab : Maintenance box is unlocked : Check the displayed ink cartridge message : When not flashing, check the ink level in the ink cartridge, then replace the cartridge, if necessary.
User Manual
Page 102
... also edit the settings displayed in your print settings so you can export these settings as a file so you want to control printing and check ink cartridge status. Windows Editing Print Setting Displays - Click Save/Del at the top of print settings or media settings so you can share them for future...
... also edit the settings displayed in your print settings so you can export these settings as a file so you want to control printing and check ink cartridge status. Windows Editing Print Setting Displays - Click Save/Del at the top of print settings or media settings so you can share them for future...

User Manual
Page 145
...go to replace it. You see this window: 145 To check your used ink cartridges to Epson for more than six months old, or if your Windows computer. 1. If you need to replace a cartridge that is expended. Note: Please dispose of your status, access the Windows Desktop..., double-click the product icon in accordance with OS X Purchase Epson Ink Cartridges and Maintenance Boxes Removing and Installing Ink Cartridges Replacing Maintenance Boxes Checking Ink and Maintenance Box Status With Windows You can check your ink or maintenance box status at any time using a utility on the ...
...go to replace it. You see this window: 145 To check your used ink cartridges to Epson for more than six months old, or if your Windows computer. 1. If you need to replace a cartridge that is expended. Note: Please dispose of your status, access the Windows Desktop..., double-click the product icon in accordance with OS X Purchase Epson Ink Cartridges and Maintenance Boxes Removing and Installing Ink Cartridges Replacing Maintenance Boxes Checking Ink and Maintenance Box Status With Windows You can check your ink or maintenance box status at any time using a utility on the ...

User Manual
Page 146
.... 1. You see a window like this: 3. Parent topic: Replacing Ink Cartridges Related tasks Removing and Installing Ink Cartridges Checking Cartridge Status with the product model, or improperly installed, Epson Status Monitor will not display an accurate ink status. Do the following as indicated on the screen. 2. Note: If any ink cartridge indicated on the screen. In the Apple menu or...
.... 1. You see a window like this: 3. Parent topic: Replacing Ink Cartridges Related tasks Removing and Installing Ink Cartridges Checking Cartridge Status with the product model, or improperly installed, Epson Status Monitor will not display an accurate ink status. Do the following as indicated on the screen. 2. Note: If any ink cartridge indicated on the screen. In the Apple menu or...

User Manual
Page 147
... number T800600 T800200 T800900 T800000 T800500 147 Parent topic: Replacing Ink Cartridges Related tasks Removing and Installing Ink Cartridges Purchase Epson Ink Cartridges and Maintenance Boxes For information on . sales) or epson.ca (Canadian sales). Note: For best printing results, use , and temperature. Other brands of ink cartridges and ink supplies are designed for printer setup and not for printing. For...
... number T800600 T800200 T800900 T800000 T800500 147 Parent topic: Replacing Ink Cartridges Related tasks Removing and Installing Ink Cartridges Purchase Epson Ink Cartridges and Maintenance Boxes For information on . sales) or epson.ca (Canadian sales). Note: For best printing results, use , and temperature. Other brands of ink cartridges and ink supplies are designed for printer setup and not for printing. For...

User Manual
Page 148
... of the ink cartridges are expended or any ink slots are empty. 1. Note: Replace all expended ink cartridges. Ink bay Right Slot Ink color 6 Photo Black (PK) 7 Matte Black (MK) 8 Dark Gray (DGY) 9 Yellow (Y) 10 Vivid Magenta (VM) 700 ml part number T800100 T800800 T800700 T800400 T800300 Parent topic: Purchase Epson Ink Cartridges and Maintenance Boxes Removing and Installing Ink Cartridges Make...
... of the ink cartridges are expended or any ink slots are empty. 1. Note: Replace all expended ink cartridges. Ink bay Right Slot Ink color 6 Photo Black (PK) 7 Matte Black (MK) 8 Dark Gray (DGY) 9 Yellow (Y) 10 Vivid Magenta (VM) 700 ml part number T800100 T800800 T800700 T800400 T800300 Parent topic: Purchase Epson Ink Cartridges and Maintenance Boxes Removing and Installing Ink Cartridges Make...

User Manual
Page 149
Insert your finger into the notch in the top of the cartridge and pull it straight out of the printer. 149 2. Open the ink cartridge cover. 3.
Insert your finger into the notch in the top of the cartridge and pull it straight out of the printer. 149 2. Open the ink cartridge cover. 3.

User Manual
Page 150
Do not take the used cartridges carefully. Remove the new cartridge from the package. Caution: Do not touch the green chip on your skin, wash it thoroughly with water. Keep ink cartridges out of the reach of used cartridge apart or try to refill it out and see a doctor right away. If ink gets into your mouth, spit it . If ink gets into your eyes, flush them immediately with soap and water. Then gently shake the cartridge for about ten seconds. Note: Dispose of children. 4. Warning: If ink gets on the cartridge. 150
Do not take the used cartridges carefully. Remove the new cartridge from the package. Caution: Do not touch the green chip on your skin, wash it thoroughly with water. Keep ink cartridges out of the reach of used cartridge apart or try to refill it out and see a doctor right away. If ink gets into your mouth, spit it . If ink gets into your eyes, flush them immediately with soap and water. Then gently shake the cartridge for about ten seconds. Note: Dispose of children. 4. Warning: If ink gets on the cartridge. 150

User Manual
Page 151
...printer is in the same environment as the printer. Install a full cartridge to enter the ink tubes, damaging the nozzles. Parent topic: Replacing Ink Cartridges 151 Note: Shake ink cartridges every 3 months after installation. 6. Caution: If you remove an ink cartridge for a cleaning,you see a prompt telling you can break the ...needle valve seal and allow air to complete the cleaning cycle. Always store ink cartridges with the arrow facing up ; At the end you that required for later use, protect the ink supply area from dirt and dust and store it clicks into place. Caution: ...
...printer is in the same environment as the printer. Install a full cartridge to enter the ink tubes, damaging the nozzles. Parent topic: Replacing Ink Cartridges 151 Note: Shake ink cartridges every 3 months after installation. 6. Caution: If you remove an ink cartridge for a cleaning,you see a prompt telling you can break the ...needle valve seal and allow air to complete the cleaning cycle. Always store ink cartridges with the arrow facing up ; At the end you that required for later use, protect the ink supply area from dirt and dust and store it clicks into place. Caution: ...

User Manual
Page 152
... on the LCD screen. Turn off your product. 3. The box will not absorb any more ink. 1. Open the maintenance box cover. 152 Related concepts Purchase Epson Ink Cartridges and Maintenance Boxes Replacing Maintenance Boxes The maintenance boxes absorb ink used in maintenance operations such as head cleaning. Replace the maintenance boxes when you see a message...
... on the LCD screen. Turn off your product. 3. The box will not absorb any more ink. 1. Open the maintenance box cover. 152 Related concepts Purchase Epson Ink Cartridges and Maintenance Boxes Replacing Maintenance Boxes The maintenance boxes absorb ink used in maintenance operations such as head cleaning. Replace the maintenance boxes when you see a message...

User Manual
Page 153
Use the handle on the bottom of the maintenance box to carefully lift it straight up, then pull it out of the product without tilting the box. 6. Insert the new maintenance box in the bag supplied with the new box and seal the bag. 7. Parent topic: Replacing Ink Cartridges 153 Place the used maintenance box in the slot. 5.
Use the handle on the bottom of the maintenance box to carefully lift it straight up, then pull it out of the product without tilting the box. 6. Insert the new maintenance box in the bag supplied with the new box and seal the bag. 7. Parent topic: Replacing Ink Cartridges 153 Place the used maintenance box in the slot. 5.

User Manual
Page 154
If running these utilities does not solve the problem, you may not be able to clean it when a cartridge is expended, and may need to replace the ink cartridges. You can check for clogged nozzles. Make sure the correct paper type is loaded in the printer. 2. Press the maintenance button. 154 ... or align the print head. Make sure roll or cut sheet paper is selected. 3. Note: You cannot clean the print head if an ink cartridge is low. Adjusting Print Quality If your print quality declines, you may need to clean the print head nozzles. Print Head Maintenance Print Head ...
If running these utilities does not solve the problem, you may not be able to clean it when a cartridge is expended, and may need to replace the ink cartridges. You can check for clogged nozzles. Make sure the correct paper type is loaded in the printer. 2. Press the maintenance button. 154 ... or align the print head. Make sure roll or cut sheet paper is selected. 3. Note: You cannot clean the print head if an ink cartridge is low. Adjusting Print Quality If your print quality declines, you may need to clean the print head nozzles. Print Head Maintenance Print Head ...

User Manual
Page 157
... there are gaps or the pattern is clean Print head needs cleaning 7. The nozzle pattern prints. 6. Note: You cannot clean the print head if an ink cartridge is expended, and may not be able to see if there are no gaps, click Finish. 5. Cleaning the Print Head Using the Product Control Panel...
... there are gaps or the pattern is clean Print head needs cleaning 7. The nozzle pattern prints. 6. Note: You cannot clean the print head if an ink cartridge is expended, and may not be able to see if there are no gaps, click Finish. 5. Cleaning the Print Head Using the Product Control Panel...


