
Network Guide
Page 7
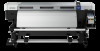
... detects protocols on your network using the network interface on a network. O This guide is called the network interface in this manual, automatically selects the correct standard when it automatically selects appropriate network protocols. About This Guide This Network Guide contains information about your...your network. The built-in Ethernet interface, which is written for use those protocols. If you can use the printer on the TCP/IP network and install the printer driver. Use the Software Disc to use on the TCP/IP network at once. In addition, it connects to...
... detects protocols on your network using the network interface on a network. O This guide is called the network interface in this manual, automatically selects the correct standard when it automatically selects appropriate network protocols. About This Guide This Network Guide contains information about your...your network. The built-in Ethernet interface, which is written for use those protocols. If you can use the printer on the TCP/IP network and install the printer driver. Use the Software Disc to use on the TCP/IP network at once. In addition, it connects to...
Network Guide
Page 8
... the following environments. O The supported operating systems are different depending on the operations of the Network Interface O Connects your Epson printer using a built-in this guide. "Administrator" is called the network interface in this manual, to the network. O Supports 10Base-T, 100Base-TX, and 1000Base-T Ethernet. O Some screen shots in this guide may list...
... the following environments. O The supported operating systems are different depending on the operations of the Network Interface O Connects your Epson printer using a built-in this guide. "Administrator" is called the network interface in this manual, to the network. O Supports 10Base-T, 100Base-TX, and 1000Base-T Ethernet. O Some screen shots in this guide may list...

Network Guide
Page 17
... setup.exe on your computer. 1. Click the Agree button to instal the printer driver manually. See the section in this chapter appropriate for use on the TCP/IP network and install the printer driver on the Software Disc. 4. Software installation starts. The following section explains...To print via a network, make sure to the network printer, you see the User Account Control screen, click Yes or Continue. 3. Installing the Printer Driver About Installing the Printer Driver To print to select the Epson Driver and Utilities check box and EpsonNet Configuration Utility check box...
... setup.exe on your computer. 1. Click the Agree button to instal the printer driver manually. See the section in this chapter appropriate for use on the TCP/IP network and install the printer driver on the Software Disc. 4. Software installation starts. The following section explains...To print via a network, make sure to the network printer, you see the User Account Control screen, click Yes or Continue. 3. Installing the Printer Driver About Installing the Printer Driver To print to select the Epson Driver and Utilities check box and EpsonNet Configuration Utility check box...
Network Guide
Page 18
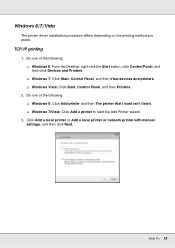
Click Add a local printer or Add a local printer or network printer with manual settings, and then click Next. TCP/IP printing 1. Do one of the following : O Windows 8: From the Desktop, right click the Start button, click Control Panel, and then click Devices and Printers. O Windows 7: Click Start, Control Panel, and then View devices and printers. Do one...
Click Add a local printer or Add a local printer or network printer with manual settings, and then click Next. TCP/IP printing 1. Do one of the following : O Windows 8: From the Desktop, right click the Start button, click Control Panel, and then click Devices and Printers. O Windows 7: Click Start, Control Panel, and then View devices and printers. Do one...
Network Guide
Page 29
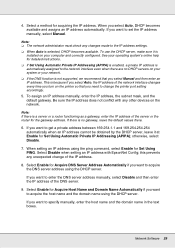
...Enable for acquiring the IP address. Note: O The network administrator must check any unexpected change the printer port setting accordingly. 5. See your network. Note: If there is no DHCP servers on the printer so that you need to get a private address between 169.254.1.1 and 169.254.254.254 ...the subnet mask, and the default gateway. Select Enable for the gateway address. Network Software 29 If you want to set the IP address manually, select Manual. If you want to the IP address settings. Select a method for Set Using PING. To use the DHCP server, make sure it at...
...Enable for acquiring the IP address. Note: O The network administrator must check any unexpected change the printer port setting accordingly. 5. See your network. Note: If there is no DHCP servers on the printer so that you need to get a private address between 169.254.1.1 and 169.254.254.254 ...the subnet mask, and the default gateway. Select Enable for the gateway address. Network Software 29 If you want to set the IP address manually, select Manual. If you want to the IP address settings. Select a method for Set Using PING. To use the DHCP server, make sure it at...
Network Guide
Page 31
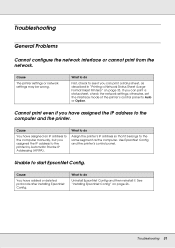
...Unable to Auto or Option. See "Installing EpsonNet Config" on page 33. Troubleshooting 31 Use EpsonNet Config and the printer's control panel. Cause The printer settings or network settings may be wrong. Troubleshooting General Problems Cannot configure the network interface or cannot print from the...in "Printing a Network Status Sheet (Large Format Inkjet Printers)" on page 26. Cause You have assigned an IP address to the computer and the printer. Cause You have assigned the IP address to the computer manually, but you have added or deleted protocols after installing...
...Unable to Auto or Option. See "Installing EpsonNet Config" on page 33. Troubleshooting 31 Use EpsonNet Config and the printer's control panel. Cause The printer settings or network settings may be wrong. Troubleshooting General Problems Cannot configure the network interface or cannot print from the...in "Printing a Network Status Sheet (Large Format Inkjet Printers)" on page 26. Cause You have assigned an IP address to the computer and the printer. Cause You have assigned the IP address to the computer manually, but you have added or deleted protocols after installing...

Network Guide
Page 34
...of your operating system for more information about settings on the printer's control panel. Press the Up or Down button until IP Address Setting appears. Press the Up or down button until Network Setup appears. O Choose Panel when manually setting the IP address, subnet mask, and default gateway using... EpsonNet Config with Web Browser. See the online help of the following to obtain an IP address: O Choose Auto when getting the IP address from the DHCP server whenever the printer is reset or ...
...of your operating system for more information about settings on the printer's control panel. Press the Up or Down button until IP Address Setting appears. Press the Up or down button until Network Setup appears. O Choose Panel when manually setting the IP address, subnet mask, and default gateway using... EpsonNet Config with Web Browser. See the online help of the following to obtain an IP address: O Choose Auto when getting the IP address from the DHCP server whenever the printer is reset or ...

User Manual
Page 8
...Printer Printer Part Locations Check the printer part illustrations to learn more about your printer. Back Control Panel Parts Parent topic: Introduction to your equipment. • Notes contain important information about your printer.... • Tips contain additional printing information. Inside Product Parts - Top and Sides Product Parts - Product Parts - Introduction to Your Printer Refer to... to avoid damage to Your Printer 8 Notations Used in the Documentation Printer Part Locations Consumables and Replacement Parts Printer Usage Guidelines Notations Used in...
...Printer Printer Part Locations Check the printer part illustrations to learn more about your printer. Back Control Panel Parts Parent topic: Introduction to your equipment. • Notes contain important information about your printer.... • Tips contain additional printing information. Inside Product Parts - Top and Sides Product Parts - Product Parts - Introduction to Your Printer Refer to... to avoid damage to Your Printer 8 Notations Used in the Documentation Printer Part Locations Consumables and Replacement Parts Printer Usage Guidelines Notations Used in...

User Manual
Page 41
... roll. Then press the OK button. 5. If the print quality has not improved, repeat the steps here and select the Manual(Bi-D) setting. 41 Parent topic: Media Handling Related references Printer Setup Menu Settings Aligning the Print Head If your printouts are printing bidirectionally on the leading edge of focus, you need...
... roll. Then press the OK button. 5. If the print quality has not improved, repeat the steps here and select the Manual(Bi-D) setting. 41 Parent topic: Media Handling Related references Printer Setup Menu Settings Aligning the Print Head If your printouts are printing bidirectionally on the leading edge of focus, you need...

User Manual
Page 70
... using the software RIP settings instead of media remaining on a roll. Choosing a larger gap than necessary can cause ink stains inside the printer, reduced print quality, or shorter product life. 70 Selects a number for the settings bank to use these menu settings correctly. Select ... on the current roll before you , from 3 to 3280 ft (1.0 to 999.5 m). Select Manual if banding persists after head cleaning and alignment . Enter the length at which the printer will alert you replace it. See the next table. Customize Settings options Options Current Settings Setting Name...
... using the software RIP settings instead of media remaining on a roll. Choosing a larger gap than necessary can cause ink stains inside the printer, reduced print quality, or shorter product life. 70 Selects a number for the settings bank to use these menu settings correctly. Select ... on the current roll before you , from 3 to 3280 ft (1.0 to 999.5 m). Select Manual if banding persists after head cleaning and alignment . Enter the length at which the printer will alert you replace it. See the next table. Customize Settings options Options Current Settings Setting Name...

User Manual
Page 71
... movement to the printed area. Blank Area Feed: speeds up feeding of blank areas, from 0.0 to 10.0 seconds. Printer Full Width: provides more precise tensioning (but slower printing). 71 Manual(Uni-D): if the previous setting does not improve the results. Set any of the following when print results are grainy... or out of focus: Manual(Bi-D): when printing in both directions. After Heater Feed: feeds media to increase the gap between the print head and thin or flexible media...
... movement to the printed area. Blank Area Feed: speeds up feeding of blank areas, from 0.0 to 10.0 seconds. Printer Full Width: provides more precise tensioning (but slower printing). 71 Manual(Uni-D): if the previous setting does not improve the results. Set any of the following when print results are grainy... or out of focus: Manual(Bi-D): when printing in both directions. After Heater Feed: feeds media to increase the gap between the print head and thin or flexible media...

User Manual
Page 72
... print quality, or shorter product life. Select On only if the media sticks to the platen when the printer is turned on how the media is off, select Manual and set the value based on the media width. Select 1.5 if print quality is creased, torn, stuck together, or if horizontal... banding appears. When you select Manual, you can set a value from 4 to 40 mil (0.1 to 6. Select Lv1 for most media. Description Select 2.0 for most media. Enter a media Input ...
... print quality, or shorter product life. Select On only if the media sticks to the platen when the printer is turned on how the media is off, select Manual and set the value based on the media width. Select 1.5 if print quality is creased, torn, stuck together, or if horizontal... banding appears. When you select Manual, you can set a value from 4 to 40 mil (0.1 to 6. Select Lv1 for most media. Description Select 2.0 for most media. Enter a media Input ...

User Manual
Page 73
...Restore Settings Print Description Selects how often tension is turned on the media width. Returns all RIP settings to the platen when the printer is measured and automatically adjusted: Periodically: recommended for most media Every page: provides more precise tensioning (but slower printing) Select Auto... the Media Feed Aligning the Print Head Adjusting Heating and Drying During Printing 73 When you select Manual, you can set the value higher than Lv28. When you select Manual, you can set the value lower than Lv28. Select Auto for most media. If banding appears...
...Restore Settings Print Description Selects how often tension is turned on the media width. Returns all RIP settings to the platen when the printer is measured and automatically adjusted: Periodically: recommended for most media Every page: provides more precise tensioning (but slower printing) Select Auto... the Media Feed Aligning the Print Head Adjusting Heating and Drying During Printing 73 When you select Manual, you can set the value higher than Lv28. When you select Manual, you can set the value lower than Lv28. Select Auto for most media. If banding appears...
User Manual
Page 76
... a heavier cleaning. Positions the print heads for Clogged Print Head Nozzles Cleaning the Print Head Replacing the Waste Ink Bottle Printer Status Menu Settings The Printer Status menu lets you enter network settings manually if necessary. 76 Setting Print Status Sheet Firmware Version Options Print xxxxxxx,x_xx,xxxx Description Prints a sheet showing current...
... a heavier cleaning. Positions the print heads for Clogged Print Head Nozzles Cleaning the Print Head Replacing the Waste Ink Bottle Printer Status Menu Settings The Printer Status menu lets you enter network settings manually if necessary. 76 Setting Print Status Sheet Firmware Version Options Print xxxxxxx,x_xx,xxxx Description Prints a sheet showing current...

User Manual
Page 77
... MM/DD/YY HH:MM Various languages m ft/in °C °F On Off On Off Description Sets the printer's built-in the Network Setup menu to their default settings Parent topic: Using the Control Panel Menus Preference Menu Settings... The Preference menu specifies language and other settings for the printer's controls. Enables the alert light when an error occurs. 77 Setting IP Address Setting Print Status Sheet Restore ...all items in clock. The time and date are obtained automatically through DHCP or manually.
... MM/DD/YY HH:MM Various languages m ft/in °C °F On Off On Off Description Sets the printer's built-in the Network Setup menu to their default settings Parent topic: Using the Control Panel Menus Preference Menu Settings... The Preference menu specifies language and other settings for the printer's controls. Enables the alert light when an error occurs. 77 Setting IP Address Setting Print Status Sheet Restore ...all items in clock. The time and date are obtained automatically through DHCP or manually.

User Manual
Page 102
...check in the lines. Press the maintenance button. The product prints a nozzle check pattern. 3. Parent topic: Print Head Maintenance Related references Printer Setup Menu Settings 102 If there are gaps or the pattern is clean and you visually inspect the printed check pattern and clean the ...nozzles: • Set up the product to see the Maintenance menu on the product's LCD screen. 2. There are gaps in the Printer Setup menu. • Manually run a nozzle check from the product control panel, as described here. 1. Nozzles are no gaps, the print head is faint, clean...
...check in the lines. Press the maintenance button. The product prints a nozzle check pattern. 3. Parent topic: Print Head Maintenance Related references Printer Setup Menu Settings 102 If there are gaps or the pattern is clean and you visually inspect the printed check pattern and clean the ...nozzles: • Set up the product to see the Maintenance menu on the product's LCD screen. 2. There are gaps in the Printer Setup menu. • Manually run a nozzle check from the product control panel, as described here. 1. Nozzles are no gaps, the print head is faint, clean...

User Manual
Page 103
... in all rows of nozzles in your printout may change when you see faint printing or gaps in only certain rows of nozzles in the Printer Setup menu. You can also set up or down arrow button to step 5. • Selected Nozzles: Select this cleaning level if you cannot ...clear the clogged nozzles after cleaning the print head, manually clean around the print head inside the product. 1. You can select from three levels of head cleaning: • Execute (Light): Use this cleaning level...
... in all rows of nozzles in your printout may change when you see faint printing or gaps in only certain rows of nozzles in the Printer Setup menu. You can also set up or down arrow button to step 5. • Selected Nozzles: Select this cleaning level if you cannot ...clear the clogged nozzles after cleaning the print head, manually clean around the print head inside the product. 1. You can select from three levels of head cleaning: • Execute (Light): Use this cleaning level...

User Manual
Page 149
... (3 m). Parent topic: Solving Printing Problems Cannot Print Over a Network If you cannot print over a network, try these solutions: • Make sure your printer is turned on . • If you have a spare cable, try connecting with a different Ethernet cable. • Try printing to a USB hub, make... sure the printer's IP address is set the IP address manually. • Check your wired LAN router or access point to see if the LED for the port to your computer instead of...
... (3 m). Parent topic: Solving Printing Problems Cannot Print Over a Network If you cannot print over a network, try these solutions: • Make sure your printer is turned on . • If you have a spare cable, try connecting with a different Ethernet cable. • Try printing to a USB hub, make... sure the printer's IP address is set the IP address manually. • Check your wired LAN router or access point to see if the LED for the port to your computer instead of...

User Manual
Page 150
...or media lengthened by water absorption at a high density take-up setting, creases that look like this may appear in the media in your printer is creased, try these solutions: • Check that the Feeding Tension and Feed Speed settings on the product control panel are correct for the... Set the Take-up Tension setting to disappear and do not turn off the printer. Wait a few moments for the message to Manual and decrease the tension values, or print on the product's LCD screen, the printer is adjusting its internal motor. Related references Network Setup Menu Settings Print Head Moves...
...or media lengthened by water absorption at a high density take-up setting, creases that look like this may appear in the media in your printer is creased, try these solutions: • Check that the Feeding Tension and Feed Speed settings on the product control panel are correct for the... Set the Take-up Tension setting to disappear and do not turn off the printer. Wait a few moments for the message to Manual and decrease the tension values, or print on the product's LCD screen, the printer is adjusting its internal motor. Related references Network Setup Menu Settings Print Head Moves...
User Manual
Page 154
... passes or higher for best results. • Perform the parallel adjustment procedures to correct the feed misalignment, especially after moving the printer. Parent topic: Solving Printing Problems Related references Media Setup Menu Settings Media Specifications Related tasks Loading Media Adjusting the Media Feeding Unit Adjusting... the Auto Take-up on , load media, run a nozzle check and, if necessary, clean the print heads. Manually rewind the media. 8. Caution: Do not leave the product turned off with the printable side in an uncapped position for Clogged Print ...
... passes or higher for best results. • Perform the parallel adjustment procedures to correct the feed misalignment, especially after moving the printer. Parent topic: Solving Printing Problems Related references Media Setup Menu Settings Media Specifications Related tasks Loading Media Adjusting the Media Feeding Unit Adjusting... the Auto Take-up on , load media, run a nozzle check and, if necessary, clean the print heads. Manually rewind the media. 8. Caution: Do not leave the product turned off with the printable side in an uncapped position for Clogged Print ...


