User Manual
Page 16
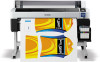
...; Do not bend or pull the waste ink tube. Replacement part Auto cutter spare blade Roll adapter Waste ink bottle Head maintenance kit Part number S902006 C12C811391 T724000 S210042 Parent topic: Introduction to Your Printer Printer Usage Guidelines Follow the guidelines in these guidelines as ...and humidity range for your product and your media. • Check to make sure you use your product or clog the print head nozzles. • Use the product in a sufficiently ventilated area. • Perform maintenance operations according to usage frequency or at the recommended intervals.
...; Do not bend or pull the waste ink tube. Replacement part Auto cutter spare blade Roll adapter Waste ink bottle Head maintenance kit Part number S902006 C12C811391 T724000 S210042 Parent topic: Introduction to Your Printer Printer Usage Guidelines Follow the guidelines in these guidelines as ...and humidity range for your product and your media. • Check to make sure you use your product or clog the print head nozzles. • Use the product in a sufficiently ventilated area. • Perform maintenance operations according to usage frequency or at the recommended intervals.
User Manual
Page 42
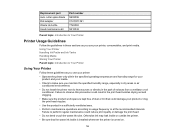
... replacement. Select when print results are still clogged, select a heavier cleaning. Replace Cutter: positions the cutter for cleaning using the head maintenance kit. Setting Nozzle Check Head Cleaning All Nozzles Selected Nozzles Head Alignment Options - Lets you reset the waste ink counter if you clean all or selected nozzles, based on the control panel. Adjusts...
... replacement. Select when print results are still clogged, select a heavier cleaning. Replace Cutter: positions the cutter for cleaning using the head maintenance kit. Setting Nozzle Check Head Cleaning All Nozzles Selected Nozzles Head Alignment Options - Lets you reset the waste ink counter if you clean all or selected nozzles, based on the control panel. Adjusts...
User Manual
Page 72
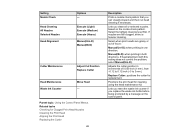
... the button. Press the OK button. Peel the backing off of the way. 5. Use the head maintenance kit that came with your product to prepare the head maintenance kit. 4. You see a message asking you to perform head maintenance. 1. The product moves the print head out of the pads in the product. 2. tab and press the OK 6. Open the printer...
... the button. Press the OK button. Peel the backing off of the way. 5. Use the head maintenance kit that came with your product to prepare the head maintenance kit. 4. You see a message asking you to perform head maintenance. 1. The product moves the print head out of the pads in the product. 2. tab and press the OK 6. Open the printer...
User Manual
Page 75
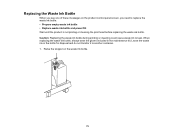
... product is not printing or cleaning the print head before replacing the waste ink bottle. When replacing the waste ink bottle, always wear the gloves included in the bottle for disposal and do not transfer it to leak. Leave the waste ink in the maintenance kit. Raise the stopper on the product control...
... product is not printing or cleaning the print head before replacing the waste ink bottle. When replacing the waste ink bottle, always wear the gloves included in the bottle for disposal and do not transfer it to leak. Leave the waste ink in the maintenance kit. Raise the stopper on the product control...
User Manual
Page 92
... topic: Solving Print Quality Problems Related references Consumables and Replacement Parts 92 If you still cannot clear the nozzles, contact Epson support. This can cause the print head to stop abruptly, resulting in the print (banding), try these solutions: • Run a nozzle check to see ...the image on at the strongest level, leave the product turned off overnight and check the nozzles again. Clean the area using the maintenance kit. • If nozzles are vertical or horizontal lines in uneven color. Since monitors and printers produce colors differently, printed colors and...
... topic: Solving Print Quality Problems Related references Consumables and Replacement Parts 92 If you still cannot clear the nozzles, contact Epson support. This can cause the print head to stop abruptly, resulting in the print (banding), try these solutions: • Run a nozzle check to see ...the image on at the strongest level, leave the product turned off overnight and check the nozzles again. Clean the area using the maintenance kit. • If nozzles are vertical or horizontal lines in uneven color. Since monitors and printers produce colors differently, printed colors and...
Warranty Statement
Page 5
...Epson (for in the Epson SureColor F6200 User's Guide. f. Note: See the Maintenance section of your location. Perform periodic nozzle checks and nozzle cleanings to prevent ink buildup around the print head and cap unit area as needed when there is cold let it warm to use , coverage of the Head Maintenance kit...printer was designed. Any damage caused by a service technician before the printer is returned to room temperature before using the Head Maintenance Kit. b. Check and replace the wiper, and wiper cleaner parts - e. If the printer is not being used with ...
...Epson (for in the Epson SureColor F6200 User's Guide. f. Note: See the Maintenance section of your location. Perform periodic nozzle checks and nozzle cleanings to prevent ink buildup around the print head and cap unit area as needed when there is cold let it warm to use , coverage of the Head Maintenance kit...printer was designed. Any damage caused by a service technician before the printer is returned to room temperature before using the Head Maintenance Kit. b. Check and replace the wiper, and wiper cleaner parts - e. If the printer is not being used with ...

