
Network Guide
Page 8
Features of the Network Interface ❏ Connects your Epson printer using a built-in Ethernet interface, which is called the network interface in this manual, to the network. ❏ Supports multiple protocols, such as TCP/IP and Bonjour. ❏ Supports both 10Base-T and 100Base-TX. ❏ Supports DHCP. ❏ Supports ...
Features of the Network Interface ❏ Connects your Epson printer using a built-in Ethernet interface, which is called the network interface in this manual, to the network. ❏ Supports multiple protocols, such as TCP/IP and Bonjour. ❏ Supports both 10Base-T and 100Base-TX. ❏ Supports DHCP. ❏ Supports ...
Network Guide
Page 17
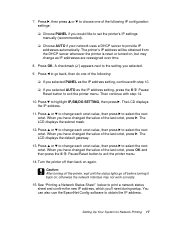
... lights go back, then do one of the following IP configuration settings: ❏ Choose PANEL if you would like to set the printer's IP settings manually (recommended). ❏ Choose AUTO if your network uses a DHCP server to choose one of the following: ❏ If you have changed the value of the...
... lights go back, then do one of the following IP configuration settings: ❏ Choose PANEL if you would like to set the printer's IP settings manually (recommended). ❏ Choose AUTO if your network uses a DHCP server to choose one of the following: ❏ If you have changed the value of the...
Network Guide
Page 19
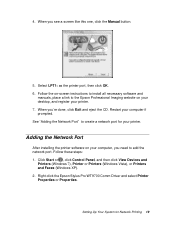
... port, then click OK. 6. Follow the on your desktop, and register your computer, you need to the Epson Professional Imaging website on -screen instructions to install all necessary software and manuals, place a link to add the network port. Restart your printer. Follow these steps: 1. When you 're... Printers and Faxes (Windows XP). 2. See "Adding the Network Port" to create a network port for Network Printing 19 4. Right-click the Epson Stylus Pro WT9700 Comm Driver and select Printer Properties or Properties. When you see a screen like this one, click the Manual button. 5.
... port, then click OK. 6. Follow the on your desktop, and register your computer, you need to the Epson Professional Imaging website on -screen instructions to install all necessary software and manuals, place a link to add the network port. Restart your printer. Follow these steps: 1. When you 're... Printers and Faxes (Windows XP). 2. See "Adding the Network Port" to create a network port for Network Printing 19 4. Right-click the Epson Stylus Pro WT9700 Comm Driver and select Printer Properties or Properties. When you see a screen like this one, click the Manual button. 5.
Network Guide
Page 24
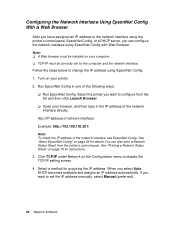
... the following ways: ❏ Run EpsonNet Config. See "About EpsonNet Config" on your computer. ❏ TCP/IP must be correctly set the IP address manually, select Manual (preferred). 24 Network Software Select the printer you want to change the IP address using EpsonNet Config with Web Browser. When you can also print...
... the following ways: ❏ Run EpsonNet Config. See "About EpsonNet Config" on your computer. ❏ TCP/IP must be correctly set the IP address manually, select Manual (preferred). 24 Network Software Select the printer you want to change the IP address using EpsonNet Config with Web Browser. When you can also print...
Network Guide
Page 25
... you turn on your network. ❏ If the Dynamic DNS function is not supported, we recommend that you want to enter the DNS server address manually, select Disable and then enter the IP address of the DNS server. 8. Network Software 25 Note: If there is a server or a router functioning as a... because if you select Auto, the IP address of the server or the router for Acquire DNS Server Address Automatically if you want to specify manually, enter the host name and the domain name in the text boxes. 9. otherwise, select Disable. 7. Select Enable for Acquire Host Name and Domain Name ...
... you turn on your network. ❏ If the Dynamic DNS function is not supported, we recommend that you want to enter the DNS server address manually, select Disable and then enter the IP address of the DNS server. 8. Network Software 25 Note: If there is a server or a router functioning as a... because if you select Auto, the IP address of the server or the router for Acquire DNS Server Address Automatically if you want to specify manually, enter the host name and the domain name in the text boxes. 9. otherwise, select Disable. 7. Select Enable for Acquire Host Name and Domain Name ...
Network Guide
Page 29
... not set correctly. Set a correct IP address for the computer. Troubleshooting 29 Cause What to do You have assigned an IP address to the computer manually, but its IP address is not installed on the computer, but you can print a status sheet, as the computer. Cause What to start EpsonNet Config...
... not set correctly. Set a correct IP address for the computer. Troubleshooting 29 Cause What to do You have assigned an IP address to the computer manually, but its IP address is not installed on the computer, but you can print a status sheet, as the computer. Cause What to start EpsonNet Config...
Product Brochure
Page 5
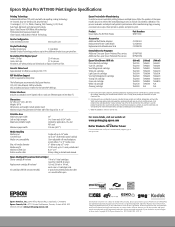
... Smallest droplet size 3.5 picoliters Variable Droplet Technology produces up to 1.5 mm posterboard 8.27" x 11" Rotary cutting, automatic and manual Epson Intelligent Pressurized Ink CartridgesB Starter cartridge fill volume 110 ml x 11 total cartridges (used 210 mm (8.27") Media Handling ...ll volumeC 150 ml, 350 ml or 700 ml, each (0.24" total) Limited by Epson America: CGS, EFI, Esko Artwork, GMG and Kodak. Product Epson Stylus Pro WT7900 Printer Part Numbers SPWT7900 Accessories Additional Roll Media Adapters Replacement Printer Cutter Blade Replacement Ink Maintenance ...
... Smallest droplet size 3.5 picoliters Variable Droplet Technology produces up to 1.5 mm posterboard 8.27" x 11" Rotary cutting, automatic and manual Epson Intelligent Pressurized Ink CartridgesB Starter cartridge fill volume 110 ml x 11 total cartridges (used 210 mm (8.27") Media Handling ...ll volumeC 150 ml, 350 ml or 700 ml, each (0.24" total) Limited by Epson America: CGS, EFI, Esko Artwork, GMG and Kodak. Product Epson Stylus Pro WT7900 Printer Part Numbers SPWT7900 Accessories Additional Roll Media Adapters Replacement Printer Cutter Blade Replacement Ink Maintenance ...
Warranty Statement
Page 7
... printer will usually be for repair. It is made after 1:00 PM, dispatch will not include promotional materials, accessories, stands, documentation, manuals, software, or cables.) The customer must be able to receive, unpack, and install the replacement printer, and prepare the defective printer for... to properly prepare the printer for return shipment by following receipt, and then return it in the user manual or documentation provided by Epson. Printer Exchange: Epson may, at its original container or equivalent. An adult must be available to 1:00 PM Pacific Time...
... printer will usually be for repair. It is made after 1:00 PM, dispatch will not include promotional materials, accessories, stands, documentation, manuals, software, or cables.) The customer must be able to receive, unpack, and install the replacement printer, and prepare the defective printer for... to properly prepare the printer for return shipment by following receipt, and then return it in the user manual or documentation provided by Epson. Printer Exchange: Epson may, at its original container or equivalent. An adult must be available to 1:00 PM Pacific Time...
User's Guide
Page 9
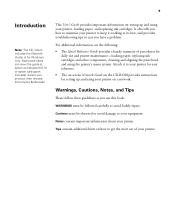
... maintenance-loading paper, replacing ink cartridges and other components, cleaning and aligning the print head, and using your product, then choose Documents & Manuals. Select your printer, loading paper, and replacing ink cartridges. For additional information, see the following: • The Quick Reference Guide provides...maintain your printer to keep it to your printer on setting up and using your equipment. Attach it working at epson.com/support (U.S.) or epson.ca/support (Canada). Cautions must be followed carefully to get the most out of procedures for daily use this ...
... maintenance-loading paper, replacing ink cartridges and other components, cleaning and aligning the print head, and using your product, then choose Documents & Manuals. Select your printer, loading paper, and replacing ink cartridges. For additional information, see the following: • The Quick Reference Guide provides...maintain your printer to keep it to your printer on setting up and using your equipment. Attach it working at epson.com/support (U.S.) or epson.ca/support (Canada). Cautions must be followed carefully to get the most out of procedures for daily use this ...

User's Guide
Page 15
Introduction | 15 Printer Parts These illustrations show the parts of the Epson Stylus Pro WT7900. Front Roll paper holder Front cover Roll paper cover Control panel Ink bay Film basket guide Ink bay Manual holder Casters Film basket Paper basket Back Optional SpectroProofer port Network interface port USB port Maintenance tank 15 AC inlet
Introduction | 15 Printer Parts These illustrations show the parts of the Epson Stylus Pro WT7900. Front Roll paper holder Front cover Roll paper cover Control panel Ink bay Film basket guide Ink bay Manual holder Casters Film basket Paper basket Back Optional SpectroProofer port Network interface port USB port Maintenance tank 15 AC inlet

User's Guide
Page 18
Unpack the stand and make sure you have all these items. Note: Make sure you tighten all bolts before moving to the next section. Insert the strut into the left side as shown. (The sides are labeled L and R.) 18 Lift the box up and away from the shipping pallet. Manual holder 6 Bolts 2 Sides Horizontal strut Hex wrench 2 Wing screws with lock washers 3. Then remove the box containing the stand and paper basket. 2. 18 | Setting Up the Printer Unpacking and Assembling the Stand 1.
Unpack the stand and make sure you have all these items. Note: Make sure you tighten all bolts before moving to the next section. Insert the strut into the left side as shown. (The sides are labeled L and R.) 18 Lift the box up and away from the shipping pallet. Manual holder 6 Bolts 2 Sides Horizontal strut Hex wrench 2 Wing screws with lock washers 3. Then remove the box containing the stand and paper basket. 2. 18 | Setting Up the Printer Unpacking and Assembling the Stand 1.

User's Guide
Page 34
Store the printer manuals in the holder. 2. Unlock the casters. Then move the printer to the left or right side of use. (The casters are meant for moving the printer for only a short distance.) Lock the casters after moving. 34 Attach the manual holder to the place of the stand. 34 | Setting Up the Printer Completing Setup and Connecting the Power Cord 1.
Store the printer manuals in the holder. 2. Unlock the casters. Then move the printer to the left or right side of use. (The casters are meant for moving the printer for only a short distance.) Lock the casters after moving. 34 Attach the manual holder to the place of the stand. 34 | Setting Up the Printer Completing Setup and Connecting the Power Cord 1.
User's Guide
Page 42
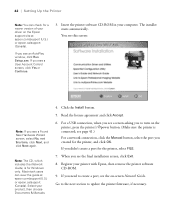
...button. (Make sure the printer is for Windows only. Select your printer with Epson, then remove the printer software CD-ROM. 9. Click the Install button. 5. Register your product, then choose Documents & Manuals. 4. Insert the printer software CD-ROM in your computer. Read the license... agreement and click Accept. 6. 42 | Setting Up the Printer Note: You can view the guide at epson.com/support (U.S.) or epson.ca/support (Canada). If you to ...
...button. (Make sure the printer is for Windows only. Select your printer with Epson, then remove the printer software CD-ROM. 9. Click the Install button. 5. Register your product, then choose Documents & Manuals. 4. Insert the printer software CD-ROM in your computer. Read the license... agreement and click Accept. 6. 42 | Setting Up the Printer Note: You can view the guide at epson.com/support (U.S.) or epson.ca/support (Canada). If you to ...
User's Guide
Page 43
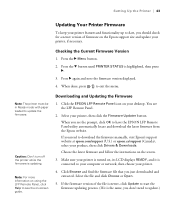
...Remote Panel icon on , its LCD displays READY, and it is the same, you don't need to download the firmware manually, visit Epson's support website at epson.com/support (U.S.) or epson.ca/support (Canada), select your product, then click Drivers & Downloads. If you need to update.) 43 If the firmware...Firmware Version 1. Note: For more information on using the LFP Remote Panel, click Help to have the EPSON LFP Remote Panel utility automatically locate and download the latest firmware from the Epson website. Select the file and click Choose or Open. 5. You see the prompt, click OK to...
...Remote Panel icon on , its LCD displays READY, and it is the same, you don't need to download the firmware manually, visit Epson's support website at epson.com/support (U.S.) or epson.ca/support (Canada), select your product, then click Drivers & Downloads. If you need to update.) 43 If the firmware...Firmware Version 1. Note: For more information on using the LFP Remote Panel, click Help to have the EPSON LFP Remote Panel utility automatically locate and download the latest firmware from the Epson website. Select the file and click Choose or Open. 5. You see the prompt, click OK to...

User's Guide
Page 56
... into position automatically, or press the button to the selected setting. 5. Cutting Film with the Built-in progress, or your settings. 7. Press OK to the manual cutting position. Press d or u to select ON, then press OK to stop. Press and release the button. When the selection menu appears, select CUT, then... press OK. 56 | Using Film and Other Media Note: Opening the front cover causes printing to save your print quality might be cut it manually. If the paper cannot be affected.
... into position automatically, or press the button to the selected setting. 5. Cutting Film with the Built-in progress, or your settings. 7. Press OK to the manual cutting position. Press d or u to select ON, then press OK to stop. Press and release the button. When the selection menu appears, select CUT, then... press OK. 56 | Using Film and Other Media Note: Opening the front cover causes printing to save your print quality might be cut it manually. If the paper cannot be affected.

User's Guide
Page 97
... ink that gets flushed from the Maintenance Menu on the LCD display. Run the Cutter Adjustment from the system during the initial ink charge and manual and automatic print head cleaning.
... ink that gets flushed from the Maintenance Menu on the LCD display. Run the Cutter Adjustment from the system during the initial ink charge and manual and automatic print head cleaning.

User's Guide
Page 111
see your SpectroProofer manual for instructions. 111 It's been a month since the white ink cartridge was shaken. To continue printing, you must shake the white ink cartridge. See page ... stops working. Solving Problems | 111 Message (in alphabetical order) SpectroProofer ERROR WRONG MAINT. TANK RIGHT SIDE MAINT. A non-genuine maintenance tank is a problem with a genuine Epson maintenance tank;
see your SpectroProofer manual for instructions. 111 It's been a month since the white ink cartridge was shaken. To continue printing, you must shake the white ink cartridge. See page ... stops working. Solving Problems | 111 Message (in alphabetical order) SpectroProofer ERROR WRONG MAINT. TANK RIGHT SIDE MAINT. A non-genuine maintenance tank is a problem with a genuine Epson maintenance tank;
User's Guide
Page 130
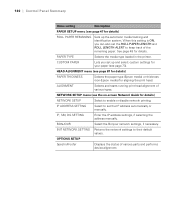
... to keep track of the remaining paper. HEAD ALIGNMENT menu (see page 87 for details) PAPER THICKNESS Selects the paper type (Epson media) or thickness (non-Epson media) for your paper (see page 73). PAPER TYPE Selects the media type loaded in the printer. CUSTOM PAPER Lets you ...can also set the ROLL PAPER LENGTH and ROLL LENGTH ALERT to enable or disable network printing. When this setting is ON, you set the IP address automatically or manually...
... to keep track of the remaining paper. HEAD ALIGNMENT menu (see page 87 for details) PAPER THICKNESS Selects the paper type (Epson media) or thickness (non-Epson media) for your paper (see page 73). PAPER TYPE Selects the media type loaded in the printer. CUSTOM PAPER Lets you ...can also set the ROLL PAPER LENGTH and ROLL LENGTH ALERT to enable or disable network printing. When this setting is ON, you set the IP address automatically or manually...
User's Guide
Page 131
..., 47 status check, printing, 81 to 82 Crystal Clear Film, 45 Custom paper settings, 113 Cut sheet paper, loading, 66 to 67 Cutter cutting paper manually, 56 ordering replacement, 10 replacing, 94 to 96 D Date and time setting, 92 Default settings, restoring, 92 to 93 Depth of printer, 122 Diagnosing problems... of printer, 122 Documentation, how to use, 9 E EDM status, checking, 82 Electrical specifications, 121 Energy consumption, 121 Environmental specifications, 121 ePlaten, 16, 125 to 126 Epson accessories, 10 help, 11 Preferred Limited Warranty Plan, 11
..., 47 status check, printing, 81 to 82 Crystal Clear Film, 45 Custom paper settings, 113 Cut sheet paper, loading, 66 to 67 Cutter cutting paper manually, 56 ordering replacement, 10 replacing, 94 to 96 D Date and time setting, 92 Default settings, restoring, 92 to 93 Depth of printer, 122 Diagnosing problems... of printer, 122 Documentation, how to use, 9 E EDM status, checking, 82 Electrical specifications, 121 Energy consumption, 121 Environmental specifications, 121 ePlaten, 16, 125 to 126 Epson accessories, 10 help, 11 Preferred Limited Warranty Plan, 11
User's Guide
Page 132
... Film basket assembling, 30 to 33 attaching, 59 to 63 storing, 64 Film, see Epson film Firmware, updating, 43 to 44 G Garbled characters, 115 Ghosting, 112 H Head Alignment menu, 87, 88... Height of printer, 122 Help, Epson, 11 Humidity requirements, 121 I Ink icons, 127 light, 16, 106 Ink cartridges checking status, ... Maintenance mode, 92 to 93 Maintenance tank checking status, 81 to 82 ordering, 10 replacing, 97 to 98 Manuals, how to use, 9 Margins default, 123 incorrect, 115 Media tracking, setting up, 48 Memory, requirements, ...
... Film basket assembling, 30 to 33 attaching, 59 to 63 storing, 64 Film, see Epson film Firmware, updating, 43 to 44 G Garbled characters, 115 Ghosting, 112 H Head Alignment menu, 87, 88... Height of printer, 122 Help, Epson, 11 Humidity requirements, 121 I Ink icons, 127 light, 16, 106 Ink cartridges checking status, ... Maintenance mode, 92 to 93 Maintenance tank checking status, 81 to 82 ordering, 10 replacing, 97 to 98 Manuals, how to use, 9 Margins default, 123 incorrect, 115 Media tracking, setting up, 48 Memory, requirements, ...


