Quick Reference Guide
Page 2
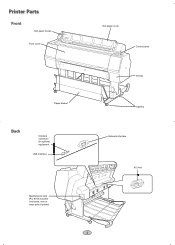
Printer Parts Front Roll paper holder Front cover Roll paper cover Control panel Paper basket Back Interface connector for optional equipment USB interface Ink bay Casters Network interface AC inlet Maintenance tank (Pro 9700 includes two tanks, one on each side of printer) 1
Printer Parts Front Roll paper holder Front cover Roll paper cover Control panel Paper basket Back Interface connector for optional equipment USB interface Ink bay Casters Network interface AC inlet Maintenance tank (Pro 9700 includes two tanks, one on each side of printer) 1
Quick Reference Guide
Page 7
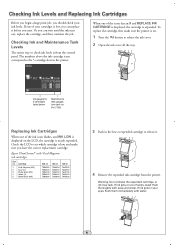
... first make sure you have the correct replacement cartridge. If one of your ink levels. Ink gauges for 5 cartridges listed below Maintenance tank gauges (one tank for Pro 7700) Replacing Ink Cartridges When one of the ink icons flashes, and INK LOW is displayed on . 1 Press the button ...to see which cartridge is low, and make sure the printer is on the LCD, the cartridge is nearly expended. Epson UltraChrome® with water. 6...
... first make sure you have the correct replacement cartridge. If one of your ink levels. Ink gauges for 5 cartridges listed below Maintenance tank gauges (one tank for Pro 7700) Replacing Ink Cartridges When one of the ink icons flashes, and INK LOW is displayed on . 1 Press the button ...to see which cartridge is low, and make sure the printer is on the LCD, the cartridge is nearly expended. Epson UltraChrome® with water. 6...
Quick Reference Guide
Page 9
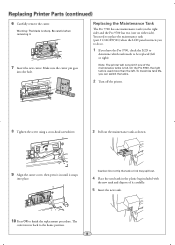
... spill out. 4 Place the used more than the left or right). Replacing the Maintenance Tank The Pro 7700 has one maintenance tank (on either side). To maximize tank life, you have the Pro 9700, check the LCD to determine which tank needs to be replaced (left . Note: The printer will not print if one ...on the right side) and the Pro 9700 has two (one of it . 7 Insert the new cutter. ...
... spill out. 4 Place the used more than the left or right). Replacing the Maintenance Tank The Pro 7700 has one maintenance tank (on either side). To maximize tank life, you have the Pro 9700, check the LCD to determine which tank needs to be replaced (left . Note: The printer will not print if one ...on the right side) and the Pro 9700 has two (one of it . 7 Insert the new cutter. ...

Quick Reference Guide
Page 10
most recent job is number 0 Information about registered paper configurations MAINTENANCE PRINTER STATUS CUTTER ADJUSTMENT CUTTER REPLACEMENT CLEANING CLOCK SETTING VERSION INK LEVEL MAINTENANCE TANK JOB HISTORY TOTAL PRINTS EDM STATUS Adjusts cutter position Moves the cutter to access the menus. See... CHECK STATUS SHEET NETWORK STATUS SHEET JOB INFORMATION CUSTOM PAPER Shows clogged or deflected nozzles Printer settings, total prints, and maintenance tank capacity remaining Network settings Date and Time and Ink and paper used for details. Press the Menu button to the replacement...
most recent job is number 0 Information about registered paper configurations MAINTENANCE PRINTER STATUS CUTTER ADJUSTMENT CUTTER REPLACEMENT CLEANING CLOCK SETTING VERSION INK LEVEL MAINTENANCE TANK JOB HISTORY TOTAL PRINTS EDM STATUS Adjusts cutter position Moves the cutter to access the menus. See... CHECK STATUS SHEET NETWORK STATUS SHEET JOB INFORMATION CUSTOM PAPER Shows clogged or deflected nozzles Printer settings, total prints, and maintenance tank capacity remaining Network settings Date and Time and Ink and paper used for details. Press the Menu button to the replacement...

User's Guide
Page 8
... 161 Replacing the Paper Cutter 162 Removing the Old Cutter 162 Installing the New Cutter 164 Replacing the Maintenance Tank 166 Cleaning the Printer 168 Transporting or Storing the Printer 170 Preparing the Printer for Shipment 170 Moving the Printer on the Stand 172 Setting ...
... 161 Replacing the Paper Cutter 162 Removing the Old Cutter 162 Installing the New Cutter 164 Replacing the Maintenance Tank 166 Cleaning the Printer 168 Transporting or Storing the Printer 170 Preparing the Printer for Shipment 170 Moving the Printer on the Stand 172 Setting ...

User's Guide
Page 12
...: Optional equipment Option Automatic Take-Up Reel System (Pro 9700 only); com for a complete list. 12 | Introduction Tip: Check the Epson Pro Imaging website at www.proimaging.epson.com (U.S. Options and Accessories Your Epson Stylus® Pro 7700/9700 offers these user-replaceable items: Consumables and user-replaceable parts Part Replacement maintenance tank (see page 166) Replacement paper cutter (see page...
...: Optional equipment Option Automatic Take-Up Reel System (Pro 9700 only); com for a complete list. 12 | Introduction Tip: Check the Epson Pro Imaging website at www.proimaging.epson.com (U.S. Options and Accessories Your Epson Stylus® Pro 7700/9700 offers these user-replaceable items: Consumables and user-replaceable parts Part Replacement maintenance tank (see page 166) Replacement paper cutter (see page...

User's Guide
Page 18
18 | Introduction Printer Parts These illustrations show the Epson Stylus Pro 9700, but the parts are the same for computer Ink bay Casters Network interface Maintenance tank (Pro 9700 includes two tanks, one on each side of printer) 18 AC inlet Front Roll paper holder Roll paper cover Front cover Control panel Paper basket Back Interface connector for optional equipment USB interface for the Pro 7700 unless otherwise noted.
18 | Introduction Printer Parts These illustrations show the Epson Stylus Pro 9700, but the parts are the same for computer Ink bay Casters Network interface Maintenance tank (Pro 9700 includes two tanks, one on each side of printer) 18 AC inlet Front Roll paper holder Roll paper cover Front cover Control panel Paper basket Back Interface connector for optional equipment USB interface for the Pro 7700 unless otherwise noted.
User's Guide
Page 19
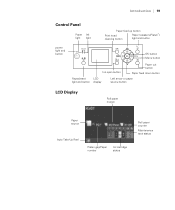
Introduction | 19 Control Panel Paper Ink light light Paper feed up button Print head cleaning button Paper release (ePlaten™) light and button power light and button OK button Menu button Ink open button Paper cut button Paper feed down button Pause/reset LCD light and button display Left arrow or paper source button LCD Display Roll paper margin Paper source Auto Take-Up Reel Platen gap/Paper number Ink cartridge status Roll paper counter Maintenance tank status 19
Introduction | 19 Control Panel Paper Ink light light Paper feed up button Print head cleaning button Paper release (ePlaten™) light and button power light and button OK button Menu button Ink open button Paper cut button Paper feed down button Pause/reset LCD light and button display Left arrow or paper source button LCD Display Roll paper margin Paper source Auto Take-Up Reel Platen gap/Paper number Ink cartridge status Roll paper counter Maintenance tank status 19
User's Guide
Page 43
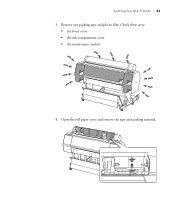
Open the roll paper cover and remove the tape and packing material. 43 Check these areas: • the front cover • the ink compartment cover • the maintenance tank(s) 4. Setting Up the Printer | 43 3. Remove any packing tape and plastic film.
Open the roll paper cover and remove the tape and packing material. 43 Check these areas: • the front cover • the ink compartment cover • the maintenance tank(s) 4. Setting Up the Printer | 43 3. Remove any packing tape and plastic film.

User's Guide
Page 48
... You can use USB and/or Ethernet network connections. Make sure that both the printer and the computer are turned off the printer, remove the maintenance tank, or open the front cover or ink covers while the P power light is completed, you need an RJ-45 CAT-5 crossover cable. 1. Never turn off...
... You can use USB and/or Ethernet network connections. Make sure that both the printer and the computer are turned off the printer, remove the maintenance tank, or open the front cover or ink covers while the P power light is completed, you need an RJ-45 CAT-5 crossover cable. 1. Never turn off...

User's Guide
Page 149
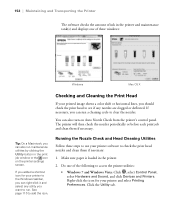
...'s status on the printer to keep working at their best. For more information, see page 151). 149 149 Chapter 6: Maintaining and Transporting the Printer The Epson Stylus Pro 7700 and Pro 9700 require little maintenance to fine-tune a variety of your maintenance tank(s), and other information.
...'s status on the printer to keep working at their best. For more information, see page 151). 149 149 Chapter 6: Maintaining and Transporting the Printer The Epson Stylus Pro 7700 and Pro 9700 require little maintenance to fine-tune a variety of your maintenance tank(s), and other information.
User's Guide
Page 150
...used (in the printer, you see the status of the remaining cartridges. When done, press l. • To check how much capacity the maintenance tank(s) have, press d to be replaced by an authorized service technician. When done, press l. • To check the status of the ...printer for instructions. Other printer parts need to select MAINTENANCE TANK, then press r. See page 161 for myEpsonPrinter.com, press d to select EDM STATUS, then press r. Press d to select STATUS SHEET, then...
...used (in the printer, you see the status of the remaining cartridges. When done, press l. • To check how much capacity the maintenance tank(s) have, press d to be replaced by an authorized service technician. When done, press l. • To check the status of the ...printer for instructions. Other printer parts need to select MAINTENANCE TANK, then press r. See page 161 for myEpsonPrinter.com, press d to select EDM STATUS, then press r. Press d to select STATUS SHEET, then...
User's Guide
Page 151
...lets you want to the Windows taskbar, you can also run . Checking Printer Status From the Printer Driver The Epson Status Monitor utility installed with your printer to run maintenance utilities by clicking the Utility button in the print job window or the icon on the printer settings screen. Follow... click Printers. Right-click your printer and select Printing Preferences. Select your Applications folder. Click the Utility tab. • Mac OS X: Open the EPSON Printer Utility3 in the printer and the level of the following to add the icon. Do one of the maintenance tank(s).
...lets you want to the Windows taskbar, you can also run . Checking Printer Status From the Printer Driver The Epson Status Monitor utility installed with your printer to run maintenance utilities by clicking the Utility button in the print job window or the icon on the printer settings screen. Follow... click Printers. Right-click your printer and select Printing Preferences. Select your Applications folder. Click the Utility tab. • Mac OS X: Open the EPSON Printer Utility3 in the printer and the level of the following to add the icon. Do one of the maintenance tank(s).
User's Guide
Page 152
...job and clean them if necessary: 1. 152 | Maintaining and Transporting the Printer The software checks the amount of ink in the printer and maintenance tank(s) and displays one of these steps to use your printer to the Windows taskbar, you can also turn on the printer settings screen. See...print head nozzles and clean them if necessary. Right-click the icon for your printer software to see if any utility you can also run maintenance utilities by clicking the Utility button in the printer. 2. Click the Utility tab. 152 If necessary, you want to run a cleaning ...
...job and clean them if necessary: 1. 152 | Maintaining and Transporting the Printer The software checks the amount of ink in the printer and maintenance tank(s) and displays one of these steps to use your printer to the Windows taskbar, you can also turn on the printer settings screen. See...print head nozzles and clean them if necessary. Right-click the icon for your printer software to see if any utility you can also run maintenance utilities by clicking the Utility button in the printer. 2. Click the Utility tab. 152 If necessary, you want to run a cleaning ...
User's Guide
Page 166
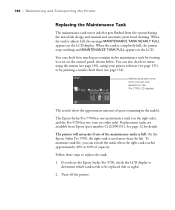
... the Epson Stylus Pro 9700, check the LCD display to determine which tank needs to 60% of the maintenance tanks is used more than the left or right). 2. The Epson Stylus Pro 7700 has one maintenance tank (on the right side), and the Pro 9700 has two (one tank icon appears on the LCD display. 166 | Maintaining and Transporting the Printer Replacing the Maintenance Tank The maintenance tank stores...
... the Epson Stylus Pro 9700, check the LCD display to determine which tank needs to 60% of the maintenance tanks is used more than the left or right). 2. The Epson Stylus Pro 7700 has one maintenance tank (on the right side), and the Pro 9700 has two (one tank icon appears on the LCD display. 166 | Maintaining and Transporting the Printer Replacing the Maintenance Tank The maintenance tank stores...

User's Guide
Page 167
Grasp the handle at the bottom of the tank (on the side of it upright at all times and dispose of the printer) and gently pull out the maintenance tank. Hold it carefully. 3. Insert the new tank. 167 Then place it . Maintaining and Transporting the Printer | 167 Caution: Be careful not to spill ink from the maintenance tank when removing it in the plastic bag included with the new tank. 4.
Grasp the handle at the bottom of the tank (on the side of it upright at all times and dispose of the printer) and gently pull out the maintenance tank. Hold it carefully. 3. Insert the new tank. 167 Then place it . Maintaining and Transporting the Printer | 167 Caution: Be careful not to spill ink from the maintenance tank when removing it in the plastic bag included with the new tank. 4.
User's Guide
Page 177
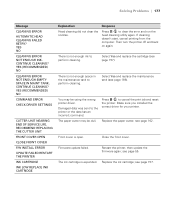
... perform cleaning. Replace the paper cutter; see page 166). Replace the ink cartridge; CONTINUE CLEANING? There is not enough space in the maintenance tank to clear the error and run the head cleaning utility again. There is not enough ink to the printer or the data has an... incorrect command. YES NO CLEANING ERROR NOT ENOUGH INK. YES (RECOMMENDED) NO CLEANING ERROR NOT ENOUGH EMPTY SPACE IN MAINT TANK. Press to perform cleaning. You may be using the wrong printer driver. Firmware update failed. CONTINUE CLEANING? The paper cutter may be dull...
... perform cleaning. Replace the paper cutter; see page 166). Replace the ink cartridge; CONTINUE CLEANING? There is not enough space in the maintenance tank to clear the error and run the head cleaning utility again. There is not enough ink to the printer or the data has an... incorrect command. YES NO CLEANING ERROR NOT ENOUGH INK. YES (RECOMMENDED) NO CLEANING ERROR NOT ENOUGH EMPTY SPACE IN MAINT TANK. Press to perform cleaning. You may be using the wrong printer driver. Firmware update failed. CONTINUE CLEANING? The paper cutter may be dull...
User's Guide
Page 178
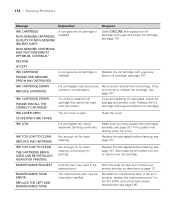
... Response INK CARTRIDGE NON-GENUINE CARTRIDGE! NON-GENUINE CARTRIDGE MAY NOT PERFORM AT OPTIMUM. Epson ink cartridge; if the contact or condensation. Replace the cartridge(s) before cleaning; If the error remains, replace the maintenance tank. For the Pro 9700, note which tank needs replacement; See page 157. Make sure you have a bad Remove and reinstall the...
... Response INK CARTRIDGE NON-GENUINE CARTRIDGE! NON-GENUINE CARTRIDGE MAY NOT PERFORM AT OPTIMUM. Epson ink cartridge; if the contact or condensation. Replace the cartridge(s) before cleaning; If the error remains, replace the maintenance tank. For the Pro 9700, note which tank needs replacement; See page 157. Make sure you have a bad Remove and reinstall the...
User's Guide
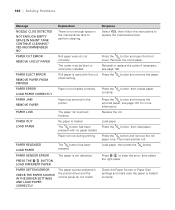
Page 179
... CLEANING? If the error remains, replace the maintenance tank. Replace the maintenance tank. MAINTENANCE TANK REPLACE THE LEFT SIDE MAINTENANCE TANK The maintenance tank is too full for head cleaning. For the Pro 9700, note which tank is not installed. one . see page 166. Solving Problems | 179 Message Explanation Response MAINTENANCE TANK ERROR REPLACE THE RIGHT SIDE MAINTENANCE TANK The maintenance tank may be performed. Select YES, then follow...
... CLEANING? If the error remains, replace the maintenance tank. Replace the maintenance tank. MAINTENANCE TANK REPLACE THE LEFT SIDE MAINTENANCE TANK The maintenance tank is too full for head cleaning. For the Pro 9700, note which tank is not installed. one . see page 166. Solving Problems | 179 Message Explanation Response MAINTENANCE TANK ERROR REPLACE THE RIGHT SIDE MAINTENANCE TANK The maintenance tank may be performed. Select YES, then follow...
User's Guide
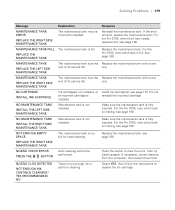
Page 180
...been pressed with the cut correctly. Press the correctly. Load paper. Press the button, then load paper. Press to replace the maintenance tank. PAPER RELEASED LOAD PAPER The button has been pressed. PRESS THE BUTTON LOAD DIFFERENT PAPER PAPER SETTING ERROR CHECK THE PAPER SOURCE IN...180 | Solving Problems Message NOZZLE CLOG DETECTED NOT ENOUGH EMPTY SPACE IN MAINT TANK CONTINUE CLEANING? Paper ran out during printing. PAPER SENSOR ERROR The paper is not enough space in the maintenance tank to perform cleaning. YES (RECOMMENDED) NO PAPER CUT ERROR REMOVE UNCUT PAPER ...
...been pressed with the cut correctly. Press the correctly. Load paper. Press the button, then load paper. Press to replace the maintenance tank. PAPER RELEASED LOAD PAPER The button has been pressed. PRESS THE BUTTON LOAD DIFFERENT PAPER PAPER SETTING ERROR CHECK THE PAPER SOURCE IN...180 | Solving Problems Message NOZZLE CLOG DETECTED NOT ENOUGH EMPTY SPACE IN MAINT TANK CONTINUE CLEANING? Paper ran out during printing. PAPER SENSOR ERROR The paper is not enough space in the maintenance tank to perform cleaning. YES (RECOMMENDED) NO PAPER CUT ERROR REMOVE UNCUT PAPER ...


