
Quick Reference Guide
Page 8
... the cartridge, try removing and then reinserting it . Gently shake the cartridge before installing it from its package. The paper cutter moves to display EXECUTE, then press OK. If the Ink light remains on the printer, then press until MAINTENANCE is the correct color, and remove it . Don...'t force it . 7 Close the ink cover. 6 Hold the cartridge with the arrow mark pointing toward the printer. Press to highlight CUTTER REPLACEMENT. 3 Press to the replacement position....
... the cartridge, try removing and then reinserting it . Gently shake the cartridge before installing it from its package. The paper cutter moves to display EXECUTE, then press OK. If the Ink light remains on the printer, then press until MAINTENANCE is the correct color, and remove it . Don...'t force it . 7 Close the ink cover. 6 Hold the cartridge with the arrow mark pointing toward the printer. Press to highlight CUTTER REPLACEMENT. 3 Press to the replacement position....
User's Guide
Page 25
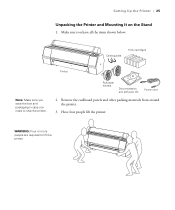
Remove the cardboard panels and other packing materials from around the printer. 3. Setting Up the Printer | 25 Unpacking the Printer and Mounting It on the Stand 1. Have four people lift the printer. WARNING: Four or more people are required to ship the printer. Roll paper holders Documentation and software CD Power cord 2. Make sure you have all the items shown below: Cable guides 5 Ink cartridges Printer Note: Make sure you save the box and packaging in case you need to lift the printer. 25
Remove the cardboard panels and other packing materials from around the printer. 3. Setting Up the Printer | 25 Unpacking the Printer and Mounting It on the Stand 1. Have four people lift the printer. WARNING: Four or more people are required to ship the printer. Roll paper holders Documentation and software CD Power cord 2. Make sure you have all the items shown below: Cable guides 5 Ink cartridges Printer Note: Make sure you save the box and packaging in case you need to lift the printer. 25
User's Guide
Page 47
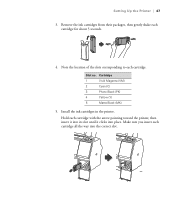
Slot no. Setting Up the Printer | 47 3. Cartridge 1 Vivid Magenta (VM) 2 Cyan (C) 3 Photo Black (PK) 4 Yellow (Y) 5 Matte Black (MK) 5. Make sure you insert each cartridge with the arrow pointing toward the printer, then insert it into its slot until it clicks into the correct slot. 47 Hold each cartridge all the way into place. Remove the ink cartridges from their packages, then gently shake each cartridge. Note the location of the slots corresponding to each cartridge for about 5 seconds. 4. Install the ink cartridges in the printer.
Slot no. Setting Up the Printer | 47 3. Cartridge 1 Vivid Magenta (VM) 2 Cyan (C) 3 Photo Black (PK) 4 Yellow (Y) 5 Matte Black (MK) 5. Make sure you insert each cartridge with the arrow pointing toward the printer, then insert it into its slot until it clicks into the correct slot. 47 Hold each cartridge all the way into place. Remove the ink cartridges from their packages, then gently shake each cartridge. Note the location of the slots corresponding to each cartridge for about 5 seconds. 4. Install the ink cartridges in the printer.

User's Guide
Page 158
...make sure the printer is turned on and REPLACE INK CARTRIDGE is displayed, the cartridge is almost expended. You can purchase online at www.proimaging.epson.com (U.S. To prevent ink reporting errors, never replace the ink cartridges with Vivid Magenta ink cartridges: Slot no. For print quality, a small...light stays on . Open the ink cover all the way. Caution: Leave the expended cartridge in the cartridge after the "replace cartridge" indicator comes on the LCD display, the indicated cartridge is expended. Note the color of opening the package. Before you are ready to replace...
...make sure the printer is turned on and REPLACE INK CARTRIDGE is displayed, the cartridge is almost expended. You can purchase online at www.proimaging.epson.com (U.S. To prevent ink reporting errors, never replace the ink cartridges with Vivid Magenta ink cartridges: Slot no. For print quality, a small...light stays on . Open the ink cover all the way. Caution: Leave the expended cartridge in the cartridge after the "replace cartridge" indicator comes on the LCD display, the indicated cartridge is expended. Note the color of opening the package. Before you are ready to replace...
User's Guide
Page 159
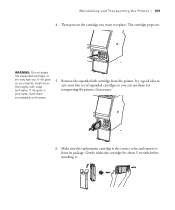
Gently shake the cartridge for transporting the printer, if necessary. 6. The cartridge pops out. WARNING: Do not shake the expended cartridge, or ink may leak out. It's a good idea to save your first set of expended cartridges so you want to replace. Make sure the replacement ...cartridge is the correct color and remove it . 159 Then press in your hands, wash them immediately with soap and water. If ink gets in the cartridge you can use them for about 5 seconds before installing it from the printer. Maintaining and Transporting the Printer | 159 4. If...
Gently shake the cartridge for transporting the printer, if necessary. 6. The cartridge pops out. WARNING: Do not shake the expended cartridge, or ink may leak out. It's a good idea to save your first set of expended cartridges so you want to replace. Make sure the replacement ...cartridge is the correct color and remove it . 159 Then press in your hands, wash them immediately with soap and water. If ink gets in the cartridge you can use them for about 5 seconds before installing it from the printer. Maintaining and Transporting the Printer | 159 4. If...

User's Guide
Page 160
If the B Ink light remains on after installing the cartridge, it clicks into place. Then insert the cartridge into the slot until it may have the wrong cartridge. ... be inserted fully. 7. Hold the cartridge with the arrow pointing toward the printer. Don't force it in. Close the ink cover. Once the cartridge is installed, the printer returns to enter the ink tubes, causing nozzle damage. 8. Doing so can 't insert the cartridge smoothly, you can compromise the needle valve seal and...
If the B Ink light remains on after installing the cartridge, it clicks into place. Then insert the cartridge into the slot until it may have the wrong cartridge. ... be inserted fully. 7. Hold the cartridge with the arrow pointing toward the printer. Don't force it in. Close the ink cover. Once the cartridge is installed, the printer returns to enter the ink tubes, causing nozzle damage. 8. Doing so can 't insert the cartridge smoothly, you can compromise the needle valve seal and...

User's Guide
Page 170
... unplug the printer. 2. To wash the paper basket, remove the shafts, then machine wash with mild detergent. If you don't have the original packaging, you should repack it on the far right) and the P power light goes off. Turn off the printer and wait until the carriage moves to... prevent water from Epson. 170 | Maintaining and Transporting the Printer 8. Keep the ink cartridge compartments closed to the home position (on its stand (see page 172). To ship the printer a longer distance, ...
... unplug the printer. 2. To wash the paper basket, remove the shafts, then machine wash with mild detergent. If you don't have the original packaging, you should repack it on the far right) and the P power light goes off. Turn off the printer and wait until the carriage moves to... prevent water from Epson. 170 | Maintaining and Transporting the Printer 8. Keep the ink cartridge compartments closed to the home position (on its stand (see page 172). To ship the printer a longer distance, ...
User's Guide
Page 178
... package and product code. see page 166. 178 INK TOO LOW TO CLEAN REPLACE INK CARTRIDGE Not enough ink for printing. INK TOO LOW TO CLEAN THE CARTRIDGE BEING USED CAN BE INSTALLED AGAIN FOR PRINTING Not enough ink for head cleaning, but enough for head cleaning. DECLINE ACCEPT INK CARTRIDGE PLEASE USE GENUINE EPSON INK CARTRIDGES A non-genuine ink...
... package and product code. see page 166. 178 INK TOO LOW TO CLEAN REPLACE INK CARTRIDGE Not enough ink for printing. INK TOO LOW TO CLEAN THE CARTRIDGE BEING USED CAN BE INSTALLED AGAIN FOR PRINTING Not enough ink for head cleaning, but enough for head cleaning. DECLINE ACCEPT INK CARTRIDGE PLEASE USE GENUINE EPSON INK CARTRIDGES A non-genuine ink...
User's Guide
Page 201
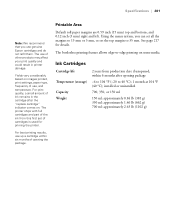
... Capacity Weight 2 years from this first set the top margin to 35 mm. The printer ships with full cartridges and part of the ink from production date if unopened; The borderless printing feature allows edge-to-edge printing on images printed, print settings, paper type, frequency of ...use genuine Epson cartridges and do not refill them. within six months of opening package -4 to 104 °F (-20 to 40 °C); 1 month at 104 °F (40 °C); The use up a...
... Capacity Weight 2 years from this first set the top margin to 35 mm. The printer ships with full cartridges and part of the ink from production date if unopened; The borderless printing feature allows edge-to-edge printing on images printed, print settings, paper type, frequency of ...use genuine Epson cartridges and do not refill them. within six months of opening package -4 to 104 °F (-20 to 40 °C); 1 month at 104 °F (40 °C); The use up a...


