
User Manual - USB/Parallel Kit
Page 5
Contents Introduction 7 Setting Up the Printer 8 Getting Started on an iMac 8 Connecting the Cable 10 Installing the Printer Software 13 Getting Started on a Windows 98 System 15 Connecting the Cable 16 Installing the Printer Software 19 Setting Up Your System to Print to the EPSON Stylus COLOR 600 27 Appendix A: Using Monitor3 with Your iMac 29 Setting Up Monitor3 29 Monitoring Print Jobs with Monitor3 30 Appendix B: Specifications 33 USB/Parallel Adapter Specifications 33 System Requirements 34 v
Contents Introduction 7 Setting Up the Printer 8 Getting Started on an iMac 8 Connecting the Cable 10 Installing the Printer Software 13 Getting Started on a Windows 98 System 15 Connecting the Cable 16 Installing the Printer Software 19 Setting Up Your System to Print to the EPSON Stylus COLOR 600 27 Appendix A: Using Monitor3 with Your iMac 29 Setting Up Monitor3 29 Monitoring Print Jobs with Monitor3 30 Appendix B: Specifications 33 USB/Parallel Adapter Specifications 33 System Requirements 34 v
User Manual - USB/Parallel Kit
Page 6
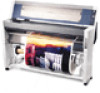
... the following printers: EPSON Stylus® COLOR 600, EPSON Stylus COLOR 440, EPSON Stylus COLOR 640, and EPSON Stylus Photo EX. To use smart cable technology to connect your EPSON printer to Get Help section in this guide, see the Where to your printer user's guide. 7 Introduction The EPSON USB/Parallel Adapter allows you to use the EPSON USB/Parallel Adapter...
... the following printers: EPSON Stylus® COLOR 600, EPSON Stylus COLOR 440, EPSON Stylus COLOR 640, and EPSON Stylus Photo EX. To use smart cable technology to connect your EPSON printer to Get Help section in this guide, see the Where to your printer user's guide. 7 Introduction The EPSON USB/Parallel Adapter allows you to use the EPSON USB/Parallel Adapter...
User Manual - USB/Parallel Kit
Page 14
... can use Windows Print Manager. Getting Started on a Windows 98 System The instructions on the next few pages explain how to connect the USB/ Parallel Adapter cable to your Windows 98 system and how to your computer via the parallel port, if you want. 15 If you're connecting to an EPSON Stylus COLOR 600 printer...
... can use Windows Print Manager. Getting Started on a Windows 98 System The instructions on the next few pages explain how to connect the USB/ Parallel Adapter cable to your Windows 98 system and how to your computer via the parallel port, if you want. 15 If you're connecting to an EPSON Stylus COLOR 600 printer...
User Manual - USB/Parallel Kit
Page 18
... driver for your printer, or whether you're performing a new installation. Otherwise, continue with a Windows 98 system that has not been upgraded from Windows 95. Deleting the INF file for your Windows directory. If you've already installed a printer driver for the old printer driver 1 Click Start,... point to Programs, and select Windows Explorer. 2 Open your EPSON printer You need to delete the printer driver's INF file before you install the USB printer driver. Installing the Printer ...
... driver for your printer, or whether you're performing a new installation. Otherwise, continue with a Windows 98 system that has not been upgraded from Windows 95. Deleting the INF file for your Windows directory. If you've already installed a printer driver for the old printer driver 1 Click Start,... point to Programs, and select Windows Explorer. 2 Open your EPSON printer You need to delete the printer driver's INF file before you install the USB printer driver. Installing the Printer ...
User Manual - USB/Parallel Kit
Page 19
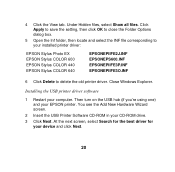
...ROM drive. 3 Click Next. You see the Add New Hardware Wizard screen. 2 Insert the USB Printer Software CD-ROM in your EPSON printer. Installing the USB printer driver software 1 Restart your device and click Next. 20 At the next screen, select Search for the ...box. 5 Open the Inf folder, then locate and select the INF file corresponding to your installed printer driver: EPSON Stylus Photo EX EPSON Stylus COLOR 600 EPSON Stylus COLOR 440 EPSON Stylus COLOR 640 EPSONEPIIFE2J.INF EPSONEPS600.INF EPSONEPIIFE3P.INF EPSONEPIIFE3O.INF 6 Click Delete to delete the old printer driver. Close...
...ROM drive. 3 Click Next. You see the Add New Hardware Wizard screen. 2 Insert the USB Printer Software CD-ROM in your EPSON printer. Installing the USB printer driver software 1 Restart your device and click Next. 20 At the next screen, select Search for the ...box. 5 Open the Inf folder, then locate and select the INF file corresponding to your installed printer driver: EPSON Stylus Photo EX EPSON Stylus COLOR 600 EPSON Stylus COLOR 440 EPSON Stylus COLOR 640 EPSONEPIIFE2J.INF EPSONEPS600.INF EPSONEPIIFE3P.INF EPSONEPIIFE3O.INF 6 Click Delete to delete the old printer driver. Close...

User Manual - USB/Parallel Kit
Page 22
... up your system to set your printer as the Windows default printer. At the last screen, click Finish. 9 When you need to use Windows Print Manager. See "Setting Up Your System to Print to the EPSON Stylus COLOR 600" on -screen instructions to install your printer driver. Windows 98 detects your printer and displays a screen similar to...
... up your system to set your printer as the Windows default printer. At the last screen, click Finish. 9 When you need to use Windows Print Manager. See "Setting Up Your System to Print to the EPSON Stylus COLOR 600" on -screen instructions to install your printer driver. Windows 98 detects your printer and displays a screen similar to...

User Manual - USB/Parallel Kit
Page 25
.... Click the + next to Settings, and click Control Panel. If you've installed printer driver software for the EPSON Stylus COLOR 600, remember to set up your system to use Windows Print Manager. (See "Setting Up Your System to Print to the EPSON Stylus COLOR 600" on the next page.) If you still have problems, contact your...
.... Click the + next to Settings, and click Control Panel. If you've installed printer driver software for the EPSON Stylus COLOR 600, remember to set up your system to use Windows Print Manager. (See "Setting Up Your System to Print to the EPSON Stylus COLOR 600" on the next page.) If you still have problems, contact your...
User Manual - USB/Parallel Kit
Page 26
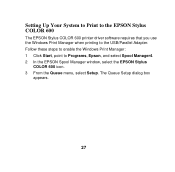
The Queue Setup dialog box appears. 27 Setting Up Your System to Print to the EPSON Stylus COLOR 600 The EPSON Stylus COLOR 600 printer driver software requires that you use the Windows Print Manager when printing to Programs, Epson, and select Spool Manager4. 2 In the EPSON Spool Manager window, select the EPSON Stylus COLOR 600 icon. 3 From the Queue menu, select Setup. Follow these steps to enable the Windows Print Manager: 1 Click Start, point to the USB/Parallel Adapter.
The Queue Setup dialog box appears. 27 Setting Up Your System to Print to the EPSON Stylus COLOR 600 The EPSON Stylus COLOR 600 printer driver software requires that you use the Windows Print Manager when printing to Programs, Epson, and select Spool Manager4. 2 In the EPSON Spool Manager window, select the EPSON Stylus COLOR 600 icon. 3 From the Queue menu, select Setup. Follow these steps to enable the Windows Print Manager: 1 Click Start, point to the USB/Parallel Adapter.

User Manual - USB/Parallel Kit
Page 27
4 Select Use Print Manager, then click OK to close the Queue Setup dialog box. 5 Close the Spool Manager window. 28
4 Select Use Print Manager, then click OK to close the Queue Setup dialog box. 5 Close the Spool Manager window. 28

User Manual - USB/Parallel Kit
Page 30
Priority list box Settings selected for jobs waiting to release the queue and resume printing. 31 To set priorities for the highlighted print job Note: If you see a stop sign icon and the message "Print queue on hold" in the EPSON Monitor3 dialog box, select Start print queue from the Printer menu to print, click the job, then click the Show details arrow at the bottom of the window.
Priority list box Settings selected for jobs waiting to release the queue and resume printing. 31 To set priorities for the highlighted print job Note: If you see a stop sign icon and the message "Print queue on hold" in the EPSON Monitor3 dialog box, select Start print queue from the Printer menu to print, click the job, then click the Show details arrow at the bottom of the window.

User Manual - USB/Parallel Kit
Page 34
Windows Computer: Operating system: Memory: Storage: Display: CD-ROM drive: Printer cable: An IBM® compatible PC with at least a 486/ 66 MHZ processor (Pentium® processor recommended) Windows 98 At least 16MB of RAM (32MB recommended) At least 50MB or free hard disk space for storing images (100MB recommended) VGA, Super VGA, or better display adapter and monitor Double-speed CD-ROM drive (quad-speed or faster recommended) for installing the printer software EPSON USB/Parallel Adapter cable 35
Windows Computer: Operating system: Memory: Storage: Display: CD-ROM drive: Printer cable: An IBM® compatible PC with at least a 486/ 66 MHZ processor (Pentium® processor recommended) Windows 98 At least 16MB of RAM (32MB recommended) At least 50MB or free hard disk space for storing images (100MB recommended) VGA, Super VGA, or better display adapter and monitor Double-speed CD-ROM drive (quad-speed or faster recommended) for installing the printer software EPSON USB/Parallel Adapter cable 35
User Manual - Color Calibration
Page 2
... prior written permission of the information contained herein. Microsoft and Windows are U.S. CPD-8407 4/99 Macintosh is assumed with respect to this product. Copyright © 1999 by any form or by Epson America, Inc. registered trademarks of Apple Computer, Inc. EPSON and EPSON Stylus are for damages resulting from the use of any options or...
... prior written permission of the information contained herein. Microsoft and Windows are U.S. CPD-8407 4/99 Macintosh is assumed with respect to this product. Copyright © 1999 by any form or by Epson America, Inc. registered trademarks of Apple Computer, Inc. EPSON and EPSON Stylus are for damages resulting from the use of any options or...

User Manual - Color Calibration
Page 11
... Before using this product, make sure that your computer system, including the video card, display monitor, and software. For Windows Users System: Display: CPU: Memory: Hard disk: Microsoft® Windows® 95, Windows 98, or Windows NT 4.0 Color monitor, 800 × 600 screen resolution (higher recommended), and 65,000 colors (higher recommended) Note: Color...
... Before using this product, make sure that your computer system, including the video card, display monitor, and software. For Windows Users System: Display: CPU: Memory: Hard disk: Microsoft® Windows® 95, Windows 98, or Windows NT 4.0 Color monitor, 800 × 600 screen resolution (higher recommended), and 65,000 colors (higher recommended) Note: Color...

User Manual - Color Calibration
Page 16
t The illustrations in this manual are taken from both Windows and Macintosh computers and may vary slightly from what appears on your RIP documentation for installation instructions. Setting up your computer, then install the utility software. Note: t Before you need to connect it to your calibrator you install the calibrator software, the RS-5000 version 1.3 or RS-5100 user software must be installed. See your screen. Chapter 2 Setting up Your Color Calibrator 2 To set up Your Color Calibrator 2-1
t The illustrations in this manual are taken from both Windows and Macintosh computers and may vary slightly from what appears on your RIP documentation for installation instructions. Setting up your computer, then install the utility software. Note: t Before you need to connect it to your calibrator you install the calibrator software, the RS-5000 version 1.3 or RS-5100 user software must be installed. See your screen. Chapter 2 Setting up Your Color Calibrator 2 To set up Your Color Calibrator 2-1

User Manual - Color Calibration
Page 22
Calibrating the EPSON Color Calibrator Measure the included color pad to calibrate your Color Calibrator, click the Calibration button. The following window appears: 3-2 Calibrating Your Printing System Follow the steps below: 1. To begin calibrating your Color Calibrator. The following dialog box appears: 3. Double-click the EPSON Color Calibrator folder. 2. Double-click the Printer Calibrator utility icon.
Calibrating the EPSON Color Calibrator Measure the included color pad to calibrate your Color Calibrator, click the Calibration button. The following window appears: 3-2 Calibrating Your Printing System Follow the steps below: 1. To begin calibrating your Color Calibrator. The following dialog box appears: 3. Double-click the EPSON Color Calibrator folder. 2. Double-click the Printer Calibrator utility icon.

User Manual - Color Calibration
Page 24
... sensor tip on to Please calibrate white point. 6. After you finish measuring the black circle, the message in the window changes to the next section. 3-4 Calibrating Your Printing System Without closing the ColorWise Pro Tools utility, continue on the color pad's white circle. After you finish measuring the white circle, click the Done...
... sensor tip on to Please calibrate white point. 6. After you finish measuring the black circle, the message in the window changes to the next section. 3-4 Calibrating Your Printing System Without closing the ColorWise Pro Tools utility, continue on the color pad's white circle. After you finish measuring the white circle, click the Done...

User Manual - Color Calibration
Page 25
Follow these steps: 1. The following window appears: Calibrating Your Printing System 3-5 Printing a Calibration Sheet Before you start, make sure you 're using the EPSON Stylus Pro 9000. Cut sheet paper is recommended if you have coated or glossy paper loaded in your computer's operating system. If you need help starting the program, ...
Follow these steps: 1. The following window appears: Calibrating Your Printing System 3-5 Printing a Calibration Sheet Before you start, make sure you 're using the EPSON Stylus Pro 9000. Cut sheet paper is recommended if you have coated or glossy paper loaded in your computer's operating system. If you need help starting the program, ...

User Manual - Color Calibration
Page 31
3. Click the From File button under Get Measurements. 5. Click OK to implement the new profile. Click the Calibrator button. Calibrating Your Printing System 3-11 A warning message appears. Click OK. 7. Click Apply to restore the factory default calibrations. Select the file you want to restore the default settings, click the Restore Device button. If you saved in the last section, then click the Open button. The following dialog box appears: 3 4. A window appears confirming that the measurements were read successfully. 6.
3. Click the From File button under Get Measurements. 5. Click OK to implement the new profile. Click the Calibrator button. Calibrating Your Printing System 3-11 A warning message appears. Click OK. 7. Click Apply to restore the factory default calibrations. Select the file you want to restore the default settings, click the Restore Device button. If you saved in the last section, then click the Open button. The following dialog box appears: 3 4. A window appears confirming that the measurements were read successfully. 6.

User Manual - Color Calibration
Page 35
... step 7 to Another 4-3 5. After you finish measuring the white circle, click the Done button. After you finish measuring the black circle, the message in the window changes to measure the color chart. Note: Make sure the sensor tip is placed flat and firmly on a flat surface. See the next section for...
... step 7 to Another 4-3 5. After you finish measuring the white circle, click the Done button. After you finish measuring the black circle, the message in the window changes to measure the color chart. Note: Make sure the sensor tip is placed flat and firmly on a flat surface. See the next section for...

User Manual - Color Calibration
Page 37
For Windows users: C:\WINDOWS\SYSTEM\Color Note: Substitute the letter of your new profile and select the appropriate folder, as indicated below. Give a name to Another 4-5 For Macintosh users: System Folder\System\ColorSync Profiles Or: System Folder\System\Preferences\ColorSync Profiles Calibrating Your System to your disk drive if it is shown on the screen. file name appears here 4 6. Click the Update Profile button. 7. After the measurement file is saved, the file name is not drive C.
For Windows users: C:\WINDOWS\SYSTEM\Color Note: Substitute the letter of your new profile and select the appropriate folder, as indicated below. Give a name to Another 4-5 For Macintosh users: System Folder\System\ColorSync Profiles Or: System Folder\System\Preferences\ColorSync Profiles Calibrating Your System to your disk drive if it is shown on the screen. file name appears here 4 6. Click the Update Profile button. 7. After the measurement file is saved, the file name is not drive C.

