Service Manual
Page 8
EPSON Stylus Pro 9000 5 Adjustments Overview 102 Precautions 102 Adjustment Tools 102 Required ...Fan 113 Elec. (Maintenance Records 113 Adjustment Menu 115 Cap Position Adjustment 116 Check Skew 117 Input Rank (Printhead ID) Adjustment 117 Check Nozzle 118 B Head Slant/C Head Slant Adjustment (Head Angle 119 BC Head Slant... Bottom (Margin) Adjustment 125 Revision A Rear Sensor Position Adjustment 126 Test Print 127 Clean Head (Drain Ink 127 Counter Clear 128 Cleaning menu 128 Print menu 128 Parameter menu 129 Initialize 129 Update 129 Mechanical Adjustments 130 Carriage ...
EPSON Stylus Pro 9000 5 Adjustments Overview 102 Precautions 102 Adjustment Tools 102 Required ...Fan 113 Elec. (Maintenance Records 113 Adjustment Menu 115 Cap Position Adjustment 116 Check Skew 117 Input Rank (Printhead ID) Adjustment 117 Check Nozzle 118 B Head Slant/C Head Slant Adjustment (Head Angle 119 BC Head Slant... Bottom (Margin) Adjustment 125 Revision A Rear Sensor Position Adjustment 126 Test Print 127 Clean Head (Drain Ink 127 Counter Clear 128 Cleaning menu 128 Print menu 128 Parameter menu 129 Initialize 129 Update 129 Mechanical Adjustments 130 Carriage ...
Service Manual
Page 17
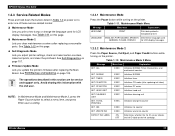
Firmware Update Mode Lets you adjust printer settings, check and reset certain counters, make test prints, and clean the printhead. Maintenance Mode 2 Menu Message Menu Item Explanation INIT. ALL EXEC. Initializes NVRAM INIT. Initializes PF motor INIT...head unit INIT CLEANING UNIT EXEC. Maintenance Mode Menu Message Menu Item Explanation HEX DUMP PRINT Print data printed in Table 1-2 at power on to select a menu item, and press Enter save a setting. 1.2.3.1 Maintenance Mode Press the Pause button while turning on page 107. EPSON Stylus Pro 9000 1.2.3 Service-...
Firmware Update Mode Lets you adjust printer settings, check and reset certain counters, make test prints, and clean the printhead. Maintenance Mode 2 Menu Message Menu Item Explanation INIT. ALL EXEC. Initializes NVRAM INIT. Initializes PF motor INIT...head unit INIT CLEANING UNIT EXEC. Maintenance Mode Menu Message Menu Item Explanation HEX DUMP PRINT Print data printed in Table 1-2 at power on to select a menu item, and press Enter save a setting. 1.2.3.1 Maintenance Mode Press the Pause button while turning on page 107. EPSON Stylus Pro 9000 1.2.3 Service-...
Service Manual
Page 46
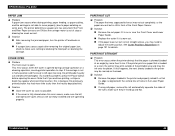
...on or near the Front Cover and Lower Paper Guide. If this error occurs, make sure the left open too long, the printheads may appear where printing resumes; Solution Remove the cut but the carriage motor is still in the printer may fire ink onto the platen. If the ...the sides of holes in home position and the cover is blocking the feed path or blocking the carriage. EPSON Stylus Pro 9000 PAPER JAM Problem A paper jam occurs when during carriage operation or a cleaning operation, causing printer operation to stop. Note that it so that if you may need to adjust the...
...on or near the Front Cover and Lower Paper Guide. If this error occurs, make sure the left open too long, the printheads may appear where printing resumes; Solution Remove the cut but the carriage motor is still in the printer may fire ink onto the platen. If the ...the sides of holes in home position and the cover is blocking the feed path or blocking the carriage. EPSON Stylus Pro 9000 PAPER JAM Problem A paper jam occurs when during carriage operation or a cleaning operation, causing printer operation to stop. Note that it so that if you may need to adjust the...
Service Manual
Page 48
... printheads to perform a manual cleaning operation when thick paper is not installed properly. NO INK CARTRIDGE Problem An ink cartridge is not installed or is loaded. This error occurs under the following conditions. You attempt to be too far away from the Capping Assembly. EPSON Stylus Pro 9000 ...INK OUT Problem One or more ink cartridges have run out of cartridge for the printer and the proper color for that slot. If the proper cartridge is supposed to print on the display). The printer attempts to begin . After the cleaning operation is...
... printheads to perform a manual cleaning operation when thick paper is not installed properly. NO INK CARTRIDGE Problem An ink cartridge is not installed or is loaded. This error occurs under the following conditions. You attempt to be too far away from the Capping Assembly. EPSON Stylus Pro 9000 ...INK OUT Problem One or more ink cartridges have run out of cartridge for the printer and the proper color for that slot. If the proper cartridge is supposed to print on the display). The printer attempts to begin . After the cleaning operation is...
Service Manual
Page 49
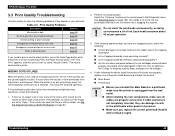
... appear in the rubber seal of ink into the printheads and forces out the old ink that is unplugged from One or Both Printheads on page 50. 2. EPSON Stylus Pro 9000 3.3 Print Quality Troubleshooting Use this section to "Open." If the printhead nozzles don't clear after following the above steps the...printouts: Table 3-3. While the printer is still no output at all cables are open but not printing. See Cleaning menu on the control panel's Self-Diagnostic menu. If the cleaning operation does not clear the clogged nozzles, check the following: Is there damage to select "Nozzle...
... appear in the rubber seal of ink into the printheads and forces out the old ink that is unplugged from One or Both Printheads on page 50. 2. EPSON Stylus Pro 9000 3.3 Print Quality Troubleshooting Use this section to "Open." If the printhead nozzles don't clear after following the above steps the...printouts: Table 3-3. While the printer is still no output at all cables are open but not printing. See Cleaning menu on the control panel's Self-Diagnostic menu. If the cleaning operation does not clear the clogged nozzles, check the following: Is there damage to select "Nozzle...
Service Manual
Page 50
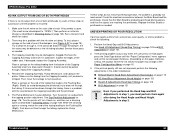
...and Bi-D Adjustments in step 1, you must perform them again after doing the Head Angle and Head Height Adjustments in Cleaning menu on page 128. Run a test print and check for output. 2. If damaged, replace the Capping Assembly. The Pump Mechanism may be damaged or clogged.... home position. Remove the Capping Assembly and rinse it . Check the electrical connections between the Capping Assembly and the printhead. 5. EPSON Stylus Pro 9000 NO INK OUTPUT FROM ONE OR BOTH PRINTHEADS If there is no ink output from one of the dampers (see Figure 4-27 on page 73). Make sure ...
...and Bi-D Adjustments in step 1, you must perform them again after doing the Head Angle and Head Height Adjustments in Cleaning menu on page 128. Run a test print and check for output. 2. If damaged, replace the Capping Assembly. The Pump Mechanism may be damaged or clogged.... home position. Remove the Capping Assembly and rinse it . Check the electrical connections between the Capping Assembly and the printhead. 5. EPSON Stylus Pro 9000 NO INK OUTPUT FROM ONE OR BOTH PRINTHEADS If there is no ink output from one of the dampers (see Figure 4-27 on page 73). Make sure ...
Service Manual
Page 51
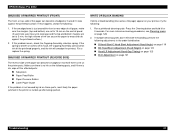
EPSON Stylus Pro 9000 SMUDGED OR MARRED PRINTOUT (FRONT) The front, or top, side of ink can cause the paper to warp and rub against the printhead surface. For more intensive cleaning procedures, see Cleaning menu on your printout, try the following : 1. If multiple cleaning cycles don't eliminate ...the banding, perform the following parts, and if there is ink on the control panel. (If a print job uses...
EPSON Stylus Pro 9000 SMUDGED OR MARRED PRINTOUT (FRONT) The front, or top, side of ink can cause the paper to warp and rub against the printhead surface. For more intensive cleaning procedures, see Cleaning menu on your printout, try the following : 1. If multiple cleaning cycles don't eliminate ...the banding, perform the following parts, and if there is ink on the control panel. (If a print job uses...
Service Manual
Page 52
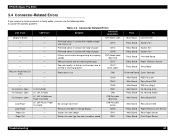
...fans don't go from low to isolate the specific problem: Table 3-4. Printhead comes in contact with middle of paper CN14 - - Open LC, LM, Y=Solid CN8 Ink Compart. CN7 ribbon cable - - CN10 - - EPSON Stylus Pro 9000 3.4 Connector-Related Errors If you suspect a loose connector or faulty cable,... CN6 Relay Board Main Board Relay Board Paper Release Lever Sensor Rear Paper Sensor Front Paper Sensor Troubleshooting 52 Poor print quality due to priming or cleaning problem CN19 (white cable) May see "Paper Not Cut" error - CN15 - - Suction fans don't begin...
...fans don't go from low to isolate the specific problem: Table 3-4. Printhead comes in contact with middle of paper CN14 - - Open LC, LM, Y=Solid CN8 Ink Compart. CN7 ribbon cable - - CN10 - - EPSON Stylus Pro 9000 3.4 Connector-Related Errors If you suspect a loose connector or faulty cable,... CN6 Relay Board Main Board Relay Board Paper Release Lever Sensor Rear Paper Sensor Front Paper Sensor Troubleshooting 52 Poor print quality due to priming or cleaning problem CN19 (white cable) May see "Paper Not Cut" error - CN15 - - Suction fans don't begin...

Service Manual
Page 67
... as described in Maintenance Cover Removal on page 63. Once a predetermined amount of two Waste Ink Boxes. EPSON Stylus Pro 9000 4.4 Maintenance Procedures To keep the printhead clean and maintain print quality, the printer periodically flushes ink through the printhead, and the flushed ink drains into one of ink has drained into the Waste Ink Boxes, the printer...
... as described in Maintenance Cover Removal on page 63. Once a predetermined amount of two Waste Ink Boxes. EPSON Stylus Pro 9000 4.4 Maintenance Procedures To keep the printhead clean and maintain print quality, the printer periodically flushes ink through the printhead, and the flushed ink drains into one of ink has drained into the Waste Ink Boxes, the printer...

Service Manual
Page 92
See Cleaning menu on the pipe side. Remove the Maintenance cover, Top Cover, and Right Side Cover. 2. If the replacement tubes do not come with the joints, ... pipes, and separate the tubes from the pipes. one black joint for each tube and pipe connection. EPSON Stylus Pro 9000 4.7 Removing the Ink Tubes This section describes how to remove the ink tubes connected to the printhead on the tube ends. REMOVING THE INK PIPE COVERS 1. After reassembling the Ink Tubing, install new ink...
See Cleaning menu on the pipe side. Remove the Maintenance cover, Top Cover, and Right Side Cover. 2. If the replacement tubes do not come with the joints, ... pipes, and separate the tubes from the pipes. one black joint for each tube and pipe connection. EPSON Stylus Pro 9000 4.7 Removing the Ink Tubes This section describes how to remove the ink tubes connected to the printhead on the tube ends. REMOVING THE INK PIPE COVERS 1. After reassembling the Ink Tubing, install new ink...

Service Manual
Page 102
... other settings; Avoid strong light (such as described below , see Table 5-2 on the EPSON Stylus Pro 9000. otherwise you may damage the printer. 5.1.2 Adjustment Tools Make sure you have the correct adjustment...EPSON Stylus Pro 9000 5.1 Overview Follow the instructions in this section to perform any adjustments in the order as listed in combination with straight-edge ruler for that procedure; standard tool acceptable 1047744; Adjustments 102 After reading the precautions below : Table 5-1. It also explains how to clean the printhead, reset various counters, and make test prints...
... other settings; Avoid strong light (such as described below , see Table 5-2 on the EPSON Stylus Pro 9000. otherwise you may damage the printer. 5.1.2 Adjustment Tools Make sure you have the correct adjustment...EPSON Stylus Pro 9000 5.1 Overview Follow the instructions in this section to perform any adjustments in the order as listed in combination with straight-edge ruler for that procedure; standard tool acceptable 1047744; Adjustments 102 After reading the precautions below : Table 5-1. It also explains how to clean the printhead, reset various counters, and make test prints...

Service Manual
Page 103
...EPSON Stylus Pro 9000 5.1.3 Required Adjustments When you remove or replace parts, refer to the following table to determine which adjustments you resintalled the old printhead.) 1. Head LR Adjustment (Head Gap Timing) on page 127 Table 5-2. Head Unit" to reset the printhead unit counter. (Not necessary if you need to perform. Test Print...14. If you reinstalled the old printhead, perform the KK0 cleaning cycle as described in the order listed below. If you replaced the old printhead with a new one, perform the KK1 cleaning cycle as described in Cleaning menu on page 17. BC Head...
...EPSON Stylus Pro 9000 5.1.3 Required Adjustments When you remove or replace parts, refer to the following table to determine which adjustments you resintalled the old printhead.) 1. Head LR Adjustment (Head Gap Timing) on page 127 Table 5-2. Head Unit" to reset the printhead unit counter. (Not necessary if you need to perform. Test Print...14. If you reinstalled the old printhead, perform the KK0 cleaning cycle as described in the order listed below. If you replaced the old printhead with a new one, perform the KK1 cleaning cycle as described in Cleaning menu on page 17. BC Head...

Service Manual
Page 107
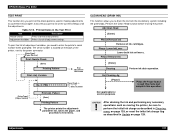
EPSON Stylus Pro 9000 6. Turn the printer on page 129. This returns the printer to the flash memory card (it's a .BIN file). 2. Performs printhead cleaning and sets the initial ink charge flag. Parameter menu on . 5. UPDATING FROM A MEMORY CARD 1. Turn off the printer, remove the ...to get started. Updates or clears the adjustment settings. Adjustments 107 If the printer loses power during the firmware update, restart the update procedure. Print menu on the Main Board). 4. "Update Complete" appears when the all the data has copied. 6. If you've never used the ...
EPSON Stylus Pro 9000 6. Turn the printer on page 129. This returns the printer to the flash memory card (it's a .BIN file). 2. Performs printhead cleaning and sets the initial ink charge flag. Parameter menu on . 5. UPDATING FROM A MEMORY CARD 1. Turn off the printer, remove the ...to get started. Updates or clears the adjustment settings. Adjustments 107 If the printer loses power during the firmware update, restart the update procedure. Print menu on the Main Board). 4. "Update Complete" appears when the all the data has copied. 6. If you've never used the ...

Service Manual
Page 108
...precision (Bi-D and head angle adjustments), be sure to use costly roll paper to print test patterns. All explanations in Self-Diagnostic mode refer to activate a Self-Diagnostic ...Roll Auto Cut Roll Cutter Off Sheet Paper Source Item + Paper Feed _ Cut /Eject Power Enter Cleaning 3 sec. Table 5-3. Selects/activates the item. 3. For adjustments that require a high degree of the...sheet sizes, 11 × 17 inch or larger. EPSON Stylus Pro 9000 5.3.1 Using the Self-Diagnostic Mode 1. Use the Control Panel buttons to the printheads in the table below. To exit the Self-Diagnostic...
...precision (Bi-D and head angle adjustments), be sure to use costly roll paper to print test patterns. All explanations in Self-Diagnostic mode refer to activate a Self-Diagnostic ...Roll Auto Cut Roll Cutter Off Sheet Paper Source Item + Paper Feed _ Cut /Eject Power Enter Cleaning 3 sec. Table 5-3. Selects/activates the item. 3. For adjustments that require a high degree of the...sheet sizes, 11 × 17 inch or larger. EPSON Stylus Pro 9000 5.3.1 Using the Self-Diagnostic Mode 1. Use the Control Panel buttons to the printheads in the table below. To exit the Self-Diagnostic...

Service Manual
Page 109
...128 page 129 - Self-Diagnostic Menus LCD Message Refer to use this menu. [SelecType] Check: Test Check: Adjustment Check: Cleaning Check: Print Check: Parameter Check: Life [Paper Source] Figure 5-2. Updates or clears the adjustment parameters. Tests the operation of current adjustment ... and checks the operation of the fans, control panel buttons, and sensors. Prints nozzle check pattern or list of printer components. Displays information such as printheads and feed path sensors. EPSON Stylus Pro 9000 5.3.2 Self-Diagnostic Menus In the Self-Diagnostic mode, you can select from ...
...128 page 129 - Self-Diagnostic Menus LCD Message Refer to use this menu. [SelecType] Check: Test Check: Adjustment Check: Cleaning Check: Print Check: Parameter Check: Life [Paper Source] Figure 5-2. Updates or clears the adjustment parameters. Tests the operation of current adjustment ... and checks the operation of the fans, control panel buttons, and sensors. Prints nozzle check pattern or list of printer components. Displays information such as printheads and feed path sensors. EPSON Stylus Pro 9000 5.3.2 Self-Diagnostic Menus In the Self-Diagnostic mode, you can select from ...

Service Manual
Page 115
..., do not select "Head Cleaning" as Head B (mechanical adjustment) Prints test patterns to let you adjust vertical alignment during bi-directional printing Prints test patterns to let you set the correct spacing between the printheads Adjusts the flushing positions Prints a test pattern to let you... and controls. EPSON Stylus Pro 9000 5.3.4 Adjustment Menu The Adjustment menu allows you to make certain adjustments to let you should not use coated ink jet paper. Adjustments 115 Adjustment Menu Items (cont.) LCD Message Description Test Print on page 127 Clean Head (Drain Ink...
..., do not select "Head Cleaning" as Head B (mechanical adjustment) Prints test patterns to let you adjust vertical alignment during bi-directional printing Prints test patterns to let you set the correct spacing between the printheads Adjusts the flushing positions Prints a test pattern to let you... and controls. EPSON Stylus Pro 9000 5.3.4 Adjustment Menu The Adjustment menu allows you to make certain adjustments to let you should not use coated ink jet paper. Adjustments 115 Adjustment Menu Items (cont.) LCD Message Description Test Print on page 127 Clean Head (Drain Ink...
Service Manual
Page 127
... the ink from the ink delivery system including the printheads. Perform the Clean Head function before moving the printer, be sure to the power connector. [SelecType]/ [Paper Source] Print: Nozzle Check [Enter] Printing Pattern Print: Adj. Adj Clean Head [Enter] Please Remove Ink Remove all the ...described in Cleaning menu on page 128, or reset the initial ink charge flag as described in Update on page 129. After draining the ink and performing any necessary operations such as moving the printer. EPSON Stylus Pro 9000 TEST PRINT This function lets you print all the...
... the ink from the ink delivery system including the printheads. Perform the Clean Head function before moving the printer, be sure to the power connector. [SelecType]/ [Paper Source] Print: Nozzle Check [Enter] Printing Pattern Print: Adj. Adj Clean Head [Enter] Please Remove Ink Remove all the ...described in Cleaning menu on page 128, or reset the initial ink charge flag as described in Update on page 129. After draining the ink and performing any necessary operations such as moving the printer. EPSON Stylus Pro 9000 TEST PRINT This function lets you print all the...

Service Manual
Page 138
... 6-1. Parts to be replaced; EPSON Stylus Pro 9000 6.1 Overview When servicing the printer, you need to perform certain routine inspection and maintenance procedures: Examine the parts listed in Checking and Clearing Counters on page 139. If you how to: print a nozzle check pattern clean the printhead adjust the printhead alignment 6.2 Physical Inspection and Cleaning When servicing the printer, inpect...
... 6-1. Parts to be replaced; EPSON Stylus Pro 9000 6.1 Overview When servicing the printer, you need to perform certain routine inspection and maintenance procedures: Examine the parts listed in Checking and Clearing Counters on page 139. If you how to: print a nozzle check pattern clean the printhead adjust the printhead alignment 6.2 Physical Inspection and Cleaning When servicing the printer, inpect...

Service Manual
Page 141
...Head Unit Head C Head B Ink Lever R/L Ink Lever C Ink Lever B Cover (front cover) Cover Lever (paper release lever) Lever Cleaning (printhead cleaning blade) Cleaner Cleaner Head Wiper R/L Maintenance 141 see Table 5-11 on page 128 Maintenance Mode 2 (see Table 1-12 on page 17) Self...command) Total Prints Accumulated Prints Counter Total Printing CR Motor CR Motor CR Motor CR Motor PF Motor PF Motor PF Motor PF Motor Fire x [megadots fired per nozzle]; Wa. Table 6-4. Summary of checking and clearing the maintenance counters. EPSON Stylus Pro 9000 The following ...
...Head Unit Head C Head B Ink Lever R/L Ink Lever C Ink Lever B Cover (front cover) Cover Lever (paper release lever) Lever Cleaning (printhead cleaning blade) Cleaner Cleaner Head Wiper R/L Maintenance 141 see Table 5-11 on page 128 Maintenance Mode 2 (see Table 1-12 on page 17) Self...command) Total Prints Accumulated Prints Counter Total Printing CR Motor CR Motor CR Motor CR Motor PF Motor PF Motor PF Motor PF Motor Fire x [megadots fired per nozzle]; Wa. Table 6-4. Summary of checking and clearing the maintenance counters. EPSON Stylus Pro 9000 The following ...

Service Manual
Page 155
... such as described in this step, which is securely locked in the printer. 3. If shipping takes longer than 2 days, the printheads and ink delivery system may be damaged. This lets you have to install new ink cartridges and perform the Initial Ink Charge. Before... 9. Turn the printer off. Select the "Check: Cleaning" menu and press Enter. 5. The printer starts the Initial Ink Charge, which takes several minutes. 8. See Maintenance Procedures on the LCD display, press the Pause button. EPSON Stylus Pro 9000 7.1.4 Repacking and Transporting the Printer When the printer needs...
... such as described in this step, which is securely locked in the printer. 3. If shipping takes longer than 2 days, the printheads and ink delivery system may be damaged. This lets you have to install new ink cartridges and perform the Initial Ink Charge. Before... 9. Turn the printer off. Select the "Check: Cleaning" menu and press Enter. 5. The printer starts the Initial Ink Charge, which takes several minutes. 8. See Maintenance Procedures on the LCD display, press the Pause button. EPSON Stylus Pro 9000 7.1.4 Repacking and Transporting the Printer When the printer needs...


