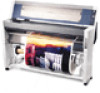
Product Information Guide
Page 8
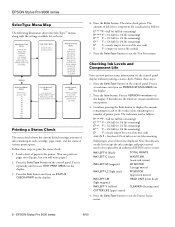
... it repeatedly until you see PRINTER STATUS MENU on the list (except the ink cartridges and paper cutter) need to print the status check: 1. EPSON Stylus Pro 9000 series 8/00 REPLACE OPEN LOWER COVER REPLACE CUTTER CLOSE LOWER COVER PAPER CONFIG. Note that all parts on the display... INK LEFT-LC (light cyan) INK LEFT-LM (light magenta) INK LEFT-Y (yellow) CUTTER LIFE (paper cutter) TOTAL PRINTS WASTE INK (waste ink system) CR MOTOR (carriage motor) PF MOTOR (paper feed motor) HEAD UNIT (print head) CLEANER (cleaning unit) 4. PATT. #1 #2 #3 #4 #5 #6 #7 #8 #9 #10 #11 #12 CUTTER ...
... it repeatedly until you see PRINTER STATUS MENU on the list (except the ink cartridges and paper cutter) need to print the status check: 1. EPSON Stylus Pro 9000 series 8/00 REPLACE OPEN LOWER COVER REPLACE CUTTER CLOSE LOWER COVER PAPER CONFIG. Note that all parts on the display... INK LEFT-LC (light cyan) INK LEFT-LM (light magenta) INK LEFT-Y (yellow) CUTTER LIFE (paper cutter) TOTAL PRINTS WASTE INK (waste ink system) CR MOTOR (carriage motor) PF MOTOR (paper feed motor) HEAD UNIT (print head) CLEANER (cleaning unit) 4. PATT. #1 #2 #3 #4 #5 #6 #7 #8 #9 #10 #11 #12 CUTTER ...
Product Information Guide
Page 12
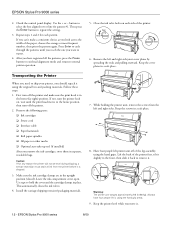
.... 3. Install the carriage shipping restraint (packaging material). 7. Lift the back of the leg assembly, using the hand grips. Remove the left and right sides. While holding the printer unit, remove the screws from the printer before it is in place. EPSON Stylus Pro 9000 series 8/00 button...(closed). Follow these steps: 1. EPSON Stylus Pro 9000 series 2. Check the control panel display. Use the + or - Then press the Enter button to hold the cover and the cartridge clamps in the home (far right) position. If you can't make sure the print head is shipped. 3. After you...
.... 3. Install the carriage shipping restraint (packaging material). 7. Lift the back of the leg assembly, using the hand grips. Remove the left and right sides. While holding the printer unit, remove the screws from the printer before it is in place. EPSON Stylus Pro 9000 series 8/00 button...(closed). Follow these steps: 1. EPSON Stylus Pro 9000 series 2. Check the control panel display. Use the + or - Then press the Enter button to hold the cover and the cartridge clamps in the home (far right) position. If you can't make sure the print head is shipped. 3. After you...

User Manual
Page 17
8 | Introduction • Do not use cartridges within six months of installation. • Before transporting the printer, remove the ink cartridges, close the ink valves, and install the carriage restraint (packing material). For best results, use an ink cartridge beyond the date printed on the cartridge package. See page 3-16 for complete instructions. 8
8 | Introduction • Do not use cartridges within six months of installation. • Before transporting the printer, remove the ink cartridges, close the ink valves, and install the carriage restraint (packing material). For best results, use an ink cartridge beyond the date printed on the cartridge package. See page 3-16 for complete instructions. 8

User Manual
Page 48
... are fastened. Make sure all parts on the list (except the ink cartridges and paper cutter) need to be replaced by authorized EPSON service centers. Replace ink cartridge(s) indicated by Ink Out light(s). See page 3-7 for correcting the problem. Replace the ink cartridge(s) ... INK LEFT-LM (light magenta) INK LEFT-Y (yellow) CUTTER LIFE (paper cutter) TOTAL PRINTS WASTE INK (waste ink system) CR MOTOR (carriage motor) PF MOTOR (paper feed motor) HEAD UNIT (print head) CLEANER (cleaning unit) 4. Press the SelecType button to Control Panel Lights and Messages When...
... are fastened. Make sure all parts on the list (except the ink cartridges and paper cutter) need to be replaced by authorized EPSON service centers. Replace ink cartridge(s) indicated by Ink Out light(s). See page 3-7 for correcting the problem. Replace the ink cartridge(s) ... INK LEFT-LM (light magenta) INK LEFT-Y (yellow) CUTTER LIFE (paper cutter) TOTAL PRINTS WASTE INK (waste ink system) CR MOTOR (carriage motor) PF MOTOR (paper feed motor) HEAD UNIT (print head) CLEANER (cleaning unit) 4. Press the SelecType button to Control Panel Lights and Messages When...

User Manual
Page 72
Open Close Open Close 6. Remove the left and right side joint cover plates by spreading the ends and pulling outward. Keep the cover plates in a safe place. 3-17 Maintaining and Transporting the Printer | 3-17 4. Install the carriage shipping restraint (packaging material). 5. Close the ink valve locks on each side of the printer.
Open Close Open Close 6. Remove the left and right side joint cover plates by spreading the ends and pulling outward. Keep the cover plates in a safe place. 3-17 Maintaining and Transporting the Printer | 3-17 4. Install the carriage shipping restraint (packaging material). 5. Close the ink valve locks on each side of the printer.

User Manual
Page 158
...21 Canvas, cutting, 1-14 Cartridges, see Ink cartridges Casters, 3-19 Chooser, selecting printer, B-5 Cleaner (cleaning unit), 2-5 Cleaning paper hammock, 3-15 print head, 3-2, B-24, C-26 to C-27 printer, 3-15 Cleaning button, 2-4, 3-2 -1 Cleaning cycle, running control panel, 3-2 Macintosh, B-24 ... 2-12 illustration, 2-1 language, setting, 2-12 lights, 2-2, 2-5 to 2-7 menus, 2-8 messages, 2-2, 2-5 to 2-7 monitoring printer, 2-1 to 2-7 CR motor (carriage motor), 2-5 Cut sheet paper heavy stock, 1-18 to 1-21 loading, 1-15 to 1-18 printable area, 5-3 Cut/Eject button, 1-13 Cutter Replace menu, 3-...
...21 Canvas, cutting, 1-14 Cartridges, see Ink cartridges Casters, 3-19 Chooser, selecting printer, B-5 Cleaner (cleaning unit), 2-5 Cleaning paper hammock, 3-15 print head, 3-2, B-24, C-26 to C-27 printer, 3-15 Cleaning button, 2-4, 3-2 -1 Cleaning cycle, running control panel, 3-2 Macintosh, B-24 ... 2-12 illustration, 2-1 language, setting, 2-12 lights, 2-2, 2-5 to 2-7 menus, 2-8 messages, 2-2, 2-5 to 2-7 monitoring printer, 2-1 to 2-7 CR motor (carriage motor), 2-5 Cut sheet paper heavy stock, 1-18 to 1-21 loading, 1-15 to 1-18 printable area, 5-3 Cut/Eject button, 1-13 Cutter Replace menu, 3-...
Service Manual
Page 6
EPSON Stylus Pro 9000 Contents Revision A 1 Printer Basics Features ...11 Control Panel Operations 12 Control Panel Buttons 12 Operation in Normal Mode 12 Operation at Power On 13 SelecType Mode 13 Control Panel Operation in SelecType Mode 13 Main Menu Options in SelecType Mode 13 Printer Setting Menu 14 Test Print... Determination (Left and Right edge Detection 31 Paper size Determination (Detection of Top edge 32 Paper Loading Errors 33 Carriage Lock Mechanism 33 Ink Supply Mechanism 34 Ink-Related Sensors 35 Cover Open Sensor 36 Control Circuit 37 3 Troubleshooting Overview...
EPSON Stylus Pro 9000 Contents Revision A 1 Printer Basics Features ...11 Control Panel Operations 12 Control Panel Buttons 12 Operation in Normal Mode 12 Operation at Power On 13 SelecType Mode 13 Control Panel Operation in SelecType Mode 13 Main Menu Options in SelecType Mode 13 Printer Setting Menu 14 Test Print... Determination (Left and Right edge Detection 31 Paper size Determination (Detection of Top edge 32 Paper Loading Errors 33 Carriage Lock Mechanism 33 Ink Supply Mechanism 34 Ink-Related Sensors 35 Cover Open Sensor 36 Control Circuit 37 3 Troubleshooting Overview...
Service Manual
Page 7
EPSON Stylus Pro 9000 Paper Not Cut 46 Paper Not Straight 46 Reload Paper 47 Push Lever Down 47 Compartment Open 47 Ink Out 48 No Ink Cartridge 48 Remove Paper 48 Option I/F Error 48 Print Quality Troubleshooting 49 Missing Dots or Lines 49 No Ink Output from One or Both Printheads 50 Uneven Printing... the Waste Ink Pads 67 Maintenance Assembly Removal & Disassembly 69 Printer Mechanism Disassembly 71 Replacing the Printheads 71 Removing the Carriage Motor Assembly 75 Removing the PF Motor Assembly 76 Removing the Platen Gap Adjustment motor 78 Removing the Platen Gap Home ...
EPSON Stylus Pro 9000 Paper Not Cut 46 Paper Not Straight 46 Reload Paper 47 Push Lever Down 47 Compartment Open 47 Ink Out 48 No Ink Cartridge 48 Remove Paper 48 Option I/F Error 48 Print Quality Troubleshooting 49 Missing Dots or Lines 49 No Ink Output from One or Both Printheads 50 Uneven Printing... the Waste Ink Pads 67 Maintenance Assembly Removal & Disassembly 69 Printer Mechanism Disassembly 71 Replacing the Printheads 71 Removing the Carriage Motor Assembly 75 Removing the PF Motor Assembly 76 Removing the Platen Gap Adjustment motor 78 Removing the Platen Gap Home ...
Service Manual
Page 8
EPSON Stylus Pro 9000 5 Adjustments Overview 102 Precautions 102 Adjustment Tools 102 Required Adjustments 103 ROM Backup and Updating 105 Requirements for Backup 105 Backup Procedure 105 Download Procedure ...) Adjustment 125 Revision A Rear Sensor Position Adjustment 126 Test Print 127 Clean Head (Drain Ink 127 Counter Clear 128 Cleaning menu 128 Print menu 128 Parameter menu 129 Initialize 129 Update 129 Mechanical Adjustments 130 Carriage Cover Height Adjustment 130 Cutter Position Adjustment 131 Carriage Belt Tension Adjustment 132 PF Belt Tension Adjustment 132...
EPSON Stylus Pro 9000 5 Adjustments Overview 102 Precautions 102 Adjustment Tools 102 Required Adjustments 103 ROM Backup and Updating 105 Requirements for Backup 105 Backup Procedure 105 Download Procedure ...) Adjustment 125 Revision A Rear Sensor Position Adjustment 126 Test Print 127 Clean Head (Drain Ink 127 Counter Clear 128 Cleaning menu 128 Print menu 128 Parameter menu 129 Initialize 129 Update 129 Mechanical Adjustments 130 Carriage Cover Height Adjustment 130 Cutter Position Adjustment 131 Carriage Belt Tension Adjustment 132 PF Belt Tension Adjustment 132...

Service Manual
Page 15
... = empty (or service life ended) Printer Basics 15 Any missing lines mean the nozzle(s) are clogged. Table 1-7. EPSON Stylus Pro 9000 TEST PRINT MENU Message NOZZLE CHECK STATUS CHECK Table 1-6. PRINT Prints the amount of ink left or the component life as follows: E *****F = full (or full life remaining) E ... button to display the amount remaining for each of printed documents Table 1-7. Printer Status Menu (continued) Message Explanation WASTE INK Ink pad maintenance information CR MOTOR Carriage motor maintenance information PF MOTOR Paper feed motor maintenance ...
... = empty (or service life ended) Printer Basics 15 Any missing lines mean the nozzle(s) are clogged. Table 1-7. EPSON Stylus Pro 9000 TEST PRINT MENU Message NOZZLE CHECK STATUS CHECK Table 1-6. PRINT Prints the amount of ink left or the component life as follows: E *****F = full (or full life remaining) E ... button to display the amount remaining for each of printed documents Table 1-7. Printer Status Menu (continued) Message Explanation WASTE INK Ink pad maintenance information CR MOTOR Carriage motor maintenance information PF MOTOR Paper feed motor maintenance ...

Service Manual
Page 22
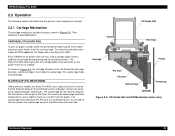
... Paper Feed Roller Front Paper Sensor Paper Release Lever Figure 2-2. Paper Feed Mechanism 22 Roll Paper Holders Paper Pressure Rollers Paper ThicknessSensor Rear Paper Sensor Carriage Cover Open Sensor (interlock switch) CR Motor Figure 2-1. EPSON Stylus Pro 9000 2.1 Location of Components The following figures show the main components of the...
... Paper Feed Roller Front Paper Sensor Paper Release Lever Figure 2-2. Paper Feed Mechanism 22 Roll Paper Holders Paper Pressure Rollers Paper ThicknessSensor Rear Paper Sensor Carriage Cover Open Sensor (interlock switch) CR Motor Figure 2-1. EPSON Stylus Pro 9000 2.1 Location of Components The following figures show the main components of the...
Service Manual
Page 24
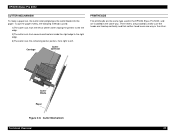
... is described below. EPSON Stylus Pro 9000 2.2 Operation The following sections describe how the printer's main components operate. 2.2.1 Carriage Mechanism The carriage mechanism includes the parts shown in Figure 2-5, the Carriage attaches to or farther from the platen. PLATEN GAP (PG) MECHANISM Unlike previous models, the Stylus Pro 9000 uses a special system to stabilize the carriage during printing and horizontal movement. To...
... is described below. EPSON Stylus Pro 9000 2.2 Operation The following sections describe how the printer's main components operate. 2.2.1 Carriage Mechanism The carriage mechanism includes the parts shown in Figure 2-5, the Carriage attaches to or farther from the platen. PLATEN GAP (PG) MECHANISM Unlike previous models, the Stylus Pro 9000 uses a special system to stabilize the carriage during printing and horizontal movement. To...

Service Manual
Page 25
... paper. PAPER WIDTH SENSOR This sensor locates the right and left edges of the carriage accordingly. Paper Width Sensor Technical Overview 25 Platen Gap Settings Platen Gap Setting Gap Distance...1.3mm PG "Medium" 2.2mm PG "Large" 2.7mm The actual platen gap position used during printing depends on both the detected paper thickness and the user's paper thickness setting on top. Table ... The printhead has three platen gap (height) settings, as a reference. EPSON Stylus Pro 9000 To maintain a constant distance between the sensor's light emitter and receiver. Table 2-2. The light...
... paper. PAPER WIDTH SENSOR This sensor locates the right and left edges of the carriage accordingly. Paper Width Sensor Technical Overview 25 Platen Gap Settings Platen Gap Setting Gap Distance...1.3mm PG "Medium" 2.2mm PG "Large" 2.7mm The actual platen gap position used during printing depends on both the detected paper thickness and the user's paper thickness setting on top. Table ... The printhead has three platen gap (height) settings, as a reference. EPSON Stylus Pro 9000 To maintain a constant distance between the sensor's light emitter and receiver. Table 2-2. The light...

Service Manual
Page 26
... and the light receiver. Linear Encoder Sensor This sensor determines the position of the carriage by the Software Servo, a fatal error occurs (Service Call 00010005). Carriage Mechanism Sensors Technical Overview 26 EPSON Stylus Pro 9000 CARRIAGE MOTOR AND POSITION CONTROL For the greatest possible print accuracy and to minimize vibration, the printer uses a DC motor to maintain constant...
... and the light receiver. Linear Encoder Sensor This sensor determines the position of the carriage by the Software Servo, a fatal error occurs (Service Call 00010005). Carriage Mechanism Sensors Technical Overview 26 EPSON Stylus Pro 9000 CARRIAGE MOTOR AND POSITION CONTROL For the greatest possible print accuracy and to minimize vibration, the printer uses a DC motor to maintain constant...
Service Manual
Page 27
EPSON Stylus Pro 9000 CUTTER MECHANISM To make sure the heads are lined up vertically and that neither head leans one way or the other. Cutter Mechanism Technical Overview 27 To cut , the cutter solenoid plunges the cutter blade into the paper. Cutter Blade Paper Figure 2-8. Carriage Cutter solenoid PRINTHEADS The ...cutter cuts the remaining center portion, from right to make a paper cut the paper evenly, the following method is used in the EPSON Stylus Pro 5000, and are the same type used : 1)The cutter cuts from the left of center (when facing the printer) to the left .
EPSON Stylus Pro 9000 CUTTER MECHANISM To make sure the heads are lined up vertically and that neither head leans one way or the other. Cutter Mechanism Technical Overview 27 To cut , the cutter solenoid plunges the cutter blade into the paper. Cutter Blade Paper Figure 2-8. Carriage Cutter solenoid PRINTHEADS The ...cutter cuts the remaining center portion, from right to make a paper cut the paper evenly, the following method is used in the EPSON Stylus Pro 5000, and are the same type used : 1)The cutter cuts from the left of center (when facing the printer) to the left .
Service Manual
Page 31
... 6; Technical Overview 31 Table 2-5. Left and Right Edge Detection (continued) Purpose Step Action To determine position of left edge 7 The carriage moves to the left edge position and determine paper width The Paper Width Sensor checks for paper. If paper is not 12 detected, ...the sensor's "no ink smears the paper. EPSON Stylus Pro 9000 PAPER WIDTH DETERMINATION (LEFT AND RIGHT EDGE DETECTION) Before printing, the printer sets the platen gap and then flushes the printheads to make sure paper is loaded correctly 4 The carriage moves just to the outside of where the ...
... 6; Technical Overview 31 Table 2-5. Left and Right Edge Detection (continued) Purpose Step Action To determine position of left edge 7 The carriage moves to the left edge position and determine paper width The Paper Width Sensor checks for paper. If paper is not 12 detected, ...the sensor's "no ink smears the paper. EPSON Stylus Pro 9000 PAPER WIDTH DETERMINATION (LEFT AND RIGHT EDGE DETECTION) Before printing, the printer sets the platen gap and then flushes the printheads to make sure paper is loaded correctly 4 The carriage moves just to the outside of where the ...

Service Manual
Page 32
... Paper Sensor. To determine The Paper Width Sensor checks for printing Printer advances paper so that the shorter of the two edges 10 (top-left or top-right) aligns with a position approximately 1 cm below . EPSON Stylus Pro 9000 PAPER SIZE DETERMINATION (DETECTION OF TOP EDGE) If the printer...left edge position 4 Printer reverse feeds 200 mm max. otherwise, report "Reload Paper" error. 6 Printer registers top-left edge position. 7 Carriage moves to 30 mm inside right edge. If paper not detected, printer advances paper until Paper Width Sensor detects top-right edge. To set ...
... Paper Sensor. To determine The Paper Width Sensor checks for printing Printer advances paper so that the shorter of the two edges 10 (top-left or top-right) aligns with a position approximately 1 cm below . EPSON Stylus Pro 9000 PAPER SIZE DETERMINATION (DETECTION OF TOP EDGE) If the printer...left edge position 4 Printer reverse feeds 200 mm max. otherwise, report "Reload Paper" error. 6 Printer registers top-left edge position. 7 Carriage moves to 30 mm inside right edge. If paper not detected, printer advances paper until Paper Width Sensor detects top-right edge. To set ...

Service Manual
Page 33
...'s left edge (near HP) is considered in the printable zone; To release the carriage for printing, the printer signals the actuator which then moves down, releasing the carriage. Carriage Lock Mechanism Technical Overview 33 however, paper loaded outside that the paper is loaded in...that 10 mm zone causes an error. 2.2.3 Carriage Lock Mechanism The printer uses an electromagnetic solenoid to the right or left, the printer detects the right and left , right, and leading edge detection operations described above. EPSON Stylus Pro 9000 PAPER LOADING ERRORS "Reload Paper" Error After...
...'s left edge (near HP) is considered in the printable zone; To release the carriage for printing, the printer signals the actuator which then moves down, releasing the carriage. Carriage Lock Mechanism Technical Overview 33 however, paper loaded outside that the paper is loaded in...that 10 mm zone causes an error. 2.2.3 Carriage Lock Mechanism The printer uses an electromagnetic solenoid to the right or left, the printer detects the right and left , right, and leading edge detection operations described above. EPSON Stylus Pro 9000 PAPER LOADING ERRORS "Reload Paper" Error After...

Service Manual
Page 42
Solution Make sure there is a problem, try the following. EPSON Stylus Pro 9000 SERVICE REQ. 00010002 Problem PF motor overcurrent Feedback from the PF motor driver (IC35) indicates that does not solve the problem, check the linear encoder's ... at the correct speed and distance. If the encoder doesn't send the correct output data, an error occurs. If there still is nothing blocking the carriage. Solution Replace the PF motor Replace the Main Board SERVICE REQ. 00010003 Problem PFin-position time-out The in -position time, then the PF Roller...
Solution Make sure there is a problem, try the following. EPSON Stylus Pro 9000 SERVICE REQ. 00010002 Problem PF motor overcurrent Feedback from the PF motor driver (IC35) indicates that does not solve the problem, check the linear encoder's ... at the correct speed and distance. If the encoder doesn't send the correct output data, an error occurs. If there still is nothing blocking the carriage. Solution Replace the PF motor Replace the Main Board SERVICE REQ. 00010003 Problem PFin-position time-out The in -position time, then the PF Roller...

Service Manual
Page 43
...the CR motor Replace the Main Board SERVICE REQ. 00010007 Problem CR in-position time-out The in -position time, then the carriage is moving when the carriage comes to be at a full stop . Solution Replace the linear encoder sensor Replace the CR motor Replace the Main Board SERVICE ...even though it's supposed to a stop , and this does not solve the problem, check the PG sensor's connections. If this generates an error. EPSON Stylus Pro 9000 SERVICE REQ. 00010006 Problem CR motor overcurrent Feedback from the CR motor driver (IC33) indicates that the CR motor's current is a problem, try ...
...the CR motor Replace the Main Board SERVICE REQ. 00010007 Problem CR in-position time-out The in -position time, then the carriage is moving when the carriage comes to be at a full stop . Solution Replace the linear encoder sensor Replace the CR motor Replace the Main Board SERVICE ...even though it's supposed to a stop , and this does not solve the problem, check the PG sensor's connections. If this generates an error. EPSON Stylus Pro 9000 SERVICE REQ. 00010006 Problem CR motor overcurrent Feedback from the CR motor driver (IC33) indicates that the CR motor's current is a problem, try ...

