Service Manual
Page 6
EPSON Stylus Pro 9000 Contents Revision A 1 Printer Basics Features ...11 Control Panel Operations 12 Control Panel Buttons 12 Operation in Normal Mode 12 Operation at Power On 13 SelecType Mode 13 Control Panel Operation in SelecType Mode 13 Main Menu Options in SelecType Mode 13 Printer Setting Menu 14 Test Print...Guide Rail 24 Platen Gap (PG) Mechanism 24 Paper Width Sensor 25 Carriage Motor and Position Control 26 Cutter Mechanism 27 Printheads 27 Paper Feed Mechanism 28 Paper Feed Motor and Rollers 28 Paper Feed Sensors 29 Paper Suction Fan 30 Paper Width Determination ...
EPSON Stylus Pro 9000 Contents Revision A 1 Printer Basics Features ...11 Control Panel Operations 12 Control Panel Buttons 12 Operation in Normal Mode 12 Operation at Power On 13 SelecType Mode 13 Control Panel Operation in SelecType Mode 13 Main Menu Options in SelecType Mode 13 Printer Setting Menu 14 Test Print...Guide Rail 24 Platen Gap (PG) Mechanism 24 Paper Width Sensor 25 Carriage Motor and Position Control 26 Cutter Mechanism 27 Printheads 27 Paper Feed Mechanism 28 Paper Feed Motor and Rollers 28 Paper Feed Sensors 29 Paper Suction Fan 30 Paper Width Determination ...
Service Manual
Page 7
EPSON Stylus Pro 9000 Paper Not Cut 46 Paper Not Straight 46 Reload Paper 47 Push Lever Down 47 Compartment Open 47 Ink Out 48 No Ink Cartridge 48 Remove Paper 48 Option I/F Error 48 Print Quality Troubleshooting 49 Missing Dots or Lines 49 No Ink Output from One or Both Printheads 50 Uneven Printing... Procedures 67 Replacing the Waste Ink Pads 67 Maintenance Assembly Removal & Disassembly 69 Printer Mechanism Disassembly 71 Replacing the Printheads 71 Removing the Carriage Motor Assembly 75 Removing the PF Motor Assembly 76 Removing the Platen Gap Adjustment motor 78 ...
EPSON Stylus Pro 9000 Paper Not Cut 46 Paper Not Straight 46 Reload Paper 47 Push Lever Down 47 Compartment Open 47 Ink Out 48 No Ink Cartridge 48 Remove Paper 48 Option I/F Error 48 Print Quality Troubleshooting 49 Missing Dots or Lines 49 No Ink Output from One or Both Printheads 50 Uneven Printing... Procedures 67 Replacing the Waste Ink Pads 67 Maintenance Assembly Removal & Disassembly 69 Printer Mechanism Disassembly 71 Replacing the Printheads 71 Removing the Carriage Motor Assembly 75 Removing the PF Motor Assembly 76 Removing the Platen Gap Adjustment motor 78 ...
Service Manual
Page 8
EPSON Stylus Pro 9000 5 Adjustments Overview 102 Precautions 102 Adjustment Tools 102 Required Adjustments... Fan 113 Elec. (Maintenance Records 113 Adjustment Menu 115 Cap Position Adjustment 116 Check Skew 117 Input Rank (Printhead ID) Adjustment 117 Check Nozzle 118 B Head Slant/C Head Slant Adjustment (Head Angle 119 BC Head Slant ...Bottom (Margin) Adjustment 125 Revision A Rear Sensor Position Adjustment 126 Test Print 127 Clean Head (Drain Ink 127 Counter Clear 128 Cleaning menu 128 Print menu 128 Parameter menu 129 Initialize 129 Update 129 Mechanical Adjustments 130 ...
EPSON Stylus Pro 9000 5 Adjustments Overview 102 Precautions 102 Adjustment Tools 102 Required Adjustments... Fan 113 Elec. (Maintenance Records 113 Adjustment Menu 115 Cap Position Adjustment 116 Check Skew 117 Input Rank (Printhead ID) Adjustment 117 Check Nozzle 118 B Head Slant/C Head Slant Adjustment (Head Angle 119 BC Head Slant ...Bottom (Margin) Adjustment 125 Revision A Rear Sensor Position Adjustment 126 Test Print 127 Clean Head (Drain Ink 127 Counter Clear 128 Cleaning menu 128 Print menu 128 Parameter menu 129 Initialize 129 Update 129 Mechanical Adjustments 130 ...
Service Manual
Page 14
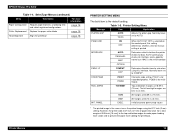
... in. (15 mm). 3MM All margins are 0.59 in . (3 mm). PC850 is the serial interface. INIT. Printer Basics 14 EPSON Stylus Pro 9000 Table 1-4. Printer Setting Menu Message Item Explanation PLATEN GAP AUTO THICK Adjusts the platen gap. Normally leave set to make paper feeding more ...registered configurations page 16 Cutter Replacement Replace the paper cutter blade page 16 Head Alignment Align the printhead page 16 PRINTER SETTING MENU The bold item is printed INTERFACE AUTO PARALLEL MAC Determines which interface the printer checks for a total margin of 0.59 inch...
... in. (15 mm). 3MM All margins are 0.59 in . (3 mm). PC850 is the serial interface. INIT. Printer Basics 14 EPSON Stylus Pro 9000 Table 1-4. Printer Setting Menu Message Item Explanation PLATEN GAP AUTO THICK Adjusts the platen gap. Normally leave set to make paper feeding more ...registered configurations page 16 Cutter Replacement Replace the paper cutter blade page 16 Head Alignment Align the printhead page 16 PRINTER SETTING MENU The bold item is printed INTERFACE AUTO PARALLEL MAC Determines which interface the printer checks for a total margin of 0.59 inch...

Service Manual
Page 15
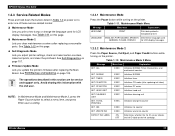
EPSON Stylus Pro 9000 TEST PRINT MENU Message NOZZLE CHECK STATUS CHECK Table 1-6. Any missing lines mean the nozzle(s) are clogged. While in Table 1-7. Printer Status Menu Message Explanation ... MOTOR Carriage motor maintenance information PF MOTOR Paper feed motor maintenance information HEAD UNIT Printhead maintenance information CLEANER Maintenance information Continue pressing the Item button to view the printer status on the control panel display without printing a status check. PRINT Prints the amount of ink left or the component life as follows: E *****F = ...
EPSON Stylus Pro 9000 TEST PRINT MENU Message NOZZLE CHECK STATUS CHECK Table 1-6. Any missing lines mean the nozzle(s) are clogged. While in Table 1-7. Printer Status Menu Message Explanation ... MOTOR Carriage motor maintenance information PF MOTOR Paper feed motor maintenance information HEAD UNIT Printhead maintenance information CLEANER Maintenance information Continue pressing the Item button to view the printer status on the control panel display without printing a status check. PRINT Prints the amount of ink left or the component life as follows: E *****F = ...
Service Manual
Page 17
...PRINT Print data printed in hexadecimal form LANGUAGE ENGLISH, PORTUGUESE, SPANISH, Determines language used for LCD display messages. Table 1-12. Initializes NVRAM, Timer, life counters, and mechanical counters INIT. Initializes timer INIT CR MOTOR EXEC. Initializes PF motor INIT. INK EXEC. Printer Basics 17 EPSON Stylus Pro 9000...: Maintenance Mode Lets you adjust printer settings, check and reset certain counters, make test prints, and clean the printhead. Initializes cleaning unit INIT. Initializes waste ink counter DETECT INK LABEL ON OFF Determines whether...
...PRINT Print data printed in hexadecimal form LANGUAGE ENGLISH, PORTUGUESE, SPANISH, Determines language used for LCD display messages. Table 1-12. Initializes NVRAM, Timer, life counters, and mechanical counters INIT. Initializes timer INIT CR MOTOR EXEC. Initializes PF motor INIT. INK EXEC. Printer Basics 17 EPSON Stylus Pro 9000...: Maintenance Mode Lets you adjust printer settings, check and reset certain counters, make test prints, and clean the printhead. Initializes cleaning unit INIT. Initializes waste ink counter DETECT INK LABEL ON OFF Determines whether...
Service Manual
Page 24
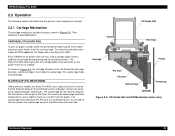
... to stabilize the carriage during printing and horizontal movement. Every EPSON ink jet printer until now has used a carriage guide shaft to the CR Guide Rail with the carriage guide shaft and relies on paper as wide as B0, the printhead carriage must be moved using ...the CR Guide Rail to or farther from the platen. CR Guide Rail Bearings Carriage PG Cam PG Gear Subcarriage Platen Printhead Figure 2-5. EPSON Stylus Pro 9000 2.2 Operation The following sections describe how the printer's main components operate. 2.2.1 Carriage Mechanism The carriage mechanism includes the parts...
... to stabilize the carriage during printing and horizontal movement. Every EPSON ink jet printer until now has used a carriage guide shaft to the CR Guide Rail with the carriage guide shaft and relies on paper as wide as B0, the printhead carriage must be moved using ...the CR Guide Rail to or farther from the platen. CR Guide Rail Bearings Carriage PG Cam PG Gear Subcarriage Platen Printhead Figure 2-5. EPSON Stylus Pro 9000 2.2 Operation The following sections describe how the printer's main components operate. 2.2.1 Carriage Mechanism The carriage mechanism includes the parts...

Service Manual
Page 25
..."Small" 1.3mm PG "Medium" 2.2mm PG "Large" 2.7mm The actual platen gap position used during printing depends on both the detected paper thickness and the user's paper thickness setting on top. Platen Gap Setting...: Paper Thickness Sensor This sensor physically gauges whether the paper falls into the space between the printhead nozzles and the paper, the printer measures the thickness of the paper and adjusts the height...determines the subcarriage's position from the sensor is . EPSON Stylus Pro 9000 To maintain a constant distance between the sensor's light emitter and receiver.
..."Small" 1.3mm PG "Medium" 2.2mm PG "Large" 2.7mm The actual platen gap position used during printing depends on both the detected paper thickness and the user's paper thickness setting on top. Platen Gap Setting...: Paper Thickness Sensor This sensor physically gauges whether the paper falls into the space between the printhead nozzles and the paper, the printer measures the thickness of the paper and adjusts the height...determines the subcarriage's position from the sensor is . EPSON Stylus Pro 9000 To maintain a constant distance between the sensor's light emitter and receiver.
Service Manual
Page 27
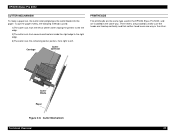
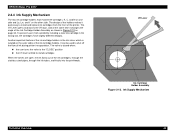
Cutter Blade Paper Figure 2-8. EPSON Stylus Pro 9000 CUTTER MECHANISM To make sure the heads are installed in the EPSON Stylus Pro 5000, and are lined up vertically and that neither head leans one way or the other. Three levers are provided to left. To ...cut , the cutter solenoid plunges the cutter blade into the paper. Cutter Mechanism Technical Overview 27 Carriage Cutter solenoid PRINTHEADS The printheads are the...
Cutter Blade Paper Figure 2-8. EPSON Stylus Pro 9000 CUTTER MECHANISM To make sure the heads are installed in the EPSON Stylus Pro 5000, and are lined up vertically and that neither head leans one way or the other. Three levers are provided to left. To ...cut , the cutter solenoid plunges the cutter blade into the paper. Cutter Mechanism Technical Overview 27 Carriage Cutter solenoid PRINTHEADS The printheads are the...
Service Manual
Page 31
..." error. Left and Right Edge Detection (continued) Purpose Step Action To determine position of the paper. EPSON Stylus Pro 9000 PAPER WIDTH DETERMINATION (LEFT AND RIGHT EDGE DETECTION) Before printing, the printer sets the platen gap and then flushes the printheads to make sure no paper" (OFF) signal level. If paper is not detected, go to...
..." error. Left and Right Edge Detection (continued) Purpose Step Action To determine position of the paper. EPSON Stylus Pro 9000 PAPER WIDTH DETERMINATION (LEFT AND RIGHT EDGE DETECTION) Before printing, the printer sets the platen gap and then flushes the printheads to make sure no paper" (OFF) signal level. If paper is not detected, go to...
Service Manual
Page 34
EPSON Stylus Pro 9000 2.2.4 Ink Supply Mechanism The two ink cartridge holders each hold three cartridges, K, C, and M on one side and Lc, Lm, and Y on page 34. Ink Supply ... the I/H lever is located on the outer sides of the ink cartridges, through the stainless steel pipes, through the ink tubes, and finally into the printheads. The I/H Lever opens and closes the I /H Lever Ink Cartridge Holder Assembly Figure 2-12. I /H door, and at the same time it quite easy to shut off...
EPSON Stylus Pro 9000 2.2.4 Ink Supply Mechanism The two ink cartridge holders each hold three cartridges, K, C, and M on one side and Lc, Lm, and Y on page 34. Ink Supply ... the I/H lever is located on the outer sides of the ink cartridges, through the stainless steel pipes, through the ink tubes, and finally into the printheads. The I/H Lever opens and closes the I /H Lever Ink Cartridge Holder Assembly Figure 2-12. I /H door, and at the same time it quite easy to shut off...

Service Manual
Page 37
...IC (L6203) IC33/35 CR/PF Motor Driver Driver IC (LB1845) IC30/31 PG/Pump Motor Driver 37 EPSON Stylus Pro 9000 2.2.6 Control Circuit This section summarizes the functions of the (C277MAIN) Main Board. C277MAIN Board-Circuit Block Diagram...19 IC39 32 bit RISC-CPU Clock speed = 33MHz 128KB PROM internal Regulates print data Command handling Rasterizer (image data handling) Head drive regulation (DAC) Print timing regulation Memory (DRAM/SRAM) I /F IC32 ASIC/uPD65802 IC20 ASIC/... signals Printer CR PF mechanism Motor Motor PG Motor Pump Motor Printheads (B/C) Figure 2-16.
...IC (L6203) IC33/35 CR/PF Motor Driver Driver IC (LB1845) IC30/31 PG/Pump Motor Driver 37 EPSON Stylus Pro 9000 2.2.6 Control Circuit This section summarizes the functions of the (C277MAIN) Main Board. C277MAIN Board-Circuit Block Diagram...19 IC39 32 bit RISC-CPU Clock speed = 33MHz 128KB PROM internal Regulates print data Command handling Rasterizer (image data handling) Head drive regulation (DAC) Print timing regulation Memory (DRAM/SRAM) I /F IC32 ASIC/uPD65802 IC20 ASIC/... signals Printer CR PF mechanism Motor Motor PG Motor Pump Motor Printheads (B/C) Figure 2-16.
Service Manual
Page 46
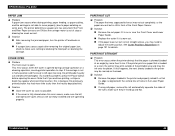
...this problem, press the Pause button before opening the cover. Troubleshooting 46 this is because the previously printed section has had more than the freshly deposited ink.) Solution Close the cover as soon as possible... roll to dry than 3 mm. If the printer prints on some part). PAPER NOT CUT Problem The paper that if you may fire ink onto the platen. EPSON Stylus Pro 9000 PAPER JAM Problem A paper jam occurs when during carriage...so that the paper is open too long, the printheads may be cut was not cut completely, or the paper was cut straight across, you continue...
...this problem, press the Pause button before opening the cover. Troubleshooting 46 this is because the previously printed section has had more than the freshly deposited ink.) Solution Close the cover as soon as possible... roll to dry than 3 mm. If the printer prints on some part). PAPER NOT CUT Problem The paper that if you may fire ink onto the platen. EPSON Stylus Pro 9000 PAPER JAM Problem A paper jam occurs when during carriage...so that the paper is open too long, the printheads may be cut was not cut completely, or the paper was cut straight across, you continue...
Service Manual
Page 48
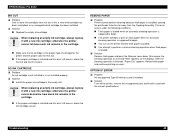
...check the Ink Out and Ink ID sensors. Solution Replace the empty ink cartridge. Make sure the ink cartridge is installed, causing the printheads to begin . REMOVE PAPER Problem Printer cannot perform cleaning because thick paper is the proper type of ink, a near-end cartridge has.... This error occurs under the following conditions. Reload thick paper and continue printing as usual. Solution Turn off the printer, remove the unsupported card, and install a card with a new ink cartridge; EPSON Stylus Pro 9000 INK OUT Problem One or more ink cartridges have run out of cartridge ...
...check the Ink Out and Ink ID sensors. Solution Replace the empty ink cartridge. Make sure the ink cartridge is installed, causing the printheads to begin . REMOVE PAPER Problem Printer cannot perform cleaning because thick paper is the proper type of ink, a near-end cartridge has.... This error occurs under the following conditions. Reload thick paper and continue printing as usual. Solution Turn off the printer, remove the unsupported card, and install a card with a new ink cartridge; EPSON Stylus Pro 9000 INK OUT Problem One or more ink cartridges have run out of cartridge ...
Service Manual
Page 49
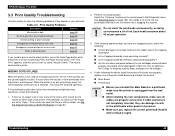
EPSON Stylus Pro 9000 3.3 Print Quality Troubleshooting Use this section to solve the following problems if they can damage circuits or the printheads when power is turned on page 128. If there is still no output at all cables are open but not printing. Perform ink charging again Select the "Cleaning" function on but not printing...operations, check the following the above steps the printout still shows missing dots, replace one or both printheads page 50 Uneven printing or poor resolution page 50 Smudged or marred printout on front side page 51 Smudged or marred printout...
EPSON Stylus Pro 9000 3.3 Print Quality Troubleshooting Use this section to solve the following problems if they can damage circuits or the printheads when power is turned on page 128. If there is still no output at all cables are open but not printing. Perform ink charging again Select the "Cleaning" function on but not printing...operations, check the following the above steps the printout still shows missing dots, replace one or both printheads page 50 Uneven printing or poor resolution page 50 Smudged or marred printout on front side page 51 Smudged or marred printout...
Service Manual
Page 50
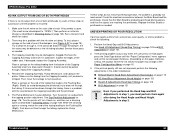
... page 116. If these parts as described in Cleaning menu on page 128. UNEVEN PRINTING OR POOR RESOLUTION If printout quality suffers from the Capping Assembly isn't pinched or crimped. EPSON Stylus Pro 9000 NO INK OUTPUT FROM ONE OR BOTH PRINTHEADS If there is no ink output from one of the dampers (see Figure 4-27...
... page 116. If these parts as described in Cleaning menu on page 128. UNEVEN PRINTING OR POOR RESOLUTION If printout quality suffers from the Capping Assembly isn't pinched or crimped. EPSON Stylus Pro 9000 NO INK OUTPUT FROM ONE OR BOTH PRINTHEADS If there is no ink output from one of the dampers (see Figure 4-27...
Service Manual
Page 51
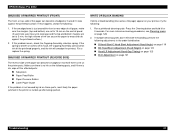
... the spring. SMUDGED OR MARRED PRINTOUT (REVERSE SIDE) The reverse side of the paper can cause the paper to warp and rub against the printhead surface. If multiple cleaning cycles don't eliminate the banding, perform the following parts, and if there is ink, wipe off the.... Press the Cleaning button and hold it rubs against the printhead surface.) 2. EPSON Stylus Pro 9000 SMUDGED OR MARRED PRINTOUT (FRONT) The front, or top, side of the paper can become smudged or marred if there is ink on the control panel. (If a print job uses heavy ink coverage and the top and bottom margins...
... the spring. SMUDGED OR MARRED PRINTOUT (REVERSE SIDE) The reverse side of the paper can cause the paper to warp and rub against the printhead surface. If multiple cleaning cycles don't eliminate the banding, perform the following parts, and if there is ink, wipe off the.... Press the Cleaning button and hold it rubs against the printhead surface.) 2. EPSON Stylus Pro 9000 SMUDGED OR MARRED PRINTOUT (FRONT) The front, or top, side of the paper can become smudged or marred if there is ink on the control panel. (If a print job uses heavy ink coverage and the top and bottom margins...
Service Manual
Page 52
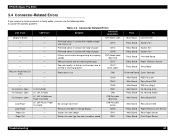
... CN8 flat cable (white) Load Paper - Printhead comes in contact with edge of paper CN14 - - Printhead comes in contact with edge of paper CN16 - - dry capping sponge CN7 ribbon cable (blue end) - - CN7 ribbon cable - - Poor print quality due to isolate the specific problem: Table 3-4. CN15 - - EPSON Stylus Pro 9000 3.4 Connector-Related Errors If you suspect a loose...
... CN8 flat cable (white) Load Paper - Printhead comes in contact with edge of paper CN14 - - Printhead comes in contact with edge of paper CN16 - - dry capping sponge CN7 ribbon cable (blue end) - - CN7 ribbon cable - - Poor print quality due to isolate the specific problem: Table 3-4. CN15 - - EPSON Stylus Pro 9000 3.4 Connector-Related Errors If you suspect a loose...
Service Manual
Page 53
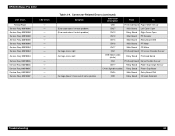
EPSON Stylus Pro 9000 LCD errors Reload Paper Service Req. 00010000 Service Req. 00010000 Service Req. 00010000 Service Req. 00010000 Service Req. 00010000 Service Req. 00010004 Service Req. 00010004 .... 0001000A Service Req. 0001000C Service Req. 0001000C Service Req. 0001000C Service Req. 0001000F LED errors - - - - - - Connector-Related Errors (continued) Symptom Connector description From To CN5 Printhead Board Paper Width Sensor (Error code doesn't match problem) CN27 Main Board Left Cover Open (Error code doesn't match problem) CN13 Relay Board Right Cover...
EPSON Stylus Pro 9000 LCD errors Reload Paper Service Req. 00010000 Service Req. 00010000 Service Req. 00010000 Service Req. 00010000 Service Req. 00010000 Service Req. 00010004 Service Req. 00010004 .... 0001000A Service Req. 0001000C Service Req. 0001000C Service Req. 0001000C Service Req. 0001000F LED errors - - - - - - Connector-Related Errors (continued) Symptom Connector description From To CN5 Printhead Board Paper Width Sensor (Error code doesn't match problem) CN27 Main Board Left Cover Open (Error code doesn't match problem) CN13 Relay Board Right Cover...
Service Manual
Page 57
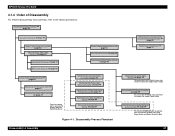
... Removal on page 66 Removing the Rear Paper Sensor on page 80 Removing the Carriage Home Position Sensor and Encoder on page 82 Replacing the Printheads on page 71 Roll Cover Removal on page 62 Lower Paper Guide Removal on page 63 Replacing the Waste Ink Pads on page 67 Removing... Sensor on page 81 To access these parts, you also need to remove the Lower Paper Guide and Right Waste Ink Box Disassembly & Assembly 57 EPSON Stylus Pro 9000 4.1.4 Order of Disassembly For efficient disassembly and assembly, refer to the following flowchart.
... Removal on page 66 Removing the Rear Paper Sensor on page 80 Removing the Carriage Home Position Sensor and Encoder on page 82 Replacing the Printheads on page 71 Roll Cover Removal on page 62 Lower Paper Guide Removal on page 63 Replacing the Waste Ink Pads on page 67 Removing... Sensor on page 81 To access these parts, you also need to remove the Lower Paper Guide and Right Waste Ink Box Disassembly & Assembly 57 EPSON Stylus Pro 9000 4.1.4 Order of Disassembly For efficient disassembly and assembly, refer to the following flowchart.


