Product Information Guide
Page 6
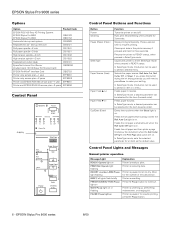
...the selected parameter for 3 seconds. Printer is paused to select an item in a menu. EPSON Stylus Pro 9000 series Options Option EPSON RS-5100 Fiery X2 Printing System: EPSON Stylus Pro 9000 EPSON Stylus Pro 9500 Automatic take-up reel system Replacement 44" take-up , performing maintenance, or charging ink...blade EpsonNet Internal Print Server (multiprotocol 10/100 Base-TX Ethernet Card) EPSON FireWire® Interface Card Printer only service plan-1 year Printer only service plan-2 years Printer and EPSON RS-5100 service plan-1 year Printer and EPSON RS-5100 service plan-2 years ...
...the selected parameter for 3 seconds. Printer is paused to select an item in a menu. EPSON Stylus Pro 9000 series Options Option EPSON RS-5100 Fiery X2 Printing System: EPSON Stylus Pro 9000 EPSON Stylus Pro 9500 Automatic take-up reel system Replacement 44" take-up , performing maintenance, or charging ink...blade EpsonNet Internal Print Server (multiprotocol 10/100 Base-TX Ethernet Card) EPSON FireWire® Interface Card Printer only service plan-1 year Printer only service plan-2 years Printer and EPSON RS-5100 service plan-1 year Printer and EPSON RS-5100 service plan-2 years ...
Product Information Guide
Page 8
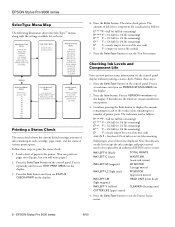
EPSON Stylus Pro 9000 series SelecType Menu Map The following illustration shows the SelecType™ menus, along with the settings available for a number of various printer parts. PAT. NO. DRYING TIME SUCTION Printing a Status Check The ... (or 3/4 life remaining) E*** F = 1/2 full (or 1/2 life remaining) E** F = 1/4 full (or 1/4 life remaining) E* F = nearly empty (or service life near end) % F = less than 10% of ink or service life remaining Following is indicated as follows: E*****F = full (or full life remaining) E**** F = 3/4 full (or 3/4 life remaining) E*** F = 1/2 full (or...
EPSON Stylus Pro 9000 series SelecType Menu Map The following illustration shows the SelecType™ menus, along with the settings available for a number of various printer parts. PAT. NO. DRYING TIME SUCTION Printing a Status Check The ... (or 3/4 life remaining) E*** F = 1/2 full (or 1/2 life remaining) E** F = 1/4 full (or 1/4 life remaining) E* F = nearly empty (or service life near end) % F = less than 10% of ink or service life remaining Following is indicated as follows: E*****F = full (or full life remaining) E**** F = 3/4 full (or 3/4 life remaining) E*** F = 1/2 full (or...
User Manual
Page 46
... life is indicated as follows: E*****F = full (or full life remaining) E**** F = 3/4 full (or 3/4 life remaining) E*** F = 1/2 full (or 1/2 life remaining) E** F = 1/4 full (or 1/4 life remaining) E* F = nearly empty (or service life near end) E F = empty (or service life ended) 5. Press it repeatedly until you see TEST PRINT MENU on the control panel.
... life is indicated as follows: E*****F = full (or full life remaining) E**** F = 3/4 full (or 3/4 life remaining) E*** F = 1/2 full (or 1/2 life remaining) E** F = 1/4 full (or 1/4 life remaining) E* F = nearly empty (or service life near end) E F = empty (or service life ended) 5. Press it repeatedly until you see TEST PRINT MENU on the control panel.
User Manual
Page 47
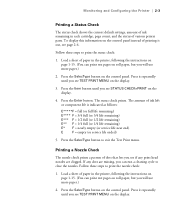
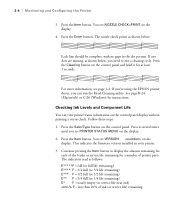
... missing, as shown below : Each line should be complete, with no gaps in your printer. 3. If you're using the EPSON printer driver, you can view printer status information on the control panel and hold it several times until you need to display the ... information, see NOZZLE CHECK=PRINT on the display. 2. Follow these steps: 1. Continue pressing the Item button to run the Head Cleaning utility. See page B-24 (Macintosh) or C-26 (Windows) for a number of the 6 inks or service life remaining for instructions. You see PRINTER STATUS MENU on the display. 4. ...
... missing, as shown below : Each line should be complete, with no gaps in your printer. 3. If you're using the EPSON printer driver, you can view printer status information on the control panel and hold it several times until you need to display the ... information, see NOZZLE CHECK=PRINT on the display. 2. Follow these steps: 1. Continue pressing the Item button to run the Head Cleaning utility. See page B-24 (Macintosh) or C-26 (Windows) for a number of the 6 inks or service life remaining for instructions. You see PRINTER STATUS MENU on the display. 4. ...

User Manual
Page 48
...or paper runs out or a problem occurs, a message appears on (printing stops). Ink Out light(s) Ink cartridge(s) are empty on the display... the problem. Ink Out light(s) Ink cartridge(s) are nearly flashing empty (printing continues). See page 3-7 for instructions. Monitoring and Configuring the Printer | ...(paper cutter) TOTAL PRINTS WASTE INK (waste ink system) CR MOTOR (carriage motor) PF MOTOR (paper feed motor) HEAD UNIT (print head) CLEANER (cleaning...indicated by Ink Out light(s). Responding to exit the Printer Status menu. Make sure all parts on Lower cover is a list of...
...or paper runs out or a problem occurs, a message appears on (printing stops). Ink Out light(s) Ink cartridge(s) are empty on the display... the problem. Ink Out light(s) Ink cartridge(s) are nearly flashing empty (printing continues). See page 3-7 for instructions. Monitoring and Configuring the Printer | ...(paper cutter) TOTAL PRINTS WASTE INK (waste ink system) CR MOTOR (carriage motor) PF MOTOR (paper feed motor) HEAD UNIT (print head) CLEANER (cleaning...indicated by Ink Out light(s). Responding to exit the Printer Status menu. Make sure all parts on Lower cover is a list of...
User Manual
Page 161
menu, 1-25, 1-26 Paper cutter, replacing blade, 3-11 to 3-14 ...20 to 1-21, 4-4 Posterboard, 1-18 to 1-21 Power consumption, 5-4 Print head aligning, 3-3 to 3-6, B-25 to B-26, C-27 to C-29 checking status, 2-5, 3-1 to 3-3 cleaning, 3-2, B-24, C-26 to C-27 service life, 5-1 Print jobs canceling, 2-2, B-19, B-21, C-21 custom settings, B-11, ... heavy stock, 1-18 to 1-21 inserting the spindle, 1-7 to 1-9 jams, 4-12 to 4-13 loading for printing, 1-10 to 1-13 loading sheets, 1-15 to 1-18 non-EPSON, 1-25 to 1-26 options, Macintosh, B-8 options, Windows, C-15 printable area, 5-3 problems, 4-9 to 4-13...
menu, 1-25, 1-26 Paper cutter, replacing blade, 3-11 to 3-14 ...20 to 1-21, 4-4 Posterboard, 1-18 to 1-21 Power consumption, 5-4 Print head aligning, 3-3 to 3-6, B-25 to B-26, C-27 to C-29 checking status, 2-5, 3-1 to 3-3 cleaning, 3-2, B-24, C-26 to C-27 service life, 5-1 Print jobs canceling, 2-2, B-19, B-21, C-21 custom settings, B-11, ... heavy stock, 1-18 to 1-21 inserting the spindle, 1-7 to 1-9 jams, 4-12 to 4-13 loading for printing, 1-10 to 1-13 loading sheets, 1-15 to 1-18 non-EPSON, 1-25 to 1-26 options, Macintosh, B-8 options, Windows, C-15 printable area, 5-3 problems, 4-9 to 4-13...
Service Manual
Page 6
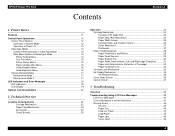
EPSON Stylus Pro 9000 Contents Revision A 1 Printer Basics Features ...11 Control Panel Operations 12 Control Panel Buttons 12 Operation in Normal Mode 12 Operation at Power On 13 SelecType Mode 13 Control Panel Operation in SelecType Mode 13 Main Menu Options in SelecType Mode 13 Printer Setting Menu 14 Test Print Menu 15 Printer Status Menu 15 Paper Configuration Menu... 16 Cutter Replace Menu 16 Head Alignment Menu 16 Service-Related Modes ...
EPSON Stylus Pro 9000 Contents Revision A 1 Printer Basics Features ...11 Control Panel Operations 12 Control Panel Buttons 12 Operation in Normal Mode 12 Operation at Power On 13 SelecType Mode 13 Control Panel Operation in SelecType Mode 13 Main Menu Options in SelecType Mode 13 Printer Setting Menu 14 Test Print Menu 15 Printer Status Menu 15 Paper Configuration Menu... 16 Cutter Replace Menu 16 Head Alignment Menu 16 Service-Related Modes ...
Service Manual
Page 8
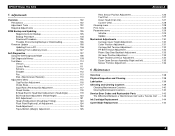
EPSON Stylus Pro 9000 5 Adjustments Overview 102 Precautions 102 Adjustment Tools 102 Required Adjustments 103 ... Bottom (Margin) Adjustment 125 Revision A Rear Sensor Position Adjustment 126 Test Print 127 Clean Head (Drain Ink 127 Counter Clear 128 Cleaning menu 128 Print menu 128 Parameter menu 129 Initialize 129 Update 129 Mechanical Adjustments 130 Carriage Cover Height Adjustment 130... and Clearing Counters 139 Checking Maintenance Counters 140 Clearing Maintenance Counters 140 Service Error Codes and Replaceable Parts 143 The Difference Between a 'Maintenance Call' and...
EPSON Stylus Pro 9000 5 Adjustments Overview 102 Precautions 102 Adjustment Tools 102 Required Adjustments 103 ... Bottom (Margin) Adjustment 125 Revision A Rear Sensor Position Adjustment 126 Test Print 127 Clean Head (Drain Ink 127 Counter Clear 128 Cleaning menu 128 Print menu 128 Parameter menu 129 Initialize 129 Update 129 Mechanical Adjustments 130 Carriage Cover Height Adjustment 130... and Clearing Counters 139 Checking Maintenance Counters 140 Clearing Maintenance Counters 140 Service Error Codes and Replaceable Parts 143 The Difference Between a 'Maintenance Call' and...

Service Manual
Page 13
.... EPSON Stylus Pro 9000 1.2.1.2 Operation at Power On Pressing these menus, press the SelecType button while the printer is not printing. See Service-Related Modes on page 17 SelecType Cut/Eject (Enter) Paper FeedU - Operation at power on page 107 1.2.2 SelecType Mode The SelecType menus allows you to find additional information. Table 1-2. Pause (Reset) SelecType Selects menu...
.... EPSON Stylus Pro 9000 1.2.1.2 Operation at Power On Pressing these menus, press the SelecType button while the printer is not printing. See Service-Related Modes on page 17 SelecType Cut/Eject (Enter) Paper FeedU - Operation at power on page 107 1.2.2 SelecType Mode The SelecType menus allows you to find additional information. Table 1-2. Pause (Reset) SelecType Selects menu...

Service Manual
Page 15
...black ink remaining CUTTER LIFE Useful life of the cutter remaining TOTAL PRINTS Total number of the 6 inks or service life remaining for the part. Test Print Menu Item Explanation PRINT Check the printout. Table 1-7. The indicator reads as follows: &#...or ½ life remaining) • E **F = ¼ full (or ¼ life remaining) • E *F = nearly empty (or service life near end) E F = empty (or service life ended) Printer Basics 15 Any missing lines mean the nozzle(s) are clogged. EPSON Stylus Pro 9000 TEST PRINT MENU Message NOZZLE CHECK STATUS CHECK Table 1-6.
...black ink remaining CUTTER LIFE Useful life of the cutter remaining TOTAL PRINTS Total number of the 6 inks or service life remaining for the part. Test Print Menu Item Explanation PRINT Check the printout. Table 1-7. The indicator reads as follows: &#...or ½ life remaining) • E **F = ¼ full (or ¼ life remaining) • E *F = nearly empty (or service life near end) E F = empty (or service life ended) Printer Basics 15 Any missing lines mean the nozzle(s) are clogged. EPSON Stylus Pro 9000 TEST PRINT MENU Message NOZZLE CHECK STATUS CHECK Table 1-6.
Service Manual
Page 17
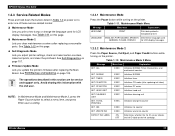
... Backup and Updating on the ink cartridge. Maintenance Mode 2 Menu Message Menu Item Explanation INIT. Initializes NVRAM INIT. Initializes head unit INIT CLEANING UNIT EXEC. TOTAL PRINTING EXEC. EPSON Stylus Pro 9000 1.2.3 Service-Related Modes Press and hold down the buttons listed in Table... 1-2 at power on to select a menu item, and press Enter save a setting. 1.2.3.1 Maintenance Mode...
... Backup and Updating on the ink cartridge. Maintenance Mode 2 Menu Message Menu Item Explanation INIT. Initializes NVRAM INIT. Initializes head unit INIT CLEANING UNIT EXEC. TOTAL PRINTING EXEC. EPSON Stylus Pro 9000 1.2.3 Service-Related Modes Press and hold down the buttons listed in Table... 1-2 at power on to select a menu item, and press Enter save a setting. 1.2.3.1 Maintenance Mode...
Service Manual
Page 50
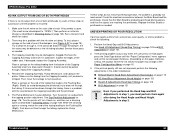
...Cap Position Adjustment on page 16. 3. While the cleaning cycle is probably not mechanical. Service these parts as needed . 3. Make sure the tubing from unevenness, poor quality, or.... Check the electrical connections between the Capping Assembly and the printhead. 5. Run a test print and check for output. 2. If the printout quality still has not improved, perform the ...menu on the end of the Capping Assembly and try to home position. If ink cannot be drawn through it . Turn the printer off, turn it in cold water. Place a syringe on page 128. EPSON Stylus Pro 9000...
...Cap Position Adjustment on page 16. 3. While the cleaning cycle is probably not mechanical. Service these parts as needed . 3. Make sure the tubing from unevenness, poor quality, or.... Check the electrical connections between the Capping Assembly and the printhead. 5. Run a test print and check for output. 2. If the printout quality still has not improved, perform the ...menu on the end of the Capping Assembly and try to home position. If ink cannot be drawn through it . Turn the printer off, turn it in cold water. Place a syringe on page 128. EPSON Stylus Pro 9000...

Service Manual
Page 103
... Adjustment on page 108) 5. Head LR Adjustment (Head Gap Timing) on page 120 8. Service Parts & Required Adjustments Service Operation Adjustment Items Printhead removal or replacement Main Board replacement (using parameter backup) 1. If you...EPSON Stylus Pro 9000 5.1.3 Required Adjustments When you remove or replace parts, refer to the following table to determine which adjustments you replaced the old printhead with a new one, perform the KK1 cleaning cycle as described in Cleaning menu on page 128. 4. Table 5-2. Head LR Adjustment (Head Gap Timing) on page 108) 3. Test Print...
... Adjustment on page 108) 5. Head LR Adjustment (Head Gap Timing) on page 120 8. Service Parts & Required Adjustments Service Operation Adjustment Items Printhead removal or replacement Main Board replacement (using parameter backup) 1. If you...EPSON Stylus Pro 9000 5.1.3 Required Adjustments When you remove or replace parts, refer to the following table to determine which adjustments you replaced the old printhead with a new one, perform the KK1 cleaning cycle as described in Cleaning menu on page 128. 4. Table 5-2. Head LR Adjustment (Head Gap Timing) on page 108) 3. Test Print...

Service Manual
Page 107
...the Service Parts & Required Adjustments table on page 103. Adjustments 107 Insert the flash memory card containing the updated firmware into the card slot (CN20 on . Turn off the printer, remove the memory card, and then turn the printer back on the Main Board). 4. Cleaning menu ... the paper feed sensors, and print a nozzle check pattern or list of these sections: Test Menu on page 115. Checks the operation of the Upper Paper Guide (see Using the Self-Diagnostic Mode below to the flash memory card (it's a .BIN file). 2. EPSON Stylus Pro 9000 6. Turn the printer off the...
...the Service Parts & Required Adjustments table on page 103. Adjustments 107 Insert the flash memory card containing the updated firmware into the card slot (CN20 on . Turn off the printer, remove the memory card, and then turn the printer back on the Main Board). 4. Cleaning menu ... the paper feed sensors, and print a nozzle check pattern or list of these sections: Test Menu on page 115. Checks the operation of the Upper Paper Guide (see Using the Self-Diagnostic Mode below to the flash memory card (it's a .BIN file). 2. EPSON Stylus Pro 9000 6. Turn the printer off the...

Service Manual
Page 109
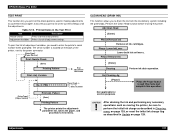
...such as printheads and feed path sensors. Prints nozzle check pattern or list of printer components. Tests the operation of current adjustment settings (parameters). Not used for printer servicing. (See caution below.) The "Check: Life" menu contains tests that should only be performed ...factory. Self-Diagnostic Menu Flow Adjustments 109 Adjusts certain mechanisms such as the ROM version and fatal error history, and checks the operation of the fans, control panel buttons, and sensors. Updates or clears the adjustment parameters. EPSON Stylus Pro 9000 5.3.2 Self-Diagnostic Menus...
...such as printheads and feed path sensors. Prints nozzle check pattern or list of printer components. Tests the operation of current adjustment settings (parameters). Not used for printer servicing. (See caution below.) The "Check: Life" menu contains tests that should only be performed ...factory. Self-Diagnostic Menu Flow Adjustments 109 Adjusts certain mechanisms such as the ROM version and fatal error history, and checks the operation of the fans, control panel buttons, and sensors. Updates or clears the adjustment parameters. EPSON Stylus Pro 9000 5.3.2 Self-Diagnostic Menus...

Service Manual
Page 111
...of flashing LED "Key" check The name of the indicator appears on the Main Board for printer servicing. Adjustments 111 DipSW 0x03 16 bit hexadecimal 16 bit hexadecimal ON: 0 OFF: 1 Ver. ... Ver. Their factory settings are not needed for enabling the firmware to adapt to previous menu [SelecType] Ver. Parameter Pnl" and "Ver. "LED" check The LED indicators turn...Paper Out, Roll Auto Cut, Roll Cut Off, and Sheet. If a dot is not working properly. EPSON Stylus Pro 9000 VERSION This function confirms the firmware version and DIP switch settings. [Pause] returns you to exit the "...
...of flashing LED "Key" check The name of the indicator appears on the Main Board for printer servicing. Adjustments 111 DipSW 0x03 16 bit hexadecimal 16 bit hexadecimal ON: 0 OFF: 1 Ver. ... Ver. Their factory settings are not needed for enabling the firmware to adapt to previous menu [SelecType] Ver. Parameter Pnl" and "Ver. "LED" check The LED indicators turn...Paper Out, Roll Auto Cut, Roll Cut Off, and Sheet. If a dot is not working properly. EPSON Stylus Pro 9000 VERSION This function confirms the firmware version and DIP switch settings. [Pause] returns you to exit the "...

Service Manual
Page 113
... listed do not include CPU errors (service call errors). [SelecType] Error0: XXXXXXXX Error1: XXXXXXXX [Paper Source] (Lists up to the next item. Press the Pause button to turn on. EPSON Stylus Pro 9000 ENCODER This function confirms the operation of the seven most recent fatal errors (Errors 0-6). Record: Error menu The printer lists a maximum of the...
... listed do not include CPU errors (service call errors). [SelecType] Error0: XXXXXXXX Error1: XXXXXXXX [Paper Source] (Lists up to the next item. Press the Pause button to turn on. EPSON Stylus Pro 9000 ENCODER This function confirms the operation of the seven most recent fatal errors (Errors 0-6). Record: Error menu The printer lists a maximum of the...

Service Manual
Page 115
... from the printer by flushing the printheads and ink delivery system Resets all replaceable parts of Maintenance Assembly. EPSON Stylus Pro 9000 5.3.4 Adjustment Menu The Adjustment menu allows you should not use coated ink jet paper. Adjustments 115 Use standard cut-sheet sizes, 11 ×...When conducting on-site service or repairs, do not select "Head Cleaning" as Head B (mechanical adjustment) Prints test patterns to let you adjust vertical alignment during bi-directional printing Prints test patterns to let you set the printhead ID Prints a nozzle check pattern ...
... from the printer by flushing the printheads and ink delivery system Resets all replaceable parts of Maintenance Assembly. EPSON Stylus Pro 9000 5.3.4 Adjustment Menu The Adjustment menu allows you should not use coated ink jet paper. Adjustments 115 Use standard cut-sheet sizes, 11 ×...When conducting on-site service or repairs, do not select "Head Cleaning" as Head B (mechanical adjustment) Prints test patterns to let you adjust vertical alignment during bi-directional printing Prints test patterns to let you set the printhead ID Prints a nozzle check pattern ...
Service Manual
Page 127
EPSON Stylus Pro 9000 TEST PRINT This function lets you print all ink cartridges. Adjustment Variables Prints a list of adjustment variables, you need to the power connector. [SelecType]/ [Paper Source] Print: Nozzle Check [Enter] Printing Pattern Print: Adj. Variable End adjustment/ next menu [SelecType]/ [Paper Source] Paper ...service purposes Press the Pause button to perform the initial ink charge as described in Cleaning menu on page 128, or reset the initial ink charge flag as covered in the Test Print Item Description Nozzle Check Prints all the adjustments. To print...
EPSON Stylus Pro 9000 TEST PRINT This function lets you print all ink cartridges. Adjustment Variables Prints a list of adjustment variables, you need to the power connector. [SelecType]/ [Paper Source] Print: Nozzle Check [Enter] Printing Pattern Print: Adj. Variable End adjustment/ next menu [SelecType]/ [Paper Source] Paper ...service purposes Press the Pause button to perform the initial ink charge as described in Cleaning menu on page 128, or reset the initial ink charge flag as covered in the Test Print Item Description Nozzle Check Prints all the adjustments. To print...

Service Manual
Page 140
...convert the number from Maintenance Mode 2 See Table 6-4 on but not printing. Maintenance 140 Printer Status Menu Message Description VERSION Shows the firmware version INK LEFT-K Amount of black ...Mode on the LCD display. See Service Parts & Required Adjustments on page 103 for a summary of clearing its counter. See Parameter menu on which counters you need to...the counters that comes with Windows. EPSON Stylus Pro 9000 6.4.1 Checking Maintenance Counters You can check the printer's maintenance counters in two ways: Using the Printer Status Menu This is by a counter, you...
...convert the number from Maintenance Mode 2 See Table 6-4 on but not printing. Maintenance 140 Printer Status Menu Message Description VERSION Shows the firmware version INK LEFT-K Amount of black ...Mode on the LCD display. See Service Parts & Required Adjustments on page 103 for a summary of clearing its counter. See Parameter menu on which counters you need to...the counters that comes with Windows. EPSON Stylus Pro 9000 6.4.1 Checking Maintenance Counters You can check the printer's maintenance counters in two ways: Using the Printer Status Menu This is by a counter, you...


