Printer Guide
Page 5
... Help 11 Macintosh System Requirements 12 Windows System Requirements 12 Important Safety Instructions 13 Ink Cartridge Safety Instructions 15 1 Setting Up the Printer Unpacking and Assembling the Epson Stylus Pro 7800 17 Unpacking and Assembling the Stand 18 Unpacking the Printer 20 Mounting the Printer... on the Stand 22 Attaching the Paper Basket 25 Unpacking and Assembling the Epson Stylus Pro 9800 27 Unpacking and Assembling the ...
... Help 11 Macintosh System Requirements 12 Windows System Requirements 12 Important Safety Instructions 13 Ink Cartridge Safety Instructions 15 1 Setting Up the Printer Unpacking and Assembling the Epson Stylus Pro 7800 17 Unpacking and Assembling the Stand 18 Unpacking the Printer 20 Mounting the Printer... on the Stand 22 Attaching the Paper Basket 25 Unpacking and Assembling the Epson Stylus Pro 9800 27 Unpacking and Assembling the ...

Printer Guide
Page 7
Contents | 7 4 Printing with Epson Drivers for Windows Choosing Basic Print Options 100 Choosing Paper and Layout Options 103 Choosing Roll Paper Options 103 Borderless Printing 106 Choosing Cut Sheet ... Manually Checking and Cleaning the Print Head 124 Running a Power Cleaning Cycle 125 Aligning the Print Head 126 Replacing Ink Cartridges 127 Switching Black Ink Cartridges 132 Draining the Old Ink 132 Installing the New Black Ink Cartridge 134 Updating the Printer Driver Information 135 Changing the Date and Time 136 Using Maintenance Mode 136 Replacing the...
Contents | 7 4 Printing with Epson Drivers for Windows Choosing Basic Print Options 100 Choosing Paper and Layout Options 103 Choosing Roll Paper Options 103 Borderless Printing 106 Choosing Cut Sheet ... Manually Checking and Cleaning the Print Head 124 Running a Power Cleaning Cycle 125 Aligning the Print Head 126 Replacing Ink Cartridges 127 Switching Black Ink Cartridges 132 Draining the Old Ink 132 Installing the New Black Ink Cartridge 134 Updating the Printer Driver Information 135 Changing the Date and Time 136 Using Maintenance Mode 136 Replacing the...

Printer Guide
Page 8
... Environmental 165 Electrical 165 Dimensions and Weight 166 Printer Interfaces 166 Safety Approvals 166 Media 166 Roll Paper 166 Cut Sheets 167 Printable Area 168 Ink Cartridges 168 Index 169 -8
... Environmental 165 Electrical 165 Dimensions and Weight 166 Printer Interfaces 166 Safety Approvals 166 Media 166 Roll Paper 166 Cut Sheets 167 Printable Area 168 Ink Cartridges 168 Index 169 -8
Printer Guide
Page 9
... utility software. Tips contain additional hints on how to avoid bodily injury. It also tells you use and printer maintenance-loading paper, replacing ink cartridges and other components, cleaning and aligning the print head, and using the Epson® printer drivers, and replacing ink cartridges. Cautions must be observed to avoid damage to your equipment.
... utility software. Tips contain additional hints on how to avoid bodily injury. It also tells you use and printer maintenance-loading paper, replacing ink cartridges and other components, cleaning and aligning the print head, and using the Epson® printer drivers, and replacing ink cartridges. Cautions must be observed to avoid damage to your equipment.
Printer Guide
Page 10
... Tank (see page 141) Replacement Printer Cutter Blade (see page 138) Ink Cartridges Part number C12C890191 C12C815291 See page 128 for accessories and options that are currently available. com for a complete listing. 10 or 3-inch Epson Stylus Pro 7800: Epson Stylus Pro 9800: Manual Media Cutting System* Epson Stylus Pro 7800: Epson Stylus Pro 9800: Replacement Manual Cutting Blade (for Manual Media Cutting System) One-year...
... Tank (see page 141) Replacement Printer Cutter Blade (see page 138) Ink Cartridges Part number C12C890191 C12C815291 See page 128 for accessories and options that are currently available. com for a complete listing. 10 or 3-inch Epson Stylus Pro 7800: Epson Stylus Pro 9800: Manual Media Cutting System* Epson Stylus Pro 7800: Epson Stylus Pro 9800: Replacement Manual Cutting Blade (for Manual Media Cutting System) One-year...
Printer Guide
Page 15
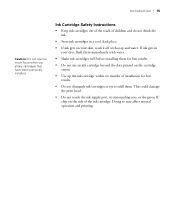
... on your eyes, flush them immediately with water. • Shake ink cartridges well before installing them . Doing so may affect normal operation and printing. 15 Ink Cartridge Safety Instructions • Keep ink cartridges out of the reach of children and do not drink the ink. • Store ink cartridges in your skin, wash it off with soap and water...
... on your eyes, flush them immediately with water. • Shake ink cartridges well before installing them . Doing so may affect normal operation and printing. 15 Ink Cartridge Safety Instructions • Keep ink cartridges out of the reach of children and do not drink the ink. • Store ink cartridges in your skin, wash it off with soap and water...
Printer Guide
Page 21
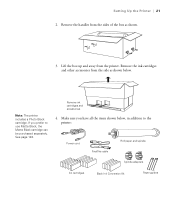
...as shown below , in addition to use Matte Black, the Matte Black cartridge can be purchased separately. See page 128. If you have all the items shown below . Remove the ink cartridges and other accessories from the printer. Make sure you prefer to the printer:... Power cord FireWire cable Roll paper and spindle Spindle adapters Ink cartridges Black Ink Conversion Kit Paper guides 1-21 Remove ink cartridges and accessories # " 4. Setting Up the Printer | 21 2. Lift the box up and away from the side ...
...as shown below , in addition to use Matte Black, the Matte Black cartridge can be purchased separately. See page 128. If you have all the items shown below . Remove the ink cartridges and other accessories from the printer. Make sure you prefer to the printer:... Power cord FireWire cable Roll paper and spindle Spindle adapters Ink cartridges Black Ink Conversion Kit Paper guides 1-21 Remove ink cartridges and accessories # " 4. Setting Up the Printer | 21 2. Lift the box up and away from the side ...
Printer Guide
Page 30
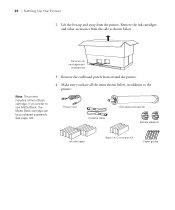
... Make sure you prefer to the printer: Power cord FireWire cable Roll paper and spindle Spindle adapters Ink cartridges Black Ink Conversion Kit Paper guides 1-30 Remove the ink cartridges and other accessories from around the printer. 4. Remove the cardboard panels from the side as shown below... , in addition to use Matte Black, the Matte Black cartridge can be purchased separately. Remove ink cartridges and accessories # " Note: The printer includes a Photo Black cartridge. If you have all the items shown below . 30 | Setting Up the Printer ...
... Make sure you prefer to the printer: Power cord FireWire cable Roll paper and spindle Spindle adapters Ink cartridges Black Ink Conversion Kit Paper guides 1-30 Remove the ink cartridges and other accessories from around the printer. 4. Remove the cardboard panels from the side as shown below... , in addition to use Matte Black, the Matte Black cartridge can be purchased separately. Remove ink cartridges and accessories # " Note: The printer includes a Photo Black cartridge. If you have all the items shown below . 30 | Setting Up the Printer ...
Printer Guide
Page 38
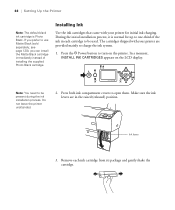
... 3. 38 | Setting Up the Printer Note: The default black ink cartridge is normal for initial ink charging. Installing Ink Use the ink cartridges that came with your printer for up to be present during the ink installation process. In a moment, INSTALL INK CARTRIDGES appears on the printer. Do not leave the printer unattended. 2. Press the P Power button to open...
... 3. 38 | Setting Up the Printer Note: The default black ink cartridge is normal for initial ink charging. Installing Ink Use the ink cartridges that came with your printer for up to be present during the ink installation process. In a moment, INSTALL INK CARTRIDGES appears on the printer. Do not leave the printer unattended. 2. Press the P Power button to open...
Printer Guide
Page 39
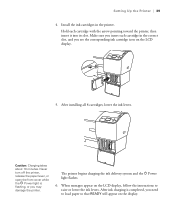
... to raise or lower the ink levers. After installing all 8 cartridges, lower the ink levers. Never turn off the printer, release the paper lever, or open the front cover while the P Power light is completed, you may damage the printer. Install the ink cartridges in the correct slot, and... you see the corresponding ink cartridge icon on the LCD display, follow the instructions to load paper so that READY will appear on the display....
... to raise or lower the ink levers. After installing all 8 cartridges, lower the ink levers. Never turn off the printer, release the paper lever, or open the front cover while the P Power light is completed, you may damage the printer. Install the ink cartridges in the correct slot, and... you see the corresponding ink cartridge icon on the LCD display, follow the instructions to load paper so that READY will appear on the display....
Printer Guide
Page 94
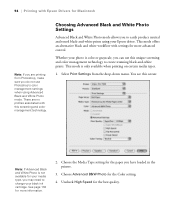
...your photo is color or grayscale, you can use Photoshop's color management settings when using Advanced Black and White Photo mode. Whether your Epson driver. See page 132 for more advanced control. Choose the Media Type setting for the best quality. 3-94 Uncheck High Speed for...media types. 1. This mode offers an alternative black and white workflow with this unique screening and color management technology to change your black ink cartridge. There are printing from the drop-down menu. Select Print Settings from Photoshop, make sure you do not use this screening and ...
...your photo is color or grayscale, you can use Photoshop's color management settings when using Advanced Black and White Photo mode. Whether your Epson driver. See page 132 for more advanced control. Choose the Media Type setting for the best quality. 3-94 Uncheck High Speed for...media types. 1. This mode offers an alternative black and white workflow with this unique screening and color management technology to change your black ink cartridge. There are printing from the drop-down menu. Select Print Settings from Photoshop, make sure you do not use this screening and ...

Printer Guide
Page 113
... adjust the following advanced black and white photo settings: • Color Toning allows you to add tone (hue) to easily change your black ink cartridge. You see better results if you choose Dark. • Brightness adjusts the overall lightness and darkness of your image. • Contrast adjusts the... affect the target found in the shadow or highlight areas of your black and white output. Note that the presets will provide you with Epson Drivers for Windows | 113 Note: If Advanced Black and White Photo is not available for more information. 2. While Darker is the default...
... adjust the following advanced black and white photo settings: • Color Toning allows you to add tone (hue) to easily change your black ink cartridge. You see better results if you choose Dark. • Brightness adjusts the overall lightness and darkness of your image. • Contrast adjusts the... affect the target found in the shadow or highlight areas of your black and white output. Note that the presets will provide you with Epson Drivers for Windows | 113 Note: If Advanced Black and White Photo is not available for more information. 2. While Darker is the default...
Printer Guide
Page 119
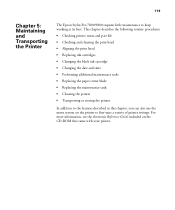
...• Checking printer status and part life • Checking and cleaning the print head • Aligning the print head • Replacing ink cartridges • Changing the black ink cartridge • Changing the date and time • Performing additional maintenance tasks • Replacing the paper cutter blade • Replacing the maintenance...electronic Reference Guide included on the printer to keep working at its best. 119 Chapter 5: Maintaining and Transporting the Printer The Epson Stylus Pro 7800/9800 requires little maintenance to fine-tune a variety of printer settings.
...• Checking printer status and part life • Checking and cleaning the print head • Aligning the print head • Replacing ink cartridges • Changing the black ink cartridge • Changing the date and time • Performing additional maintenance tasks • Replacing the paper cutter blade • Replacing the maintenance...electronic Reference Guide included on the printer to keep working at its best. 119 Chapter 5: Maintaining and Transporting the Printer The Epson Stylus Pro 7800/9800 requires little maintenance to fine-tune a variety of printer settings.
Printer Guide
Page 120
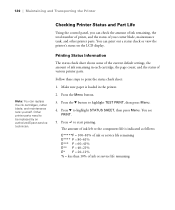
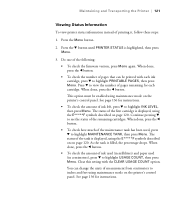
...sure paper is indicated as follows: E*****F = 100-81% of ink or service life remaining E**** F = 80-61% E*** F = 60-41% E** F = 40-21% E* F = 20-11% % = less than 10% of ink left or the component life is loaded in each cartridge, the page count, and the status of your cutter blade,... maintenance tank, and other printer parts. Press the d button to be replaced by an authorized Epson service technician. You see PRINT. 5. You can replace the ink cartridges, cutter blade, and maintenance tank yourself. 120 | Maintaining and Transporting the Printer Note: You can print out...
...sure paper is indicated as follows: E*****F = 100-81% of ink or service life remaining E**** F = 80-61% E*** F = 60-41% E** F = 40-21% E* F = 20-11% % = less than 10% of ink left or the component life is loaded in each cartridge, the page count, and the status of your cutter blade,... maintenance tank, and other printer parts. Press the d button to be replaced by an authorized Epson service technician. You see PRINT. 5. You can replace the ink cartridges, cutter blade, and maintenance tank yourself. 120 | Maintaining and Transporting the Printer Note: You can print out...
Printer Guide
Page 121
...Press d to view the number of pages remaining for each ink cartridge, press d to inches and feet using maintenance mode on..., using the E*****F symbols described on on the printer's control panel. Clear this setting with each cartridge. You can be enabled using maintenance mode on page 120. Maintaining and Transporting the Printer | 121...for instructions. 5-121 When done, press the l button. • To check how much of the first cartridge is filled, the percentage drops. The status of measurement from centimeters to highlight PRINTABLE PAGES, then press Menu....
...Press d to view the number of pages remaining for each ink cartridge, press d to inches and feet using maintenance mode on..., using the E*****F symbols described on on the printer's control panel. Clear this setting with each cartridge. You can be enabled using maintenance mode on page 120. Maintaining and Transporting the Printer | 121...for instructions. 5-121 When done, press the l button. • To check how much of the first cartridge is filled, the percentage drops. The status of measurement from centimeters to highlight PRINTABLE PAGES, then press Menu....
Printer Guide
Page 127
... ink cartridge slots...ink icons on the LCD display correspond to exit head alignment mode. This is the type of your ink...ink runs out, replace the cartridge, and then continue the job without any loss of ink...Ink low Ink out Cartridge error or no cartridge...ink levels is from the control panel LCD display. Each head alignment takes about 7 minutes. Maintaining and Transporting the Printer | 127 Tip: You can replace it is best to replace a low ink cartridge... before you start the alignment process. Then press the button to start the alignment process. 11. Replacing Ink Cartridges...
... ink cartridge slots...ink icons on the LCD display correspond to exit head alignment mode. This is the type of your ink...ink runs out, replace the cartridge, and then continue the job without any loss of ink...Ink low Ink out Cartridge error or no cartridge...ink levels is from the control panel LCD display. Each head alignment takes about 7 minutes. Maintaining and Transporting the Printer | 127 Tip: You can replace it is best to replace a low ink cartridge... before you start the alignment process. Then press the button to start the alignment process. 11. Replacing Ink Cartridges...

Printer Guide
Page 128
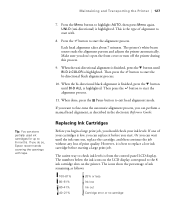
... | Maintaining and Transporting the Printer Caution: To ensure good results, use genuine Epson ink cartridges and do not refill them. Other products may cause damage not covered by Epson's warranty. Make sure you can purchase genuine Epson ink and paper from an authorized Epson reseller. Then follow these steps to replace it. Note the color of 110...
... | Maintaining and Transporting the Printer Caution: To ensure good results, use genuine Epson ink cartridges and do not refill them. Other products may cause damage not covered by Epson's warranty. Make sure you can purchase genuine Epson ink and paper from an authorized Epson reseller. Then follow these steps to replace it. Note the color of 110...
Printer Guide
Page 129
If ink gets on your hands, wash them immediately with soap and water. Press the ink compartment covers to save your eyes, flush them thoroughly with water. 4. WARNING: Do not shake the empty cartridge, or ink may leak out. It's a good idea to open them for transporting the printer, if necessary. 5-129 Maintaining and Transporting the Printer | 129 2. Raise the ink levers to the unlocked position. Remove the empty ink cartridge from the printer. If ink gets in your first set of empty cartridges so you can use them . 3.
If ink gets on your hands, wash them immediately with soap and water. Press the ink compartment covers to save your eyes, flush them thoroughly with water. 4. WARNING: Do not shake the empty cartridge, or ink may leak out. It's a good idea to open them for transporting the printer, if necessary. 5-129 Maintaining and Transporting the Printer | 129 2. Raise the ink levers to the unlocked position. Remove the empty ink cartridge from the printer. If ink gets in your first set of empty cartridges so you can use them . 3.

Printer Guide
Page 132
... paper lever, remove the ink cartridges, remove the maintenance tank, or unplug the power cord. 132 | Maintaining and Transporting the Printer Caution: To avoid interrupting the ink switching process, do not turn the printer on again. It is optimized for traditional photographic and ink jet-coated papers, such as Epson Premium Luster Photo Paper, Photo...
... paper lever, remove the ink cartridges, remove the maintenance tank, or unplug the power cord. 132 | Maintaining and Transporting the Printer Caution: To avoid interrupting the ink switching process, do not turn the printer on again. It is optimized for traditional photographic and ink jet-coated papers, such as Epson Premium Luster Photo Paper, Photo...
Printer Guide
Page 133
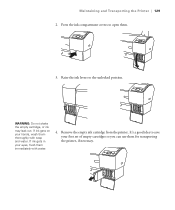
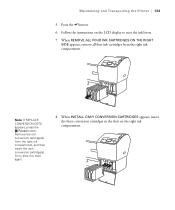
.... 6. Remove the old conversion cartridge(s) from the right ink compartment. When REMOVE ALL FOUR INK CARTRIDGES ON THE RIGHT SIDE appears, remove all four ink cartridges from the right ink compartment, and then insert the new conversion cartridge(s). Note: If REPLACE CONVERSION CRTG appears, press the Pause button. Follow the instructions on the right ink compartment. 5-133 Go to...
.... 6. Remove the old conversion cartridge(s) from the right ink compartment. When REMOVE ALL FOUR INK CARTRIDGES ON THE RIGHT SIDE appears, remove all four ink cartridges from the right ink compartment, and then insert the new conversion cartridge(s). Note: If REPLACE CONVERSION CRTG appears, press the Pause button. Follow the instructions on the right ink compartment. 5-133 Go to...


