Quick Guide
Page 1
Epson Stylus® NX100 Series Quick Guide Basic Copying, Printing, and Scanning Maintaining Your NX100 Series Solving Problems
Epson Stylus® NX100 Series Quick Guide Basic Copying, Printing, and Scanning Maintaining Your NX100 Series Solving Problems
Quick Guide
Page 2
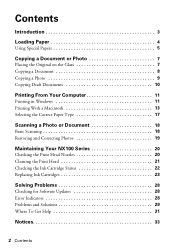
... With a Macintosh 13 Selecting the Correct Paper Type 17 Scanning a Photo or Document 18 Basic Scanning 18 Restoring and Correcting Photos 19 Maintaining Your NX100 Series 20 Checking the Print Head Nozzles 20 Cleaning the Print Head 21 Checking the Ink Cartridge Status 22 Replacing Ink Cartridges 23 Solving Problems 28...
... With a Macintosh 13 Selecting the Correct Paper Type 17 Scanning a Photo or Document 18 Basic Scanning 18 Restoring and Correcting Photos 19 Maintaining Your NX100 Series 20 Checking the Print Head Nozzles 20 Cleaning the Print Head 21 Checking the Ink Cartridge Status 22 Replacing Ink Cartridges 23 Solving Problems 28...

Quick Guide
Page 3
...Tips contain hints for it to your desktop. Note: Notes contain important information about your computer! Introduction After you have set up your Epson Stylus® NX100 Series as described on the Start Here sheet, turn here to: ■ Load paper ■ Make a copy of these guidelines as ...your Windows® or Macintosh® computer. For additional instructions, see the on-screen Epson Information Center by double-clicking the icon for better copying, scanning, and printing. Of course, your NX100 Series can do most of a document or photo ■ Get the basic steps for ...
...Tips contain hints for it to your desktop. Note: Notes contain important information about your computer! Introduction After you have set up your Epson Stylus® NX100 Series as described on the Start Here sheet, turn here to: ■ Load paper ■ Make a copy of these guidelines as ...your Windows® or Macintosh® computer. For additional instructions, see the on-screen Epson Information Center by double-clicking the icon for better copying, scanning, and printing. Of course, your NX100 Series can do most of a document or photo ■ Get the basic steps for ...
Quick Guide
Page 9
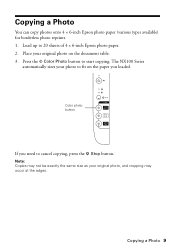
The NX100 Series automatically sizes your photo to cancel copying, press the y Stop button. Color photo button If you need to fit on the document table. 3. Copying a Photo You can copy photos onto 4 × 6-inch Epson photo paper (various types available) for borderless photo reprints. 1. Place your original photo, and cropping may occur at the edges. Load up to start copying. Press the x Color Photo button to 20 sheets of 4 × 6-inch Epson photo paper. 2. Note: Copies may not be exactly the same size as your original photo on the paper you loaded. Copying a Photo 9
The NX100 Series automatically sizes your photo to cancel copying, press the y Stop button. Color photo button If you need to fit on the document table. 3. Copying a Photo You can copy photos onto 4 × 6-inch Epson photo paper (various types available) for borderless photo reprints. 1. Place your original photo, and cropping may occur at the edges. Load up to start copying. Press the x Color Photo button to 20 sheets of 4 × 6-inch Epson photo paper. 2. Note: Copies may not be exactly the same size as your original photo on the paper you loaded. Copying a Photo 9
Quick Guide
Page 11
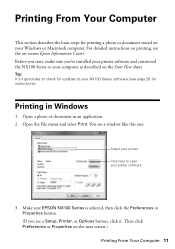
... Windows 1. Open the File menu and select Print. Make sure EPSON NX100 Series is selected, then click the Preferences or Properties button. (If you 've installed your printer software and connected the NX100 Series to your Windows or Macintosh computer. For detailed instructions on printing,...You see a window like this one: Select your printer Click here to your printer software 3. Then click Preferences or Properties on -screen Epson Information Center. Tip: It's a good idea to check for updates to open your NX100 Series software (see a Setup, Printer, or Options button, click it....
... Windows 1. Open the File menu and select Print. Make sure EPSON NX100 Series is selected, then click the Preferences or Properties button. (If you 've installed your printer software and connected the NX100 Series to your Windows or Macintosh computer. For detailed instructions on printing,...You see a window like this one: Select your printer Click here to your printer software 3. Then click Preferences or Properties on -screen Epson Information Center. Tip: It's a good idea to check for updates to open your NX100 Series software (see a Setup, Printer, or Options button, click it....
Quick Guide
Page 17
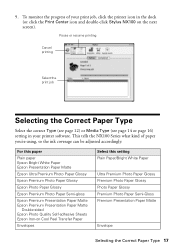
... you're using, so the ink coverage can be adjusted accordingly. This tells the NX100 Series what kind of your print job, click the printer icon in your printer software. Pause or resume printing Cancel printing Select the print job Selecting the Correct Paper Type...Stylus NX100 on Cool Peel Transfer Paper Envelopes Select this setting Plain Paper/Bright White Paper Ultra Premium Photo Paper Glossy Premium Photo Paper Glossy Photo Paper Glossy Premium Photo Paper Semi-Gloss Premium Presentation Paper Matte Envelope Selecting the Correct Paper Type 17 For this paper Plain paper Epson...
... you're using, so the ink coverage can be adjusted accordingly. This tells the NX100 Series what kind of your print job, click the printer icon in your printer software. Pause or resume printing Cancel printing Select the print job Selecting the Correct Paper Type...Stylus NX100 on Cool Peel Transfer Paper Envelopes Select this setting Plain Paper/Bright White Paper Ultra Premium Photo Paper Glossy Premium Photo Paper Glossy Photo Paper Glossy Premium Photo Paper Semi-Gloss Premium Presentation Paper Matte Envelope Selecting the Correct Paper Type 17 For this paper Plain paper Epson...
Quick Guide
Page 18
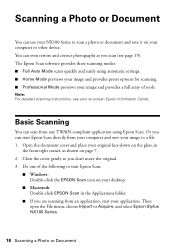
...or Document You can use your NX100 Series to scan a photo or document and save your image and provides a full array of the following to a file. 1. Do one of tools. Then open the File menu, choose Import or Acquire, and select Epson Stylus NX100 Series. 18 Scanning a Photo or Document ...Close the cover gently so you can scan from an application, start Epson Scan directly from your computer and save it ...
...or Document You can use your NX100 Series to scan a photo or document and save your image and provides a full array of the following to a file. 1. Do one of tools. Then open the File menu, choose Import or Acquire, and select Epson Stylus NX100 Series. 18 Scanning a Photo or Document ...Close the cover gently so you can scan from an application, start Epson Scan directly from your computer and save it ...
Quick Guide
Page 20
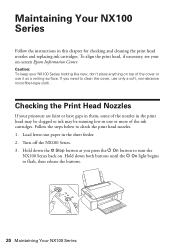
... new, don't place anything on -screen Epson Information Center. Follow the steps below to clean the cover, use it as you need to check the print head nozzles. 1. Turn off the NX100 Series. 3. Hold down both buttons until the P On light begins to turn the NX100 Series back on. If you press the... P On button to flash, then release the buttons. 20 Maintaining Your NX100 Series Checking the Print Head Nozzles If your on top of the cover or use only a soft, non-abrasive microfiber-type cloth. Load letter-size paper in one or more of the nozzles in the print head may be clogged...
... new, don't place anything on -screen Epson Information Center. Follow the steps below to clean the cover, use it as you need to check the print head nozzles. 1. Turn off the NX100 Series. 3. Hold down both buttons until the P On light begins to turn the NX100 Series back on. If you press the... P On button to flash, then release the buttons. 20 Maintaining Your NX100 Series Checking the Print Head Nozzles If your on top of the cover or use only a soft, non-abrasive microfiber-type cloth. Load letter-size paper in one or more of the nozzles in the print head may be clogged...
Quick Guide
Page 21
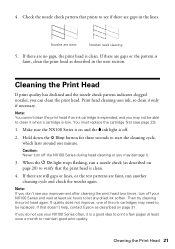
... nozzle check pattern indicates clogged nozzles, you do not use your NX100 Series and wait at least once a month to start the cleaning cycle, which lasts around one of the ink cartridges may damage it is clean. If quality does... the Print Head 21 You must replace the cartridge first (see if there are gaps or the pattern is off your NX100 Series often, it . 3. If there are faint, run a nozzle check (as described on and the B ink light is ... quality. Caution: Never turn off . 2. Check the nozzle check pattern that doesn't help, contact Epson as described in the lines.
... nozzle check pattern indicates clogged nozzles, you do not use your NX100 Series and wait at least once a month to start the cleaning cycle, which lasts around one of the ink cartridges may damage it is clean. If quality does... the Print Head 21 You must replace the cartridge first (see if there are gaps or the pattern is off your NX100 Series often, it . 3. If there are faint, run a nozzle check (as described on and the B ink light is ... quality. Caution: Never turn off . 2. Check the nozzle check pattern that doesn't help, contact Epson as described in the lines.
Quick Guide
Page 23
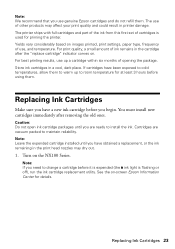
... until you have obtained a replacement, or the ink remaining in printer damage. Note: If you need to install the ink. See the on the NX100 Series. Store ink cartridges in the cartridge after removing the old ones. Replacing Ink Cartridges 23 Yields vary considerably based on . Replacing ...cartridge before it is expended (the B ink light is used for priming the printer. Note: We recommend that you use up to room temperature for at least 3 hours before using them. Turn on -screen Epson Information Center for details. If cartridges have a new ink cartridge before you ...
... until you have obtained a replacement, or the ink remaining in printer damage. Note: If you need to install the ink. See the on the NX100 Series. Store ink cartridges in the cartridge after removing the old ones. Replacing Ink Cartridges 23 Yields vary considerably based on . Replacing ...cartridge before it is expended (the B ink light is used for priming the printer. Note: We recommend that you use up to room temperature for at least 3 hours before using them. Turn on -screen Epson Information Center for details. If cartridges have a new ink cartridge before you ...
Quick Guide
Page 24
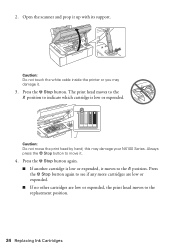
... support. this may damage it . 4. Always press the y Stop button to the _ position. Caution: Do not touch the white cable inside the printer or you may damage your NX100 Series. Press the y Stop button again. ■ If another cartridge is low or expended. Open the scanner and prop it moves to move...
... support. this may damage it . 4. Always press the y Stop button to the _ position. Caution: Do not touch the white cable inside the printer or you may damage your NX100 Series. Press the y Stop button again. ■ If another cartridge is low or expended. Open the scanner and prop it moves to move...
Quick Guide
Page 27
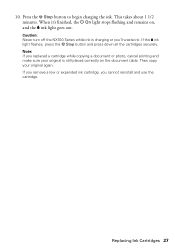
10. Caution: Never turn off the NX100 Series while ink is still placed correctly on , and the B ink light goes out. If you remove a low or expended ink cartridge, you 'll waste ink. ...
10. Caution: Never turn off the NX100 Series while ink is still placed correctly on , and the B ink light goes out. If you remove a low or expended ink cartridge, you 'll waste ink. ...
Quick Guide
Page 28
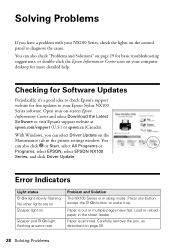
... more detailed help. You can also click or Start, select All Programs or Programs, select EPSON, select EPSON NX100 Series, and click Driver Update. Load or reload paper in the printer settings window. Paper is out or multiple pages have a problem with your computer desktop for...and P On light flashing at epson.com/support (U.S.) or epson.ca (Canada). Press any button except the P On button to wake it 's a good idea to check Epson's support website for Software Updates Periodically, it up. Paper is jammed. Open your Epson Stylus NX100 Series software. Solving Problems If you...
... more detailed help. You can also click or Start, select All Programs or Programs, select EPSON, select EPSON NX100 Series, and click Driver Update. Load or reload paper in the printer settings window. Paper is out or multiple pages have a problem with your computer desktop for...and P On light flashing at epson.com/support (U.S.) or epson.ca (Canada). Press any button except the P On button to wake it 's a good idea to check Epson's support website for Software Updates Periodically, it up. Paper is jammed. Open your Epson Stylus NX100 Series software. Solving Problems If you...
Quick Guide
Page 29
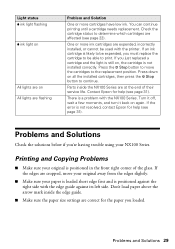
... help (see page 31). Don't load paper above the arrow mark inside the NX100 Series are flashing Problem and Solution One or more ink cartridges are affected (see page 31). If you loaded. Contact Epson for the paper you just replaced a cartridge and the light is positioned against the right side with the... the replacement position. Parts inside the edge guide. ■ Make sure the paper size settings are cropped, move the cartridges to be used with the printer. Problems and Solutions 29
... help (see page 31). Don't load paper above the arrow mark inside the NX100 Series are flashing Problem and Solution One or more ink cartridges are affected (see page 31). If you loaded. Contact Epson for the paper you just replaced a cartridge and the light is positioned against the right side with the... the replacement position. Parts inside the edge guide. ■ Make sure the paper size settings are cropped, move the cartridges to be used with the printer. Problems and Solutions 29
Quick Guide
Page 30
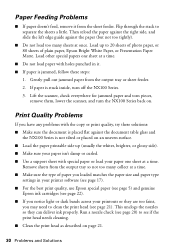
...slide the left edge guide against the document table glass and the NX100 Series is stuck inside, turn the NX100 Series back on. Print Quality Problems If you may need to see if ... you have any problems with the copy or print quality, try these steps: 1. Load other special papers one sheet at a time. Paper Feeding Problems ■ If paper doesn't feed, remove it . ■... a support sheet with holes punched in your printer software (see page 17). ■ For the best print quality, use Epson special paper (see page 5) and genuine Epson ink cartridges (see page 21). Lift the ...
...slide the left edge guide against the document table glass and the NX100 Series is stuck inside, turn the NX100 Series back on. Print Quality Problems If you may need to see if ... you have any problems with the copy or print quality, try these steps: 1. Load other special papers one sheet at a time. Paper Feeding Problems ■ If paper doesn't feed, remove it . ■... a support sheet with holes punched in your printer software (see page 17). ■ For the best print quality, use Epson special paper (see page 5) and genuine Epson ink cartridges (see page 21). Lift the ...
Quick Guide
Page 31
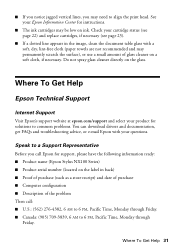
...the following information ready: ■ Product name (Epson Stylus NX100 Series) ■ Product serial number (located on the... label in the image, clean the document table glass with a soft, dry, lint-free cloth (paper towels are not recommended and may need to align the print head. Do not spray glass cleaner directly on ink. Where To Get Help Epson...and date of purchase ■ Computer configuration ■ Description of the problem Then call Epson for instructions. ■ The ink cartridges may be low on the glass. Check your...
...the following information ready: ■ Product name (Epson Stylus NX100 Series) ■ Product serial number (located on the... label in the image, clean the document table glass with a soft, dry, lint-free cloth (paper towels are not recommended and may need to align the print head. Do not spray glass cleaner directly on ink. Where To Get Help Epson...and date of purchase ■ Computer configuration ■ Description of the problem Then call Epson for instructions. ■ The ink cartridges may be low on the glass. Check your...
Quick Guide
Page 33
...does not exceed the wall outlet's ampere rating. ■ Avoid locations that are subject to the electrical outlet. ■ Avoid plugging the NX100 Series into the extension cord does not exceed the cord's ampere rating. Notices Important Safety Instructions Before using the P On button, and wait until the... P On light stops flashing before unplugging the printer or cutting off , or on the NX100 Series label. ■ Use only the power cord that comes with the NX100 Series, make sure the total ampere rating of all warnings and instructions marked on the ...
...does not exceed the wall outlet's ampere rating. ■ Avoid locations that are subject to the electrical outlet. ■ Avoid plugging the NX100 Series into the extension cord does not exceed the cord's ampere rating. Notices Important Safety Instructions Before using the P On button, and wait until the... P On light stops flashing before unplugging the printer or cutting off , or on the NX100 Series label. ■ Use only the power cord that comes with the NX100 Series, make sure the total ampere rating of all warnings and instructions marked on the ...
Quick Guide
Page 34
... copying, printing, or scanning. ■ Do not touch the flat white cable inside the NX100 Series or touch any cartridges during printing. ■ Install a new ink cartridge immediately after removing an expended one. ■ Place the NX100 Series on your skin, wash it off with soap and water. Store cartridges with their labels...
... copying, printing, or scanning. ■ Do not touch the flat white cable inside the NX100 Series or touch any cartridges during printing. ■ Install a new ink cartridge immediately after removing an expended one. ■ Place the NX100 Series on your skin, wash it off with soap and water. Store cartridges with their labels...
Start Here
Page 1
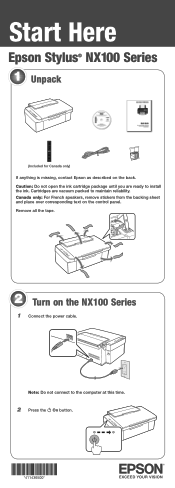
Remove all the tape. 2 Turn on the back. Cartridges are ready to maintain reliability. Start Here Epson Stylus® NX100 Series 1 Unpack (Included for Canada only) If anything is missing, contact Epson as described on the NX100 Series 1 Connect the power cable. Caution: Do not open the ink cartridge package until you are vacuum packed to install the ink. Canada only: For French speakers, remove stickers from the backing sheet and place over corresponding text on the control panel. Note: Do not connect to the computer at this time. 2 Press the On button.
Remove all the tape. 2 Turn on the back. Cartridges are ready to maintain reliability. Start Here Epson Stylus® NX100 Series 1 Unpack (Included for Canada only) If anything is missing, contact Epson as described on the NX100 Series 1 Connect the power cable. Caution: Do not open the ink cartridge package until you are vacuum packed to install the ink. Canada only: For French speakers, remove stickers from the backing sheet and place over corresponding text on the control panel. Note: Do not connect to the computer at this time. 2 Press the On button.
Start Here
Page 3
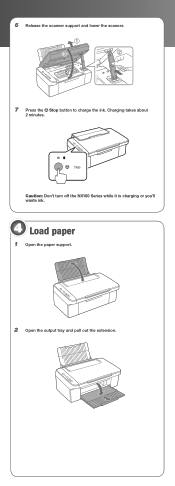
Charging takes about 2 minutes. 6 Release the scanner support and lower the scanner. 7 Press the Stop button to charge the ink. Stop Caution: Don't turn off the NX100 Series while it is charging or you'll waste ink. 4 Load paper 1 Open the paper support. 2 Open the output tray and pull out the extension.
Charging takes about 2 minutes. 6 Release the scanner support and lower the scanner. 7 Press the Stop button to charge the ink. Stop Caution: Don't turn off the NX100 Series while it is charging or you'll waste ink. 4 Load paper 1 Open the paper support. 2 Open the output tray and pull out the extension.


