Quick Guide
Page 11
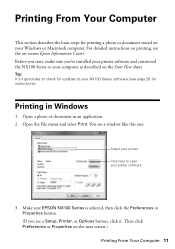
...1. Open the File menu and select Print. Printing in an application. 2. Make sure EPSON NX100 Series is selected, then click the Preferences or Properties button. (If you 've installed your printer software and connected the NX100 Series to your Windows or Macintosh computer. Printing From Your Computer... NX100 Series software (see a Setup, Printer, or Options button, click it. Before you start, make sure you see page 28 for printing a photo or document stored on printing, see a window like this one: Select your printer Click here to your printer software 3. You see the on the ...
...1. Open the File menu and select Print. Printing in an application. 2. Make sure EPSON NX100 Series is selected, then click the Preferences or Properties button. (If you 've installed your printer software and connected the NX100 Series to your Windows or Macintosh computer. Printing From Your Computer... NX100 Series software (see a Setup, Printer, or Options button, click it. Before you start, make sure you see page 28 for printing a photo or document stored on printing, see a window like this one: Select your printer Click here to your printer software 3. You see the on the ...
Quick Guide
Page 23
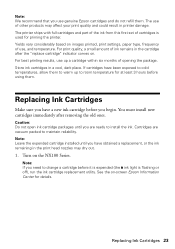
... Cartridges 23 Turn on -screen Epson Information Center for details. Note: We recommend that you use genuine Epson cartridges and do not refill them . For print quality, a small amount of ink remains in a cool, dark place. You must install new cartridges immediately after the "replace...ones. Replacing Ink Cartridges Make sure you are vacuum packed to change a cartridge before it is expended (the B ink light is used for at least 3 hours before you begin. Note: Leave the expended cartridge installed until you have obtained a replacement, or the ink remaining in printer...
... Cartridges 23 Turn on -screen Epson Information Center for details. Note: We recommend that you use genuine Epson cartridges and do not refill them . For print quality, a small amount of ink remains in a cool, dark place. You must install new cartridges immediately after the "replace...ones. Replacing Ink Cartridges Make sure you are vacuum packed to change a cartridge before it is expended (the B ink light is used for at least 3 hours before you begin. Note: Leave the expended cartridge installed until you have obtained a replacement, or the ink remaining in printer...
Quick Guide
Page 29
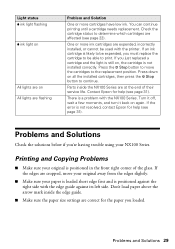
...wait a few moments, and turn it back on All lights are flashing Problem and Solution One or more ink cartridges are correct for the paper you must replace the cartridge to be able..., the cartridge is likely to be used with the printer. Parts inside the edge guide. ■ Make sure the paper size settings are expended, incorrectly installed, or cannot be expended, you loaded. There is ... is a problem with the edge guide against the right side with the NX100 Series. Contact Epson for help (see page 31). Printing and Copying Problems ■ Make sure your paper is loaded...
...wait a few moments, and turn it back on All lights are flashing Problem and Solution One or more ink cartridges are correct for the paper you must replace the cartridge to be able..., the cartridge is likely to be used with the printer. Parts inside the edge guide. ■ Make sure the paper size settings are expended, incorrectly installed, or cannot be expended, you loaded. There is ... is a problem with the edge guide against the right side with the NX100 Series. Contact Epson for help (see page 31). Printing and Copying Problems ■ Make sure your paper is loaded...
Quick Guide
Page 34
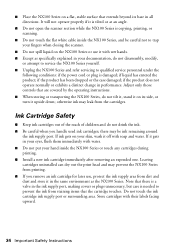
..., or scanning. ■ Do not touch the flat white cable inside the NX100 Series or touch any cartridges during printing. ■ Install a new ink cartridge immediately after removing an expended one. If it gets in your eyes, flush them immediately with water. ■ Do not put your hand inside the NX100 Series...
..., or scanning. ■ Do not touch the flat white cable inside the NX100 Series or touch any cartridges during printing. ■ Install a new ink cartridge immediately after removing an expended one. If it gets in your eyes, flush them immediately with water. ■ Do not put your hand inside the NX100 Series...
Quick Guide
Page 35
...digital apparatus complies with the instructions, may cause interference levels which can radiate radio frequency energy and, if not installed and used in a residential installation. FCC Compliance Statement For United States Users This equipment has been tested and found to comply with the limits ... user's authority to radio or television reception. If this device. This equipment generates, uses, and can be determined by one interface connector, do not leave cables connected to provide reasonable protection against harmful interference in accordance with Canadian ICES-003. FCC...
...digital apparatus complies with the instructions, may cause interference levels which can radiate radio frequency energy and, if not installed and used in a residential installation. FCC Compliance Statement For United States Users This equipment has been tested and found to comply with the limits ... user's authority to radio or television reception. If this device. This equipment generates, uses, and can be determined by one interface connector, do not leave cables connected to provide reasonable protection against harmful interference in accordance with Canadian ICES-003. FCC...
Quick Guide
Page 37
... Epson authorizes an exchange for the defective unit, Epson will be made freight collect. Exchange products and parts assume the remaining warranty period of one . Epson is not responsible for warranty service should the Epson ...installation, neglect, improper shipping, damage caused by Epson. Epson America, Inc. Shipments to other locations will provide telephone diagnostic service to you must provide proof of the date of the printer or a part, the item replaced becomes Epson property. Limited Warranty 37 Possessions). If Epson authorizes repair instead of exchange, Epson...
... Epson authorizes an exchange for the defective unit, Epson will be made freight collect. Exchange products and parts assume the remaining warranty period of one . Epson is not responsible for warranty service should the Epson ...installation, neglect, improper shipping, damage caused by Epson. Epson America, Inc. Shipments to other locations will provide telephone diagnostic service to you must provide proof of the date of the printer or a part, the item replaced becomes Epson property. Limited Warranty 37 Possessions). If Epson authorizes repair instead of exchange, Epson...
Start Here
Page 1
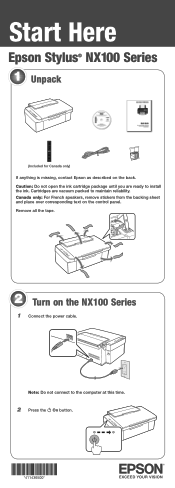
Canada only: For French speakers, remove stickers from the backing sheet and place over corresponding text on the NX100 Series 1 Connect the power cable. Remove all the tape. 2 Turn on the control panel. Start Here Epson Stylus® NX100 Series 1 Unpack (Included for Canada only) If anything is missing, contact Epson as described on the back. Caution: Do not open the ink cartridge package until you are vacuum packed to maintain reliability. Note: Do not connect to install the ink. Cartridges are ready to the computer at this time. 2 Press the On button.
Canada only: For French speakers, remove stickers from the backing sheet and place over corresponding text on the NX100 Series 1 Connect the power cable. Remove all the tape. 2 Turn on the control panel. Start Here Epson Stylus® NX100 Series 1 Unpack (Included for Canada only) If anything is missing, contact Epson as described on the back. Caution: Do not open the ink cartridge package until you are vacuum packed to maintain reliability. Note: Do not connect to install the ink. Cartridges are ready to the computer at this time. 2 Press the On button.
Start Here
Page 2
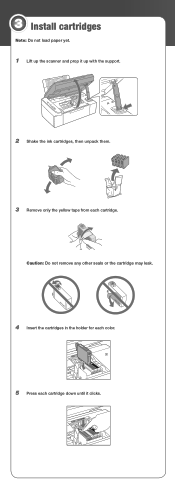
Caution: Do not remove any other seals or the cartridge may leak. 4 Insert the cartridges in the holder for each color. 5 Press each cartridge. 3 Install cartridges Note: Do not load paper yet. 1 Lift up the scanner and prop it up with the support. 2 Shake the ink cartridges, then unpack them. 3 Remove only the yellow tape from each cartridge down until it clicks.
Caution: Do not remove any other seals or the cartridge may leak. 4 Insert the cartridges in the holder for each color. 5 Press each cartridge. 3 Install cartridges Note: Do not load paper yet. 1 Lift up the scanner and prop it up with the support. 2 Shake the ink cartridges, then unpack them. 3 Remove only the yellow tape from each cartridge down until it clicks.
Start Here
Page 5
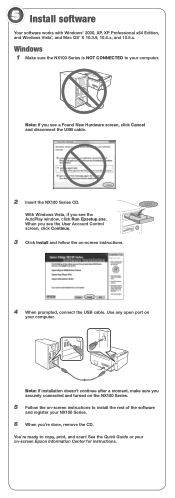
...connected and turned on the NX100 Series. 5 Follow the on-screen instructions to install the rest of the software and register your on-screen Epson Information Center for instructions. Note: If installation doesn't continue after a moment, make sure you see the User Account Control ...screen, click Continue. 3 Click Install and follow the on your computer. 5 Install software Your software works with Windows...
...connected and turned on the NX100 Series. 5 Follow the on-screen instructions to install the rest of the software and register your on-screen Epson Information Center for instructions. Note: If installation doesn't continue after a moment, make sure you see the User Account Control ...screen, click Continue. 3 Click Install and follow the on your computer. 5 Install software Your software works with Windows...
Start Here
Page 6
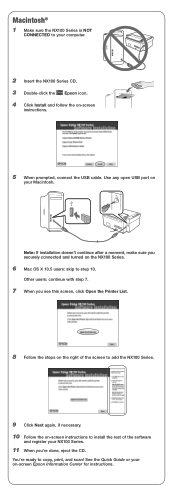
...this screen, click Open the Printer List. 8 Follow the steps on the right of the screen to add the NX100 Series. 9 Click Next again, if necessary. 10 Follow the on-screen instructions to install the rest of the software and register your on-screen Epson Information Center for instructions. You...-screen instructions. 5 When prompted, connect the USB cable. Macintosh® 1 Make sure the NX100 Series is NOT CONNECTED to your Macintosh. Note: If installation doesn't continue after a moment, make sure you 're done, eject the CD. Use any open USB port on your computer. 2 Insert the NX100 ...
...this screen, click Open the Printer List. 8 Follow the steps on the right of the screen to add the NX100 Series. 9 Click Next again, if necessary. 10 Follow the on-screen instructions to install the rest of the software and register your on-screen Epson Information Center for instructions. You...-screen instructions. 5 When prompted, connect the USB cable. Macintosh® 1 Make sure the NX100 Series is NOT CONNECTED to your Macintosh. Note: If installation doesn't continue after a moment, make sure you 're done, eject the CD. Use any open USB port on your computer. 2 Insert the NX100 ...


