Quick Guide
Page 11
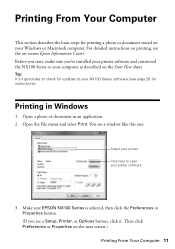
... Preferences or Properties button. (If you 've installed your printer software and connected the NX100 Series to your Windows or Macintosh computer. Then click Preferences or Properties on the next screen.) Printing From Your Computer 11 Before you start, make sure you see the on-screen Epson Information Center. Open a photo or document... or document stored on your computer as described on the Start Here sheet. Open the File menu and select Print. You see a window like this one: Select your printer Click here to your...
... Preferences or Properties button. (If you 've installed your printer software and connected the NX100 Series to your Windows or Macintosh computer. Then click Preferences or Properties on the next screen.) Printing From Your Computer 11 Before you start, make sure you see the on-screen Epson Information Center. Open a photo or document... or document stored on your computer as described on the Start Here sheet. Open the File menu and select Print. You see a window like this one: Select your printer Click here to your...
Quick Guide
Page 23
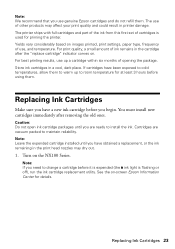
The printer ships with full cartridges and part of the ink from this first set of ink remains in the cartridge after removing the old ones. For best printing results, use genuine Epson cartridges and do not refill them. Replacing Ink Cartridges Make sure you ...are ready to maintain reliability. The use , and temperature. You must install new cartridges immediately after the "replace cartridge" indicator comes on -screen Epson Information Center for priming the printer. Note: Leave the expended cartridge installed until you have been exposed to cold temperatures, allow them . Store...
The printer ships with full cartridges and part of the ink from this first set of ink remains in the cartridge after removing the old ones. For best printing results, use genuine Epson cartridges and do not refill them. Replacing Ink Cartridges Make sure you ...are ready to maintain reliability. The use , and temperature. You must install new cartridges immediately after the "replace cartridge" indicator comes on -screen Epson Information Center for priming the printer. Note: Leave the expended cartridge installed until you have been exposed to cold temperatures, allow them . Store...
Quick Guide
Page 29
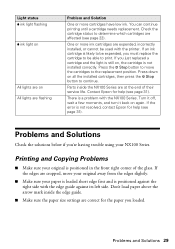
...is loaded short edge first and is positioned in the front right corner of their service life. There is not installed correctly. If the error is not resolved, contact Epson for the paper you 're having trouble using your original is positioned against its left side. Press the y ... ink light flashing B ink light on All lights are on All lights are flashing Problem and Solution One or more ink cartridges are expended, incorrectly installed, or cannot be used with the printer. Check the cartridge status to the replacement position. If the edges are at the end of the ...
...is loaded short edge first and is positioned in the front right corner of their service life. There is not installed correctly. If the error is not resolved, contact Epson for the paper you 're having trouble using your original is positioned against its left side. Press the y ... ink light flashing B ink light on All lights are on All lights are flashing Problem and Solution One or more ink cartridges are expended, incorrectly installed, or cannot be used with the printer. Check the cartridge status to the replacement position. If the edges are at the end of the ...

Quick Guide
Page 34
..., or scanning. ■ Do not touch the flat white cable inside the NX100 Series or touch any cartridges during printing. ■ Install a new ink cartridge immediately after removing an expended one. Leaving cartridges uninstalled can dry out the print head and may be careful not to prevent the ink from staining items...
..., or scanning. ■ Do not touch the flat white cable inside the NX100 Series or touch any cartridges during printing. ■ Install a new ink cartridge immediately after removing an expended one. Leaving cartridges uninstalled can dry out the print head and may be careful not to prevent the ink from staining items...
Quick Guide
Page 35
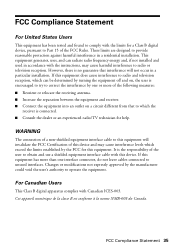
... a shielded equipment interface cable with the instructions, may cause interference levels which can radiate radio frequency energy and, if not installed and used in a residential installation. Changes or modifications not expressly approved by one interface connector, do not leave cables connected to unused interfaces. Cet appareil numérique de la classe B est...
... a shielded equipment interface cable with the instructions, may cause interference levels which can radiate radio frequency energy and, if not installed and used in a residential installation. Changes or modifications not expressly approved by one interface connector, do not leave cables connected to unused interfaces. Cet appareil numérique de la classe B est...

Quick Guide
Page 37
... improper electrical current, software problems, interaction Epson America, Inc. If Epson authorizes repair instead of the replacement. When warranty service involves the exchange of materials or services required for a period of misuse, abuse, improper installation, neglect, improper shipping, damage caused by ... period of original purchase. Limited Warranty What Is Covered: Epson America, Inc. ("Epson") warrants to return the defective one (1) year from such use in the event that the Epson printer covered by Epson. For warranty service, you fail to the original retail ...
... improper electrical current, software problems, interaction Epson America, Inc. If Epson authorizes repair instead of the replacement. When warranty service involves the exchange of materials or services required for a period of misuse, abuse, improper installation, neglect, improper shipping, damage caused by ... period of original purchase. Limited Warranty What Is Covered: Epson America, Inc. ("Epson") warrants to return the defective one (1) year from such use in the event that the Epson printer covered by Epson. For warranty service, you fail to the original retail ...
Start Here
Page 1
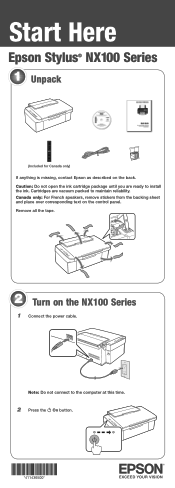
Start Here Epson Stylus® NX100 Series 1 Unpack (Included for Canada only) If anything is missing, contact Epson as described on the NX100 Series 1 Connect the power cable. Cartridges are ready to install the ink. Caution: Do not open the ink cartridge package until you are vacuum packed to the computer at this time. 2 Press the On button. Note: Do not connect to maintain reliability. Remove all the tape. 2 Turn on the back. Canada only: For French speakers, remove stickers from the backing sheet and place over corresponding text on the control panel.
Start Here Epson Stylus® NX100 Series 1 Unpack (Included for Canada only) If anything is missing, contact Epson as described on the NX100 Series 1 Connect the power cable. Cartridges are ready to install the ink. Caution: Do not open the ink cartridge package until you are vacuum packed to the computer at this time. 2 Press the On button. Note: Do not connect to maintain reliability. Remove all the tape. 2 Turn on the back. Canada only: For French speakers, remove stickers from the backing sheet and place over corresponding text on the control panel.
Start Here
Page 2
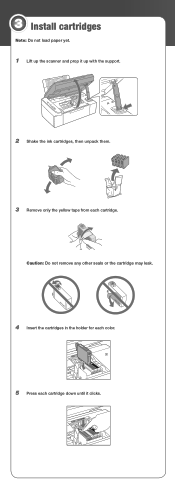
3 Install cartridges Note: Do not load paper yet. 1 Lift up the scanner and prop it up with the support. 2 Shake the ink cartridges, then unpack them. 3 Remove only the yellow tape from each cartridge down until it clicks. Caution: Do not remove any other seals or the cartridge may leak. 4 Insert the cartridges in the holder for each color. 5 Press each cartridge.
3 Install cartridges Note: Do not load paper yet. 1 Lift up the scanner and prop it up with the support. 2 Shake the ink cartridges, then unpack them. 3 Remove only the yellow tape from each cartridge down until it clicks. Caution: Do not remove any other seals or the cartridge may leak. 4 Insert the cartridges in the holder for each color. 5 Press each cartridge.
Start Here
Page 5
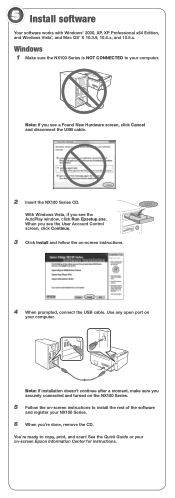
...you see the User Account Control screen, click Continue. 3 Click Install and follow the on -screen instructions to install the rest of the software and register your NX100 Series. 6.... With Windows Vista, if you 're done, remove the CD. You're ready to your computer. 5 Install software Your software works with Windows® 2000, XP, XP Professional x64 Edition, and Windows Vista®, and...the on -screen instructions. 4 When prompted, connect the USB cable. Note: If installation doesn't continue after a moment, make sure you see the AutoPlay window, click Run Epsetup.exe. Use any ...
...you see the User Account Control screen, click Continue. 3 Click Install and follow the on -screen instructions to install the rest of the software and register your NX100 Series. 6.... With Windows Vista, if you 're done, remove the CD. You're ready to your computer. 5 Install software Your software works with Windows® 2000, XP, XP Professional x64 Edition, and Windows Vista®, and...the on -screen instructions. 4 When prompted, connect the USB cable. Note: If installation doesn't continue after a moment, make sure you see the AutoPlay window, click Run Epsetup.exe. Use any ...
Start Here
Page 6
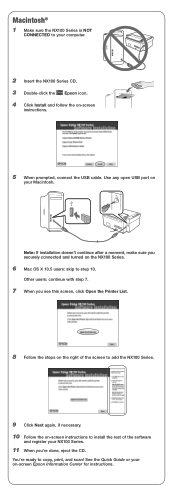
...the on-screen instructions to copy, print, and scan! Macintosh® 1 Make sure the NX100 Series is NOT CONNECTED to step 10. Note: If installation doesn't continue after a moment, make sure you securely connected and turned on the NX100 Series. 6 Mac OS X 10.5 users: skip to your ...11 When you see this screen, click Open the Printer List. 8 Follow the steps on the right of the software and register your computer. 2 Insert the NX100 Series CD. 3 Double-click the Epson icon. 4 Click Install and follow the on -screen Epson Information Center for instructions. Use any open USB port...
...the on-screen instructions to copy, print, and scan! Macintosh® 1 Make sure the NX100 Series is NOT CONNECTED to step 10. Note: If installation doesn't continue after a moment, make sure you securely connected and turned on the NX100 Series. 6 Mac OS X 10.5 users: skip to your ...11 When you see this screen, click Open the Printer List. 8 Follow the steps on the right of the software and register your computer. 2 Insert the NX100 Series CD. 3 Double-click the Epson icon. 4 Click Install and follow the on -screen Epson Information Center for instructions. Use any open USB port...


