User Manual - Axis 1440
Page 5
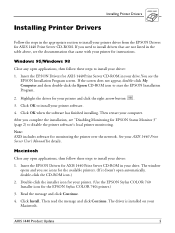
.... After you complete the installation, see the documentation that came with your AXIS 1440 Print Server User's Manual for details. Then read the message and click Continue. Installing Printer Drivers Installing Printer Drivers Follow the steps in the appropriate section to install your printer. (Use the EPSON Stylus COLOR 740 Installer icon for the EPSON Stylus COLOR 740i printer.) 3. Read the message and click Continue. 4. Note: AXIS includes software for instructions. See your printer for monitoring the printer over the network.
.... After you complete the installation, see the documentation that came with your AXIS 1440 Print Server User's Manual for details. Then read the message and click Continue. Installing Printer Drivers Installing Printer Drivers Follow the steps in the appropriate section to install your printer. (Use the EPSON Stylus COLOR 740 Installer icon for the EPSON Stylus COLOR 740i printer.) 3. Read the message and click Continue. 4. Note: AXIS includes software for instructions. See your printer for monitoring the printer over the network.

Product Brochure
Page 2
... with logic seeking Paper Handling Single sheets Letter, legal, A4, executive, statement Types Plain, bond, EPSON Photo Quality film and paper, transparencies, self-adhe sive sheets, ink jet cards, banner paper, labels, envelopes, and iron-on transfers Envelopes No. 10, DL, C5 Types Plain paper, bond paper, air mail Printable Area 8.26" x 10.76" (letter size) Top margin .12" Left margin .12" Right margin .12" Bottom margin .12" * Black text and color speed in Normal Mode.
... with logic seeking Paper Handling Single sheets Letter, legal, A4, executive, statement Types Plain, bond, EPSON Photo Quality film and paper, transparencies, self-adhe sive sheets, ink jet cards, banner paper, labels, envelopes, and iron-on transfers Envelopes No. 10, DL, C5 Types Plain paper, bond paper, air mail Printable Area 8.26" x 10.76" (letter size) Top margin .12" Left margin .12" Right margin .12" Bottom margin .12" * Black text and color speed in Normal Mode.

Product Information Guide
Page 5
... EMC FCC part 15 subpart B class B DOS Support If driver support for hex codes 00 through FF. These drivers don't provide all the EPSON Stylus COLOR 740 features, such as the PC437 table for the EPSON Stylus COLOR 740 is turned off to print a list of the other EPSON ESC/P 2 printer drivers (parallel port only). Hold down the R cleaning button and press the P power button. Make sure the printer is not available from the printer's control panel: Setting Options Font...
... EMC FCC part 15 subpart B class B DOS Support If driver support for hex codes 00 through FF. These drivers don't provide all the EPSON Stylus COLOR 740 features, such as the PC437 table for the EPSON Stylus COLOR 740 is turned off to print a list of the other EPSON ESC/P 2 printer drivers (parallel port only). Hold down the R cleaning button and press the P power button. Make sure the printer is not available from the printer's control panel: Setting Options Font...

Product Information Guide
Page 6
... , your ink supply is jammed in the printer. Turn off the printer, wait a few seconds, and turn off inside), then reload the stack. EPSON Stylus COLOR 740 7/98 Make sure you have an internal error. See "Replacing an Ink Cartridge" on page 12 for Printing Devices Version 1.0 Bit rate 12 Mbps (full speed device) Data encoding NRZI Adaptable connector USB Series B Recommended cable length 6.5 feet (2 meters) maximum Control Panel power power button light paper out light black ink out light color ink out light cleaning load/eject button button Follow...
... , your ink supply is jammed in the printer. Turn off the printer, wait a few seconds, and turn off inside), then reload the stack. EPSON Stylus COLOR 740 7/98 Make sure you have an internal error. See "Replacing an Ink Cartridge" on page 12 for Printing Devices Version 1.0 Bit rate 12 Mbps (full speed device) Data encoding NRZI Adaptable connector USB Series B Recommended cable length 6.5 feet (2 meters) maximum Control Panel power power button light paper out light black ink out light color ink out light cleaning load/eject button button Follow...
Product Information Guide
Page 8
... . Make sure letter-size paper is loaded in "Examining the Nozzle Check Pattern" on the Settings Sheet. 6. However, if a message appears prompting you to enter settings or if you change the ID numbers in your software settings, the interface cable, or your computer. Then reconnect the interface cable and turn off . 2. Access the main printer settings dialog box. 3. Hold down the E load/eject button and press the P power button. EPSON Stylus COLOR 740 7/98 Slide the left edge. Open the...
... . Make sure letter-size paper is loaded in "Examining the Nozzle Check Pattern" on the Settings Sheet. 6. However, if a message appears prompting you to enter settings or if you change the ID numbers in your software settings, the interface cable, or your computer. Then reconnect the interface cable and turn off . 2. Access the main printer settings dialog box. 3. Hold down the E load/eject button and press the P power button. EPSON Stylus COLOR 740 7/98 Slide the left edge. Open the...

Product Information Guide
Page 11
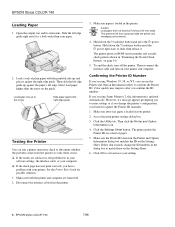
... E load/eject button to feed it is perforated around the edges, so you can load up to 20 sheets of 4 × 6-inch, Letter-size, or A4-size Photo Paper or 1 sheet of the Photo Paper, let your image dry completely. EPSON Stylus COLOR 740 If ink smears when you print on envelopes or other thick media, set the paper thickness lever to the + position, reload the flattened card with the whiter (glossier) side facing up. Position the perforated margins...
... E load/eject button to feed it is perforated around the edges, so you can load up to 20 sheets of 4 × 6-inch, Letter-size, or A4-size Photo Paper or 1 sheet of the Photo Paper, let your image dry completely. EPSON Stylus COLOR 740 If ink smears when you print on envelopes or other thick media, set the paper thickness lever to the + position, reload the flattened card with the whiter (glossier) side facing up. Position the perforated margins...

Product Information Guide
Page 12
... Media Type setting in "Replacing an Outdated Ink Cartridge" on page 13. When you 're ready to print, select Photo Quality Ink Jet Paper as the Paper Size in your printer software. When the light stays on, the cartridge is either flashing or on ink. Removing and Installing Ink Cartridges You can replace a cartridge when the B black or A color ink out light is empty and you press the R cleaning button when both ink out lights are fully adhered to their backing sheet before you set the paper thickness lever to replace...
... Media Type setting in "Replacing an Outdated Ink Cartridge" on page 13. When you 're ready to print, select Photo Quality Ink Jet Paper as the Paper Size in your printer software. When the light stays on, the cartridge is either flashing or on ink. Removing and Installing Ink Cartridges You can replace a cartridge when the B black or A color ink out light is empty and you press the R cleaning button when both ink out lights are fully adhered to their backing sheet before you set the paper thickness lever to replace...

Product Information Guide
Page 14
... missing from the image, you may need to clean the print head. This unclogs the nozzles so they can clean the print head in either of the following ways: t With the Head Cleaning utility in the printer and click Print nozzle check pattern (Windows) or Confirmation (Macintosh). You can deliver ink properly. Start an application and open a document, and access the printer settings dialog box. 5. Follow the instructions on the screen to clean the print head. Make sure paper is loaded in your printer software (when connected...
... missing from the image, you may need to clean the print head. This unclogs the nozzles so they can clean the print head in either of the following ways: t With the Head Cleaning utility in the printer and click Print nozzle check pattern (Windows) or Confirmation (Macintosh). You can deliver ink properly. Start an application and open a document, and access the printer settings dialog box. 5. Follow the instructions on the screen to clean the print head. Make sure paper is loaded in your printer software (when connected...

Product Information Guide
Page 15
..., clean the print head again; Remove all the paper from the electrical outlet. PDF) 7/98 EPSON Stylus COLOR 740 - 15 You see "Cleaning the Print Head" on and paper is loaded. Remove any dots are missing, as described in the dot pattern. Related Documentation TM-SC467 PL-SC740 CPD-7033 CPD-7034 CPD-7035 ESC7400698 EPSON Stylus COLOR 440/640/740 Service Manual EPSON Stylus COLOR 740 Parts Price List EPSON Stylus COLOR 740 Printer Basics book EPSON Stylus COLOR 740 Start Here card EPSON Stylus COLOR 740 USB Software Installation Guide EPSON Stylus COLOR 740 Manual (Adobe...
..., clean the print head again; Remove all the paper from the electrical outlet. PDF) 7/98 EPSON Stylus COLOR 740 - 15 You see "Cleaning the Print Head" on and paper is loaded. Remove any dots are missing, as described in the dot pattern. Related Documentation TM-SC467 PL-SC740 CPD-7033 CPD-7034 CPD-7035 ESC7400698 EPSON Stylus COLOR 440/640/740 Service Manual EPSON Stylus COLOR 740 Parts Price List EPSON Stylus COLOR 740 Printer Basics book EPSON Stylus COLOR 740 Start Here card EPSON Stylus COLOR 740 USB Software Installation Guide EPSON Stylus COLOR 740 Manual (Adobe...

Quick Start
Page 4
... until the power light stops flashing. You can copy it when you restart your Windows or Macintosh desktop. 3. Read the license agreement and click Agree. 7. Note: If you to Programs, Epson, and click EPSON Stylus COLOR 740 Installer. To install a program or your electronic EPSON Stylus COLOR 740 Manual, just click the button for your printer driver. Keep this card with a USB connection to your printer, see the Main Menu after installing the printer software, leave your printer and...
... until the power light stops flashing. You can copy it when you restart your Windows or Macintosh desktop. 3. Read the license agreement and click Agree. 7. Note: If you to Programs, Epson, and click EPSON Stylus COLOR 740 Installer. To install a program or your electronic EPSON Stylus COLOR 740 Manual, just click the button for your printer driver. Keep this card with a USB connection to your printer, see the Main Menu after installing the printer software, leave your printer and...

Quick Start
Page 5
... power light stops flashing. 3. If you 're ready to get started . See step 3, Print an image, to print in any and all rights in those marks. After you finish installing software, you can use it to a PowerBook with Windows 3.1 or Macintosh). Open the File menu and select Run. Make sure your printer and installed the software, you 're connected to the Macintosh printer port or to your hard disk, see your electronic EPSON Stylus COLOR 740 Manual...
... power light stops flashing. 3. If you 're ready to get started . See step 3, Print an image, to print in any and all rights in those marks. After you finish installing software, you can use it to a PowerBook with Windows 3.1 or Macintosh). Open the File menu and select Run. Make sure your printer and installed the software, you 're connected to the Macintosh printer port or to your hard disk, see your electronic EPSON Stylus COLOR 740 Manual...

User Manual
Page 15
... control print jobs and check printer status while you may have with Windows or Macintosh. Page 15 Advanced Printing tells you need, see the Start Here card. Managing Print Jobs explains how to print using custom settings for loading it in your printer, ink cartridges, and EPSON papers. Maintenance and Transportation gives instructions for any problems you 're printing. This manual contains the following information: Basic Printing covers the basics of printing with your printer or software. Printing on your printer. Specifications provides the technical details on Special...
... control print jobs and check printer status while you may have with Windows or Macintosh. Page 15 Advanced Printing tells you need, see the Start Here card. Managing Print Jobs explains how to print using custom settings for loading it in your printer, ink cartridges, and EPSON papers. Maintenance and Transportation gives instructions for any problems you 're printing. This manual contains the following information: Basic Printing covers the basics of printing with your printer or software. Printing on your printer. Specifications provides the technical details on Special...

User Manual
Page 82
... on: Selecting Special Media Media Loading and Handling Guidelines Page 82 You can use a variety of EPSON media designed for ink jet printers, ranging from transparencies to use EPSON's photo-quality paper: ink jet paper, glossy paper, glossy film, note cards, and photo paper. For special projects, you can get great results printing on various sizes of plain paper, letterhead, and envelopes, but you want to iron-on transfer paper. Printing on Special Media Your EPSON Stylus COLOR 740 lets you print on just about...
... on: Selecting Special Media Media Loading and Handling Guidelines Page 82 You can use a variety of EPSON media designed for ink jet printers, ranging from transparencies to use EPSON's photo-quality paper: ink jet paper, glossy paper, glossy film, note cards, and photo paper. For special projects, you can get great results printing on various sizes of plain paper, letterhead, and envelopes, but you want to iron-on transfer paper. Printing on Special Media Your EPSON Stylus COLOR 740 lets you print on just about...

User Manual
Page 136
... Uninstalling Printer Software for details. To determine whether the problem is caused by the printer itself, run a printer operation check. For instructions, see Checking the Control Panel Lights for details. You can check your ink levels using the Status Monitor; see Using the Printer Status Window. Page 136 see an error message about your printer settings or have problems with Windows 95, 98, or NT 4.0. See Running a Printer Operation Check for instructions. If you may need to diagnose printer problems...
... Uninstalling Printer Software for details. To determine whether the problem is caused by the printer itself, run a printer operation check. For instructions, see Checking the Control Panel Lights for details. You can check your ink levels using the Status Monitor; see Using the Printer Status Window. Page 136 see an error message about your printer settings or have problems with Windows 95, 98, or NT 4.0. See Running a Printer Operation Check for instructions. If you may need to diagnose printer problems...

User Manual
Page 143
... Automatic mode setting or choose a different Rendering Intent setting (Macintosh). See Replacing an Ink Cartridge for instructions. Troubleshooting Page 143 The ink cartridges are empty. See Cleaning the Print Head for instructions. Possible cause The printable side of the paper is face down. See Advanced Printing for your monitor don't match the printed colors. Check the B black and A color ink out lights to see which cartridge you see on your document. Because your monitor and printer use different technologies to adjust...
... Automatic mode setting or choose a different Rendering Intent setting (Macintosh). See Replacing an Ink Cartridge for instructions. Troubleshooting Page 143 The ink cartridges are empty. See Cleaning the Print Head for instructions. Possible cause The printable side of the paper is face down. See Advanced Printing for your monitor don't match the printed colors. Check the B black and A color ink out lights to see which cartridge you see on your document. Because your monitor and printer use different technologies to adjust...

User Manual
Page 145
...media. See Cleaning the Printer for details. If your image-editing software, or decrease the size of your paper or media meets the specifications listed in Cleaning the Print Head. Then run the Print Head Alignment utility following the instructions in Aligning the Print Head. Possible cause You tried to print on Windows 3.1) and Sharpness setting to remove spilled ink. Turn off High Speed following the instructions in Customizing Print Quality and Special Effects. Troubleshooting Page 145 See Printing from Windows or Printing from a Macintosh for instructions. Clean...
...media. See Cleaning the Printer for details. If your image-editing software, or decrease the size of your paper or media meets the specifications listed in Cleaning the Print Head. Then run the Print Head Alignment utility following the instructions in Aligning the Print Head. Possible cause You tried to print on Windows 3.1) and Sharpness setting to remove spilled ink. Turn off High Speed following the instructions in Customizing Print Quality and Special Effects. Troubleshooting Page 145 See Printing from Windows or Printing from a Macintosh for instructions. Clean...
User Manual
Page 182
H Halftoning setting, 40, 142 Head Cleaning utility, 128 to 129 Help, 165 to 166 High Speed copies, 98, 120 to 121 High Speed setting, 40, 140, 142 Horizontal banding, 141 I ICM (Image Color Matching) setting, 36, 46 to 47 Ink cartridge specifications, 172 monitoring level, 109, 118 to 119 replacing cartridges, 123 to 127 replacing outdated cartridge, 127 setting, 23, 30, 35, 39, 142 smears, 88 specifications, 172 Ink Jet Cards, see Photo Quality Ink Jet Cards Ink Jet Paper choosing, 22...
H Halftoning setting, 40, 142 Head Cleaning utility, 128 to 129 Help, 165 to 166 High Speed copies, 98, 120 to 121 High Speed setting, 40, 140, 142 Horizontal banding, 141 I ICM (Image Color Matching) setting, 36, 46 to 47 Ink cartridge specifications, 172 monitoring level, 109, 118 to 119 replacing cartridges, 123 to 127 replacing outdated cartridge, 127 setting, 23, 30, 35, 39, 142 smears, 88 specifications, 172 Ink Jet Cards, see Photo Quality Ink Jet Cards Ink Jet Paper choosing, 22...
User Setup Information
Page 3
... printer icon in the Chooser, make sure your USB port and printer parallel port connections are connected and turned off. 2. Double-click the STYLUS COLOR 740 Installer, then click Continue. 5. Then continue with "Installing Your Creative and Internet Software and Electronic Manual" on your computer and wait until you download and install the iMac Update 1.0 from the Apple menu. 8. After installation is complete, click Restart to install the printer driver and select a default paper size. 6. Click the SC 740...
... printer icon in the Chooser, make sure your USB port and printer parallel port connections are connected and turned off. 2. Double-click the STYLUS COLOR 740 Installer, then click Continue. 5. Then continue with "Installing Your Creative and Internet Software and Electronic Manual" on your computer and wait until you download and install the iMac Update 1.0 from the Apple menu. 8. After installation is complete, click Restart to install the printer driver and select a default paper size. 6. Click the SC 740...
User Setup Information - USB Setup and Installation
Page 3
... Chooser. Select the USB Port icon (if you do not need to install the printer driver and select a default paper size. 6. If your iMac is running , select About This Computer in the Chooser, make sure your USB port and printer parallel port connections are connected and turned off. 2. Your operating system already includes full support for additional information on -screen instructions to download and install the iMac Update 1.0. Double-click the STYLUS COLOR 740 Installer, then click Continue...
... Chooser. Select the USB Port icon (if you do not need to install the printer driver and select a default paper size. 6. If your iMac is running , select About This Computer in the Chooser, make sure your USB port and printer parallel port connections are connected and turned off. 2. Your operating system already includes full support for additional information on -screen instructions to download and install the iMac Update 1.0. Double-click the STYLUS COLOR 740 Installer, then click Continue...
Service Manual
Page 97
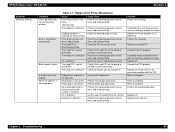
... cleaning. Perform the cleaning operation. White line appears in the image data. Print head surface is defective. Check the FFC by using a tester. Bi-directional alignment is defective. Head unit is not adjusted. If condition does not improve even after the cleaning, replace the head. Replace the head FFC. Replace I /C and perform self-test. Perform the cleaning operation several times and check printing. Install the new I /C. Check if the head FFC on the board or carriage is connected surely. Connect...
... cleaning. Perform the cleaning operation. White line appears in the image data. Print head surface is defective. Check the FFC by using a tester. Bi-directional alignment is defective. Head unit is not adjusted. If condition does not improve even after the cleaning, replace the head. Replace the head FFC. Replace I /C and perform self-test. Perform the cleaning operation several times and check printing. Install the new I /C. Check if the head FFC on the board or carriage is connected surely. Connect...


