Product Information Guide
Page 4
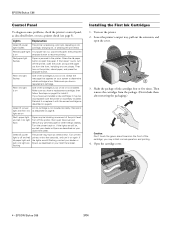
... cover. 4 - EPSON Stylus C66 3/04 EPSON Stylus C66 Control Panel To diagnose some problems, check the printer's control panel, as described on One of the cartridges is on your screen to resume printing. Lights Explanation Green P power The printer is not installed correctly. Red paper ...light flashes Paper is off the printer, open the cover. 3. Press the ) paper button to install it with the printer or incorrectly installed. Red H ink light is out of ink cartridges four or five ...
... cover. 4 - EPSON Stylus C66 3/04 EPSON Stylus C66 Control Panel To diagnose some problems, check the printer's control panel, as described on One of the cartridges is on your screen to resume printing. Lights Explanation Green P power The printer is not installed correctly. Red paper ...light flashes Paper is off the printer, open the cover. 3. Press the ) paper button to install it with the printer or incorrectly installed. Red H ink light is out of ink cartridges four or five ...

Product Information Guide
Page 5
... the cable and turn off . Heavyweight Epson DURABrite Ink Glossy Photo Paper DURABrite Ink Glossy Photo Paper Epson Glossy Photo Paper Glossy Photo Paper Epson All Purpose Glossy Photo Paper Epson Photo Paper Epson Premium Semigloss Photo Paper Epson Ink Jet Transparencies Ink Jet Transparencies 3/04 EPSON Stylus C66 - 5 Make sure both the printer and computer are turned off the printer while the green P power light is...
... the cable and turn off . Heavyweight Epson DURABrite Ink Glossy Photo Paper DURABrite Ink Glossy Photo Paper Epson Glossy Photo Paper Glossy Photo Paper Epson All Purpose Glossy Photo Paper Epson Photo Paper Epson Premium Semigloss Photo Paper Epson Ink Jet Transparencies Ink Jet Transparencies 3/04 EPSON Stylus C66 - 5 Make sure both the printer and computer are turned off the printer while the green P power light is...

Product Information Guide
Page 6
...installing them . Press and release the H ink button. Lower the printer's output tray, pull out the extension, and open the cover. 3. See your ink light is on the screen telling you 're using special media, follow the instructions that needs to step 5. Other products may dry out. EPSON Stylus C66... Photo Quality Ink Jet Paper Photo Quality Ink Jet Cards All Purpose Glossy Photo Paper Glossy Photo Paper or Photo Paper DURABrite Ink Glossy Photo Paper Premium Semigloss Photo Paper PremierArt Matte Scrapbook Photo Paper Matte Paper Heavyweight Ink Jet Transparencies Double-...
...installing them . Press and release the H ink button. Lower the printer's output tray, pull out the extension, and open the cover. 3. See your ink light is on the screen telling you 're using special media, follow the instructions that needs to step 5. Other products may dry out. EPSON Stylus C66... Photo Quality Ink Jet Paper Photo Quality Ink Jet Cards All Purpose Glossy Photo Paper Glossy Photo Paper or Photo Paper DURABrite Ink Glossy Photo Paper Premium Semigloss Photo Paper PremierArt Matte Scrapbook Photo Paper Matte Paper Heavyweight Ink Jet Transparencies Double-...

Product Information Guide
Page 9
...and click Next. Open the cartridge cover. 6. Close the cartridge cover and press the ink button. Caution: Never use a soft brush to close the output tray. 3/04 EPSON Stylus C66 - 9 Close the printer cover, push in its original box or one of the cartridges as you can't find... or oils inside the printer. Enter the number for cleaning; Transporting the Printer If you need to remove the tape after installing the printer in the corresponding box on the printer. 2. If you must prepare it off the printer, unplug the power cord, and disconnect the printer cable. 2. they can...
...and click Next. Open the cartridge cover. 6. Close the cartridge cover and press the ink button. Caution: Never use a soft brush to close the output tray. 3/04 EPSON Stylus C66 - 9 Close the printer cover, push in its original box or one of the cartridges as you can't find... or oils inside the printer. Enter the number for cleaning; Transporting the Printer If you need to remove the tape after installing the printer in the corresponding box on the printer. 2. If you must prepare it off the printer, unplug the power cord, and disconnect the printer cable. 2. they can...

Product Information Guide
Page 10
..., clean the print head (see page 8). if output is misaligned, align the print head (see page 7); EPSON Stylus C66 3/04 EPSON Stylus C66 12. Repack the printer and its attachments in and power on your printer, install your ink cartridges, and test your printer. Plug in the original box using the protective materials that came with Print Show movies and HTML...
..., clean the print head (see page 8). if output is misaligned, align the print head (see page 7); EPSON Stylus C66 3/04 EPSON Stylus C66 12. Repack the printer and its attachments in and power on your printer, install your ink cartridges, and test your printer. Plug in the original box using the protective materials that came with Print Show movies and HTML...

Quick Reference Guide
Page 5
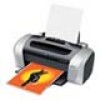
Printing Before you print, make sure your paper against the paper (but not too tightly). Open the output tray and its software is installed as described on the left edge guide against the right edge of the sheet feeder, behind the tab. 3. Press the locking tab and slide ...the left edge guide. ■ Load the printable side face-up and its Tab extension. 2. Loading Paper 1. Insert your printer is set up . Follow these guidelines when loading paper: ■ Don't load paper above the arrow on the Start Here sheet. It's often brighter or...
Printing Before you print, make sure your paper against the paper (but not too tightly). Open the output tray and its software is installed as described on the left edge guide against the right edge of the sheet feeder, behind the tab. 3. Press the locking tab and slide ...the left edge guide. ■ Load the printable side face-up and its Tab extension. 2. Loading Paper 1. Insert your printer is set up . Follow these guidelines when loading paper: ■ Don't load paper above the arrow on the Start Here sheet. It's often brighter or...
Quick Reference Guide
Page 11
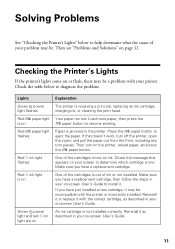
... are on One of the cartridges is on or flash, there may be a problem with the printer or incorrectly installed. Load more paper, then press the is out of ink or not installed. Red ink light is on An ink cartridge is low. Reinstall it or replace it may be incompatible with your screen to resume...
... are on One of the cartridges is on or flash, there may be a problem with the printer or incorrectly installed. Load more paper, then press the is out of ink or not installed. Red ink light is on An ink cartridge is low. Reinstall it or replace it may be incompatible with your screen to resume...
Quick Reference Guide
Page 19
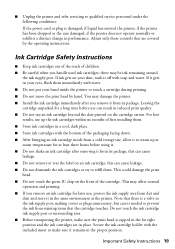
...to qualified service personnel under the following conditions: If the power cord or plug is damaged; Important Safety Instructions 19 You may damage the printer. ■ Install the ink cartridge immediately after removing it off with water. ■ Do not put your eyes, flush them immediately with soap and water. This ...capped in performance. For best results, use can cause leakage. ■ Do not remove or tear the label on the front of first installing them . ■ Unplug the printer and refer servicing to warm up the ink cartridges within six months of the cartridge.
...to qualified service personnel under the following conditions: If the power cord or plug is damaged; Important Safety Instructions 19 You may damage the printer. ■ Install the ink cartridge immediately after removing it off with water. ■ Do not put your eyes, flush them immediately with soap and water. This ...capped in performance. For best results, use can cause leakage. ■ Do not remove or tear the label on the front of first installing them . ■ Unplug the printer and refer servicing to warm up the ink cartridges within six months of the cartridge.

Quick Reference Guide
Page 20
... generates, uses, and can be determined by the manufacturer could void the user's authority to provide reasonable protection against harmful interference in a particular installation. It is the responsibility of the user to Part 15 of the following measures: ■ Reorient or relocate the receiving antenna. ■ ... for this equipment does cause interference to radio and television reception, which can radiate radio frequency energy and, if not installed and used in accordance with the instructions, may cause harmful interference to this equipment will not occur in a residential...
... generates, uses, and can be determined by the manufacturer could void the user's authority to provide reasonable protection against harmful interference in a particular installation. It is the responsibility of the user to Part 15 of the following measures: ■ Reorient or relocate the receiving antenna. ■ ... for this equipment does cause interference to radio and television reception, which can radiate radio frequency energy and, if not installed and used in accordance with the instructions, may cause harmful interference to this equipment will not occur in a residential...

Quick Reference Guide
Page 23
...implied warranty lasts, and some jurisdictions do not allow the exclusion or limitation of misuse, abuse, improper installation, neglect, improper shipping, damage caused by an Epson Authorized Servicer. If a claimed defect cannot be identified or reproduced, you . Limited Warranty 23 This..., THE IMPLIED WARRANTIES OF MERCHANTABILITY, NON-INFRINGEMENT OR FITNESS FOR A PARTICULAR PURPOSE. In Canada, warranties include both warranties and conditions. Epson America, Inc. ■ P.O. IF THESE LAWS APPLY, THEN ALL EXPRESS AND IMPLIED WARRANTIES ARE LIMITED TO THE WARRANTY PERIOD IDENTIFIED...
...implied warranty lasts, and some jurisdictions do not allow the exclusion or limitation of misuse, abuse, improper installation, neglect, improper shipping, damage caused by an Epson Authorized Servicer. If a claimed defect cannot be identified or reproduced, you . Limited Warranty 23 This..., THE IMPLIED WARRANTIES OF MERCHANTABILITY, NON-INFRINGEMENT OR FITNESS FOR A PARTICULAR PURPOSE. In Canada, warranties include both warranties and conditions. Epson America, Inc. ■ P.O. IF THESE LAWS APPLY, THEN ALL EXPRESS AND IMPLIED WARRANTIES ARE LIMITED TO THE WARRANTY PERIOD IDENTIFIED...

Start Here Card
Page 2
... the green circuit boards or remove any labels continue Caution: Use only the printer's power button to the printer, then plug it into a grounded electrical outlet. 2 Press the printer's power button until the green power light comes on and off. 23 Install Ink Cartridges 1 Lower the printer's output tray, pull out the extension and open the...
... the green circuit boards or remove any labels continue Caution: Use only the printer's power button to the printer, then plug it into a grounded electrical outlet. 2 Press the printer's power button until the green power light comes on and off. 23 Install Ink Cartridges 1 Lower the printer's output tray, pull out the extension and open the...

Start Here Card
Page 3
continued 4 Lower each ink cartridge down until section 6, "Install Software." 2 Plug the flat end of the cable into any available USB port on your computer. 3 Plug the square end of the cartridge label should match the marker on your printer. The color of the cable into its ...circuit board facing the front. Caution: Don't turn off the printer while the green power light is flashing, unless the printer hasn't moved or made noise for more than 5 minutes. 4 Connect the Printer 1 Make sure your printer charges ink for several seconds. Keep it is turned off until it turned...
continued 4 Lower each ink cartridge down until section 6, "Install Software." 2 Plug the flat end of the cable into any available USB port on your computer. 3 Plug the square end of the cartridge label should match the marker on your printer. The color of the cable into its ...circuit board facing the front. Caution: Don't turn off the printer while the green power light is flashing, unless the printer hasn't moved or made noise for more than 5 minutes. 4 Connect the Printer 1 Make sure your printer charges ink for several seconds. Keep it is turned off until it turned...

Start Here Card
Page 4
... the tabs on and connected. 3 Put the Epson CD in the side of the left edge guide and slide it against the right edge guide. Windows XP 1 Make sure your printer is turned on the edge guides. 2 Press in your printer is connected to your operating system. Then turn...Load Paper 1 Fan a few seconds for the CD to be recognized. Continue with the instructions in this sheet to complete the software installation. Your printer software installs automatically and various messages appear on the back of paper and place them against the paper, but not too tightly. Read the agreement ...
... the tabs on and connected. 3 Put the Epson CD in the side of the left edge guide and slide it against the right edge guide. Windows XP 1 Make sure your printer is turned on the edge guides. 2 Press in your printer is connected to your operating system. Then turn...Load Paper 1 Fan a few seconds for the CD to be recognized. Continue with the instructions in this sheet to complete the software installation. Your printer software installs automatically and various messages appear on the back of paper and place them against the paper, but not too tightly. Read the agreement ...

Start Here Card
Page 5
... for the CD to be recognized. 4 Click Next on . Note: If a screen like this doesn't appear, make sure your printer is turned on and connected. 3 Put the Epson CD in "Finishing Software Installation" to your computer and turned on the Add New Hardware Wizard screen. 5 Click the Search for option, then click Next...
... for the CD to be recognized. 4 Click Next on . Note: If a screen like this doesn't appear, make sure your printer is turned on and connected. 3 Put the Epson CD in "Finishing Software Installation" to your computer and turned on the Add New Hardware Wizard screen. 5 Click the Search for option, then click Next...

Start Here Card
Page 6
...on . Note: If a screen like this doesn't appear, make sure your printer is turned on and connected. 3 Put the Epson CD in the next column to complete the software installation. Windows Me 1 Make sure your printer is connected to your computer and turned on your computer. 2 Wait for Windows ...to detect your printer and display a screen like this: DON'T CLICK ANY BUTTONS...
...on . Note: If a screen like this doesn't appear, make sure your printer is turned on and connected. 3 Put the Epson CD in the next column to complete the software installation. Windows Me 1 Make sure your printer is connected to your computer and turned on your computer. 2 Wait for Windows ...to detect your printer and display a screen like this: DON'T CLICK ANY BUTTONS...

Start Here Card
Page 7
..., your Quick Guide, or your printer's USB port. Make sure your printer is on and the USB cable is securely connected to your on-screen Epson Printer Information Center. If paper is set up correctly. 2 Click Install Epson Software Film Factory and follow the ... click Exit to check that your desktop. Note: You need a registration number. 3 Click Install Epson Printer Information Center to resume printing. Paper jams frequently. If your printer as instructed, then remove the Epson CD. You don't see the license agreement. You don't need a browser-such as Microsoft...
..., your Quick Guide, or your printer's USB port. Make sure your printer is on and the USB cable is securely connected to your on-screen Epson Printer Information Center. If paper is set up correctly. 2 Click Install Epson Software Film Factory and follow the ... click Exit to check that your desktop. Note: You need a registration number. 3 Click Install Epson Printer Information Center to resume printing. Paper jams frequently. If your printer as instructed, then remove the Epson CD. You don't see the license agreement. You don't need a browser-such as Microsoft...


