
User Manual
Page 2
EPSON® 48-NOZZLE INK JET PRINTER All rights reserved. Neither Seiko Epson Corporation nor its subsidiaries. EPSON Connection is a registered trademark of any options or any means, electronic, mechanical, photocopying, recording or otherwise, without the prior written permission of Seiko Epson Corporation. ActionPrinter is a trademark and CompuServe is a service mark of this product or unauthorized modifications, repairs...
EPSON® 48-NOZZLE INK JET PRINTER All rights reserved. Neither Seiko Epson Corporation nor its subsidiaries. EPSON Connection is a registered trademark of any options or any means, electronic, mechanical, photocopying, recording or otherwise, without the prior written permission of Seiko Epson Corporation. ActionPrinter is a trademark and CompuServe is a service mark of this product or unauthorized modifications, repairs...

User Manual
Page 5
... settings 2-13 Changing the character-table setting 2-16 Chapter 3 Maintenance and Troubleshooting Replacing the Ink Cartridge Cleaning the Print Head Cleaning the Printer 3-4 Transporting the Printer 3-5 Troubleshooting 3-5 Error indicators 3-6 Power supply 3-7 Printing 3-7 Paper handling 3-12 Appendix Technical Specifications A-2 Printer specifications A-2 Command Summary A-12 Sending printer commands A-12 Using the command summary A-12 Character Tables A-23 Glossary iv
... settings 2-13 Changing the character-table setting 2-16 Chapter 3 Maintenance and Troubleshooting Replacing the Ink Cartridge Cleaning the Print Head Cleaning the Printer 3-4 Transporting the Printer 3-5 Troubleshooting 3-5 Error indicators 3-6 Power supply 3-7 Printing 3-7 Paper handling 3-12 Appendix Technical Specifications A-2 Printer specifications A-2 Command Summary A-12 Sending printer commands A-12 Using the command summary A-12 Character Tables A-23 Glossary iv

User Manual
Page 7
...end. How to Use This Manual Here's what you'll find in this chapter. Be sure to unpack and set up the printer. cl Chapter 2 contains information that you have difficulties, see this book: 0 Chapter 1 describes how to read and follow these instructions. If the... printer does not operate properly or you will need to load paper manually and change printer settings from the control panel. 0 Chapter 3 contains maintenance and troubleshooting information. It explains how to use ...
...end. How to Use This Manual Here's what you'll find in this chapter. Be sure to unpack and set up the printer. cl Chapter 2 contains information that you have difficulties, see this book: 0 Chapter 1 describes how to read and follow these instructions. If the... printer does not operate properly or you will need to load paper manually and change printer settings from the control panel. 0 Chapter 3 contains maintenance and troubleshooting information. It explains how to use ...
User Manual
Page 8
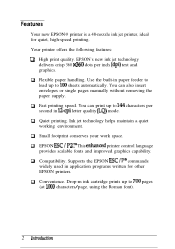
... maintain a quiet working environment. 0 Small footprint conserves your work space. 0 EPSON ESC / P 21' This enhanoqd printer control language provides scalable fonts and improved graphics capability. 0 Compatibility. Supports the EPSON ESC /I'@ commands widely used in application programs written for quiet, high-speed printing. EPSON's new ink jet technology delivers crisp 360 x 360 dots per second in paper feeder...
... maintain a quiet working environment. 0 Small footprint conserves your work space. 0 EPSON ESC / P 21' This enhanoqd printer control language provides scalable fonts and improved graphics capability. 0 Compatibility. Supports the EPSON ESC /I'@ commands widely used in application programs written for quiet, high-speed printing. EPSON's new ink jet technology delivers crisp 360 x 360 dots per second in paper feeder...

User Manual
Page 18
... printouts usually associated with soap and water. About Your Ink Jet Printer If you're new to ink jet printers, you are high print quality and quiet printing. An ink jet printer produces cost-effective, quality print results. Inside the ink jet print head, tiny spray units, or jets, draw ink from dot matrix or laser printers. cl Keep the ink cartridges out of the reach of children. 0 Do...
... printouts usually associated with soap and water. About Your Ink Jet Printer If you're new to ink jet printers, you are high print quality and quiet printing. An ink jet printer produces cost-effective, quality print results. Inside the ink jet print head, tiny spray units, or jets, draw ink from dot matrix or laser printers. cl Keep the ink cartridges out of the reach of children. 0 Do...
User Manual
Page 19
... one . Leaving the cartridge unpacked for a long time before the print head is capped. (The print head is capped when it with a new one hour until the ink warms to the new temperature. 0 Do not turn off the printer while printing or before use an ink cartridge beyond its package. o Do not use may become unusable...
... one . Leaving the cartridge unpacked for a long time before the print head is capped. (The print head is capped when it with a new one hour until the ink warms to the new temperature. 0 Do not turn off the printer while printing or before use an ink cartridge beyond its package. o Do not use may become unusable...

User Manual
Page 20
...a good practice to the condition of the paper are particularly sensitive to test any paper or envelopes in your ink jet printer is not absorbent enough, the ink may occur under certain conditions. Most correspondence-quality paper works in your paper. With paper that is selecting the... sheets one at a time as they finish printing. Also, avoid paper that has a rough finish or a slick, coated finish. Keep unused paper in its original packaging material and store it is an especially important consideration. Note: Ink jet printers are also important. Perform the self test and...
...a good practice to the condition of the paper are particularly sensitive to test any paper or envelopes in your ink jet printer is not absorbent enough, the ink may occur under certain conditions. Most correspondence-quality paper works in your paper. With paper that is selecting the... sheets one at a time as they finish printing. Also, avoid paper that has a rough finish or a slick, coated finish. Keep unused paper in its original packaging material and store it is an especially important consideration. Note: Ink jet printers are also important. Perform the self test and...

User Manual
Page 24
...power cord is not attached to the printer, connect it to the amount of text and graphics on the back of pages a single cartridge can print varies according to the AC inlet on each page- Installing the Ink Cartridge Each ink cartridge contains enough ink to perform this operation only once. ...1-8 Setting Up Your Printer lf ink does get on the back of your dealer for your...
...power cord is not attached to the printer, connect it to the amount of text and graphics on the back of pages a single cartridge can print varies according to the AC inlet on each page- Installing the Ink Cartridge Each ink cartridge contains enough ink to perform this operation only once. ...1-8 Setting Up Your Printer lf ink does get on the back of your dealer for your...

User Manual
Page 25
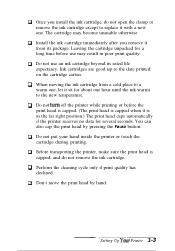
... off . 2. a Always wait until the head stops moving, and then turn on the printer. Release the buttons after the printer starts initializing. Ll Select Economy mode to replace it . The print hea$ moves to install the ink cartridge: 1. a Don't move the print head by hand. Hold down both the AH and Pause buttons while you...
... off . 2. a Always wait until the head stops moving, and then turn on the printer. Release the buttons after the printer starts initializing. Ll Select Economy mode to replace it . The print hea$ moves to install the ink cartridge: 1. a Don't move the print head by hand. Hold down both the AH and Pause buttons while you...

User Manual
Page 28
Press the Alt button again to return the print head to the far right position and to secure the cartridge. 8. Push the ink cartridge clamp toward the back of the printer to charge the ink delivery system. Close the printer cover. 1-12 Setting Up Your Printer Charging takes about one minute. The Pause light flashes throughout the cycle and turns off or reset the printer until the ink-charging cycle is finished. 7. e Caution: Do not turn off when ink charging is complete. 9.
Press the Alt button again to return the print head to the far right position and to secure the cartridge. 8. Push the ink cartridge clamp toward the back of the printer to charge the ink delivery system. Close the printer cover. 1-12 Setting Up Your Printer Charging takes about one minute. The Pause light flashes throughout the cycle and turns off or reset the printer until the ink-charging cycle is finished. 7. e Caution: Do not turn off when ink charging is complete. 9.

User Manual
Page 30
Then move the left edge guide to secure the paper stack. For more about printing with the right edge of the paper feeder. Close the paper feeder cover and lower the paper separator to match the width of the stack with the paper feeder, be sure to run the self test. 3. Align the right edge of your paper, as shown below. 4. Now you are ready to read "Tips for Using the Paper Feeder" at the end of paper all the way into the paper feeder with the printable surface facedown. Insert a stack of this chapter. 1-14 Setting Up Your Printer
Then move the left edge guide to secure the paper stack. For more about printing with the right edge of the paper feeder. Close the paper feeder cover and lower the paper separator to match the width of the stack with the paper feeder, be sure to run the self test. 3. Align the right edge of your paper, as shown below. 4. Now you are ready to read "Tips for Using the Paper Feeder" at the end of paper all the way into the paper feeder with the printable surface facedown. Insert a stack of this chapter. 1-14 Setting Up Your Printer

User Manual
Page 31
Make sure the printer is part of a typical self test: Courier 0123456789:; Then the printer prints characters in each font on the printer. It prints on the first and last lines of paper automatically from the paper feeder and begins the self test. It loads a sheet of page 1 to measure the page length. Here is turned off. 2. While holding down the Font button, turn on page 2. Running the self test 1.
Make sure the printer is part of a typical self test: Courier 0123456789:; Then the printer prints characters in each font on the printer. It prints on the first and last lines of paper automatically from the paper feeder and begins the self test. It loads a sheet of page 1 to measure the page length. Here is turned off. 2. While holding down the Font button, turn on page 2. Running the self test 1.

User Manual
Page 32
Connecting the Printer to Your Computer If the self test prints correctly, you are turned off. 2. Make sure both sides. If your computer to the ground connector at the computer end of the cable, connect it .... You need a shielded twisted-pair parallel cable to connect your cable has a ground wire, connect it to the printer's built-in place on both the printer and computer are ready to connect your printer to the ground connector above the interface connector. 4. Plug the other end of the computer. 1-16 Setting Up Your...
Connecting the Printer to Your Computer If the self test prints correctly, you are turned off. 2. Make sure both sides. If your computer to the ground connector at the computer end of the cable, connect it .... You need a shielded twisted-pair parallel cable to connect your cable has a ground wire, connect it to the printer's built-in place on both the printer and computer are ready to connect your printer to the ground connector above the interface connector. 4. Plug the other end of the computer. 1-16 Setting Up Your...

User Manual
Page 34
... OK button. 11. What is very important for Windows. The software you are printing. This step is a Printer Driver? You have now chosen the printer driver for proper page breaks in your printer. These software codes select the font, margins, page size, line spacing, and ...your software package. Choose the Setup button. 8. If you added) and click the button labeled Set As Default Printer. 12. Highlight EPSON Stylus 400 (or the printer you selected the LQ-870 printer, select Sheet Feeder Bin 1 as the Resolution. 9. If there is important that run (or "drive") your...
... OK button. 11. What is very important for Windows. The software you are printing. This step is a Printer Driver? You have now chosen the printer driver for proper page breaks in your printer. These software codes select the font, margins, page size, line spacing, and ...your software package. Choose the Setup button. 8. If you added) and click the button labeled Set As Default Printer. 12. Highlight EPSON Stylus 400 (or the printer you selected the LQ-870 printer, select Sheet Feeder Bin 1 as the Resolution. 9. If there is important that run (or "drive") your...

User Manual
Page 35
Microsoft Windows standard drivers use the printer's internal fonts and the TrueType fonts, contact Microsoft Windows Product Support. Until your Stylus 400 driver arrives, you may want to install the driver for one of WordPerfect does not support the EPSON Stylus 400, contact WordPerfect for MS-DOS® If your printed document. (This feature is called WYSIWYG, What...
Microsoft Windows standard drivers use the printer's internal fonts and the TrueType fonts, contact Microsoft Windows Product Support. Until your Stylus 400 driver arrives, you may want to install the driver for one of WordPerfect does not support the EPSON Stylus 400, contact WordPerfect for MS-DOS® If your printed document. (This feature is called WYSIWYG, What...

User Manual
Page 46
... you press the Font button. When only this mode is selected, the printer prints a condensed version of paper. Paper Out/Ink Out On when the printer runs out of selected fonts. Font Indicate the current font setting. Indicator lights Pause On when printing is low. For instructions on and off when you determine which font...
... you press the Font button. When only this mode is selected, the printer prints a condensed version of paper. Paper Out/Ink Out On when the printer runs out of selected fonts. Font Indicate the current font setting. Indicator lights Pause On when printing is low. For instructions on and off when you determine which font...
User Manual
Page 51
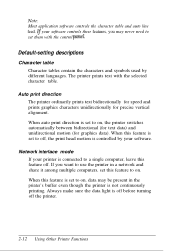
... feature is set to on, the printer switches automatically between bidirectional (for text data) and unidirectional motion (for precise vertical alignment. Auto print direction The printer ordinarily prints text bidirectionally for speed and prints graphics characters unidirectionally for graphics data). ...may never need to off . When auto print direction is not continuously printing. lf your software. Network interface mode If your printer is off before turning off the printer. 2-12 Using Other Printer Functions The printer prints text with the control panel. Always make sure...
... feature is set to on, the printer switches automatically between bidirectional (for text data) and unidirectional motion (for precise vertical alignment. Auto print direction The printer ordinarily prints text bidirectionally for speed and prints graphics characters unidirectionally for graphics data). ...may never need to off . When auto print direction is not continuously printing. lf your software. Network interface mode If your printer is off before turning off the printer. 2-12 Using Other Printer Functions The printer prints text with the control panel. Always make sure...

User Manual
Page 53
...lights indicate the appropriate selection. Default-setting menu Character table Auto print dlrectlon Network Interface mode Mixed text/graphics mode Auto line feed Loadlng positlon On 0 Off 0 Flashing 8 Data light 0 0 0 0 0 The printer loads a sheet of your selection. language English French German ... After you want to the feature you want messages printed in the language you selected. Press the Font button until printing is finished; then go to select the language that you press the Ait button, the printer prints the current default settings and the next instruction in ...
...lights indicate the appropriate selection. Default-setting menu Character table Auto print dlrectlon Network Interface mode Mixed text/graphics mode Auto line feed Loadlng positlon On 0 Off 0 Flashing 8 Data light 0 0 0 0 0 The printer loads a sheet of your selection. language English French German ... After you want to the feature you want messages printed in the language you selected. Press the Font button until printing is finished; then go to select the language that you press the Ait button, the printer prints the current default settings and the next instruction in ...
User Manual
Page 65
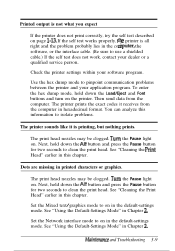
... Set the Mixed text/graphics mode to clean the print head. See "Using the Default-Settings Mode" in this chapter. See "Cleaning the Print Head" earlier in Chapter 2. Dots are missing in hexadecimal format. The printer prints the exact codes it is all right and the problem... probably lies in the default-settings mode. See "Cleaning the Print Head" earlier in the default-settings ...
... Set the Mixed text/graphics mode to clean the print head. See "Using the Default-Settings Mode" in this chapter. See "Cleaning the Print Head" earlier in Chapter 2. Dots are missing in hexadecimal format. The printer prints the exact codes it is all right and the problem... probably lies in the default-settings mode. See "Cleaning the Print Head" earlier in the default-settings ...

User Manual
Page 104
... off and then back on which the print head prints in one direction only. propottionai pfinttng Printing in the upper part of the character varies from character to its contents when you run the self test, the printer prints the characters stored in the printer by turning the printer off the printer. RAM Random Access Memory. ROM Read...
... off and then back on which the print head prints in one direction only. propottionai pfinttng Printing in the upper part of the character varies from character to its contents when you run the self test, the printer prints the characters stored in the printer by turning the printer off the printer. RAM Random Access Memory. ROM Read...


