
Before You Begin...
Page 3
... print them to look at your printer driver to get one page at a time by selecting Print Pages for the page range and then typing the page number you can select the Print Preview option in the print ...window. You don't have to view your pages before you want to see a printed draft of the caption text Preview Then, just..., you can print one final look . Just load plain paper in your printer and select Draft Color in your pages before printing Draft If you want them . Check all your print settings Select Print Preview to print...
... print them to look at your printer driver to get one page at a time by selecting Print Pages for the page range and then typing the page number you can select the Print Preview option in the print ...window. You don't have to view your pages before you want to see a printed draft of the caption text Preview Then, just..., you can print one final look . Just load plain paper in your printer and select Draft Color in your pages before printing Draft If you want them . Check all your print settings Select Print Preview to print...
Before You Begin...
Page 4
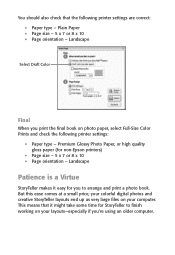
You should also check that it easy for non-Epson printers) • Page size - 5 x 7 or 8 x 10 • Page orientation - But this ease comes at a small price; Landscape Select Draft Color Final When you print the final book on your computer. Premium Glossy Photo Paper, or ...select Full-Size Color Prints and check the following printer settings are correct: • Paper type - Landscape Patience is a Virtue StoryTeller makes it might take some time for StoryTeller to arrange and print a photo book. Plain Paper • Page size - 5 x 7 or 8 x 10 • Page orientation - This ...
You should also check that it easy for non-Epson printers) • Page size - 5 x 7 or 8 x 10 • Page orientation - But this ease comes at a small price; Landscape Select Draft Color Final When you print the final book on your computer. Premium Glossy Photo Paper, or ...select Full-Size Color Prints and check the following printer settings are correct: • Paper type - Landscape Patience is a Virtue StoryTeller makes it might take some time for StoryTeller to arrange and print a photo book. Plain Paper • Page size - 5 x 7 or 8 x 10 • Page orientation - This ...

Before You Begin...
Page 5
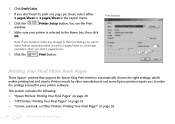
... you've printed your StoryTeller photo pages, you might not be able to print a front and back cover separately. Instead, you can create and print a colorful, themed cover for your photo book. Attaching the full wrapping cover Attaching separate front and back cover pages Depending on the type of... printer you have and its capabilities, you 're doing. StoryTeller lets you know how far along it Up!...
... you've printed your StoryTeller photo pages, you might not be able to print a front and back cover separately. Instead, you can create and print a colorful, themed cover for your photo book. Attaching the full wrapping cover Attaching separate front and back cover pages Depending on the type of... printer you have and its capabilities, you 're doing. StoryTeller lets you know how far along it Up!...

Creating a Photo Book
Page 4
...Printing a Draft of Your Photo Book 27 Printing Your Final Photo Book Pages 28 Epson Printers: Printing Your Final Pages 29 HP Printers: Printing Your Final Pages 33 Canon, Lexmark, or Other Printers: Printing Your Final Pages 36 Create Your Cover 41 Adding Photos to the Front and Back ...44 Saving Your Cover Pages to Your Computer 47 E-Mailing Your Front Cover Page 47 Print Your Cover 48 Printing a Reduced Size Color Draft of Your Cover 48 Printing Your Final Cover Page 50 Epson Printers: Printing the Final Cover Page 50 HP Printers: Printing Your Final Cover Page 59 Canon, Lexmark,...
...Printing a Draft of Your Photo Book 27 Printing Your Final Photo Book Pages 28 Epson Printers: Printing Your Final Pages 29 HP Printers: Printing Your Final Pages 33 Canon, Lexmark, or Other Printers: Printing Your Final Pages 36 Create Your Cover 41 Adding Photos to the Front and Back ...44 Saving Your Cover Pages to Your Computer 47 E-Mailing Your Front Cover Page 47 Print Your Cover 48 Printing a Reduced Size Color Draft of Your Cover 48 Printing Your Final Cover Page 50 Epson Printers: Printing the Final Cover Page 50 HP Printers: Printing Your Final Cover Page 59 Canon, Lexmark,...
Creating a Photo Book
Page 6
...to do with all those photos you how to put your cover, and easy-to-use the StoryTeller Publisher software, your photo book, and creating and printing a cover page. The Epson StoryTeller™ kit includes everything you through selecting and enhancing your photos, building and printing your system ...1.3 GHz or faster recommended) ● At least 2.3GB available hard disk space ● 256MB RAM (512MB RAM recommended) ● 16-bit color display, 800 × 600 pixels (higher resolution recommended) 6 You can add your own captions and titles to make sure your photos tell your ...
...to do with all those photos you how to put your cover, and easy-to-use the StoryTeller Publisher software, your photo book, and creating and printing a cover page. The Epson StoryTeller™ kit includes everything you through selecting and enhancing your photos, building and printing your system ...1.3 GHz or faster recommended) ● At least 2.3GB available hard disk space ● 256MB RAM (512MB RAM recommended) ● 16-bit color display, 800 × 600 pixels (higher resolution recommended) 6 You can add your own captions and titles to make sure your photos tell your ...

Creating a Photo Book
Page 17
... of the screen. Continue with the instructions in the Sharpen control. 5 To add a special color effect, click Color Effects. Saving Your Photo Changes 17 When you see the Save As dialog box, navigate to ...Once you've fixed a photo, you can save it to the right or left, click one of the color effects settings. 6 To rotate the image 90° to your mind again! Just click the icon at... a later date. Then select a new setting in "Create Your Photo Book Pages" on page 18, or go to the next section to your photo book. Then select one of the rotation icons...
... of the screen. Continue with the instructions in the Sharpen control. 5 To add a special color effect, click Color Effects. Saving Your Photo Changes 17 When you see the Save As dialog box, navigate to ...Once you've fixed a photo, you can save it to the right or left, click one of the color effects settings. 6 To rotate the image 90° to your mind again! Just click the icon at... a later date. Then select a new setting in "Create Your Photo Book Pages" on page 18, or go to the next section to your photo book. Then select one of the rotation icons...

Creating a Photo Book
Page 26
... to Your Computer Once you've created your photo book, you want to save it to print your own text on page 27. Then click OK to move through the pages. Use the scrollbar to the right of the screen. When you see the Save As dialog box, navigate to the location... box. 5 Enter your pages. Or go to the next section to save it and click Save. 26 Create Your Photo Book Pages 4 Use the editing tools in "Print Your Photo Book Pages" on all the pages. Now you're ready to your photo book to the text, such as a different typeface, color, or text alignment.
... to Your Computer Once you've created your photo book, you want to save it to print your own text on page 27. Then click OK to move through the pages. Use the scrollbar to the right of the screen. When you see the Save As dialog box, navigate to the location... box. 5 Enter your pages. Or go to the next section to save it and click Save. 26 Create Your Photo Book Pages 4 Use the editing tools in "Print Your Photo Book Pages" on all the pages. Now you're ready to your photo book to the text, such as a different typeface, color, or text alignment.

Creating a Photo Book
Page 27
...Be sure to print two pages per sheet or four pages per sheet. 1 Click Print Book on the Create Book tab. Printing a Draft of Your Photo Book Your draft prints in portrait mode, with one book page on plain letter-size paper to see this window: Click Draft Color You can change the layout... to print a draft of printer you can select a different page layout for your photo book on each printed sheet.
...Be sure to print two pages per sheet or four pages per sheet. 1 Click Print Book on the Create Book tab. Printing a Draft of Your Photo Book Your draft prints in portrait mode, with one book page on plain letter-size paper to see this window: Click Draft Color You can change the layout... to print a draft of printer you can select a different page layout for your photo book on each printed sheet.
Creating a Photo Book
Page 28
... following: ● "Epson Printers: Printing Your Final Pages" on page 29 ● "HP Printers: Printing Your Final Pages" on page 33 ● "Canon, Lexmark, or Other Printers: Printing Your Final Pages" on page 36 28 Print Your Photo Book Pages 2 Click Draft Color. 3 If you don't want to print one page per sheet, select either 2 pages/sheet or 4 pages/sheet in the...
... following: ● "Epson Printers: Printing Your Final Pages" on page 29 ● "HP Printers: Printing Your Final Pages" on page 33 ● "Canon, Lexmark, or Other Printers: Printing Your Final Pages" on page 36 28 Print Your Photo Book Pages 2 Click Draft Color. 3 If you don't want to print one page per sheet, select either 2 pages/sheet or 4 pages/sheet in the...
Creating a Photo Book
Page 30
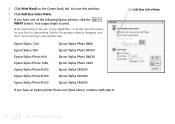
... 2200 Epson Stylus CX4600 Epson Stylus CX6400 Epson Stylus CX6600 If you have an Epson printer that is not listed above, continue with step 8. 5 Click Print Book on the size of the following Epson printers, click the PRINT button. Note: Depending on the Create Book tab. Your pages begin to start another task. Click Full Size Color...
... 2200 Epson Stylus CX4600 Epson Stylus CX6400 Epson Stylus CX6600 If you have an Epson printer that is not listed above, continue with step 8. 5 Click Print Book on the size of the following Epson printers, click the PRINT button. Note: Depending on the Create Book tab. Your pages begin to start another task. Click Full Size Color...

Creating a Photo Book
Page 34
Printer Setup button. You see this window: Make sure Full Size Color Prints is selected here Then click here 34 Print Your Photo Book Pages Make sure your printer is selected in the Name box, then click Properties. Then click the 6 Make sure your printer is selected Then click here 5 Click Full Size Color Prints. 4 Click Print Book on the Create Book tab.
Printer Setup button. You see this window: Make sure Full Size Color Prints is selected here Then click here 34 Print Your Photo Book Pages Make sure your printer is selected in the Name box, then click Properties. Then click the 6 Make sure your printer is selected Then click here 5 Click Full Size Color Prints. 4 Click Print Book on the Create Book tab.

Creating a Photo Book
Page 37
Make sure your printer is selected in the Name box, then click Properties. You see this window: Make sure Full Size Color Prints is selected here Then click here Canon, Lexmark, or Other Printers: Printing Your Final Pages 37 Printer Setup button. Then click the 6 Make sure your printer is selected Then click here 5 Click Full Size Color Prints. 4 Click Print Book on the Create Book tab.
Make sure your printer is selected in the Name box, then click Properties. You see this window: Make sure Full Size Color Prints is selected here Then click here Canon, Lexmark, or Other Printers: Printing Your Final Pages 37 Printer Setup button. Then click the 6 Make sure your printer is selected Then click here 5 Click Full Size Color Prints. 4 Click Print Book on the Create Book tab.

Creating a Photo Book
Page 43
... to enter your cover's spine and flaps. 4 Follow the instructions beginning on page 22 to replace, resize, reposition, or rotate photos on page 44. Note: If you don't enter new text, the page prints without text since the default text is automatically deleted. 6 When you want to the Front and... Back Covers 43 Adding Photos to change in the text box to make any modifications to the text, such as a different typeface, color...
... to enter your cover's spine and flaps. 4 Follow the instructions beginning on page 22 to replace, resize, reposition, or rotate photos on page 44. Note: If you don't enter new text, the page prints without text since the default text is automatically deleted. 6 When you want to the Front and... Back Covers 43 Adding Photos to change in the text box to make any modifications to the text, such as a different typeface, color...

Creating a Photo Book
Page 46
...print your front cover page. 46 Create Your Cover Select the text area on the flap Then type your text here 5 Use the editing tools in the text box to make any modifications to your computer or e-mail your cover page. Now you don't... text since the sample text is automatically deleted. Continue with the next two sections to save your cover pages to the text, such as a different typeface, color, or text alignment. 6 Click and edit all text areas on the flaps. 7 Click the text ... in "Print Your Cover" on the right. Or continue with the instructions in the text box on page 48.
...print your front cover page. 46 Create Your Cover Select the text area on the flap Then type your text here 5 Use the editing tools in the text box to make any modifications to your computer or e-mail your cover page. Now you don't... text since the sample text is automatically deleted. Continue with the next two sections to save your cover pages to the text, such as a different typeface, color, or text alignment. 6 Click and edit all text areas on the flaps. 7 Click the text ... in "Print Your Cover" on the right. Or continue with the instructions in the text box on page 48.
Creating a Photo Book
Page 48
...; 7-inch StoryTeller paper. The front cover, back cover, and flaps and spine will each print on a separate sheet of paper. 1 Load letter-size plain paper in your cover on plain letter-size paper. If this section to print a color proof of your printer. Note: See page 29 for instructions for your Epson printer, page 33...
...; 7-inch StoryTeller paper. The front cover, back cover, and flaps and spine will each print on a separate sheet of paper. 1 Load letter-size plain paper in your cover on plain letter-size paper. If this section to print a color proof of your printer. Note: See page 29 for instructions for your Epson printer, page 33...

Creating a Photo Book
Page 93
Index A Adding color effects, 17 page layouts to book, 24 photos to cover, 41 to 43 photos to page layouts, 21 photos to photo bin, 11 to 13 text to cover, 43 text to pages, 25 to 26 Assembling photo book, 83 to 89 Attaching pages to photo book, 83 to 86 Auto Book, 21, 91..., 38 to 39, 74 to 75, 80 to 81 loading cover sheet, 70 loading glossy photo paper, 36 printing book pages, 36 to 40 printing cover, 69 to 82 Captions, see Text Color effects, adding, 17 Contents of kit, 7 Contrast, adjusting, 16 Cover adding photos, 41 to 43 adding text, 43 attaching...
Index A Adding color effects, 17 page layouts to book, 24 photos to cover, 41 to 43 photos to page layouts, 21 photos to photo bin, 11 to 13 text to cover, 43 text to pages, 25 to 26 Assembling photo book, 83 to 89 Attaching pages to photo book, 83 to 86 Auto Book, 21, 91..., 38 to 39, 74 to 75, 80 to 81 loading cover sheet, 70 loading glossy photo paper, 36 printing book pages, 36 to 40 printing cover, 69 to 82 Captions, see Text Color effects, adding, 17 Contents of kit, 7 Contrast, adjusting, 16 Cover adding photos, 41 to 43 adding text, 43 attaching...