

Creating a Photo Book
Page 4
Print Your Photo Book Pages 27 Printing a Draft of Your Photo Book 27 Printing Your Final Photo Book Pages 28 Epson Printers: Printing Your Final Pages 29 HP Printers: Printing Your Final Pages 33 Canon, Lexmark, or Other Printers: Printing Your Final Pages 36 Create Your Cover 41 Adding Photos to the Front and Back Covers 41 Adding Photos and Text to the...
Print Your Photo Book Pages 27 Printing a Draft of Your Photo Book 27 Printing Your Final Photo Book Pages 28 Epson Printers: Printing Your Final Pages 29 HP Printers: Printing Your Final Pages 33 Canon, Lexmark, or Other Printers: Printing Your Final Pages 36 Create Your Cover 41 Adding Photos to the Front and Back Covers 41 Adding Photos and Text to the...

Creating a Photo Book
Page 27
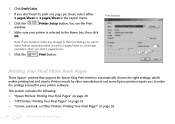
... draft here 27 Be sure to print a draft of your photo book on plain letter-size paper to see this window: Click Draft Color You can change the layout to print your photo book pages depend on the type of printer you print the final book. You see how it looks before you have. Print Your... Photo Book Pages The steps you use to print two pages per sheet or four pages per...
... draft here 27 Be sure to print a draft of your photo book on plain letter-size paper to see this window: Click Draft Color You can change the layout to print your photo book pages depend on the type of printer you print the final book. You see how it looks before you have. Print Your... Photo Book Pages The steps you use to print two pages per sheet or four pages per...
Creating a Photo Book
Page 28
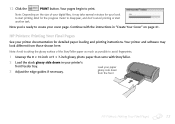
.../sheet. 6 Click the Print button. Note: If you decide to make the settings yourself in your printer is selected in the Name box, then click OK. Print window Printing Your Final Photo Book Pages Those Epson® printers that support the Epson Easy Print interface automatically choose the right settings, which makes printing fast and simple.
.../sheet. 6 Click the Print button. Note: If you decide to make the settings yourself in your printer is selected in the Name box, then click OK. Print window Printing Your Final Photo Book Pages Those Epson® printers that support the Epson Easy Print interface automatically choose the right settings, which makes printing fast and simple.
Creating a Photo Book
Page 29
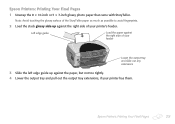
...StoryTeller paper as much as possible to avoid fingerprints. 2 Load the stack glossy side up against the paper, but not too tightly. 4 Lower the output tray and pull out the output tray extensions, if your printer's feeder. Epson Printers: Printing Your Final Pages 1 Unwrap the 8 × 10-inch or 5 × 7-inch glossy photo... paper that came with StoryTeller.
...StoryTeller paper as much as possible to avoid fingerprints. 2 Load the stack glossy side up against the paper, but not too tightly. 4 Lower the output tray and pull out the output tray extensions, if your printer's feeder. Epson Printers: Printing Your Final Pages 1 Unwrap the 8 × 10-inch or 5 × 7-inch glossy photo... paper that came with StoryTeller.
Creating a Photo Book
Page 30
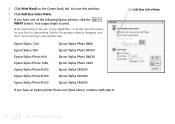
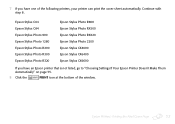
... Size Color Prints 30 Print Your Photo Book Pages Your pages begin to print. Epson Stylus® C64 Epson Stylus C84 Epson Stylus Photo 900 Epson Stylus Photo 1280 Epson Stylus Photo R200 Epson Stylus Photo R300 Epson Stylus Photo R320 Epson Stylus Photo R800 Epson Stylus Photo RX500 Epson Stylus Photo RX620 Epson Stylus Photo 2200 Epson Stylus CX4600 Epson Stylus CX6400 Epson Stylus CX6600 If you have an Epson printer that is not listed above...
... Size Color Prints 30 Print Your Photo Book Pages Your pages begin to print. Epson Stylus® C64 Epson Stylus C84 Epson Stylus Photo 900 Epson Stylus Photo 1280 Epson Stylus Photo R200 Epson Stylus Photo R300 Epson Stylus Photo R320 Epson Stylus Photo R800 Epson Stylus Photo RX500 Epson Stylus Photo RX620 Epson Stylus Photo 2200 Epson Stylus CX4600 Epson Stylus CX6400 Epson Stylus CX6600 If you have an Epson printer that is not listed above...

Creating a Photo Book
Page 31
Make sure your printer is selected here Then click here Epson Printers: Printing Your Final Pages 31 8 Click the Printer Setup button. 9 Make sure your printer is selected in the Name box, then click Properties.
Make sure your printer is selected here Then click here Epson Printers: Printing Your Final Pages 31 8 Click the Printer Setup button. 9 Make sure your printer is selected in the Name box, then click Properties.
Creating a Photo Book
Page 33
...your cover page. Load your printer's front feeder tray. 3 Adjust the edge guides if necessary. HP Printers: Printing Your Final Pages See your printer documentation for your book to avoid fingerprints. 1 Unwrap the 8 × 10-inch or 5 × 7-inch glossy photo paper that came with the ...instructions in your paper glossy side down in "Create Your Cover" on the size of the StoryTeller ...
...your cover page. Load your printer's front feeder tray. 3 Adjust the edge guides if necessary. HP Printers: Printing Your Final Pages See your printer documentation for your book to avoid fingerprints. 1 Unwrap the 8 × 10-inch or 5 × 7-inch glossy photo paper that came with the ...instructions in your paper glossy side down in "Create Your Cover" on the size of the StoryTeller ...

Creating a Photo Book
Page 34
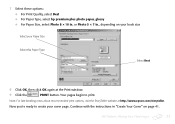
Printer Setup button. You see this window: Make sure Full Size Color Prints is selected here Then click here 34 Print Your Photo Book Pages Make sure your printer is selected in the Name box, then click Properties. Then click the 6 Make sure your printer is selected Then click here 5 Click Full Size Color Prints. 4 Click Print Book on the Create Book tab.
Printer Setup button. You see this window: Make sure Full Size Color Prints is selected here Then click here 34 Print Your Photo Book Pages Make sure your printer is selected in the Name box, then click Properties. Then click the 6 Make sure your printer is selected Then click here 5 Click Full Size Color Prints. 4 Click Print Book on the Create Book tab.
Creating a Photo Book
Page 35
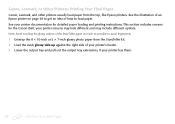
Continue with the instructions in . HP Printers: Printing Your Final Pages 35 Your pages begin to create your Paper Size Select this Paper Type Select Best 8 Click OK, then click OK again at http://www.epson.com/storyteller. or Photo 5 × 7 in., depending on ...StoryTeller website at the Print window. 9 Click the PRINT button. Now you're ready to print. 7 Select these options: ● For Print Quality, select Best ● For Paper Type, select hp premium plus photo paper, glossy ● For Paper Size, select Photo 8 × 10 in "Create Your Cover" on your book...
Continue with the instructions in . HP Printers: Printing Your Final Pages 35 Your pages begin to create your Paper Size Select this Paper Type Select Best 8 Click OK, then click OK again at http://www.epson.com/storyteller. or Photo 5 × 7 in., depending on ...StoryTeller website at the Print window. 9 Click the PRINT button. Now you're ready to print. 7 Select these options: ● For Print Quality, select Best ● For Paper Type, select hp premium plus photo paper, glossy ● For Paper Size, select Photo 8 × 10 in "Create Your Cover" on your book...
Creating a Photo Book
Page 36
... from the top, like Epson printers. your printer has them. 36 Print Your Photo Book Pages See the illustration of an Epson printer on page 29 to load paper. See your printer documentation for the Canon i560; Canon, Lexmark, or Other Printers: Printing Your Final Pages Canon, Lexmark, and other printers usually load paper from the StoryTeller kit. 2 Load the stack...
... from the top, like Epson printers. your printer has them. 36 Print Your Photo Book Pages See the illustration of an Epson printer on page 29 to load paper. See your printer documentation for the Canon i560; Canon, Lexmark, or Other Printers: Printing Your Final Pages Canon, Lexmark, and other printers usually load paper from the StoryTeller kit. 2 Load the stack...

Creating a Photo Book
Page 37
Printer Setup button. Then click the 6 Make sure your printer is selected here Then click here Canon, Lexmark, or Other Printers: Printing Your Final Pages 37 Make sure your printer is selected Then click here 5 Click Full Size Color Prints. 4 Click Print Book on the Create Book tab. You see this window: Make sure Full Size Color Prints is selected in the Name box, then click Properties.
Printer Setup button. Then click the 6 Make sure your printer is selected here Then click here Canon, Lexmark, or Other Printers: Printing Your Final Pages 37 Make sure your printer is selected Then click here 5 Click Full Size Color Prints. 4 Click Print Book on the Create Book tab. You see this window: Make sure Full Size Color Prints is selected in the Name box, then click Properties.

Creating a Photo Book
Page 39
8 Select the correct paper size for your printer doesn't have an 8 × 10-inch or 5 × 7-inch paper size option, select Custom or User Defined as the paper size and type the correct ... in the dialog box that appears 9 Click OK, then click OK again at the Print window. If your book; If your printer doesn't have the paper size option on the first screen, and some printers will require you to click another tab. For Canon, click the Page Setup tab. Canon, Lexmark, or Other...
8 Select the correct paper size for your printer doesn't have an 8 × 10-inch or 5 × 7-inch paper size option, select Custom or User Defined as the paper size and type the correct ... in the dialog box that appears 9 Click OK, then click OK again at the Print window. If your book; If your printer doesn't have the paper size option on the first screen, and some printers will require you to click another tab. For Canon, click the Page Setup tab. Canon, Lexmark, or Other...

Creating a Photo Book
Page 44
... appear in the preview area Click the front flap 44 Create Your Cover If you 're ready to print your non-Epson printer can print a full-length cover page. Note: All Epson printers can print a full-length cover page, see the instructions beginning on page 48. Go to print a long cover page.... Adding Photos and Text to the Flaps and Spine Some printers are not able to "Print Your Cover" on page 48. 1 In the diagram...
... appear in the preview area Click the front flap 44 Create Your Cover If you 're ready to print your non-Epson printer can print a full-length cover page. Note: All Epson printers can print a full-length cover page, see the instructions beginning on page 48. Go to print a long cover page.... Adding Photos and Text to the Flaps and Spine Some printers are not able to "Print Your Cover" on page 48. 1 In the diagram...
Creating a Photo Book
Page 48
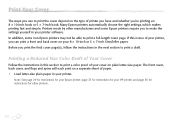
... use to print the cover depend on the type of your printer, you can print a front and back cover on plain letter-size paper. Printers made by other printers. 48 Before you 're printing an 8 × 10-inch book or 5 × 7-inch book. If this section to print a full-length cover page. ...to make the settings yourself in your HP printer, and page 36 for instructions for other manufacturers and some non-Epson printers may not be able to print a color proof of paper. 1 Load letter-size plain paper in your 8 × 10-inch or 5 × 7-inch StoryTeller paper. Note: See page 29 for ...
... use to print the cover depend on the type of your printer, you can print a front and back cover on plain letter-size paper. Printers made by other printers. 48 Before you 're printing an 8 × 10-inch book or 5 × 7-inch book. If this section to print a full-length cover page. ...to make the settings yourself in your HP printer, and page 36 for instructions for other manufacturers and some non-Epson printers may not be able to print a color proof of paper. 1 Load letter-size plain paper in your 8 × 10-inch or 5 × 7-inch StoryTeller paper. Note: See page 29 for ...

Creating a Photo Book
Page 49
You see a message asking if you want to deselect it. 5 Click the PRINT icon. Your cover prints on the StoryTeller window. You see this window: 3 Click Draft (Plain Paper). 4 If your printer does not support banner or panoramic printing, click the Spine and Flaps box to optimize your photos for better prints. 6 Click No. 2 Click the PRINT icon on several sheets. Printing a Reduced Size Color Draft of Your Cover 49
You see a message asking if you want to deselect it. 5 Click the PRINT icon. Your cover prints on the StoryTeller window. You see this window: 3 Click Draft (Plain Paper). 4 If your printer does not support banner or panoramic printing, click the Spine and Flaps box to optimize your photos for better prints. 6 Click No. 2 Click the PRINT icon on several sheets. Printing a Reduced Size Color Draft of Your Cover 49

Creating a Photo Book
Page 50
... section includes instructions for these printers: ● "Epson Printers: Printing the Final Cover Page" in the opposite direction (for both the 8 × 10-inch and 5 × 7-inch books. In addition, many Epson printers automatically choose the right print settings, so printing is easy. Note: Avoid touching the glossy surface of the StoryTeller paper as much as possible...
... section includes instructions for these printers: ● "Epson Printers: Printing the Final Cover Page" in the opposite direction (for both the 8 × 10-inch and 5 × 7-inch books. In addition, many Epson printers automatically choose the right print settings, so printing is easy. Note: Avoid touching the glossy surface of the StoryTeller paper as much as possible...

Creating a Photo Book
Page 51
2 Load the sheet glossy side up against the right side of the StoryTeller screen. Load the sheet in your printer has them. 5 Click the PRINT icon at the bottom of the feeder. 3 Slide the left edge guide up against the paper, but not too tightly. 4 Lower the output tray and pull out the output tray extensions, if your Epson printer glossy side up Click here Epson Printers: Printing the Final Cover Page 51
2 Load the sheet glossy side up against the right side of the StoryTeller screen. Load the sheet in your printer has them. 5 Click the PRINT icon at the bottom of the feeder. 3 Slide the left edge guide up against the paper, but not too tightly. 4 Lower the output tray and pull out the output tray extensions, if your Epson printer glossy side up Click here Epson Printers: Printing the Final Cover Page 51
Creating a Photo Book
Page 53
... one of the window. Epson Stylus C64 Epson Stylus C84 Epson Stylus Photo 900 Epson Stylus Photo 1280 Epson Stylus Photo R200 Epson Stylus Photo R300 Epson Stylus Photo R320 Epson Stylus Photo R800 Epson Stylus Photo RX500 Epson Stylus Photo RX620 Epson Stylus Photo 2200 Epson Stylus CX4600 Epson Stylus CX6400 Epson Stylus CX6600 If you have an Epson printer that is not listed, go to "Choosing Settings If Your Epson Printer Doesn't Make Them Automatically...
... one of the window. Epson Stylus C64 Epson Stylus C84 Epson Stylus Photo 900 Epson Stylus Photo 1280 Epson Stylus Photo R200 Epson Stylus Photo R300 Epson Stylus Photo R320 Epson Stylus Photo R800 Epson Stylus Photo RX500 Epson Stylus Photo RX620 Epson Stylus Photo 2200 Epson Stylus CX4600 Epson Stylus CX6400 Epson Stylus CX6600 If you have an Epson printer that is not listed, go to "Choosing Settings If Your Epson Printer Doesn't Make Them Automatically...

Creating a Photo Book
Page 54
...want to optimize your photos for your cover to start another task. 10 Lightly support the cover sheet as it may take several minutes for printing, click Yes. Continue with the instructions in "Assemble Your Photo Book" on the size of your digital files, it goes into the printer And as it ...goes into the printer and comes out at the paper tray. 9 If you see a message asking if you 're...
...want to optimize your photos for your cover to start another task. 10 Lightly support the cover sheet as it may take several minutes for printing, click Yes. Continue with the instructions in "Assemble Your Photo Book" on the size of your digital files, it goes into the printer And as it ...goes into the printer and comes out at the paper tray. 9 If you see a message asking if you 're...

Creating a Photo Book
Page 55
Click here 3 When you see the Print window, make sure your printer is selected in the Name box. Then click Properties. . Make sure your printer is selected here Then click here Epson Printers: Printing the Final Cover Page 55 Choosing Settings If Your Epson Printer Doesn't Make Them Automatically 1 Click the PRINT WIZARD button at the bottom of the Print Setup window. 2 Click the Printer Setup button.
Click here 3 When you see the Print window, make sure your printer is selected in the Name box. Then click Properties. . Make sure your printer is selected here Then click here Epson Printers: Printing the Final Cover Page 55 Choosing Settings If Your Epson Printer Doesn't Make Them Automatically 1 Click the PRINT WIZARD button at the bottom of the Print Setup window. 2 Click the Printer Setup button.