
Technical Brief (Ink Jet Printers)
Page 1
... the optimal output quality High Resolution Printing High resolution allows the printer to produce award-winning print quality, and each of offering a one printers. Print Quality-Core Printing Technologies The core technologies used in Epson ink jet printers work together to produce brilliant Photo Quality color, sharp text, and incredible print speeds Small Ink Droplet Size...
... the optimal output quality High Resolution Printing High resolution allows the printer to produce award-winning print quality, and each of offering a one printers. Print Quality-Core Printing Technologies The core technologies used in Epson ink jet printers work together to produce brilliant Photo Quality color, sharp text, and incredible print speeds Small Ink Droplet Size...

Technical Brief (Ink Jet Printers)
Page 2
... Bubble Nozzle Droplet Some thermal printers produce more color combinations and smoother color gradations. Epson printers are increased Epson printers use high-precision mechanical pumps to increase the number of different ink droplet sizes. Gradations and blends become smoother as resolution and droplet control are unique in photos and laser sharp text. 1. Also, Epson's variable ink droplet sizes and...
... Bubble Nozzle Droplet Some thermal printers produce more color combinations and smoother color gradations. Epson printers are increased Epson printers use high-precision mechanical pumps to increase the number of different ink droplet sizes. Gradations and blends become smoother as resolution and droplet control are unique in photos and laser sharp text. 1. Also, Epson's variable ink droplet sizes and...

Technical Brief (Ink Jet Printers)
Page 3
...ficient pattern for optional cartridges, and you see continuous tone color. Epson Printer + Epson Ink + Epson Paper Delivers Epson Quality 6. High Quality Halftoning: Every ink jet printer uses a method referred to as halftoning, that produces fast, high-quality, color-accurate output. Fine Art Pro Advanced Amateur Photo Enthusiast Chief Memory Officer® General Purpose You can...
...ficient pattern for optional cartridges, and you see continuous tone color. Epson Printer + Epson Ink + Epson Paper Delivers Epson Quality 6. High Quality Halftoning: Every ink jet printer uses a method referred to as halftoning, that produces fast, high-quality, color-accurate output. Fine Art Pro Advanced Amateur Photo Enthusiast Chief Memory Officer® General Purpose You can...
Basics
Page 2
... those designated as some countries' laws permit limited copying of the copyright laws when using digital cameras, scanners, and ink jet printers. Responsible Use of Seiko Epson Corporation. Trademarks Epson, Epson Stylus, MicroWeave, PictBridge, and Epson Photo Stickers are registered trademarks and PhotoFine, PRINT Image Matching, the PRINT Image Matching logo, and USB Direct Print are for...
... those designated as some countries' laws permit limited copying of the copyright laws when using digital cameras, scanners, and ink jet printers. Responsible Use of Seiko Epson Corporation. Trademarks Epson, Epson Stylus, MicroWeave, PictBridge, and Epson Photo Stickers are registered trademarks and PhotoFine, PRINT Image Matching, the PRINT Image Matching logo, and USB Direct Print are for...

Basics
Page 12
... an extensive line of papers that provide outstanding results when used with your printer. Plain paper may not get the results you expect. 1. If you have to work with Epson printers and ink. Epson paper is designed to specify Plain(Back) as the Paper Type when printing (see the inside...cover for suggestions, or check online at www.epsonstore.com. See the inside back cover for a complete list of specialty papers that work with Epson printers and ink. Open the front cover. 12 Copying Press Extend the paper support. 2. If you use different brands, you may also be ...
... an extensive line of papers that provide outstanding results when used with your printer. Plain paper may not get the results you expect. 1. If you have to work with Epson printers and ink. Epson paper is designed to specify Plain(Back) as the Paper Type when printing (see the inside...cover for suggestions, or check online at www.epsonstore.com. See the inside back cover for a complete list of specialty papers that work with Epson printers and ink. Open the front cover. 12 Copying Press Extend the paper support. 2. If you use different brands, you may also be ...

Basics
Page 28
Make sure the memory card light (next to 4600 × 4600 pixels ■ No more than 999 photos on your card as shown: CompactFlash or Microdrive (bottom) MemoryStick, SD, or MMC (middle) SmartMedia or xD (top) 28 Making Prints From Your Digital Camera ...Open the memory card slot cover. Make sure the photos on the card (you can have additional photos, but the printer can read only the first 999) Inserting Your Camera's Memory Card 1. Open cover 2. Then insert your card meet these requirements...
Make sure the memory card light (next to 4600 × 4600 pixels ■ No more than 999 photos on your card as shown: CompactFlash or Microdrive (bottom) MemoryStick, SD, or MMC (middle) SmartMedia or xD (top) 28 Making Prints From Your Digital Camera ...Open the memory card slot cover. Make sure the photos on the card (you can have additional photos, but the printer can read only the first 999) Inserting Your Camera's Memory Card 1. Open cover 2. Then insert your card meet these requirements...

Basics
Page 32
... to select the correct Paper Type setting on the RX700 screen (step 4 on page 30). This important setting tells the printer what kind of paper you 've loaded this setting Plain(Front) or Plain(Back) Plain(Back) Prem.Glossy SemiGloss Prem.Luster Glossy Photo Matte 32 Making Prints From Your Digital Camera Making...
... to select the correct Paper Type setting on the RX700 screen (step 4 on page 30). This important setting tells the printer what kind of paper you 've loaded this setting Plain(Front) or Plain(Back) Plain(Back) Prem.Glossy SemiGloss Prem.Luster Glossy Photo Matte 32 Making Prints From Your Digital Camera Making...

Basics
Page 41
... necessary, turn on your camera (you leave a card in your camera. You may have additional photos, but the printer can have to scroll down to see page 31). 5. Make sure your photos meet these requirements: ■ JPEG files or uncompressed Tiff files only ■ Resolutions ranging from ... PictBridge and USB Direct Print let you want to print on (see all the settings. After a moment, the RX700 reads and counts your digital camera directly to the Stylus Photo RX700. Use the d button to select default print settings, such as Paper Type, Paper Size, and Quality. Load ...
... necessary, turn on your camera (you leave a card in your camera. You may have additional photos, but the printer can have to scroll down to see page 31). 5. Make sure your photos meet these requirements: ■ JPEG files or uncompressed Tiff files only ■ Resolutions ranging from ... PictBridge and USB Direct Print let you want to print on (see all the settings. After a moment, the RX700 reads and counts your digital camera directly to the Stylus Photo RX700. Use the d button to select default print settings, such as Paper Type, Paper Size, and Quality. Load ...

Basics
Page 48
... the surface may cause errors when you print. Note: For small 8-cm disks, place the included adapter on the tray first. 48 Printing on the RX700 and open tab. The CD/DVD guide slides out. 3. Turn on CDs and DVDs Otherwise, dirt or scratches on the CD/DVD tray with ink...
... the surface may cause errors when you print. Note: For small 8-cm disks, place the included adapter on the tray first. 48 Printing on the RX700 and open tab. The CD/DVD guide slides out. 3. Turn on CDs and DVDs Otherwise, dirt or scratches on the CD/DVD tray with ink...

Basics
Page 49
...the instructions on your computer, you first open the EPSON Print CD folder and select EPSON Print CD. Using EPSON Print CD 49 Make sure the arrow marks are aligned. Designing CDs and DVDs 1. Align arrows Using EPSON Print CD If your RX700 is connected to your system, to create and ...print a disk design with images and text. Note: When you can use the EPSON Print CD software to build a printer information database. Insert the tray into the...
...the instructions on your computer, you first open the EPSON Print CD folder and select EPSON Print CD. Using EPSON Print CD 49 Make sure the arrow marks are aligned. Designing CDs and DVDs 1. Align arrows Using EPSON Print CD If your RX700 is connected to your system, to create and ...print a disk design with images and text. Note: When you can use the EPSON Print CD software to build a printer information database. Insert the tray into the...
Basics
Page 52
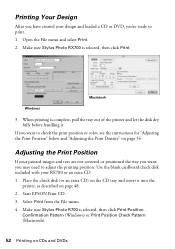
Select Print from the File menu. 4. When printing is complete, pull the tray out of the printer and let the disk dry fully before handling it into the printer, as described on page 54. If you may need to adjust the printing position. Use the blank cardboard check ... a CD or DVD, you're ready to check the print position or color, see the instructions for "Adjusting the Print Position" below and "Adjusting the Print Density" on page 48. 2. Start EPSON Print CD. 3. Make sure Stylus Photo RX700 is selected, then click Print Position Confirmation Pattern (Windows) or Print Position...
Select Print from the File menu. 4. When printing is complete, pull the tray out of the printer and let the disk dry fully before handling it into the printer, as described on page 54. If you may need to adjust the printing position. Use the blank cardboard check ... a CD or DVD, you're ready to check the print position or color, see the instructions for "Adjusting the Print Position" below and "Adjusting the Print Density" on page 48. 2. Start EPSON Print CD. 3. Make sure Stylus Photo RX700 is selected, then click Print Position Confirmation Pattern (Windows) or Print Position...

Basics
Page 55
... Disks from different manufacturers absorb ink differently, so you want to print a colorful design directly onto a CD or DVD without using your disk. 1. Change the Copy Density as a drawing or 4 × 6-inch photo) or use your Stylus Photo RX700 to scan an image (such as needed, then press OK. You can ... section below, depending on your digital camera's memory card. When printing is complete, pull the tray out of the printer and let the disk dry fully before handling it onto the disk or use photos from your disk this way, but you may need to copy in grayscale.
... Disks from different manufacturers absorb ink differently, so you want to print a colorful design directly onto a CD or DVD without using your disk. 1. Change the Copy Density as a drawing or 4 × 6-inch photo) or use your Stylus Photo RX700 to scan an image (such as needed, then press OK. You can ... section below, depending on your digital camera's memory card. When printing is complete, pull the tray out of the printer and let the disk dry fully before handling it onto the disk or use photos from your disk this way, but you may need to copy in grayscale.

Basics
Page 57
... select multiple copies of each photo, if desired. ■ Use the l and r arrow buttons to select how many copies of the printer and let the disk dry...button. 8. At the preview screen, press the x Color button to print in grayscale. If necessary, print a test sample using the blank cardboard check disk included with your photo(s) for printing. When printing is displayed, use the ...+ and - Press the Setup button. 3. If the printed image is printed. 6. Select your RX700 or an extra CD. 2....
... select multiple copies of each photo, if desired. ■ Use the l and r arrow buttons to select how many copies of the printer and let the disk dry...button. 8. At the preview screen, press the x Color button to print in grayscale. If necessary, print a test sample using the blank cardboard check disk included with your photo(s) for printing. When printing is displayed, use the ...+ and - Press the Setup button. 3. If the printed image is printed. 6. Select your RX700 or an extra CD. 2....

Basics
Page 72
... in the front tray (see light or dark lines across the page, you don't use the printer for a long time. 5. Press OK again to select Nozzle Check, then press OK. 4. The RX700 begins charging the ink delivery system, and you 've just finished cleaning the print head, the ...setup screen appears automatically). 3. Caution: Never turn on your printouts are unexpectedly light, colors are clogged, or to check the results after cleaning the...
... in the front tray (see light or dark lines across the page, you don't use the printer for a long time. 5. Press OK again to select Nozzle Check, then press OK. 4. The RX700 begins charging the ink delivery system, and you 've just finished cleaning the print head, the ...setup screen appears automatically). 3. Caution: Never turn on your printouts are unexpectedly light, colors are clogged, or to check the results after cleaning the...
Basics
Page 73
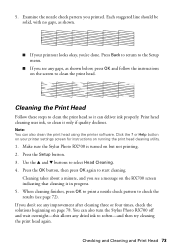
Cleaning takes about a minute, and you see page 72). If you see any gaps, as shown. ■ If your printer settings screen for instructions on but not printing. 2. 5. Cleaning the Print Head Follow these steps to clean the print head so it only if... deliver ink properly. Make sure the Stylus Photo RX700 is in progress. 5. You can also turn the Stylus Photo RX700 off and wait overnight-this allows any dried ink to start cleaning. Print head cleaning uses ink, so clean it can also clean the print head using the printer software. Examine the nozzle check pattern ...
Cleaning takes about a minute, and you see page 72). If you see any gaps, as shown. ■ If your printer settings screen for instructions on but not printing. 2. 5. Cleaning the Print Head Follow these steps to clean the print head so it only if... deliver ink properly. Make sure the Stylus Photo RX700 is in progress. 5. You can also turn the Stylus Photo RX700 off and wait overnight-this allows any dried ink to start cleaning. Print head cleaning uses ink, so clean it can also clean the print head using the printer software. Examine the nozzle check pattern ...

Basics
Page 74
...tray (see a message that appear jagged, you may need to select the circled number for instructions on and not printing. 2. On the RX700 screen, use a magnifying glass or loupe. 6. Load several sheets of plain letter-size paper in section #1. 7. Press OK again to ... the alignment pattern. 5. Examine the printout. Click the ? Make sure the Stylus Photo RX700 is complete. Note: You can also run a print head alignment using the printer software. Aligning the Print Head If your printer settings window for each section (#1 through #4), circle the box with the least ...
...tray (see a message that appear jagged, you may need to select the circled number for instructions on and not printing. 2. On the RX700 screen, use a magnifying glass or loupe. 6. Load several sheets of plain letter-size paper in section #1. 7. Press OK again to ... the alignment pattern. 5. Examine the printout. Click the ? Make sure the Stylus Photo RX700 is complete. Note: You can also run a print head alignment using the printer software. Aligning the Print Head If your printer settings window for each section (#1 through #4), circle the box with the least ...

Basics
Page 77
...Layout setting and turn off . ■ If you're making prints from your computer. If the Stylus Photo RX700 is turned on but nothing prints, check the following: ■ Make sure the USB cable is ... application, or as the Windows default printer. ■ Run a nozzle check as described in the on page 72. If the check page prints, make sure your RX700 software is too slow, make sure...original size may not be cropped because Epson photo paper does not have the same proportions as the Zoom In/Out setting, and then use the + and - See your RX700 for problems printing from a slide, ...
...Layout setting and turn off . ■ If you're making prints from your computer. If the Stylus Photo RX700 is turned on but nothing prints, check the following: ■ Make sure the USB cable is ... application, or as the Windows default printer. ■ Run a nozzle check as described in the on page 72. If the check page prints, make sure your RX700 software is too slow, make sure...original size may not be cropped because Epson photo paper does not have the same proportions as the Zoom In/Out setting, and then use the + and - See your RX700 for problems printing from a slide, ...

Basics
Page 78
...Make sure the paper is blurry or smeared. ■ Make sure your paper isn't damp or curled. ■ Use Epson paper for proper saturation and absorption of Epson inks. see page 72 for printing on envelopes), be sure to switch it with the printable side face-up in the ... . Load it back to Off when printing individuals sheets. 78 Solving Problems Print Quality Problems You see banding (light lines) in your printer software. ■ Try printing with Epson paper. If you changed the Paper Thickness setting to On (for instructions. ■ The ink cartridges may need replacing;
...Make sure the paper is blurry or smeared. ■ Make sure your paper isn't damp or curled. ■ Use Epson paper for proper saturation and absorption of Epson inks. see page 72 for printing on envelopes), be sure to switch it with the printable side face-up in the ... . Load it back to Off when printing individuals sheets. 78 Solving Problems Print Quality Problems You see banding (light lines) in your printer software. ■ Try printing with Epson paper. If you changed the Paper Thickness setting to On (for instructions. ■ The ink cartridges may need replacing;

Basics
Page 79
...Solutions 79 Your printout is grainy. ■ Use Epson paper for instructions. ■ The ink cartridges may be incorrect. ■ If you're printing photos from a scanned image, rescan it at a smaller ...size. You see page 74 for the paper you loaded (see page 32). ■ If the RX700 runs out of paper during...never exactly match your printer software. ■ If you're printing from a digital camera, check the Auto Correct and Filter settings to make sure Grayscale is off (Windows) or Color ink is selected (...
...Solutions 79 Your printout is grainy. ■ Use Epson paper for instructions. ■ The ink cartridges may be incorrect. ■ If you're printing photos from a scanned image, rescan it at a smaller ...size. You see page 74 for the paper you loaded (see page 32). ■ If the RX700 runs out of paper during...never exactly match your printer software. ■ If you're printing from a digital camera, check the Auto Correct and Filter settings to make sure Grayscale is off (Windows) or Color ink is selected (...

Basics
Page 80
...in the direction of paper (such as Epson photo paper) in the rear sheet feeder. ■ Don't push the paper in too far. The stack should never be above the arrow on , and press the x Color button. To clear a paper jam: If paper jams, turn the Stylus Photo RX700 back on the inside , including any ... jams by pulling the paper out of the left edge guide. follow the instructions that it with your Stylus Photo RX700, lift open the scanner section, and remove any paper that's inside of the printer in the rear sheet feeder: ■ You may have pushed the paper down too far into the ...
...in the direction of paper (such as Epson photo paper) in the rear sheet feeder. ■ Don't push the paper in too far. The stack should never be above the arrow on , and press the x Color button. To clear a paper jam: If paper jams, turn the Stylus Photo RX700 back on the inside , including any ... jams by pulling the paper out of the left edge guide. follow the instructions that it with your Stylus Photo RX700, lift open the scanner section, and remove any paper that's inside of the printer in the rear sheet feeder: ■ You may have pushed the paper down too far into the ...


