
Technical Brief (Ink Jet Printers)
Page 1
... of offering a one printers. This combination of core technologies used in Epson ink jet printers work together to produce brilliant Photo Quality color, sharp text, and incredible print speeds Small Ink Droplet Size Small ink droplets produce smoother gradations and greater tonal control Epson Inks Epson innovates ink solutions tailored to the needs of specific users instead of these...
... of offering a one printers. This combination of core technologies used in Epson ink jet printers work together to produce brilliant Photo Quality color, sharp text, and incredible print speeds Small Ink Droplet Size Small ink droplets produce smoother gradations and greater tonal control Epson Inks Epson innovates ink solutions tailored to the needs of specific users instead of these...

Technical Brief (Ink Jet Printers)
Page 2
...or highlight areas, reducing the visibility of printed "dots" • Large ink droplets are used in photos and laser sharp text. Small ink droplet size: Most Epson printers produce ink droplets so small you cannot see them with high resolutions to precisely print ...this technique, Epson printers can be combined to achieve more tone representations for highlights and detailed areas Variable sizes combine to achieve more color combinations and smoother color gradations. Smallest ink droplets produce smooth photos, especially beneficial for smoother gradations Ink Jet Printer...
...or highlight areas, reducing the visibility of printed "dots" • Large ink droplets are used in photos and laser sharp text. Small ink droplet size: Most Epson printers produce ink droplets so small you cannot see them with high resolutions to precisely print ...this technique, Epson printers can be combined to achieve more tone representations for highlights and detailed areas Variable sizes combine to achieve more color combinations and smoother color gradations. Smallest ink droplets produce smooth photos, especially beneficial for smoother gradations Ink Jet Printer...

Technical Brief (Ink Jet Printers)
Page 3
.... Epson Printer + Epson Ink + Epson Paper Delivers Epson Quality 6. Epson disclaims any and all three elements are specifically designed to as halftoning, that produces fast, high-quality, color-accurate output. Epson Papers: In general, Epson printers will deliver their respective owners. Ink Jet Printer Technical Brief Page 3 High Quality Halftoning: Every ink jet printer uses a method referred to receive Epson inks. Epson...
.... Epson Printer + Epson Ink + Epson Paper Delivers Epson Quality 6. Epson disclaims any and all three elements are specifically designed to as halftoning, that produces fast, high-quality, color-accurate output. Epson Papers: In general, Epson printers will deliver their respective owners. Ink Jet Printer Technical Brief Page 3 High Quality Halftoning: Every ink jet printer uses a method referred to receive Epson inks. Epson...

Basics Guide
Page 4
Printing on CDs and DVDs 45 Measuring Your CDs/DVDs 45 Inserting a CD or DVD 46 Printing Photos on a CD or DVD 48 Copying onto a CD/DVD 51 Returning the Front Tray to the Paper Position 54 Printing a CD/DVD Jewel Case Insert ... Document 63 Scanning to Your Computer 63 Scanning to a Memory Card 66 Backing Up Your Photos 67 Maintaining Your RX580 69 Checking the Print Head Nozzles 69 Cleaning the Print Head 70 Replacing Ink Cartridges 71 Aligning the Print Head 77 Solving Problems 78 Error Messages 78 Problems and Solutions 79 Where To...
Printing on CDs and DVDs 45 Measuring Your CDs/DVDs 45 Inserting a CD or DVD 46 Printing Photos on a CD or DVD 48 Copying onto a CD/DVD 51 Returning the Front Tray to the Paper Position 54 Printing a CD/DVD Jewel Case Insert ... Document 63 Scanning to Your Computer 63 Scanning to a Memory Card 66 Backing Up Your Photos 67 Maintaining Your RX580 69 Checking the Print Head Nozzles 69 Cleaning the Print Head 70 Replacing Ink Cartridges 71 Aligning the Print Head 77 Solving Problems 78 Error Messages 78 Problems and Solutions 79 Where To...

Basics Guide
Page 6
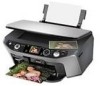
... to use. 6 Introduction maintain the RX580; You also see a green light rotate around the Mode buttons. crop or zoom a photo Print on card; Press any button to reactivate the RX580. adjust CD/DVD print position; print photo greeting cards Check ink status; Using the RX580 Control Panel Copy a photo or document View and print photos on CD/DVDs;
... to use. 6 Introduction maintain the RX580; You also see a green light rotate around the Mode buttons. crop or zoom a photo Print on card; Press any button to reactivate the RX580. adjust CD/DVD print position; print photo greeting cards Check ink status; Using the RX580 Control Panel Copy a photo or document View and print photos on CD/DVDs;

Basics Guide
Page 7
See page 10 for a list of Epson's special ink jet papers designed for your printer. However, for your job. Open the paper support, then pull up the extension. 2. For example, photos look , so make sure you are just making a copy or printing a rough draft, plain paper is fine. Loading Paper The type of paper you choose affects the way your printouts look great printed on Epson® Ultra Premium Photo Paper Glossy. If you select the correct paper for the best results, use one of Epson papers and ordering information. 1. Open the front cover. Loading Paper 7
See page 10 for a list of Epson's special ink jet papers designed for your printer. However, for your job. Open the paper support, then pull up the extension. 2. For example, photos look , so make sure you are just making a copy or printing a rough draft, plain paper is fine. Loading Paper The type of paper you choose affects the way your printouts look great printed on Epson® Ultra Premium Photo Paper Glossy. If you select the correct paper for the best results, use one of Epson papers and ordering information. 1. Open the front cover. Loading Paper 7

Basics Guide
Page 11
... plastic photo storage box in the original package. The special Epson Claria™ inks designed for your printer provide the ultimate combination of ozone. ■ As with all photographs, keep your prints away from direct sunlight. ■ Keep your prints away from high temperature. ■ For proper storage, keep your RX580 will minimize color changes...
... plastic photo storage box in the original package. The special Epson Claria™ inks designed for your printer provide the ultimate combination of ozone. ■ As with all photographs, keep your prints away from direct sunlight. ■ Keep your prints away from high temperature. ■ For proper storage, keep your RX580 will minimize color changes...
Basics Guide
Page 28
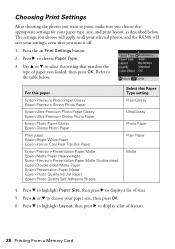
... Settings button. 2. Press r to all your selected photos, and the RX580 will save your settings, even after you turn it off...Epson Premium Photo Paper Glossy Epson Premium Glossy Photo Paper Epson Ultra Premium Photo Paper Glossy Epson Ultra Premium Glossy Photo Paper Epson Photo Paper Glossy Epson Glossy Photo Paper Plain paper Epson Bright White Paper Epson Iron-on Cool Peel Transfer Paper Epson Premium Presentation Paper Matte Epson Matte Paper Heavyweight Epson Premium Presentation Paper Matte Double-sided Epson Double-sided Matte Paper Epson Presentation Paper Matte Epson Photo Quality Ink...
... Settings button. 2. Press r to all your selected photos, and the RX580 will save your settings, even after you turn it off...Epson Premium Photo Paper Glossy Epson Premium Glossy Photo Paper Epson Ultra Premium Photo Paper Glossy Epson Ultra Premium Glossy Photo Paper Epson Photo Paper Glossy Epson Glossy Photo Paper Plain paper Epson Bright White Paper Epson Iron-on Cool Peel Transfer Paper Epson Premium Presentation Paper Matte Epson Matte Paper Heavyweight Epson Premium Presentation Paper Matte Double-sided Epson Double-sided Matte Paper Epson Presentation Paper Matte Epson Photo Quality Ink...
Basics Guide
Page 45
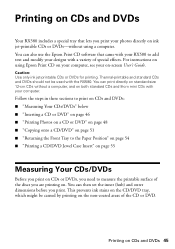
...on CDs and DVDs Your RX580 includes a special tray that came with your RX580 to measure the printable surface of the discs you print. You can print directly on standard-size 12-cm CDs without using Epson Print CD on your computer, see your photos directly on ink jet-printable CDs or DVDs...-without a computer, and on both standard CDs and 8-cm mini CDs with the RX580. Printing on using a computer. You can then set the ...
...on CDs and DVDs Your RX580 includes a special tray that came with your RX580 to measure the printable surface of the discs you print. You can print directly on standard-size 12-cm CDs without using Epson Print CD on your computer, see your photos directly on ink jet-printable CDs or DVDs...-without a computer, and on both standard CDs and 8-cm mini CDs with the RX580. Printing on using a computer. You can then set the ...

Basics Guide
Page 46
... as shown: Outer Inner See page 50 for instructions on adjusting the dimensions. Turn on the surface may cause errors when you may damage the RX580 or tray. 1. If you print. Caution: Make sure you insert the tray correctly, or you burn the data. Inserting a CD or DVD Make sure the... data, music, or video is turned on CDs and DVDs Only insert a CD or DVD when the RX580 is burned on your ink jet-printable CDs or DVDs before you plan to print large numbers of CDs or DVDs, it is open and the front tray...
... as shown: Outer Inner See page 50 for instructions on adjusting the dimensions. Turn on the surface may cause errors when you may damage the RX580 or tray. 1. If you print. Caution: Make sure you insert the tray correctly, or you burn the data. Inserting a CD or DVD Make sure the... data, music, or video is turned on CDs and DVDs Only insert a CD or DVD when the RX580 is burned on your ink jet-printable CDs or DVDs before you plan to print large numbers of CDs or DVDs, it is open and the front tray...

Basics Guide
Page 49
... button. 8. Note: If you may need to select the following layouts: 1-up 4-up 8-up 12-up One photo is selected. ■ Layout: choose from moisture and direct sunlight. To allow the ink to dry fully, you need to wait up pictures of faces, because of the hole in a drive. Press l... press the Copies + button. Note: After you are finished printing, remove the CD/DVD tray from the RX580. For more information, see page 54. If you don't select enough photos for close-up to print on the disc) before playing the disc or inserting it in the center). Press the x ...
... button. 8. Note: If you may need to select the following layouts: 1-up 4-up 8-up 12-up One photo is selected. ■ Layout: choose from moisture and direct sunlight. To allow the ink to dry fully, you need to wait up pictures of faces, because of the hole in a drive. Press l... press the Copies + button. Note: After you are finished printing, remove the CD/DVD tray from the RX580. For more information, see page 54. If you don't select enough photos for close-up to print on the disc) before playing the disc or inserting it in the center). Press the x ...

Basics Guide
Page 50
... the inner hub, and 114 mm for a batch of the CD or DVD. 1. This prevents ink stains on the CD/DVD tray, which might be caused by printing on the noncoated areas of CDs or... DVDs. 50 Printing on the RX580. Press d to the CD printing screen. After you have selected Print on CD/DVD, as described on... to save your discs has different measurements, you only need to set them on CDs and DVDs Note: The RX580 remembers this setting even after it has been turned off, so you need to adjust the dimensions. If the...
... the inner hub, and 114 mm for a batch of the CD or DVD. 1. This prevents ink stains on the CD/DVD tray, which might be caused by printing on the noncoated areas of CDs or... DVDs. 50 Printing on the RX580. Press d to the CD printing screen. After you have selected Print on CD/DVD, as described on... to save your discs has different measurements, you only need to set them on CDs and DVDs Note: The RX580 remembers this setting even after it has been turned off, so you need to adjust the dimensions. If the...

Basics Guide
Page 53
4. Press d, then press l or r to select Graphics, Photo, or Text. 7. See page 16 for the Layout. 8. After you want to check the output before playing the disc or inserting it in a drive. If ink smears on the disc) before copying, select Plain Paper as needed, then press...sunlight. Change the Copy Density as the Paper Type and load plain paper. 9. Press the x Start button to choose Color or B&W. 6. Keep printed discs away from different manufacturers absorb ink differently, so you need to adjust other settings, press the x Print Settings button. Press l or r to start ...
4. Press d, then press l or r to select Graphics, Photo, or Text. 7. See page 16 for the Layout. 8. After you want to check the output before playing the disc or inserting it in a drive. If ink smears on the disc) before copying, select Plain Paper as needed, then press...sunlight. Change the Copy Density as the Paper Type and load plain paper. 9. Press the x Start button to choose Color or B&W. 6. Keep printed discs away from different manufacturers absorb ink differently, so you need to adjust other settings, press the x Print Settings button. Press l or r to start ...

Basics Guide
Page 58
If you want to change the layout settings, click the Page Layout tab and select settings as a group so you can select Photo RPM (5760 × 1440) from the quality option pop-up menu (as shown above). For more printing options, click the Advanced button. .... 8. This window appears and shows the progress of your settings, then click OK or Print to buy ink 6. Then select the following settings as necessary: Select a color management method (To choose No Color Adjustment, click ICM first) Select Paper & Quality Options as necessary Select Print Options as necessary Note: For...
If you want to change the layout settings, click the Page Layout tab and select settings as a group so you can select Photo RPM (5760 × 1440) from the quality option pop-up menu (as shown above). For more printing options, click the Advanced button. .... 8. This window appears and shows the progress of your settings, then click OK or Print to buy ink 6. Then select the following settings as necessary: Select a color management method (To choose No Color Adjustment, click ICM first) Select Paper & Quality Options as necessary Select Print Options as necessary Note: For...

Basics Guide
Page 62
... Photo Paper Epson Premium Photo Paper Glossy Epson Premium Glossy Photo Paper Epson Premium Photo Paper Semigloss Epson Premium Semigloss Photo Paper Epson Photo Paper Glossy Epson Glossy Photo Paper Epson Premium Presentation Paper Matte Epson Matte Paper Heavyweight Epson Premium Presentation Paper Matte Double-sided Epson Double-sided Matte Paper Epson Presentation Paper Matte Epson Photo Quality Ink Jet Paper Epson Photo Quality Self Adhesive Sheets Epson Ultra Premium Photo Paper Luster Epson Premium Luster Photo...
... Photo Paper Epson Premium Photo Paper Glossy Epson Premium Glossy Photo Paper Epson Premium Photo Paper Semigloss Epson Premium Semigloss Photo Paper Epson Photo Paper Glossy Epson Glossy Photo Paper Epson Premium Presentation Paper Matte Epson Matte Paper Heavyweight Epson Premium Presentation Paper Matte Double-sided Epson Double-sided Matte Paper Epson Presentation Paper Matte Epson Photo Quality Ink Jet Paper Epson Photo Quality Self Adhesive Sheets Epson Ultra Premium Photo Paper Luster Epson Premium Luster Photo...
Basics Guide
Page 69
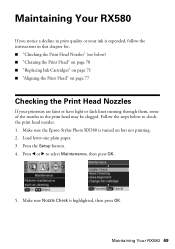
...71 ■ "Aligning the Print Head" on but not printing. 2. Make sure the Epson Stylus Photo RX580 is turned on page 77 Checking the Print Head Nozzles If your ink is highlighted, then press OK. Maintaining Your RX580 If you notice a decline in print quality or your printouts are faint or have light ...or dark lines running through them, some of the nozzles in the print head may be clogged. Maintaining Your RX580 69 Press l ...
...71 ■ "Aligning the Print Head" on but not printing. 2. Make sure the Epson Stylus Photo RX580 is turned on page 77 Checking the Print Head Nozzles If your ink is highlighted, then press OK. Maintaining Your RX580 If you notice a decline in print quality or your printouts are faint or have light ...or dark lines running through them, some of the nozzles in the print head may be clogged. Maintaining Your RX580 69 Press l ...
Basics Guide
Page 70
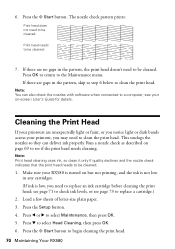
...needs cleaning. Press l or r to the Maintenance menu. Press OK to return to select Maintenance, then press OK. 5. see your RX580 is turned on but not printing, and the ink is low, you may need to a computer; Run a nozzle check as described on -screen User's Guide for details. This unclogs the...or dark bands across your printouts are no gaps in the pattern, the print head doesn't need to be cleaned. 1. Note: You can deliver ink properly. Cleaning the Print Head If your printout, you need to be cleaned: Print head needs to clean the print head. Note: Print head ...
...needs cleaning. Press l or r to the Maintenance menu. Press OK to return to select Maintenance, then press OK. 5. see your RX580 is turned on but not printing, and the ink is low, you may need to a computer; Run a nozzle check as described on -screen User's Guide for details. This unclogs the...or dark bands across your printouts are no gaps in the pattern, the print head doesn't need to be cleaned. 1. Note: You can deliver ink properly. Cleaning the Print Head If your printout, you need to be cleaned: Print head needs to clean the print head. Note: Print head ...
Basics Guide
Page 71
... Maintenance menu. This lets any improvement after cleaning and aligning the print head, you do not use your RX580 often, it is not low. Tip: If you can replace the cartridge even if the ink is a good idea to replace it . 7. Note: When a cartridge has been installed for more than six months... Status, then press OK. If the quality doesn't improve after cleaning four or five times, see any dried ink soften. Caution: Never turn the printer off the RX580 while head cleaning is low or needs to clean the print head again. If there are gaps in progress, or you don't see page...
... Maintenance menu. This lets any improvement after cleaning and aligning the print head, you do not use your RX580 often, it is not low. Tip: If you can replace the cartridge even if the ink is a good idea to replace it . 7. Note: When a cartridge has been installed for more than six months... Status, then press OK. If the quality doesn't improve after cleaning four or five times, see any dried ink soften. Caution: Never turn the printer off the RX580 while head cleaning is low or needs to clean the print head again. If there are gaps in progress, or you don't see page...
Basics Guide
Page 72
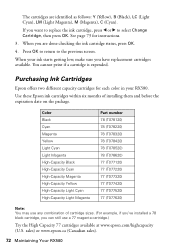
... use a 77 magenta cartridge.) Try the High Capacity 77 cartridges available at www.epson.com/highcapacity (U.S. sales) or www.epson.ca (Canadian sales). 72 Maintaining Your RX580 Purchasing Ink Cartridges Epson offers two different capacity cartridges for instructions. 3. See page 73 for each color in your ink starts getting low, make sure you want to replace the...
... use a 77 magenta cartridge.) Try the High Capacity 77 cartridges available at www.epson.com/highcapacity (U.S. sales) or www.epson.ca (Canadian sales). 72 Maintaining Your RX580 Purchasing Ink Cartridges Epson offers two different capacity cartridges for instructions. 3. See page 73 for each color in your ink starts getting low, make sure you want to replace the...

Basics Guide
Page 73
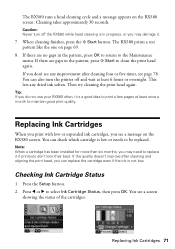
... is not inserted, and the front tray is expended, the RX580 screen indicates which cartridge(s) need to your RX580 not covered by Epson's warranty. To find the nearest reseller, call 800-GO-EPSON (800-463-7766). Or you are vacuum packed to install the ink. Cartridges are ready to maintain reliability. 1. Caution: Leave the expended...
... is not inserted, and the front tray is expended, the RX580 screen indicates which cartridge(s) need to your RX580 not covered by Epson's warranty. To find the nearest reseller, call 800-GO-EPSON (800-463-7766). Or you are vacuum packed to install the ink. Cartridges are ready to maintain reliability. 1. Caution: Leave the expended...


