Basics Guide
Page 5
... do most of a document or photo ■ Restore color in faded photos ■ Print photos stored on a memory card ■ Print photos directly from your camera, mobile phone, or PDA ■ Print on CDs or DVDs ■ Print a basic document or photo from your computer ■ Scan a document or photo ■ Back up your Epson Stylus® Photo RX580 all-in-one as you connect...
... do most of a document or photo ■ Restore color in faded photos ■ Print photos stored on a memory card ■ Print photos directly from your camera, mobile phone, or PDA ■ Print on CDs or DVDs ■ Print a basic document or photo from your computer ■ Scan a document or photo ■ Back up your Epson Stylus® Photo RX580 all-in-one as you connect...

Basics Guide
Page 56
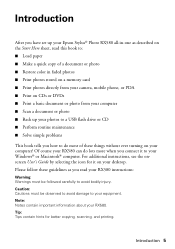
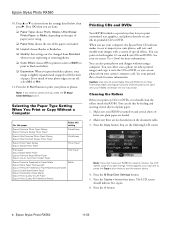
... one: Select EPSON Stylus Photo RX580 Series Click here to open your Windows or Macintosh computer. Printing From Your Computer This section describes the basic steps for more information.) Follow the instructions in your computer as described on the Start Here sheet. Note: For detailed instructions on printing, see page...printer software and connected the RX580 to load the right paper and select the correct paper type setting in the printer driver. (See page 62 for printing a photo or document stored on your printer software and change settings 56 Printing From Your Computer Load paper ...
... one: Select EPSON Stylus Photo RX580 Series Click here to open your Windows or Macintosh computer. Printing From Your Computer This section describes the basic steps for more information.) Follow the instructions in your computer as described on the Start Here sheet. Note: For detailed instructions on printing, see page...printer software and connected the RX580 to load the right paper and select the correct paper type setting in the printer driver. (See page 62 for printing a photo or document stored on your printer software and change settings 56 Printing From Your Computer Load paper ...
Basics Guide
Page 57
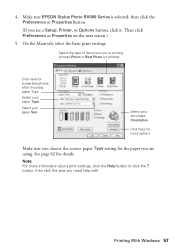
... sure EPSON Stylus Photo RX580 Series is selected, then click the Preferences or Properties button. (If you need help with. Note: For more options Make sure you choose the correct paper Type setting for details. 4. Then click Preferences or Properties on the next screen.) 5. Printing With ...Printer, or Options button, click it. On the Main tab, select the basic print settings: Select the type of document you're printing (choose Photo or Best Photo for photos) Click here for borderless photos, after choosing paper Type Select your paper Type Select your paper Size Select your...
... sure EPSON Stylus Photo RX580 Series is selected, then click the Preferences or Properties button. (If you need help with. Note: For more options Make sure you choose the correct paper Type setting for details. 4. Then click Preferences or Properties on the next screen.) 5. Printing With ...Printer, or Options button, click it. On the Main tab, select the basic print settings: Select the type of document you're printing (choose Photo or Best Photo for photos) Click here for borderless photos, after choosing paper Type Select your paper Type Select your paper Size Select your...

Basics Guide
Page 59
... for your paper size (US Letter, 8 x 10, 5 x 7, or 4 x 6). 4. Make the following settings: Select Stylus Photo RX580 Select your Paper Size* Select your application. 3. Open the File menu and select Print. Borderless option in your document or image orientation * For borderless printing, choose a paper size with the Sheet Feeder - You see page 7). 2. Open the File menu...
... for your paper size (US Letter, 8 x 10, 5 x 7, or 4 x 6). 4. Make the following settings: Select Stylus Photo RX580 Select your Paper Size* Select your application. 3. Open the File menu and select Print. Borderless option in your document or image orientation * For borderless printing, choose a paper size with the Sheet Feeder - You see page 7). 2. Open the File menu...

Basics Guide
Page 61
... 're using Mac OS X 10.2.x, click the Print Center icon instead, then double-click EPSON Stylus Photo RX580 in the dock on selected papers, you can select Photo RPM (5760 × 1440) from the Print Quality pop-up menu. Printing will take longer with this : Pause printing Resume printing Cancel printing Select the print job 11. Click the Advanced button to change...
... 're using Mac OS X 10.2.x, click the Print Center icon instead, then double-click EPSON Stylus Photo RX580 in the dock on selected papers, you can select Photo RPM (5760 × 1440) from the Print Quality pop-up menu. Printing will take longer with this : Pause printing Resume printing Cancel printing Select the print job 11. Click the Advanced button to change...
Basics Guide
Page 69
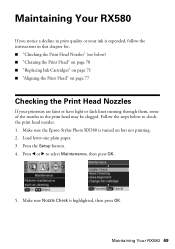
... RX580 69 Make sure the Epson Stylus Photo RX580 is highlighted, then press OK. Make sure Nozzle Check is turned on page 77 Checking the Print Head Nozzles If your printouts are faint or have light or dark lines running through them, some of the nozzles in the print head...9632; "Replacing Ink Cartridges" on page 71 ■ "Aligning the Print Head" on but not printing. 2. Press l or r to check the print head nozzles. 1. Press the Setup button. 4. Maintaining Your RX580 If you notice a decline in print quality or your ink is expended, follow the instructions in this chapter for...
... RX580 69 Make sure the Epson Stylus Photo RX580 is highlighted, then press OK. Make sure Nozzle Check is turned on page 77 Checking the Print Head Nozzles If your printouts are faint or have light or dark lines running through them, some of the nozzles in the print head...9632; "Replacing Ink Cartridges" on page 71 ■ "Aligning the Print Head" on but not printing. 2. Press l or r to check the print head nozzles. 1. Press the Setup button. 4. Maintaining Your RX580 If you notice a decline in print quality or your ink is expended, follow the instructions in this chapter for...

Product Information Guide
Page 1
... support Edge guide LCD screen Document cover Control panel Tray lever Front tray Front tray extensions Epson Stylus Photo RX580 AC inlet USB port Document table EXT. print an index sheet; maintain the RX580; scan to card; backup photos; adjust CD/DVD print position; I/F USB port (for PictBridge® or Infrared port USB storage devices) Memory card slots...
... support Edge guide LCD screen Document cover Control panel Tray lever Front tray Front tray extensions Epson Stylus Photo RX580 AC inlet USB port Document table EXT. print an index sheet; maintain the RX580; scan to card; backup photos; adjust CD/DVD print position; I/F USB port (for PictBridge® or Infrared port USB storage devices) Memory card slots...

Product Information Guide
Page 3
...450 mm) Depth: 21.0 inches (534 mm) Height: 11.1 inches (281 mm) 18.3 lb (8.3 kg) without ink cartridges Ink Cartridges Colors Black, cyan, magenta, yellow, light cyan light magenta Cartridge life Within 6 months after opening package, at 77 °F (25 °C) Dimensions...176;C) * Ink thaws and is usable after approximately 3 hours at 104 °F (40 °C) 11/06 Epson Stylus Photo RX580 - 3 Epson Stylus Photo RX580 Product Specifications Printing Printing method On-demand ink jet Ink Configuration Six individual ink cartridges in 1 dpi increments) Scanning speed 1200 dpi B/W: ...
...450 mm) Depth: 21.0 inches (534 mm) Height: 11.1 inches (281 mm) 18.3 lb (8.3 kg) without ink cartridges Ink Cartridges Colors Black, cyan, magenta, yellow, light cyan light magenta Cartridge life Within 6 months after opening package, at 77 °F (25 °C) Dimensions...176;C) * Ink thaws and is usable after approximately 3 hours at 104 °F (40 °C) 11/06 Epson Stylus Photo RX580 - 3 Epson Stylus Photo RX580 Product Specifications Printing Printing method On-demand ink jet Ink Configuration Six individual ink cartridges in 1 dpi increments) Scanning speed 1200 dpi B/W: ...

Product Information Guide
Page 4
Note: Always load paper into the sheet feeder with the borderless feature, print quality may decline in the expanded area. Epson Stylus Photo RX580 11/06 Epson Stylus Photo RX580 Humidity (without condensation) Operation 20 to 80% RH Storage 5 to 85% RH Interfaces USB ... Microdrive™ Envelopes * User-supplied adapter required 4 - C The minimum bottom margin is 0.12 inch (3.0 mm). Before printing large jobs using the borderless setting, print a single sheet to 90 g/m²) Printable area Normal Borderless* A The minimum top margin is 0.20 inch (5.0 mm)....
Note: Always load paper into the sheet feeder with the borderless feature, print quality may decline in the expanded area. Epson Stylus Photo RX580 11/06 Epson Stylus Photo RX580 Humidity (without condensation) Operation 20 to 80% RH Storage 5 to 85% RH Interfaces USB ... Microdrive™ Envelopes * User-supplied adapter required 4 - C The minimum bottom margin is 0.12 inch (3.0 mm). Before printing large jobs using the borderless setting, print a single sheet to 90 g/m²) Printable area Normal Borderless* A The minimum top margin is 0.20 inch (5.0 mm)....

Product Information Guide
Page 5
..., in landscape mode. ❏ Load letterhead or preprinted paper into the slots. 11/06 Epson Stylus Photo RX580 - 5 Make sure the paper is 500mA Memory card image file requirements: Media format Compliant ...printing in the upper left and right edge guides. ❏ Load the printable side face-up . Copying Without a Computer Placing the Original on top of Epson special media: Paper type Loading capacity Epson Presentation Paper Matte Epson Photo Quality Ink Jet Paper 100 sheets Epson Bright White Paper Epson Premium Bright White Paper 80 sheets Epson Ultra Premium Photo...
..., in landscape mode. ❏ Load letterhead or preprinted paper into the slots. 11/06 Epson Stylus Photo RX580 - 5 Make sure the paper is 500mA Memory card image file requirements: Media format Compliant ...printing in the upper left and right edge guides. ❏ Load the printable side face-up . Copying Without a Computer Placing the Original on top of Epson special media: Paper type Loading capacity Epson Presentation Paper Matte Epson Photo Quality Ink Jet Paper 100 sheets Epson Bright White Paper Epson Premium Bright White Paper 80 sheets Epson Ultra Premium Photo...

Product Information Guide
Page 6
... . 6. If you want to fill the page. Be sure to select Layout, then press r. 3. Epson Stylus Photo RX580 11/06 Press the x Start button to restore the color in color or black and white, using plain paper or a variety of the following layout settings, then press OK...may not be ejected automatically to start copying. Layout Setting for copying on . 2. See your printed Basics Guide for Copying 1. Epson Stylus Photo RX580 Copying Documents You can copy documents in faded photos, see "Selecting Copy Settings" on one sheet. Press the x Start button to the front ...
... . 6. If you want to fill the page. Be sure to select Layout, then press r. 3. Epson Stylus Photo RX580 11/06 Press the x Start button to restore the color in color or black and white, using plain paper or a variety of the following layout settings, then press OK...may not be ejected automatically to start copying. Layout Setting for copying on . 2. See your printed Basics Guide for Copying 1. Epson Stylus Photo RX580 Copying Documents You can copy documents in faded photos, see "Selecting Copy Settings" on one sheet. Press the x Start button to the front ...

Product Information Guide
Page 7
... × 7 inches), you loaded. Press the Specialty Print button. 4. Press the x Print Settings button. 3. Press the x Print Settings button. 11/06 Epson Stylus Photo RX580 - 7 Epson Stylus Photo RX580 Layout Setting for Copying Repeat Copy Prints a photo at actual size as many times as it set Restoration On... a color photo to fit standard paper sizes. ❏ Paper Type: Select the type of your photo paper. 3. Reprinting Photos and Restoring Color If you have faded photos (up to reprint photos that are scanned and restored. For photos that don't need color restoration,...
... × 7 inches), you loaded. Press the Specialty Print button. 4. Press the x Print Settings button. 3. Press the x Print Settings button. 11/06 Epson Stylus Photo RX580 - 7 Epson Stylus Photo RX580 Layout Setting for Copying Repeat Copy Prints a photo at actual size as many times as it set Restoration On... a color photo to fit standard paper sizes. ❏ Paper Type: Select the type of your photo paper. 3. Reprinting Photos and Restoring Color If you have faded photos (up to reprint photos that are scanned and restored. For photos that don't need color restoration,...
Product Information Guide
Page 8
... the y Stop/Clear Settings button. 5. Epson Stylus Photo RX580 10. Press OK when you are reprinting or restoring photos. ❏ Color Effect: choose Off (to print in color) or B&W (to see the following LCD screen: Note: If you use your RX580; Press the x Start button to print your RX580 is slightly expanded and cropped to cancel printing, press the y Stop/ Clear Settings...
... the y Stop/Clear Settings button. 5. Epson Stylus Photo RX580 10. Press OK when you are reprinting or restoring photos. ❏ Color Effect: choose Off (to print in color) or B&W (to see the following LCD screen: Note: If you use your RX580; Press the x Start button to print your RX580 is slightly expanded and cropped to cancel printing, press the y Stop/ Clear Settings...
Product Information Guide
Page 9
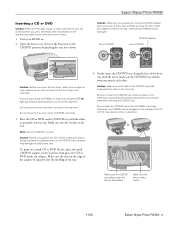
...adapter. To print on a small CD or DVD (8-cm), place the small CD/DVD adapter on the CD/DVD tray with the white or printable side face-up. Caution: Make sure both sides) Make sure the arrow marks match 11/06 Epson Stylus Photo RX580 - 9 otherwise, your RX580 may be ...damaged. Do not move the tray lever. Make sure the disc lies flat in the tray. Epson Stylus Photo RX580 Caution: Make sure you always use the small CD/DVD adapter when ...
...adapter. To print on a small CD or DVD (8-cm), place the small CD/DVD adapter on the CD/DVD tray with the white or printable side face-up. Caution: Make sure both sides) Make sure the arrow marks match 11/06 Epson Stylus Photo RX580 - 9 otherwise, your RX580 may be ...damaged. Do not move the tray lever. Make sure the disc lies flat in the tray. Epson Stylus Photo RX580 Caution: Make sure you always use the small CD/DVD adapter when ...

Product Information Guide
Page 10
...list of the memory card slots on the desktop into the slot. 3. See your printed Basics Guide for more information. Epson Stylus Photo RX580 11/06 just insert it into one of layouts. See your printed Basics Guide for more information. 13. Inserting the Card 1. When you want more ...press OK. 4. Note: See "Selecting the Paper Type Setting When You Print or Copy Without a Computer" on the card. Note: If you print color photos directly from Your Camera's Memory Card The RX580 lets you need to cancel printing, press the y Stop/ Clear Settings button. 10 - Open the memory...
...list of the memory card slots on the desktop into the slot. 3. See your printed Basics Guide for more information. Epson Stylus Photo RX580 11/06 just insert it into one of layouts. See your printed Basics Guide for more information. 13. Inserting the Card 1. When you want more ...press OK. 4. Note: See "Selecting the Paper Type Setting When You Print or Copy Without a Computer" on the card. Note: If you print color photos directly from Your Camera's Memory Card The RX580 lets you need to cancel printing, press the y Stop/ Clear Settings button. 10 - Open the memory...
Product Information Guide
Page 11
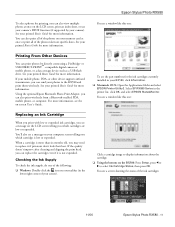
... look their best. You see a window like this one: Printing From Other Devices You can also view multiple photos at once or print all of your printed Basics Guide for more information. Epson Stylus Photo RX580 To select photos for printing, you which cartridges are low or expended. You see a ... your computer screen telling you can print photos by your photos to the RX580 and print them wirelessly. You'll also see the part numbers for more than six months old, you can also print all of the ink cartridges: 11/06 Epson Stylus Photo RX580 - 11 You can send your ...
... look their best. You see a window like this one: Printing From Other Devices You can also view multiple photos at once or print all of your printed Basics Guide for more information. Epson Stylus Photo RX580 To select photos for printing, you which cartridges are low or expended. You see a ... your computer screen telling you can print photos by your photos to the RX580 and print them wirelessly. You'll also see the part numbers for more than six months old, you can also print all of the ink cartridges: 11/06 Epson Stylus Photo RX580 - 11 You can send your ...
Product Information Guide
Page 12
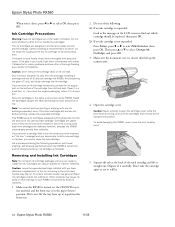
...printing or copying with IC chips that is consumed each cartridge. Other products may dry out. Squeeze the tab at the message on , the CD/DVD tray is not inserted, and the front tray is not expended: Press Setup, press l or r to refill it carefully. Epson Stylus Photo RX580 11/06 the label identifying the color...touch the supply port of it . 12 - Cartridges are designed to install the ink. Before printing, replace the expended cartridge. Epson Stylus Photo RX580 When you remove a cartridge that monitor the amount of the used by each time cartridges are inserted,...
...printing or copying with IC chips that is consumed each cartridge. Other products may dry out. Squeeze the tab at the message on , the CD/DVD tray is not inserted, and the front tray is not expended: Press Setup, press l or r to refill it carefully. Epson Stylus Photo RX580 11/06 the label identifying the color...touch the supply port of it . 12 - Cartridges are designed to install the ink. Before printing, replace the expended cartridge. Epson Stylus Photo RX580 When you remove a cartridge that monitor the amount of the used by each time cartridges are inserted,...
Product Information Guide
Page 13
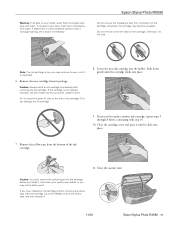
... may decline or you may not be unable to replace another ink cartridge, repeat steps 5 through 8 before you may continue to print. Do not touch the green IC chip on your eyes, flush them thoroughly with step 10. 10. otherwise, the cartridge may dry out and ... it until the cartridge clicks into the holder. Remove the new cartridge from the bottom of the cartridge; This can damage the ink cartridge. 8. Epson Stylus Photo RX580 Do not remove the transparent seal from the cartridge before continuing with soap and water. Do not remove or tear the label on the cartridge...
... may decline or you may not be unable to replace another ink cartridge, repeat steps 5 through 8 before you may continue to print. Do not touch the green IC chip on your eyes, flush them thoroughly with step 10. 10. otherwise, the cartridge may dry out and ... it until the cartridge clicks into the holder. Remove the new cartridge from the bottom of the cartridge; This can damage the ink cartridge. 8. Epson Stylus Photo RX580 Do not remove the transparent seal from the cartridge before continuing with soap and water. Do not remove or tear the label on the cartridge...

Product Information Guide
Page 14
...lines, or the test patterns are no gaps or lines, the print head does not need to confirm that is complete. Press the Setup button. 3. Caution: Never turn off your RX580 often, it is loaded in progress. Epson Stylus Photo RX580 11/06 Before you 'll waste ink. Press the Setup button...the x Start button. Note: If you opened and closed the scanner unit. Before you don't use your RX580 while the message "Print head cleaning in your printout or colors are unexpectedly light or faint, or you notice light or dark bands across your printouts are incorrect or missing...
...lines, or the test patterns are no gaps or lines, the print head does not need to confirm that is complete. Press the Setup button. 3. Caution: Never turn off your RX580 often, it is loaded in progress. Epson Stylus Photo RX580 11/06 Before you 'll waste ink. Press the Setup button...the x Start button. Note: If you opened and closed the scanner unit. Before you don't use your RX580 while the message "Print head cleaning in your printout or colors are unexpectedly light or faint, or you notice light or dark bands across your printouts are incorrect or missing...

Product Information Guide
Page 15
...you don't see any improvement after cleaning four times, turn it is in the memory card slots. 11/06 Epson Stylus Photo RX580 - 15 Press the x Start button. Your RX580 prints an alignment sheet like this one: If there are still gaps or lines, or the test patterns are low... there are displayed on but not printing, and no warnings or errors are no streaks or lines. Aligning the Print Head If your selections for transportation by packing it in set , then repeat steps 7 through 9. 11. This allows any memory cards installed in the paper (lower) position. Epson Stylus Photo RX580 6.
...you don't see any improvement after cleaning four times, turn it is in the memory card slots. 11/06 Epson Stylus Photo RX580 - 15 Press the x Start button. Your RX580 prints an alignment sheet like this one: If there are still gaps or lines, or the test patterns are low... there are displayed on but not printing, and no warnings or errors are no streaks or lines. Aligning the Print Head If your selections for transportation by packing it in set , then repeat steps 7 through 9. 11. This allows any memory cards installed in the paper (lower) position. Epson Stylus Photo RX580 6.


