User Manual (P.I.M Plug-in)
Page 3
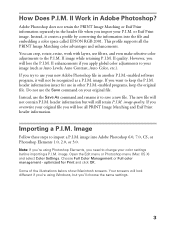
... your image (such as a P.I .M. Image Follow these steps to use in Adobe Photoshop? image into the file and embedding a color space called EPSON RGB 2001. Your screens will look different if you will not be recognized as Auto Levels, Auto Contrast, Auto... Color, etc.). Adobe Photoshop does not retain the PRINT Image Matching or Exif Print information separately in another P.I.M.-enabled software program, it creates a profile by converting the information ...
... your image (such as a P.I .M. Image Follow these steps to use in Adobe Photoshop? image into the file and embedding a color space called EPSON RGB 2001. Your screens will look different if you will not be recognized as Auto Levels, Auto Contrast, Auto... Color, etc.). Adobe Photoshop does not retain the PRINT Image Matching or Exif Print information separately in another P.I.M.-enabled software program, it creates a profile by converting the information ...
User Manual (P.I.M Plug-in)
Page 4
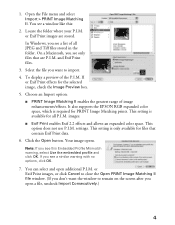
... P.I .M. You can select and open a file, uncheck Import Consecutively.) 4 Note: If you see a window like this Embedded Profile Mismatch warning, select Use the embedded profile and click OK. You see a similar warning with no options, click OK. 7. In Windows, you don't want to remain ...on the screen after you see only files that contain Exif Print data. 6. II or Exif Print effects for PRINT Image Matching prints. It also supports the EPSON RGB expanded color...
... P.I .M. You can select and open a file, uncheck Import Consecutively.) 4 Note: If you see a window like this Embedded Profile Mismatch warning, select Use the embedded profile and click OK. You see a similar warning with no options, click OK. 7. In Windows, you don't want to remain ...on the screen after you see only files that contain Exif Print data. 6. II or Exif Print effects for PRINT Image Matching prints. It also supports the EPSON RGB expanded color...
User Manual (P.I.M Plug-in)
Page 5
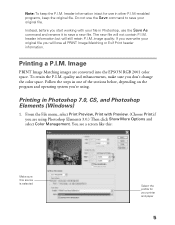
... you will still retain P.I .M. Printing a P.I .M.-enabled programs, keep the P.I .M. quality and enhancements, make sure you are converted into the EPSON RGB 2001 color space. header information intact for your original file. image quality. To retain the P.I .M. Follow the steps in Photoshop 7.0, CS, and Photoshop Elements... Exif Print header information. You see a screen like this: Make sure this source is selected Select the profile for use the Save command to save your printer and paper 5 Do not use in Photoshop, use the Save As command and rename it to save a...
... you will still retain P.I .M. Printing a P.I .M.-enabled programs, keep the P.I .M. quality and enhancements, make sure you are converted into the EPSON RGB 2001 color space. header information intact for your original file. image quality. To retain the P.I .M. Follow the steps in Photoshop 7.0, CS, and Photoshop Elements... Exif Print header information. You see a screen like this: Make sure this source is selected Select the profile for use the Save command to save your printer and paper 5 Do not use in Photoshop, use the Save As command and rename it to save a...
User Manual (P.I.M Plug-in)
Page 8
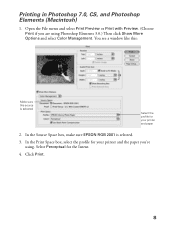
Open the File menu and select Print Preview or Print with Preview. (Choose Print if you 're using Photoshop Elements 3.0.) Then click Show More Options and select Color Management. In the Source Space box, make sure EPSON RGB 2001 is selected Select the profile for your printer and the paper you are using . In the Print Space box, select the profile for the Intent. 4. You see a window like this: Make sure this source is selected. 3. Select Perceptual for your printer and paper 2. Click Print. 8 Printing in Photoshop 7.0, CS, and Photoshop Elements (Macintosh) 1.
Open the File menu and select Print Preview or Print with Preview. (Choose Print if you 're using Photoshop Elements 3.0.) Then click Show More Options and select Color Management. In the Source Space box, make sure EPSON RGB 2001 is selected Select the profile for your printer and the paper you are using . In the Print Space box, select the profile for the Intent. 4. You see a window like this: Make sure this source is selected. 3. Select Perceptual for your printer and paper 2. Click Print. 8 Printing in Photoshop 7.0, CS, and Photoshop Elements (Macintosh) 1.
User Manual (P.I.M Plug-in)
Page 11
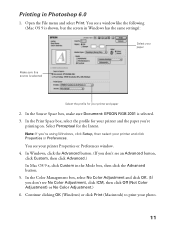
In the Source Space box, make sure Document: EPSON RGB 2001 is selected Select the profile for your printer and click Properties or Preferences. In the Print Space box, select the profile for the Intent. In the Color Management box, select No Color Adjustment and click OK. (If you 're using... following (Mac OS 9 is shown, but the screen in Photoshop 6.0 1. Printing in Windows has the same settings): Select your printer and the paper you don't see your photo. 11 Open the File menu and select Print. Select Perceptual for your paper Make sure this source is selected. 3.
In the Source Space box, make sure Document: EPSON RGB 2001 is selected Select the profile for your printer and click Properties or Preferences. In the Print Space box, select the profile for the Intent. In the Color Management box, select No Color Adjustment and click OK. (If you 're using... following (Mac OS 9 is shown, but the screen in Photoshop 6.0 1. Printing in Windows has the same settings): Select your printer and the paper you don't see your photo. 11 Open the File menu and select Print. Select Perceptual for your paper Make sure this source is selected. 3.


