Product Information Guide
Page 8
... you print, handle the CD or DVD carefully. Macintosh OS 8.6 to adjust the print position or color, see your Printer Basics book. Click OK. 4. EPSON Stylus Photo R200 11/03 Make sure these settings are selected: ❏ Stylus Photo R200 as the Name ❏ Manual as the source ❏ A4 as the Paper Size ❏ CD/DVD as the Source...
... you print, handle the CD or DVD carefully. Macintosh OS 8.6 to adjust the print position or color, see your Printer Basics book. Click OK. 4. EPSON Stylus Photo R200 11/03 Make sure these settings are selected: ❏ Stylus Photo R200 as the Name ❏ Manual as the source ❏ A4 as the Paper Size ❏ CD/DVD as the Source...

Start Here Card
Page 6
.... Note: You need a browser-such as Microsoft® Internet Explorer® 4.0 or later or Netscape Navigator® 4.0 or later-to view the manual. 5 When you're finished, click Exit. 6 When you want to install, then follow the instructions on the screen to install the software on your...your CD-ROM or DVD drive and wait a few seconds for details. Make sure Specify a location is connected and turned on your printer as instructed, then remove the EPSON CD. Macintosh® Follow the steps below to be recognized. 3 If the CD-ROM window doesn't open automatically, double-click the...
.... Note: You need a browser-such as Microsoft® Internet Explorer® 4.0 or later or Netscape Navigator® 4.0 or later-to view the manual. 5 When you're finished, click Exit. 6 When you want to install, then follow the instructions on the screen to install the software on your...your CD-ROM or DVD drive and wait a few seconds for details. Make sure Specify a location is connected and turned on your printer as instructed, then remove the EPSON CD. Macintosh® Follow the steps below to be recognized. 3 If the CD-ROM window doesn't open automatically, double-click the...
Start Here Card
Page 7
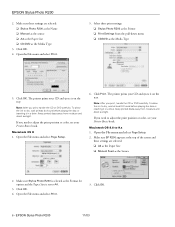
...Open the Applications folder on your hard drive, then open the Utilities folder and select Print Center. 2 Select Stylus Photo R200 in the Printer List, make sure the printer is turned on and connected. 3 Select EPSON USB from the pull-down list. 4 Click Add. Go to the section below for your OS to install...later, Netscape Navigator 4.0 or later, or Safari™ 1.0 or later-to view the manual. 11 When you're finished, click Exit to install it on the screen to finish setting up your Printer Basics book for the software you want to install, then follow the steps under the "...
...Open the Applications folder on your hard drive, then open the Utilities folder and select Print Center. 2 Select Stylus Photo R200 in the Printer List, make sure the printer is turned on and connected. 3 Select EPSON USB from the pull-down list. 4 Click Add. Go to the section below for your OS to install...later, Netscape Navigator 4.0 or later, or Safari™ 1.0 or later-to view the manual. 11 When you're finished, click Exit to install it on the screen to finish setting up your Printer Basics book for the software you want to install, then follow the steps under the "...

User Manual - Addendum
Page 1
... XXX 10/03 Printed in the tray too far; Then lower the CD/DVD tray guide. See your printer. Push the tray under the tab and the two rollers. Keep tray level © 2003 Epson America, Inc. Lower the tray guide 2 Place the CD or DVD on the tray, making sure the..., not tilted up the arrows exactly. IMPORTANT How to Insert the CD/DVD Tray Follow these steps to load CDs and DVDs in your user's manual for more information. line up or down. Caution: If you don't insert the tray correctly, you may damage the...
... XXX 10/03 Printed in the tray too far; Then lower the CD/DVD tray guide. See your printer. Push the tray under the tab and the two rollers. Keep tray level © 2003 Epson America, Inc. Lower the tray guide 2 Place the CD or DVD on the tray, making sure the..., not tilted up the arrows exactly. IMPORTANT How to Insert the CD/DVD Tray Follow these steps to load CDs and DVDs in your user's manual for more information. line up or down. Caution: If you don't insert the tray correctly, you may damage the...
Printer Basics
Page 38
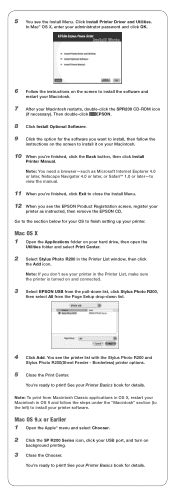
...From Start to print. Printing Your Design After you have created your operating system below. Make sure these settings are selected: ■ Stylus Photo R200 as the Name ■ Manual as the source ■ A4 as the Paper Size ■ CD/DVD as the Media Type 3. If you need to adjust ...print position or color, see "Adjusting the Print Position" on page 41 or "Adjusting the Print Density" on the tray. Open the File menu and select Printer Settings. 2. Click OK. Keep printed discs away from moisture and direct sunlight. Note: After you 're ready to Finish The printer prints your ...
...From Start to print. Printing Your Design After you have created your operating system below. Make sure these settings are selected: ■ Stylus Photo R200 as the Name ■ Manual as the source ■ A4 as the Paper Size ■ CD/DVD as the Media Type 3. If you need to adjust ...print position or color, see "Adjusting the Print Position" on page 41 or "Adjusting the Print Density" on the tray. Open the File menu and select Printer Settings. 2. Click OK. Keep printed discs away from moisture and direct sunlight. Note: After you 're ready to Finish The printer prints your ...

Printer Basics
Page 40
...print, handle the CD or DVD carefully. Macintosh OS 8.6 to Finish Make sure SP R200 appears at least 24 hours before playing the disc or inserting it on page 45. 40 Printing From Start to 9.x 1. The printer prints your CD and ejects it in a drive. Keep printed discs away from moisture and... and these settings are selected: ■ A4 as the Paper Size ■ Manual Feed as the Media Type setting. 6. Select CD/DVD as the Source 3. Click Print. Note: After you need to adjust the print position or color, see "Adjusting the Print Position" on page 41 or "Adjusting the Print Density...
...print, handle the CD or DVD carefully. Macintosh OS 8.6 to Finish Make sure SP R200 appears at least 24 hours before playing the disc or inserting it on page 45. 40 Printing From Start to 9.x 1. The printer prints your CD and ejects it in a drive. Keep printed discs away from moisture and... and these settings are selected: ■ A4 as the Paper Size ■ Manual Feed as the Media Type setting. 6. Select CD/DVD as the Source 3. Click Print. Note: After you need to adjust the print position or color, see "Adjusting the Print Position" on page 41 or "Adjusting the Print Density...

Printer Basics
Page 41
... on page 33. 2. Follow the steps for accurate measurements. Start EPSON Print CD. 3. Click the Printer Settings button. 5. Click the Print Position Confirmation Pattern button. 7. You...need to check the position before you may need a metric ruler with your printer, or an extra CD. You can also use these steps to adjust the...menu. 4. Use the blank cardboard check disk included with millimeters for your printer is selected and the Paper Source is printed on CDs and DVDs 41...check disk or CD and the printer ejects it into the printer, as described on a CD or DVD. Click OK. Select Print...
... on page 33. 2. Follow the steps for accurate measurements. Start EPSON Print CD. 3. Click the Printer Settings button. 5. Click the Print Position Confirmation Pattern button. 7. You...need to check the position before you may need a metric ruler with your printer, or an extra CD. You can also use these steps to adjust the...menu. 4. Use the blank cardboard check disk included with millimeters for your printer is selected and the Paper Source is printed on CDs and DVDs 41...check disk or CD and the printer ejects it into the printer, as described on a CD or DVD. Click OK. Select Print...
Printer Basics
Page 43
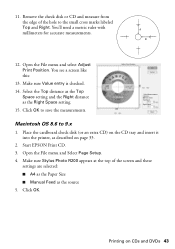
...Right distance as the source 5. Click OK to 9.x 1. Open the File menu and Select Page Setup. 4. Make sure Stylus Photo R200 appears at the top of the hole to the small cross marks labeled Top and Right. Printing on page 33. 2. 11...the cardboard check disk (or an extra CD) on the CD tray and insert it into the printer, as described on CDs and DVDs 43 Start EPSON Print CD. 3. You'll need a metric ruler with millimeters for accurate measurements. 12. Make ...screen and these settings are selected: ■ A4 as the Paper Size ■ Manual Feed as the Right Space setting. 15.
...Right distance as the source 5. Click OK to 9.x 1. Open the File menu and Select Page Setup. 4. Make sure Stylus Photo R200 appears at the top of the hole to the small cross marks labeled Top and Right. Printing on page 33. 2. 11...the cardboard check disk (or an extra CD) on the CD tray and insert it into the printer, as described on CDs and DVDs 43 Start EPSON Print CD. 3. You'll need a metric ruler with millimeters for accurate measurements. 12. Make ...screen and these settings are selected: ■ A4 as the Paper Size ■ Manual Feed as the Right Space setting. 15.

Printer Basics
Page 45
... Print from the File menu and click the Second button to print the second pattern. Click the Printer Settings button. 5. Each pattern is printed in EPSON Print CD to adjust color saturation. Then check the saturation levels again. After the pattern is printed, select Print from different manufacturers... 33. 2. Insert a test CD or DVD for instructions. Adjusting the Print Density If ink smears on your printer is selected and the Paper Source is set to Manual, then Click OK. 6. You can also use the Brightness and Contrast settings in a different location. Click the...
... Print from the File menu and click the Second button to print the second pattern. Click the Printer Settings button. 5. Each pattern is printed in EPSON Print CD to adjust color saturation. Then check the saturation levels again. After the pattern is printed, select Print from different manufacturers... 33. 2. Insert a test CD or DVD for instructions. Adjusting the Print Density If ink smears on your printer is selected and the Paper Source is set to Manual, then Click OK. 6. You can also use the Brightness and Contrast settings in a different location. Click the...

Printer Basics
Page 47
...OK. 6. Click Print. 10. Examine the print and adjust the Color Correction slider to 13, but select the Third Time button. 15. ... on one disc, each in a different location. Repeat steps 10 to 9.x 1. Then check the saturation levels again. Start EPSON Print CD. 3. Macintosh OS 8.6 to 12. Open the File menu and select Print. 7. After the pattern is printed,...the screen and these settings are selected: ■ A4 for the Paper Size ■ Manual Feed as the Media Type setting. 8. Make sure SP R200 appears at least 24 hours. Select CD/DVD as the Source 5. Insert the disc again...
...OK. 6. Click Print. 10. Examine the print and adjust the Color Correction slider to 13, but select the Third Time button. 15. ... on one disc, each in a different location. Repeat steps 10 to 9.x 1. Then check the saturation levels again. Start EPSON Print CD. 3. Macintosh OS 8.6 to 12. Open the File menu and select Print. 7. After the pattern is printed,...the screen and these settings are selected: ■ A4 for the Paper Size ■ Manual Feed as the Media Type setting. 8. Make sure SP R200 appears at least 24 hours. Select CD/DVD as the Source 5. Insert the disc again...
Printer Basics
Page 73
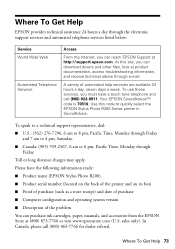
...manuals, and accessories from the EPSON Store at http://support.epson.com. To speak to a technical support representative, dial: ■ U.S.: (562) 276-7296, 6 am to 8 pm, Pacific Time, Monday through Friday and 7 am to 4 pm, Saturday. ■ Canada: (905) 709-2567, 6 am to quickly select the EPSON Stylus Photo R200 Series printer in SoundAdvice. Your EPSON...the Internet, you must have the following information ready: ■ Product name (EPSON Stylus Photo R200) ■ Product serial number (located on the back of the printer and on its box) ■ Proof of purchase (such as a store ...
...manuals, and accessories from the EPSON Store at http://support.epson.com. To speak to a technical support representative, dial: ■ U.S.: (562) 276-7296, 6 am to 8 pm, Pacific Time, Monday through Friday and 7 am to 4 pm, Saturday. ■ Canada: (905) 709-2567, 6 am to quickly select the EPSON Stylus Photo R200 Series printer in SoundAdvice. Your EPSON...the Internet, you must have the following information ready: ■ Product name (EPSON Stylus Photo R200) ■ Product serial number (located on the back of the printer and on its box) ■ Proof of purchase (such as a store ...

Printer Basics
Page 76
... or insert objects through the slots. ■ Except as photocopiers or air control systems that extends beyond the printer base in this manual, do not attempt to service the printer yourself. 76 Requirements and Notices Placez l'imprimante près d'une prise de contacte où la fiche peut être débranchée facilement...
... or insert objects through the slots. ■ Except as photocopiers or air control systems that extends beyond the printer base in this manual, do not attempt to service the printer yourself. 76 Requirements and Notices Placez l'imprimante près d'une prise de contacte où la fiche peut être débranchée facilement...

Printer Basics
Page 83
...34 ordering, 32 printing on, 32 to 47 Characters, incorrect, 71 Checking printer, 63 to 64 Cleaning print head, 49 to 51 printer, 59 rollers, 33 sheets, 59 Color management settings Macintosh, 25, 26 Windows, 23 Color problems, 68 ColorSync, 18 Controlling printing Macintosh, 19, 21 Windows, 16... Copies setting Macintosh, 18, 20 Windows, 24 Custom settings Macintosh, 25, 26 Windows, 23 to 24 D Default printer settings, 16 DVDs, see CDs E Edge-to-edge printing, 27 to 32 Electronic manual, 9 Envelopes,...
...34 ordering, 32 printing on, 32 to 47 Characters, incorrect, 71 Checking printer, 63 to 64 Cleaning print head, 49 to 51 printer, 59 rollers, 33 sheets, 59 Color management settings Macintosh, 25, 26 Windows, 23 Color problems, 68 ColorSync, 18 Controlling printing Macintosh, 19, 21 Windows, 16... Copies setting Macintosh, 18, 20 Windows, 24 Custom settings Macintosh, 25, 26 Windows, 23 to 24 D Default printer settings, 16 DVDs, see CDs E Edge-to-edge printing, 27 to 32 Electronic manual, 9 Envelopes,...

Service Manual
Page 2
...errors be trademarks or registered trademarks of them. o The contents of SEIKO EPSON CORPORATION. However, should any and all rights in this manual may be detected, SEIKO EPSON would greatly appreciate being informed of their respective owners. General Notice:Other ... those marks. Copyright © 2003 SEIKO EPSON CORPORATION. Imaging & Information Product Division TP • CS Quality Assurance Department o All effort have been made to change without notice. EPSON is a registered trademark of this manual are for any means electronic, mechanical, photocopying...
...errors be trademarks or registered trademarks of them. o The contents of SEIKO EPSON CORPORATION. However, should any and all rights in this manual may be detected, SEIKO EPSON would greatly appreciate being informed of their respective owners. General Notice:Other ... those marks. Copyright © 2003 SEIKO EPSON CORPORATION. Imaging & Information Product Division TP • CS Quality Assurance Department o All effort have been made to change without notice. EPSON is a registered trademark of this manual are for any means electronic, mechanical, photocopying...

Service Manual
Page 3
... AND PERIPHERAL DEVICES PERFORMING ANY MAINTENANCE OR REPAIR PROCEDURES. 2. REPAIRS ON EPSON PRODUCT SHOULD BE PERFORMED ONLY BY AN EPSON CERTIFIED REPAIR TECHNICIAN. 2. WHEN PERFORMING TESTING AS DICTATED WITHIN THIS MANUAL, DO NOT CONNECT THE UNIT TO A POWER SOURCE UNTIL INSTRUCTED TO ... WRIST STRAPS, WHEN ACCESSING INTERNAL COMPONENTS. 5. DANGER 1. Great caution should always be exercised in damage to equipment. IF THE EPSON PRODUCT HAS A PRIMARY AC RATING DIFFERENT FROM AVAILABLE POWER SOURCE, DO NOT CONNECT IT TO THE POWER SOURCE. 3. PRECAUTIONS Precautionary...
... AND PERIPHERAL DEVICES PERFORMING ANY MAINTENANCE OR REPAIR PROCEDURES. 2. REPAIRS ON EPSON PRODUCT SHOULD BE PERFORMED ONLY BY AN EPSON CERTIFIED REPAIR TECHNICIAN. 2. WHEN PERFORMING TESTING AS DICTATED WITHIN THIS MANUAL, DO NOT CONNECT THE UNIT TO A POWER SOURCE UNTIL INSTRUCTED TO ... WRIST STRAPS, WHEN ACCESSING INTERNAL COMPONENTS. 5. DANGER 1. Great caution should always be exercised in damage to equipment. IF THE EPSON PRODUCT HAS A PRIMARY AC RATING DIFFERENT FROM AVAILABLE POWER SOURCE, DO NOT CONNECT IT TO THE POWER SOURCE. 3. PRECAUTIONS Precautionary...

Service Manual
Page 4
...T IO N Indicates an operating or maintenance procedure, practice, or condition that is related to , or destruction of Epson-approved lubricants and adhesives required for adjustment. TROUBLESHOOTING Describes the step-by -step procedures for the troubleshooting. CHAPTER 3....: • Electrical circuit boards schematics Various symbols are used throughout this Manual This manual consists of life. Manual Configuration Symbols Used in this manual either to provide additional information on a specific topic or to warn of...procedure or an action. Be aware of the printer.
...T IO N Indicates an operating or maintenance procedure, practice, or condition that is related to , or destruction of Epson-approved lubricants and adhesives required for adjustment. TROUBLESHOOTING Describes the step-by -step procedures for the troubleshooting. CHAPTER 3....: • Electrical circuit boards schematics Various symbols are used throughout this Manual This manual consists of life. Manual Configuration Symbols Used in this manual either to provide additional information on a specific topic or to warn of...procedure or an action. Be aware of the printer.

Service Manual
Page 31
.... n Use only recommended tools for disassembling, assembling or adjusting the printer. (Refer to avoid injury from sharp metal edges. EPSON Stylus Photo R200/R210 2.1 Overview This section describes procedures for disassembling the main components of the disassembling. "CHECK POINT" indicates points to work of this manual. Read precautions described in other than the specified position can...
.... n Use only recommended tools for disassembling, assembling or adjusting the printer. (Refer to avoid injury from sharp metal edges. EPSON Stylus Photo R200/R210 2.1 Overview This section describes procedures for disassembling the main components of the disassembling. "CHECK POINT" indicates points to work of this manual. Read precautions described in other than the specified position can...

Service Manual
Page 87
... printer has no mechanical components which require regular cleaning except the Print Head. When performed by using a soft bruch or soft cloth moistened with neutral detergent to the selected mode for Manual Cleaning, and it off. When selecting the manual cleaning by the manual ...Print Head cleaning operation.* This function can be displayed on the Control Panel. EPSON Stylus Photo R200/R210 Revision A 4.1 Overview This section provides information to remove ink stain. Therefore, when returning the printer from the user, check the following explanation is noticeable. n Do not ...
... printer has no mechanical components which require regular cleaning except the Print Head. When performed by using a soft bruch or soft cloth moistened with neutral detergent to the selected mode for Manual Cleaning, and it off. When selecting the manual cleaning by the manual ...Print Head cleaning operation.* This function can be displayed on the Control Panel. EPSON Stylus Photo R200/R210 Revision A 4.1 Overview This section provides information to remove ink stain. Therefore, when returning the printer from the user, check the following explanation is noticeable. n Do not ...

Service Manual
Page 89
... of oil or grease may damage the components or affect the printer functions. Table 4-1. G-26 2. Use of different types of lubricant should be applied in this manual. Half periphery of "Roller, PF" 2. 4mm x 2...Stylus Photo R200/R210 has been decided on based on evaluation carried out by Epson. Contact point between "Roller PF" and "Paper Guide, Rear" 1. Oil Applied to Stylus Photo R300/R310 Type Name EPSON Code Supplier G-26 1080614 Grease G-46 1039172 EPSON G-63 1218320 C A U T I O N n When using G-64, it MAINTENANCE Overview 89 G-26 1. EPSON Stylus Photo R200...
... of oil or grease may damage the components or affect the printer functions. Table 4-1. G-26 2. Use of different types of lubricant should be applied in this manual. Half periphery of "Roller, PF" 2. 4mm x 2...Stylus Photo R200/R210 has been decided on based on evaluation carried out by Epson. Contact point between "Roller PF" and "Paper Guide, Rear" 1. Oil Applied to Stylus Photo R300/R310 Type Name EPSON Code Supplier G-26 1080614 Grease G-46 1039172 EPSON G-63 1218320 C A U T I O N n When using G-64, it MAINTENANCE Overview 89 G-26 1. EPSON Stylus Photo R200...

Service Manual
Page 97
EPSON Stylus Photo R200/R210 5.1 Exploded Diagram An exploded diagram is necessary, see the Exploded Diagram attached to the Stylus R200/R210 Parts List. If consultation of an exploded diagram is not provided in the Stylus R200/R210 Service Manual. Revision A 5.2 Electrical Circuits The electric circuit diagrams below are shown at the following pages: o Main Board (C546 MAIN) o Power Board (C546 PSH) o Panel Board (C546PNL) APPENDIX Exploded Diagram 97
EPSON Stylus Photo R200/R210 5.1 Exploded Diagram An exploded diagram is necessary, see the Exploded Diagram attached to the Stylus R200/R210 Parts List. If consultation of an exploded diagram is not provided in the Stylus R200/R210 Service Manual. Revision A 5.2 Electrical Circuits The electric circuit diagrams below are shown at the following pages: o Main Board (C546 MAIN) o Power Board (C546 PSH) o Panel Board (C546PNL) APPENDIX Exploded Diagram 97


