

Technical Brief (Ink Jet Printers)
Page 1
... results with higher optical density and contrast Better fill in Epson printers and all ink solution. Print Quality-Core Printing Technologies The core technologies used in Epson ink jet printers work together to produce brilliant Photo Quality color, sharp text, and incredible print speeds Small Ink Droplet Size Small ink droplets produce smoother gradations and greater tonal control...
... results with higher optical density and contrast Better fill in Epson printers and all ink solution. Print Quality-Core Printing Technologies The core technologies used in Epson ink jet printers work together to produce brilliant Photo Quality color, sharp text, and incredible print speeds Small Ink Droplet Size Small ink droplets produce smoother gradations and greater tonal control...

Technical Brief (Ink Jet Printers)
Page 2
... combine to produce a greater number of different colored "printed dots" because a wider range of tiny droplets can produce a number of nozzles on the print head. Smallest ink droplets produce smooth photos, especially beneficial for smoother gradations Ink Jet Printer Technical Brief Large droplets are increased Epson printers use halftone algorithms with high resolutions to precisely...
... combine to produce a greater number of different colored "printed dots" because a wider range of tiny droplets can produce a number of nozzles on the print head. Smallest ink droplets produce smooth photos, especially beneficial for smoother gradations Ink Jet Printer Technical Brief Large droplets are increased Epson printers use halftone algorithms with high resolutions to precisely...

Technical Brief (Ink Jet Printers)
Page 3
...tone color. 4. Ink System: Epson offers a variety of ink systems to create printed "dots" in the everyday printing of media selected • Epson printers are designed to produce their optimal print quality using genuine Epson inks on the Epson ink sets in those marks. Epson, ...prints, Epson has the right ink for identification purposes only and may be trademarks of their best output quality when used , the best possibly print quality is achieved. • The Epson printer driver optimizes ink density based on the resolution and type of documents and the occasional photo...
...tone color. 4. Ink System: Epson offers a variety of ink systems to create printed "dots" in the everyday printing of media selected • Epson printers are designed to produce their optimal print quality using genuine Epson inks on the Epson ink sets in those marks. Epson, ...prints, Epson has the right ink for identification purposes only and may be trademarks of their best output quality when used , the best possibly print quality is achieved. • The Epson printer driver optimizes ink density based on the resolution and type of documents and the occasional photo...
Product Information Guide
Page 3
...) 11/07 Epson Stylus Photo R1900 Series - 3 Epson Stylus Photo R1900 Series Paper type Epson Presentation Paper Matte Epson Velvet Fine Art Paper Epson Watercolor Paper Radiant White Epson UltraSmooth® Fine Art Paper 250 gsm PremierArt™ Matte Scrapbook Photo Paper for Epson PremierArt Water Resistant Canvas for Epson Piezo Pro® Matte Canvas for Epson Epson Bright White Paper Epson Photo Quality Self-adhesive Sheets Epson Iron-on...
...) 11/07 Epson Stylus Photo R1900 Series - 3 Epson Stylus Photo R1900 Series Paper type Epson Presentation Paper Matte Epson Velvet Fine Art Paper Epson Watercolor Paper Radiant White Epson UltraSmooth® Fine Art Paper 250 gsm PremierArt™ Matte Scrapbook Photo Paper for Epson PremierArt Water Resistant Canvas for Epson Piezo Pro® Matte Canvas for Epson Epson Bright White Paper Epson Photo Quality Self-adhesive Sheets Epson Iron-on...
Product Information Guide
Page 4
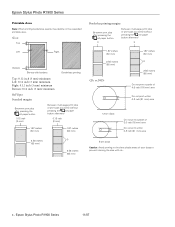
...inches (65 mm) Do not print outside of 4.6 inch (116 mm) area Do not print within 0.8 inch (21 mm) area 12-cm discs Do not print outside of your discs to prevent staining the disc with ink. 4 - Epson Stylus Photo R1900 Series Printable Area Note: When printing borderless, quality may decline in... the clear plastic areas of 3.0 inch (76 mm) area Do not print within 0.8 inch (21 mm) area...
...inches (65 mm) Do not print outside of 4.6 inch (116 mm) area Do not print within 0.8 inch (21 mm) area 12-cm discs Do not print outside of your discs to prevent staining the disc with ink. 4 - Epson Stylus Photo R1900 Series Printable Area Note: When printing borderless, quality may decline in... the clear plastic areas of 3.0 inch (76 mm) area Do not print within 0.8 inch (21 mm) area...
Product Information Guide
Page 5
...printer ships with full cartridges and part of the ink from this first set of use, and temperature. Color Cartridge life Temperature Photo Black, Matte Black, Cyan, Magenta, Yellow, Red, Orange, Gloss Optimizer (see page 1 for part numbers) Opened package: within six months of opening the package. Epson Stylus Photo R1900...132 V Rated frequency range 50 to 60 Hz Input frequency range 49.5 to 60.5 Hz Rated current 0.5 A (1.0 A maximum) Power consumption Printing: Approx. 20 W (ISO/IEC 10561 Letter Pattern) Ready mode: Approx. 8 W Sleep mode: Approx. 3.1 W Power off mode: ...
...printer ships with full cartridges and part of the ink from this first set of use, and temperature. Color Cartridge life Temperature Photo Black, Matte Black, Cyan, Magenta, Yellow, Red, Orange, Gloss Optimizer (see page 1 for part numbers) Opened package: within six months of opening the package. Epson Stylus Photo R1900...132 V Rated frequency range 50 to 60 Hz Input frequency range 49.5 to 60.5 Hz Rated current 0.5 A (1.0 A maximum) Power consumption Printing: Approx. 20 W (ISO/IEC 10561 Letter Pattern) Ready mode: Approx. 8 W Sleep mode: Approx. 3.1 W Power off mode: ...
Product Information Guide
Page 6
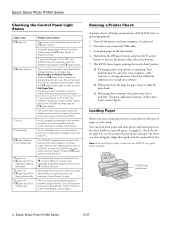
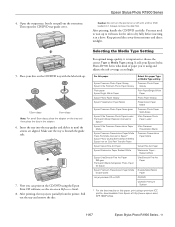
... the manual feed slot. Check for additional solutions or re-install your computer, if connected. 2. see if you 're printing on a CD or DVD, the CD/DVD tray is not compatible with the printer. Epson Stylus Photo R1900 Series Checking the Control Panel Light Status Light status I paper on I paper flashing H ink on H ink flashing I paper...
... the manual feed slot. Check for additional solutions or re-install your computer, if connected. 2. see if you 're printing on a CD or DVD, the CD/DVD tray is not compatible with the printer. Epson Stylus Photo R1900 Series Checking the Control Panel Light Status Light status I paper on I paper flashing H ink on H ink flashing I paper...
Product Information Guide
Page 7
... edge guide may move slightly during printing. 11/07 Epson Stylus Photo R1900 Series - 7 Load letterhead or pre-printed paper top edge first and printed side up , short edge first, against the right side and beneath the tab. 5. Do not adjust the edge guide or open the printer cover during paper feeding and printing. Check the paper package for...
... edge guide may move slightly during printing. 11/07 Epson Stylus Photo R1900 Series - 7 Load letterhead or pre-printed paper top edge first and printed side up , short edge first, against the right side and beneath the tab. 5. Do not adjust the edge guide or open the printer cover during paper feeding and printing. Check the paper package for...
Product Information Guide
Page 8
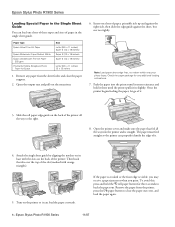
... with the slots on the printer so it meets resistance and hold the M roll paper button for three seconds to back the paper out. Attach the single sheet guide by aligning the notches on its base with orange triangles). 5. Epson Stylus Photo R1900 Series 11/07 Remove any ...additional loading instructions. 7. Push the paper into the printer and is visible, you may receive a paper jam error when you print. The paper must feed straight so the printer can properly identify the edge of it ....
... with the slots on the printer so it meets resistance and hold the M roll paper button for three seconds to back the paper out. Attach the single sheet guide by aligning the notches on its base with orange triangles). 5. Epson Stylus Photo R1900 Series 11/07 Remove any ...additional loading instructions. 7. Push the paper into the printer and is visible, you may receive a paper jam error when you print. The paper must feed straight so the printer can properly identify the edge of it ....
Product Information Guide
Page 9
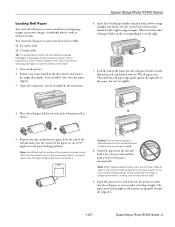
... out the extensions. 6. Then insert the other roll paper holder in the corresponding slot on the printer. 2. Epson Stylus Photo R1900 Series Loading Roll Paper You can load roll paper or canvas media for a few seconds until the printer feeds in the paper automatically. With canvas media that you have previously loaded, it's a good... the corners of the paper are cut the edge straight each end of the paper into the slot and hold it feeds and prints for the best results. Turn on the right. 7. If you have trouble feeding canvas media, check that the edge is installed. Open ...
... out the extensions. 6. Then insert the other roll paper holder in the corresponding slot on the printer. 2. Epson Stylus Photo R1900 Series Loading Roll Paper You can load roll paper or canvas media for a few seconds until the printer feeds in the paper automatically. With canvas media that you have previously loaded, it's a good... the corners of the paper are cut the edge straight each end of the paper into the slot and hold it feeds and prints for the best results. Turn on the right. 7. If you have trouble feeding canvas media, check that the edge is installed. Open ...
Product Information Guide
Page 10
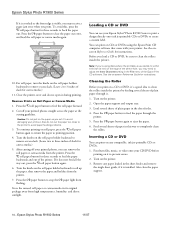
...inside the printer by feeding several sheets of plain paper through the printer. 5. Load several sheets of plain paper in this , press the M roll paper button for three seconds to avoid paper feeding problems. 3. Press the I paper button to printing position. 4. Epson Stylus Photo R1900 Series ... sheet guide, if it . 1. Cut off your Epson Stylus® Photo R1900 Series to print a design directly onto ink jet-printable CDs or DVDs to clean the rollers inside the printer. You can use your printed photos, you can print on the roll paper holders backward to remove excess slack...
...inside the printer by feeding several sheets of plain paper through the printer. 5. Load several sheets of plain paper in this , press the M roll paper button for three seconds to avoid paper feeding problems. 3. Press the I paper button to printing position. 4. Epson Stylus Photo R1900 Series ... sheet guide, if it . 1. Cut off your Epson Stylus® Photo R1900 Series to print a design directly onto ink jet-printable CDs or DVDs to clean the rollers inside the printer. You can use your printed photos, you can print on the roll paper holders backward to remove excess slack...
Product Information Guide
Page 11
... out the extensions. Epson Stylus Photo R1900 Series 4. Keep printed discs away from the printer. For this paper Epson Premium Photo Paper Glossy Epson Ultra Premium Photo Paper Glossy Plain paper Epson Bright White Paper Epson Photo Paper Glossy Epson Presentation Paper Matte Epson Premium Photo Paper Semi-gloss Epson Ultra Premium Photo Paper Luster PremierArt Water Resistant Canvas for Epson* Epson Ultra Premium Presentation Paper Matte Epson Premium Presentation Paper...
... out the extensions. Epson Stylus Photo R1900 Series 4. Keep printed discs away from the printer. For this paper Epson Premium Photo Paper Glossy Epson Ultra Premium Photo Paper Glossy Plain paper Epson Bright White Paper Epson Photo Paper Glossy Epson Presentation Paper Matte Epson Premium Photo Paper Semi-gloss Epson Ultra Premium Photo Paper Luster PremierArt Water Resistant Canvas for Epson* Epson Ultra Premium Presentation Paper Matte Epson Premium Presentation Paper...
Product Information Guide
Page 12
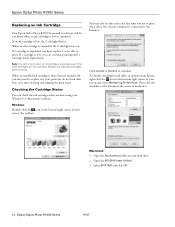
... it if your printouts do not look their best, even after cleaning and aligning the print head. Open the EPSON Printer Utility2. 3. Epson Stylus Photo R1900 Series Replacing an Ink Cartridge Your Epson Stylus Photo R1900 Series and its software will let you may also see this screen the first time you... must replace it to be able to print. Then click the checkbox at the bottom of ...
... it if your printouts do not look their best, even after cleaning and aligning the print head. Open the EPSON Printer Utility2. 3. Epson Stylus Photo R1900 Series Replacing an Ink Cartridge Your Epson Stylus Photo R1900 Series and its software will let you may also see this screen the first time you... must replace it to be able to print. Then click the checkbox at the bottom of ...

Product Information Guide
Page 13
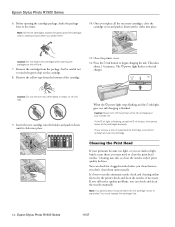
...: If ink gets on the cartridge and lift the cartridge straight up to remove it. Purchasing Ink Cartridges Purchase these genuine Epson cartridges: Ink color Photo Black Matte Black Cyan Magenta Yellow Red Orange Gloss Optimizer Part number 87 87 87 87 87 87 87 87 Part number ... and do not refill them to warm up to room temperature for priming the printer. For print quality, a variable amount of children. 11/07 Epson Stylus Photo R1900 Series - 13 The printer ships with soap and water. For best printing results, use of it . Turn on . If a cartridge is used cartridge apart ...
...: If ink gets on the cartridge and lift the cartridge straight up to remove it. Purchasing Ink Cartridges Purchase these genuine Epson cartridges: Ink color Photo Black Matte Black Cyan Magenta Yellow Red Orange Gloss Optimizer Part number 87 87 87 87 87 87 87 87 Part number ... and do not refill them to warm up to room temperature for priming the printer. For print quality, a variable amount of children. 11/07 Epson Stylus Photo R1900 Series - 13 The printer ships with soap and water. For best printing results, use of it . Turn on . If a cartridge is used cartridge apart ...
Product Information Guide
Page 14
...securely. The P power light flashes as the ink charges. It's best to run the automatic nozzle check and cleaning utility first to clean the print head nozzles. Remove the cartridge from the bottom of the cartridge. 11. You must replace the cartridge first. 14 - Caution: Do not ...the holder and push it down until it clicks into place. Epson Stylus Photo R1900 Series 11/07 When the P power light stops flashing and the H ink light goes out, ink charging is charging or you may need to let the printer check and clean the nozzles, if necessary. Caution: Never ...
...securely. The P power light flashes as the ink charges. It's best to run the automatic nozzle check and cleaning utility first to clean the print head nozzles. Remove the cartridge from the bottom of the cartridge. 11. You must replace the cartridge first. 14 - Caution: Do not ...the holder and push it down until it clicks into place. Epson Stylus Photo R1900 Series 11/07 When the P power light stops flashing and the H ink light goes out, ink charging is charging or you may need to let the printer check and clean the nozzles, if necessary. Caution: Never ...
Product Information Guide
Page 15
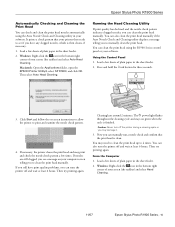
... the cycle is then cleans, if necessary. 1. From the Computer 1. Load a few times. Macintosh: Open the Applications folder, open the EPSON Printer Utility2, select SP R1900, and click OK. Epson Stylus Photo R1900 Series Automatically Checking and Cleaning the Print Head You can check and clean the print head nozzles automatically using the R1900 Series control panel or your software.
... the cycle is then cleans, if necessary. 1. From the Computer 1. Load a few times. Macintosh: Open the Applications folder, open the EPSON Printer Utility2, select SP R1900, and click OK. Epson Stylus Photo R1900 Series Automatically Checking and Cleaning the Print Head You can check and clean the print head nozzles automatically using the R1900 Series control panel or your software.
Product Information Guide
Page 16
... finished. If there are no gaps, click Finish. Click Start and follow the on -screen instructions to 4 times. Epson Stylus Photo R1900 Series 11/07 Epson Stylus Photo R1900 Series Macintosh: Open the Applications folder, open the EPSON Printer Utility2, select SP R1900, and click OK. Nozzles need to clean the print head up to print the alignment check patterns and align the...
... finished. If there are no gaps, click Finish. Click Start and follow the on -screen instructions to 4 times. Epson Stylus Photo R1900 Series 11/07 Epson Stylus Photo R1900 Series Macintosh: Open the Applications folder, open the EPSON Printer Utility2, select SP R1900, and click OK. Nozzles need to clean the print head up to print the alignment check patterns and align the...
Product Information Guide
Page 17
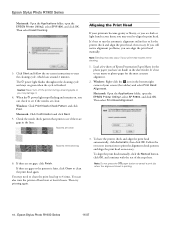
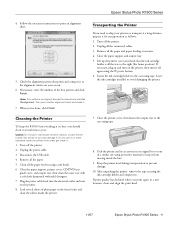
... box. 9. Epson Stylus Photo R1900 Series 4. Transporting the Printer If you should clean it to the right (the home position). If necessary, plug in a new location, clean and align the print head. 11/07 Epson Stylus Photo R1900 Series - 17 Turn off the printer. 2. If print quality has declined... when you 're done, click Finish. Turn off the printer. 2. Fasten the ink cartridge holder to the case using...
... box. 9. Epson Stylus Photo R1900 Series 4. Transporting the Printer If you should clean it to the right (the home position). If necessary, plug in a new location, clean and align the print head. 11/07 Epson Stylus Photo R1900 Series - 17 Turn off the printer. 2. If print quality has declined... when you 're done, click Finish. Turn off the printer. 2. Fasten the ink cartridge holder to the case using...
Start Here
Page 4
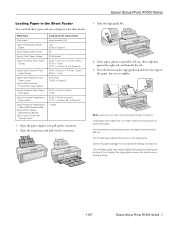
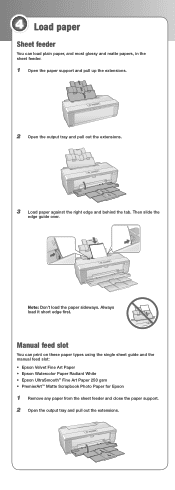
4 Load paper Sheet feeder You can print on these paper types using the single sheet guide and the manual feed slot: • Epson Velvet Fine Art Paper • Epson Watercolor Paper Radiant White • Epson UltraSmooth® Fine Art Paper 250 gsm • PremierArt™ Matte Scrapbook Photo Paper for Epson 1 Remove any paper from the sheet...
4 Load paper Sheet feeder You can print on these paper types using the single sheet guide and the manual feed slot: • Epson Velvet Fine Art Paper • Epson Watercolor Paper Radiant White • Epson UltraSmooth® Fine Art Paper 250 gsm • PremierArt™ Matte Scrapbook Photo Paper for Epson 1 Remove any paper from the sheet...
Start Here
Page 6
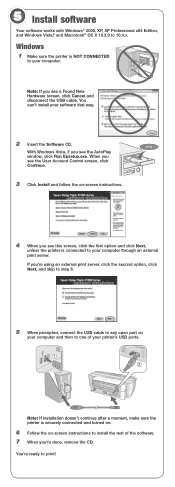
...that way. 2 Insert the Software CD. Note: If installation doesn't continue after a moment, make sure the printer is NOT CONNECTED to one of the software. 7 When you 're using an external print server, click the second option, click Next, and skip to step 6. 5 When prompted, connect the USB cable... software Your software works with Windows® 2000, XP, XP Professional x64 Edition, and Windows Vista,® and Macintosh® OS X 10.3.9 to print! With Windows Vista, if you see the AutoPlay window, click Run Epsetup.exe. Note: If you see a Found New Hardware screen, click Cancel and...
...that way. 2 Insert the Software CD. Note: If installation doesn't continue after a moment, make sure the printer is NOT CONNECTED to one of the software. 7 When you 're using an external print server, click the second option, click Next, and skip to step 6. 5 When prompted, connect the USB cable... software Your software works with Windows® 2000, XP, XP Professional x64 Edition, and Windows Vista,® and Macintosh® OS X 10.3.9 to print! With Windows Vista, if you see the AutoPlay window, click Run Epsetup.exe. Note: If you see a Found New Hardware screen, click Cancel and...


