Product Information Guide
Page 14
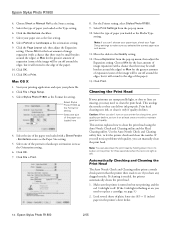
... source. 11. Epson Stylus Photo R1800 2/05 Click OK or Print. Click OK. 7. For the Printer setting, select Stylus Photo R1800. 9. Select Print Settings from the pop-up menu. 10. This section explains how to let the printer check and clean the nozzles. Choose Sheet or Manual Roll as the ... be small borders around the edges, but it will extend to clean the print head. Select Stylus Photo R1800 as the Format for three seconds (when the red H ink light is needed, the printer automatically cleans the print head. 1. Borderless source as the Orientation setting. 6....
... source. 11. Epson Stylus Photo R1800 2/05 Click OK or Print. Click OK. 7. For the Printer setting, select Stylus Photo R1800. 9. Select Print Settings from the pop-up menu. 10. This section explains how to let the printer check and clean the nozzles. Choose Sheet or Manual Roll as the ... be small borders around the edges, but it will extend to clean the print head. Select Stylus Photo R1800 as the Format for three seconds (when the red H ink light is needed, the printer automatically cleans the print head. 1. Borderless source as the Orientation setting. 6....
Product Information Guide
Page 15
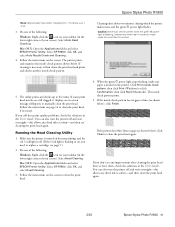
... on the screen to manually clean the print head. If some print head nozzles are still clogged, it then cleans the print head and prints and checks another nozzle check pattern. see any dried ink to replace a cartridge; Make sure the printer is off and wait ... -screen message telling you need to soften-and then clean the print head again. 2/05 Epson Stylus Photo R1800 - 15 Follow the instructions on your taskbar (in the printer. Running the Head Cleaning Utility 1. Cleaning takes about two minutes, during which the printer makes noise and the green P power light flashes....
... on the screen to manually clean the print head. If some print head nozzles are still clogged, it then cleans the print head and prints and checks another nozzle check pattern. see any dried ink to replace a cartridge; Make sure the printer is off and wait ... -screen message telling you need to soften-and then clean the print head again. 2/05 Epson Stylus Photo R1800 - 15 Follow the instructions on your taskbar (in the printer. Running the Head Cleaning Utility 1. Cleaning takes about two minutes, during which the printer makes noise and the green P power light flashes....
Product Information Guide
Page 16
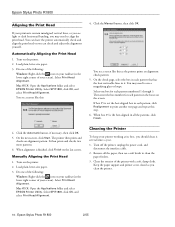
...to align the print head. Turn on the last screen. Select Print Head Alignment. Click the Manual button, then click OK. When alignment is finished, click Finish on the printer. 2. Select Print Head Alignment. Select one box for each pattern numbered 1 through 3. If ... patterns, click Finish. 4. You see a screen like this as you should clean it . Epson Stylus Photo R1800 2/05 Load plain, letter-size paper. 3. Click the Automatic button, if necessary, then click OK. 5. The printer then prints and checks an alignment pattern. On the check page, select the ...
...to align the print head. Turn on the last screen. Select Print Head Alignment. Click the Manual button, then click OK. When alignment is finished, click Finish on the printer. 2. Select Print Head Alignment. Select one box for each pattern numbered 1 through 3. If ... patterns, click Finish. 4. You see a screen like this as you should clean it . Epson Stylus Photo R1800 2/05 Load plain, letter-size paper. 3. Click the Automatic button, if necessary, then click OK. 5. The printer then prints and checks an alignment pattern. On the check page, select the ...
User's Guide
Page 4
... the Head Cleaning Utility 75 Replacing an Ink Cartridge 76 Checking the Ink Levels 77 Purchasing Ink Cartridges 77 Ink Cartridge Precautions 78 Removing and Installing Ink Cartridges 78 Aligning the Print Head 80 Automatically Aligning the Print Head 80 Manually Aligning the Print Head 81 Cleaning the Printer 82 Transporting the Printer 83 4 Contents
... the Head Cleaning Utility 75 Replacing an Ink Cartridge 76 Checking the Ink Levels 77 Purchasing Ink Cartridges 77 Ink Cartridge Precautions 78 Removing and Installing Ink Cartridges 78 Aligning the Print Head 80 Automatically Aligning the Print Head 80 Manually Aligning the Print Head 81 Cleaning the Printer 82 Transporting the Printer 83 4 Contents
User's Guide
Page 73
This unclogs the nozzles so they can manually clean the print head. This section explains how to let the printer check and clean the nozzles. Note: You can also clean the print head by holding down the H ink button on the printer for a long time, print quality can decline, so turn on your ...below ■ "Replacing an Ink Cartridge" on page 76 ■ "Aligning the Print Head" on page 80 ■ "Cleaning the Printer" on page 82 ■ "Transporting the Printer" on at its best and to prepare it only if quality declines. If you still notice problems with quality, you may need ...
This unclogs the nozzles so they can manually clean the print head. This section explains how to let the printer check and clean the nozzles. Note: You can also clean the print head by holding down the H ink button on the printer for a long time, print quality can decline, so turn on your ...below ■ "Replacing an Ink Cartridge" on page 76 ■ "Aligning the Print Head" on page 80 ■ "Cleaning the Printer" on page 82 ■ "Transporting the Printer" on at its best and to prepare it only if quality declines. If you still notice problems with quality, you may need ...

User's Guide
Page 74
...ink to soften-and then try cleaning the print head again. 74 Maintaining Your Printer The printer prints and examines the nozzle check pattern shown below. If cleaning is needed, the printer automatically cleans the print head. 1. Follow the instructions on EPSON Stylus Photo R1800, and select Printing Preferences. ... the Maintenance tab and click Auto Nozzle Check and Cleaning. Follow the instructions on , you to manually clean the print head. Select SP R1800, click OK, and select Auto Nozzle Check and Cleaning. 4. Make sure the printer is turned on but not printing, and the red...
...ink to soften-and then try cleaning the print head again. 74 Maintaining Your Printer The printer prints and examines the nozzle check pattern shown below. If cleaning is needed, the printer automatically cleans the print head. 1. Follow the instructions on EPSON Stylus Photo R1800, and select Printing Preferences. ... the Maintenance tab and click Auto Nozzle Check and Cleaning. Follow the instructions on , you to manually clean the print head. Select SP R1800, click OK, and select Auto Nozzle Check and Cleaning. 4. Make sure the printer is turned on but not printing, and the red...
User's Guide
Page 104
...its side, or turn the printer off and unplug the printer before cleaning. if liquid has entered the printer; if the printer does not operate normally or exhibits a distinct change in this manual, do not attempt to service the printer yourself. ■ Unplug the printer and refer servicing to qualified service...specifically explained in performance. Caution: Always turn it upside-down. if the printer has been dropped or the case damaged; The printer will not operate properly if it is damaged; Clean with the printer, make sure the total ampere rating of the devices plugged into the ...
...its side, or turn the printer off and unplug the printer before cleaning. if liquid has entered the printer; if the printer does not operate normally or exhibits a distinct change in this manual, do not attempt to service the printer yourself. ■ Unplug the printer and refer servicing to qualified service...specifically explained in performance. Caution: Always turn it upside-down. if the printer has been dropped or the case damaged; The printer will not operate properly if it is damaged; Clean with the printer, make sure the total ampere rating of the devices plugged into the ...
User's Guide
Page 112
... color management, 53, 57, 60, 62 Windows, 29 Electronic manual, 9 to 10 Enhanced Matte Paper, 14, 38 Epson help...setting, Windows, 27 Glossy Photo Paper, 14, 38, 40, 42, 45 Grainy prints, 94 H Head Cleaning utility, 75 to 76 Help Epson, 101 to 102 other ...software, 102 see also Troubleshooting High Speed setting, 92 to 93 112 Index I ICM (Image Color Matching) setting, 30, 57, 62 Incorrect characters, 99 colors...Macintosh, 34 Windows, 30 Letterhead, 13 Lights, 88 to 89 Luster Photo Paper, 14, 38, 40, 42 M Macintosh basic printing, 31 to...
... color management, 53, 57, 60, 62 Windows, 29 Electronic manual, 9 to 10 Enhanced Matte Paper, 14, 38 Epson help...setting, Windows, 27 Glossy Photo Paper, 14, 38, 40, 42, 45 Grainy prints, 94 H Head Cleaning utility, 75 to 76 Help Epson, 101 to 102 other ...software, 102 see also Troubleshooting High Speed setting, 92 to 93 112 Index I ICM (Image Color Matching) setting, 30, 57, 62 Incorrect characters, 99 colors...Macintosh, 34 Windows, 30 Letterhead, 13 Lights, 88 to 89 Luster Photo Paper, 14, 38, 40, 42 M Macintosh basic printing, 31 to...


