User Manual
Page 4
... USB Devices 39 USB Device Projection...40 Connecting a USB Device or Camera to the Projector 40 Selecting the Connected USB Source 41 Disconnecting a USB Device or Camera From the Projector 41 Connecting to a Document Camera 42 Installing Batteries in the Remote Control 42 Opening the... Lens Cover ...44 Using Basic Projector Features ...45 Turning On the Projector ...45 Turning Off the Projector ...47 Selecting the Language for the Projector Menus 49 Adjusting the Image Height ...49 Image Shape...51 Correcting Image Shape with the Keystone...
... USB Devices 39 USB Device Projection...40 Connecting a USB Device or Camera to the Projector 40 Selecting the Connected USB Source 41 Disconnecting a USB Device or Camera From the Projector 41 Connecting to a Document Camera 42 Installing Batteries in the Remote Control 42 Opening the... Lens Cover ...44 Using Basic Projector Features ...45 Turning On the Projector ...45 Turning Off the Projector ...47 Selecting the Language for the Projector Menus 49 Adjusting the Image Height ...49 Image Shape...51 Correcting Image Shape with the Keystone...
User Manual
Page 5
... Controlling the Volume with the Volume Buttons 66 Projecting a Slide Show ...67 Supported Slideshow File Types 67 Starting a Slide Show ...68 Slideshow Display Options ...70 Adjusting Projector Features ...72 Shutting Off the Picture and Sound Temporarily 72 Stopping Video Action Temporarily ...73 Zooming Into and Out of Images ...73...
... Controlling the Volume with the Volume Buttons 66 Projecting a Slide Show ...67 Supported Slideshow File Types 67 Starting a Slide Show ...68 Slideshow Display Options ...70 Adjusting Projector Features ...72 Shutting Off the Picture and Sound Temporarily 72 Stopping Video Action Temporarily ...73 Zooming Into and Out of Images ...73...
User Manual
Page 12
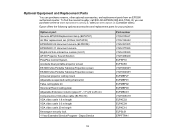
...) or www.epson.ca (Canadian sales). ELPAF32) EPSON DC-06 document camera (ELPDC06) EPSON DC-11 document camera BrightLink Solo interactive module (IU-01) AP-60 Projector Sound Solution PixiePlus Control System Accolade Duet portable projector screen ES1000 Ultra Portable Tabletop Projection screen ES3000 Ultra Portable Tabletop Projection screen Universal projector ceiling mount Adjustable suspended ceiling channel...
...) or www.epson.ca (Canadian sales). ELPAF32) EPSON DC-06 document camera (ELPDC06) EPSON DC-11 document camera BrightLink Solo interactive module (IU-01) AP-60 Projector Sound Solution PixiePlus Control System Accolade Duet portable projector screen ES1000 Ultra Portable Tabletop Projection screen ES3000 Ultra Portable Tabletop Projection screen Universal projector ceiling mount Adjustable suspended ceiling channel...
User Manual
Page 19
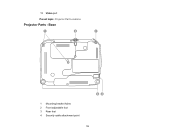
13 Video port Parent topic: Projector Part Locations Projector Parts - Base 1 Mounting bracket holes 2 Front adjustable foot 3 Rear feet 4 Security cable attachment point 19
13 Video port Parent topic: Projector Part Locations Projector Parts - Base 1 Mounting bracket holes 2 Front adjustable foot 3 Rear feet 4 Security cable attachment point 19
User Manual
Page 20
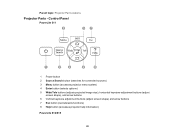
Parent topic: Projector Part Locations Projector Parts - Control Panel PowerLite S11 1 Power button 2 Source Search button (searches for connected sources) 3 Menu button (accesses projector menu system) 4 Enter button (selects options) 5 Wide/Tele buttons (adjusts projected image size), horizontal keystone adjustment buttons (adjust screen shape), and arrow buttons 6 Vertical keystone adjustment buttons (adjust screen shape) and arrow buttons 7 Esc button (cancels/exits functions) 8 Help button (accesses projector help information) PowerLite X12/X15 20
Parent topic: Projector Part Locations Projector Parts - Control Panel PowerLite S11 1 Power button 2 Source Search button (searches for connected sources) 3 Menu button (accesses projector menu system) 4 Enter button (selects options) 5 Wide/Tele buttons (adjusts projected image size), horizontal keystone adjustment buttons (adjust screen shape), and arrow buttons 6 Vertical keystone adjustment buttons (adjust screen shape) and arrow buttons 7 Esc button (cancels/exits functions) 8 Help button (accesses projector help information) PowerLite X12/X15 20
User Manual
Page 21
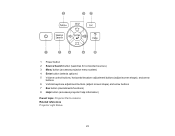
1 Power button 2 Source Search button (searches for connected sources) 3 Menu button (accesses projector menu system) 4 Enter button (selects options) 5 Volume control buttons, horizontal keystone adjustment buttons (adjust screen shape), and arrow buttons 6 Vertical keystone adjustment buttons (adjust screen shape) and arrow buttons 7 Esc button (cancels/exits functions) 8 Help button (accesses projector help information) Parent topic: Projector Part Locations Related references Projector Light Status 21
1 Power button 2 Source Search button (searches for connected sources) 3 Menu button (accesses projector menu system) 4 Enter button (selects options) 5 Volume control buttons, horizontal keystone adjustment buttons (adjust screen shape), and arrow buttons 6 Vertical keystone adjustment buttons (adjust screen shape) and arrow buttons 7 Esc button (cancels/exits functions) 8 Help button (accesses projector help information) Parent topic: Projector Part Locations Related references Projector Light Status 21
User Manual
Page 23
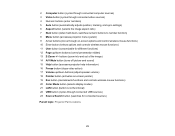
...4 Numeric buttons (enter numbers) 5 Auto button (automatically adjusts position, tracking, and sync settings) 6 Aspect button (selects the image aspect ratio) 7 Num button (when held down, switches numeric buttons to number function) 8 Menu button (accesses projector menu system) 9 Arrow buttons (move through connected USB...image) 14 A/V Mute button (turns off picture and sound) 15 Help button (accesses projector help information) 16 Freeze button (stops video action) 17 Volume up /down buttons (adjust speaker volume) 18 Pointer button (activates on-screen pointer) 19 Esc button (cancels/exits...
...4 Numeric buttons (enter numbers) 5 Auto button (automatically adjusts position, tracking, and sync settings) 6 Aspect button (selects the image aspect ratio) 7 Num button (when held down, switches numeric buttons to number function) 8 Menu button (accesses projector menu system) 9 Arrow buttons (move through connected USB...image) 14 A/V Mute button (turns off picture and sound) 15 Help button (accesses projector help information) 16 Freeze button (stops video action) 17 Volume up /down buttons (adjust speaker volume) 18 Pointer button (activates on-screen pointer) 19 Esc button (cancels/exits...
User Manual
Page 45
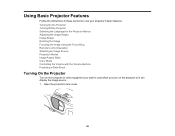
... these sections to use before you turn on the computer or video equipment you want to use your projector's basic features. Turning On the Projector Turning Off the Projector Selecting the Language for the Projector Menus Adjusting the Image Height Image Shape Resizing the Image Focusing the Image Using the Focus Ring Remote Control Operation...
... these sections to use before you turn on the computer or video equipment you want to use your projector's basic features. Turning On the Projector Turning Off the Projector Selecting the Language for the Projector Menus Adjusting the Image Height Image Shape Resizing the Image Focusing the Image Using the Focus Ring Remote Control Operation...
User Manual
Page 49
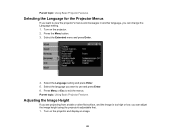
... projecting from a table or other flat surface, and the image is too high or low, you can adjust the image height using the projector's adjustable feet. 1. Turn on the projector. 2. Select the language you want to view the projector's menus and messages in another language, you can change the Language setting. 1. Press Menu or Esc...
... projecting from a table or other flat surface, and the image is too high or low, you can adjust the image height using the projector's adjustable feet. 1. Turn on the projector. 2. Select the language you want to view the projector's menus and messages in another language, you can change the Language setting. 1. Press Menu or Esc...
User Manual
Page 50
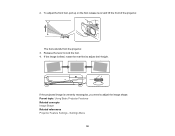
To adjust the front foot, pull up on the foot release lever and lift the front of the projector. Release the lever to adjust the image shape. The foot extends from the projector. 3. Parent topic: Using Basic Projector Features Related concepts Image Shape Related references Projector Feature Settings - Settings Menu 50 If the projected image is tilted, rotate the rear feet to adjust their height. If the image is unevenly rectangular, you need to lock the foot. 4. 2.
To adjust the front foot, pull up on the foot release lever and lift the front of the projector. Release the lever to adjust the image shape. The foot extends from the projector. 3. Parent topic: Using Basic Projector Features Related concepts Image Shape Related references Projector Feature Settings - Settings Menu 50 If the projected image is tilted, rotate the rear feet to adjust their height. If the image is unevenly rectangular, you need to lock the foot. 4. 2.

User Manual
Page 51
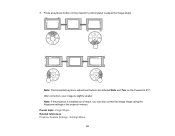
... unevenly rectangular on the sides. 1. When you turn on automatic keystone correction in your projector's Settings menu (PowerLite X12/X15), your projector automatically corrects keystone effects when you may need to display the Keystone adjustment screen. 51 Turn on the projector and display an image. Press one of the screen and keeping it level. Image Shape...
... unevenly rectangular on the sides. 1. When you turn on automatic keystone correction in your projector's Settings menu (PowerLite X12/X15), your projector automatically corrects keystone effects when you may need to display the Keystone adjustment screen. 51 Turn on the projector and display an image. Press one of the screen and keeping it level. Image Shape...
User Manual
Page 52
Note: The horizontal keystone adjustment buttons are labeled Wide and Tele on the projector's control panel to adjust the image shape. Press a keystone button on the PowerLite S11. After correction, your image is installed out of reach, you can also correct the image shape using the Keystone settings in the projector menus. Note: If the projector is slightly smaller. Settings Menu 52 Parent topic: Image Shape Related references Projector Feature Settings - 3.
Note: The horizontal keystone adjustment buttons are labeled Wide and Tele on the projector's control panel to adjust the image shape. Press a keystone button on the PowerLite S11. After correction, your image is installed out of reach, you can also correct the image shape using the Keystone settings in the projector menus. Note: If the projector is slightly smaller. Settings Menu 52 Parent topic: Image Shape Related references Projector Feature Settings - 3.
User Manual
Page 53
... Image Shape with Quick Corner You can display a pattern to aid in adjusting the projected image using the Settings menu. 2. Note: You can use the projector's horizontal keystone slider (PowerLite X12/X15) to correct the shape of an image that is unevenly rectangular horizontally, such... as when the projector is unevenly rectangular on all sides. 1. Turn on the projector and display an image. Parent topic: ...
... Image Shape with Quick Corner You can display a pattern to aid in adjusting the projected image using the Settings menu. 2. Note: You can use the projector's horizontal keystone slider (PowerLite X12/X15) to correct the shape of an image that is unevenly rectangular horizontally, such... as when the projector is unevenly rectangular on all sides. 1. Turn on the projector and display an image. Parent topic: ...
User Manual
Page 54
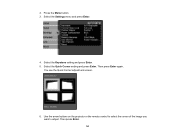
Press the Menu button. 3. Select the Settings menu and press Enter. 4. Use the arrow buttons on the projector or the remote control to select the corner of the image you want to adjust. Select the Keystone setting and press Enter. 5. Then press Enter again. 2. Select the Quick Corner setting and press Enter. Then press Enter. 54 You see the Quick Corner adjustment screen. 6.
Press the Menu button. 3. Select the Settings menu and press Enter. 4. Use the arrow buttons on the projector or the remote control to select the corner of the image you want to adjust. Select the Keystone setting and press Enter. 5. Then press Enter again. 2. Select the Quick Corner setting and press Enter. Then press Enter. 54 You see the Quick Corner adjustment screen. 6.
User Manual
Page 55
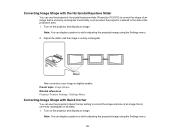
...You can display a pattern to aid in adjusting the projected image using the projector's zoom ring or the Wide and Tele buttons, depending on the projector's control panel to enlarge or reduce the image size. • If the projector includes Wide and Tele buttons, press the Wide... Settings menu. • If the projector includes a zoom ring, rotate it to enlarge the image size. 7. Press the arrow buttons to reduce the image size. 1 PowerLite X12/X15 2 PowerLite S11 Parent topic: Using Basic Projector Features 55 Press the Tele button to adjust the image shape as necessary. 8. ...
...You can display a pattern to aid in adjusting the projected image using the projector's zoom ring or the Wide and Tele buttons, depending on the projector's control panel to enlarge or reduce the image size. • If the projector includes Wide and Tele buttons, press the Wide... Settings menu. • If the projector includes a zoom ring, rotate it to enlarge the image size. 7. Press the arrow buttons to reduce the image size. 1 PowerLite X12/X15 2 PowerLite S11 Parent topic: Using Basic Projector Features 55 Press the Tele button to adjust the image shape as necessary. 8. ...
User Manual
Page 56
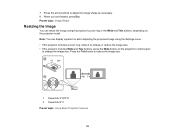
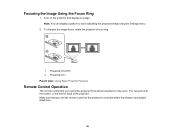
... that you control the projector from almost anywhere in adjusting the projected image using the Settings menu. 2. You can display a pattern to aid in the room. Focusing the Image Using the Focus Ring 1. To sharpen the image focus, rotate the projector's focus ring. 1 PowerLite X12/X15 2 PowerLite S11 Parent topic: Using Basic Projector Features Remote Control Operation...
... that you control the projector from almost anywhere in adjusting the projected image using the Settings menu. 2. You can display a pattern to aid in the room. Focusing the Image Using the Focus Ring 1. To sharpen the image focus, rotate the projector's focus ring. 1 PowerLite X12/X15 2 PowerLite S11 Parent topic: Using Basic Projector Features Remote Control Operation...
User Manual
Page 65
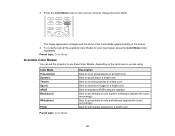
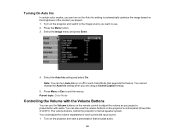
... images projected in a bright room Parent topic: Color Mode 65 Parent topic: Color Mode Available Color Modes You can set the projector to use these Color Modes, depending on the remote control to change the Color Mode. Press the Color Mode button on the ...for television images in a bright room Best for standard sRGB computer displays Best for presentations onto a green chalkboard (adjusts the colors accordingly) Best for presentations onto a whiteboard (adjusts the colors accordingly) Best for your input signal, press the Color Mode button repeatedly. The image appearance changes ...
... images projected in a bright room Parent topic: Color Mode 65 Parent topic: Color Mode Available Color Modes You can set the projector to use these Color Modes, depending on the remote control to change the Color Mode. Press the Color Mode button on the ...for television images in a bright room Best for standard sRGB computer displays Best for presentations onto a green chalkboard (adjusts the colors accordingly) Best for presentations onto a whiteboard (adjusts the colors accordingly) Best for your input signal, press the Color Mode button repeatedly. The image appearance changes ...
User Manual
Page 66
... control to use the volume buttons on the projector's control panel (PowerLite X12/X15). You can also use . 2. The volume buttons control the projector's internal speaker system. Press Menu or Esc to automatically optimize the image based on the brightness of the content you project. 1. You must adjust the volume separately for each connected input...
... control to use the volume buttons on the projector's control panel (PowerLite X12/X15). You can also use . 2. The volume buttons control the projector's internal speaker system. Press Menu or Esc to automatically optimize the image based on the brightness of the content you project. 1. You must adjust the volume separately for each connected input...
User Manual
Page 72
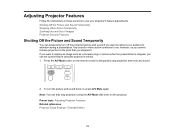
...Press the A/V Mute button on the remote control to run, however, so you cannot resume projection at the point that you stopped it. Adjusting Projector Features Follow the instructions in these sections to use your audience's attention during a presentation. Shutting Off the Picture and Sound Temporarily Stopping Video ...If you want to display an image such as a company logo or picture when the presentation is stopped, you want to redirect your projector's feature adjustments. To turn off the projected picture and sound if you can temporarily turn the picture and sound back on the...
...Press the A/V Mute button on the remote control to run, however, so you cannot resume projection at the point that you stopped it. Adjusting Projector Features Follow the instructions in these sections to use your audience's attention during a presentation. Shutting Off the Picture and Sound Temporarily Stopping Video ...If you want to display an image such as a company logo or picture when the presentation is stopped, you want to redirect your projector's feature adjustments. To turn off the projected picture and sound if you can temporarily turn the picture and sound back on the...
User Manual
Page 73
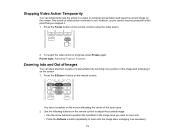
You see a crosshair on the remote control to adjust the zoomed image: • Use the arrow buttons to position the crosshair in the image area you stopped it on the remote control. Use the .... • Press the E-Zoom + button repeatedly to zoom into a portion of the image and enlarging it . 1. Press the E-Zoom + button on the screen. 1. Parent topic: Adjusting Projector Features Zooming Into and Out of Images You can temporarily stop the video action. 2. To restart the video action in a video or computer presentation and...
You see a crosshair on the remote control to adjust the zoomed image: • Use the arrow buttons to position the crosshair in the image area you stopped it on the remote control. Use the .... • Press the E-Zoom + button repeatedly to zoom into a portion of the image and enlarging it . 1. Press the E-Zoom + button on the screen. 1. Parent topic: Adjusting Projector Features Zooming Into and Out of Images You can temporarily stop the video action. 2. To restart the video action in a video or computer presentation and...


