ESC/VP Level 21 Communication Manual
Page 1
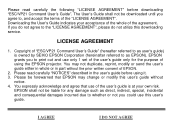
...change or modify this downloading service. Please read carefully the following "LICENSE AGREEMENT" before using the EPSON projector. Downloading the User's Guide indicates your own risk. You expressly acknowledge and agree that EPSON may not duplicate, reprint, modify or send the user's guide either in whole or in ...to whether or not you do not agree to , and accept the terms of the user's guide only for any damage such as EPSON). EPSON grants you agree to the "LICENSE AGREEMENT", please do not utilize this user's guide without the prior written consent of using it. ...
...change or modify this downloading service. Please read carefully the following "LICENSE AGREEMENT" before using the EPSON projector. Downloading the User's Guide indicates your own risk. You expressly acknowledge and agree that EPSON may not duplicate, reprint, modify or send the user's guide either in whole or in ...to whether or not you do not agree to , and accept the terms of the user's guide only for any damage such as EPSON). EPSON grants you agree to the "LICENSE AGREEMENT", please do not utilize this user's guide without the prior written consent of using it. ...

Installation Guide - ELPMBUNI Universal Mount Assembly
Page 2
... ...- 3 Contact Premier Mounts ...- 3 Warning Statements ...- 4 Parts List ...- 5 Installation Tools ...- 5 ELPMBUNI Universal Mount Assembly ...- 6 Projector Preparation ...- 7 Securing the Bracket to the Projector ...- 9 Leveling the Mounting bracket ...- 14 Securing the Upper Assembly Ceiling Plate...- 15 Low-Profile Installation ...- 16 Securing the... Projector to mounts, adapters, display equipment or personal injury. Warranty Limited Lifetime Warranty All Premier Mounts products ...
... ...- 3 Contact Premier Mounts ...- 3 Warning Statements ...- 4 Parts List ...- 5 Installation Tools ...- 5 ELPMBUNI Universal Mount Assembly ...- 6 Projector Preparation ...- 7 Securing the Bracket to the Projector ...- 9 Leveling the Mounting bracket ...- 14 Securing the Upper Assembly Ceiling Plate...- 15 Low-Profile Installation ...- 16 Securing the... Projector to mounts, adapters, display equipment or personal injury. Warranty Limited Lifetime Warranty All Premier Mounts products ...

Installation Guide - ELPMBUNI Universal Mount Assembly
Page 3
... is to vibration, movement or chance of direct heat energy. If the mount is to do so could increase the risk of the projector. FAILURE TO DO SO COULD RESULT IN SERIOUS PERSONAL INJURY. WARNING: PRIOR TO THE INSTALLATION OF THIS PRODUCT, THE INSTALLATION INSTRUCTIONS SHOULD ... least two qualified people should perform the installation procedure. Failure to do so may result in damage to the projector and could result in damage to the projector and/or damage to installation. THE INSTALLATION INSTRUCTIONS MUST BE READ TO PREVENT PERSONAL INJURY AND PROPERTY DAMAGE. Safety...
... is to vibration, movement or chance of direct heat energy. If the mount is to do so could increase the risk of the projector. FAILURE TO DO SO COULD RESULT IN SERIOUS PERSONAL INJURY. WARNING: PRIOR TO THE INSTALLATION OF THIS PRODUCT, THE INSTALLATION INSTRUCTIONS SHOULD ... least two qualified people should perform the installation procedure. Failure to do so may result in damage to the projector and could result in damage to the projector and/or damage to installation. THE INSTALLATION INSTRUCTIONS MUST BE READ TO PREVENT PERSONAL INJURY AND PROPERTY DAMAGE. Safety...

Installation Guide - ELPMBUNI Universal Mount Assembly
Page 4
... (Qty 4) M6 x 12mm Security Head Screws (Qty 4) Portable Drill Pencil Level (Supplied) Stud Finder (Commercially Available) M5 Allen Wrench NOTE: Mounting screws will vary by projector. If there are missing and/or damaged before beginning installation.
... (Qty 4) M6 x 12mm Security Head Screws (Qty 4) Portable Drill Pencil Level (Supplied) Stud Finder (Commercially Available) M5 Allen Wrench NOTE: Mounting screws will vary by projector. If there are missing and/or damaged before beginning installation.

Installation Guide - ELPMBUNI Universal Mount Assembly
Page 5
... number of mounting points found on the bottom of single and dual legs together as single leg or any combination C of your projector for filter and lamp access. ELPMBUNI Universal Mount Assembly A Single Wooden Stud Mounting Points B Solid Structure Mounting Points C Ceiling Plate... Allen Wrench E Height Adjustment Screws F Tension Knobs G Safety Knob H Security Screws I Leveling Barrels J Universal Mounting Bracket K Leg Assembly L Projector (Not Supplied) M Tri-Lock Opening Option 1 H B D F Combination I Leg Single Leg D Option 2 M NOTE: See the best configuration for your...
... number of mounting points found on the bottom of single and dual legs together as single leg or any combination C of your projector for filter and lamp access. ELPMBUNI Universal Mount Assembly A Single Wooden Stud Mounting Points B Solid Structure Mounting Points C Ceiling Plate... Allen Wrench E Height Adjustment Screws F Tension Knobs G Safety Knob H Security Screws I Leveling Barrels J Universal Mounting Bracket K Leg Assembly L Projector (Not Supplied) M Tri-Lock Opening Option 1 H B D F Combination I Leg Single Leg D Option 2 M NOTE: See the best configuration for your...

Installation Guide - ELPMBUNI Universal Mount Assembly
Page 6
...as outlined in the installation instructions must be adhered to. Most projectors have either three or four mounting points and are M4 in serious personal injury and possible damage to the projector. ELPMBUNI Projector Preparation WARNING: Proper installation procedure by qualified personnel as (distance from... the screen to the lens of the projector, top of the lens placement to the top screen etc. ...
...as outlined in the installation instructions must be adhered to. Most projectors have either three or four mounting points and are M4 in serious personal injury and possible damage to the projector. ELPMBUNI Projector Preparation WARNING: Proper installation procedure by qualified personnel as (distance from... the screen to the lens of the projector, top of the lens placement to the top screen etc. ...

Installation Guide - ELPMBUNI Universal Mount Assembly
Page 7
Next loosen the safety screw knurl knob far enough to allow the two parts to create free play between the bracket tri-lock assembly and the upper section tri-lock assembly points. 5. Figure 2 Tri-Lock Opening Rotate 180° To Unlock Tension Knobs Upper Assembly Safety Knob Figure 3 Figure 4 Page - 8 - ELPMBUNI 4. Installation Manual Separate the upper assembly from the projector mounting bracket by slightly loosening the two tension knurl knobs to be rotated 180° apart and separate.
Next loosen the safety screw knurl knob far enough to allow the two parts to create free play between the bracket tri-lock assembly and the upper section tri-lock assembly points. 5. Figure 2 Tri-Lock Opening Rotate 180° To Unlock Tension Knobs Upper Assembly Safety Knob Figure 3 Figure 4 Page - 8 - ELPMBUNI 4. Installation Manual Separate the upper assembly from the projector mounting bracket by slightly loosening the two tension knurl knobs to be rotated 180° apart and separate.

Installation Guide - ELPMBUNI Universal Mount Assembly
Page 8
... the M3 x 16 Phillips screws with the flat washers attached through the leveling barrel. Select the mounting hardware that your projector requires and loosely install the universal mount to adjust the height of the mounting bracket. Page - 9 - Insert the M3 x 16 Phillips screws with the ...: The two-piece mounting legs are designed to allow routing of the legs around critical ventilation screens on the bottom of the projector and use the appropriate number of mounting legs. 2. Using a Phillips screwdriver, loosely secure the screws to the mounting points. You may also reduce the two...
... the M3 x 16 Phillips screws with the flat washers attached through the leveling barrel. Select the mounting hardware that your projector requires and loosely install the universal mount to adjust the height of the mounting bracket. Page - 9 - Insert the M3 x 16 Phillips screws with the ...: The two-piece mounting legs are designed to allow routing of the legs around critical ventilation screens on the bottom of the projector and use the appropriate number of mounting legs. 2. Using a Phillips screwdriver, loosely secure the screws to the mounting points. You may also reduce the two...

Installation Guide - ELPMBUNI Universal Mount Assembly
Page 9
PowerLite S3, S4, 62C, 76C, 82C, Hardware: M4 x 12mm (Qty 3) Page - 10 - PowerLite 830p, 835p Hardware: M4 x 12mm (Qty 4) Installation Manual ELPMBUNI NOTE: If your projector model is not shown, when arranging the leg combination, simply ensure access to filters and lamp housings when aligning brackets. This mount works with all sub-25 pound projectors.
PowerLite S3, S4, 62C, 76C, 82C, Hardware: M4 x 12mm (Qty 3) Page - 10 - PowerLite 830p, 835p Hardware: M4 x 12mm (Qty 4) Installation Manual ELPMBUNI NOTE: If your projector model is not shown, when arranging the leg combination, simply ensure access to filters and lamp housings when aligning brackets. This mount works with all sub-25 pound projectors.

Installation Guide - ELPMBUNI Universal Mount Assembly
Page 13
... that it avoids most, if not all, ventilation points (including lamp & filter access doors). 2. Installation Manual Rotate the leveling barrels to the projector then tighten the hex head leg screws with the Allen wrench (supplied) (Figure 8 and Figure 9). Failure to do not over-tighten the mounting... hardware. Allen Wrench Level Inverted Projector DOWN UP Adjusting the Mount Figure 8 Leveling Barrels Page - 14 - CAUTION: Secure but do so will result in damaging the threads in the...
... that it avoids most, if not all, ventilation points (including lamp & filter access doors). 2. Installation Manual Rotate the leveling barrels to the projector then tighten the hex head leg screws with the Allen wrench (supplied) (Figure 8 and Figure 9). Failure to do not over-tighten the mounting... hardware. Allen Wrench Level Inverted Projector DOWN UP Adjusting the Mount Figure 8 Leveling Barrels Page - 14 - CAUTION: Secure but do so will result in damaging the threads in the...

Installation Guide - ELPMBUNI Universal Mount Assembly
Page 14
...centered horizontally on your installation environment (Figure 9). Page - 15 - ELPMBUNI Securing the Upper Assembly Ceiling Plate 1. Locate the inverted projectors top of the lens point to parallel with other (commercially available) hardware depending on the screen and no higher then the top ...(ELPMBSEC), please refer to the security kit installation guide before attaching the ceiling plate to the center of the projector. Before you mount your projector's distance calculation to determine what distance is normally better to determine the proper placement of the center of the ...
...centered horizontally on your installation environment (Figure 9). Page - 15 - ELPMBUNI Securing the Upper Assembly Ceiling Plate 1. Locate the inverted projectors top of the lens point to parallel with other (commercially available) hardware depending on the screen and no higher then the top ...(ELPMBSEC), please refer to the security kit installation guide before attaching the ceiling plate to the center of the projector. Before you mount your projector's distance calculation to determine what distance is normally better to determine the proper placement of the center of the ...

Installation Guide - ELPMBUNI Universal Mount Assembly
Page 17
... to lock the mounting bracket to the upper assembly Insert universal bracket to the tri-lock, then rotate the projector 180° Universal Mount Page - 18 - ELPMBUNI Securing the Projector to the upper assembly. Safety Knurl Knob Tension Knurl Knobs Figure 13 Tri-Lock Opening Alignment Slot... slot must be in the base of the upper assembly. 3. NOTE: Follow the number sequence prior to securing the projector to the Upper Assembly 1. Once inserted rotate the projector and mounting bracket 180° and secure the rear safety knob first to the "tri-lock" mounting plate in direct...
... to lock the mounting bracket to the upper assembly Insert universal bracket to the tri-lock, then rotate the projector 180° Universal Mount Page - 18 - ELPMBUNI Securing the Projector to the upper assembly. Safety Knurl Knob Tension Knurl Knobs Figure 13 Tri-Lock Opening Alignment Slot... slot must be in the base of the upper assembly. 3. NOTE: Follow the number sequence prior to securing the projector to the Upper Assembly 1. Once inserted rotate the projector and mounting bracket 180° and secure the rear safety knob first to the "tri-lock" mounting plate in direct...

Installation Guide - ELPMBUNI Universal Mount Assembly
Page 18
...). The height can now proceed with the final height, tilt, and roll and yaw to the projector you can be adjusted by slightly loosening the two 8mm height adjustment screws and raising or lowering the projector (Figure 14). 3. Once the height is needed to square the images on and signal supplied to... optimize the projected image. 2. With the projector secured in the mount and power on the screen, slightly loosen the front and rear M8 screws and adjust to the screen and firmly tighten ...
...). The height can now proceed with the final height, tilt, and roll and yaw to the projector you can be adjusted by slightly loosening the two 8mm height adjustment screws and raising or lowering the projector (Figure 14). 3. Once the height is needed to square the images on and signal supplied to... optimize the projected image. 2. With the projector secured in the mount and power on the screen, slightly loosen the front and rear M8 screws and adjust to the screen and firmly tighten ...

Product Brochure
Page 1
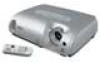
... dedicated toll-free support line available from 6 a.m. With smooth video playback, on and -off the projector and unplug it 's always ready to view more with the Epson PowerLite S3. weighs just 5.6 lb • For color-rich presentations in well-lit rooms. And, specialized color modes mean you get the most vibrant images, whatever the...
... dedicated toll-free support line available from 6 a.m. With smooth video playback, on and -off the projector and unplug it 's always ready to view more with the Epson PowerLite S3. weighs just 5.6 lb • For color-rich presentations in well-lit rooms. And, specialized color modes mean you get the most vibrant images, whatever the...
Product Brochure
Page 2
... mouse/keyboard control) Security Kensington®-style lock provision Warranty Two-year limited warranty, 90-day lamp warranty, Epson Road Service Program and Epson PrivateLine dedicated toll-free support (U.S. Product/Accessory Part Numbers Epson PowerLite S3 projector Replacement lamp Air filter set Universal ceiling mount Suspension adapter False ceiling plate Adjustable ceiling channel (ceiling plate not...
... mouse/keyboard control) Security Kensington®-style lock provision Warranty Two-year limited warranty, 90-day lamp warranty, Epson Road Service Program and Epson PrivateLine dedicated toll-free support (U.S. Product/Accessory Part Numbers Epson PowerLite S3 projector Replacement lamp Air filter set Universal ceiling mount Suspension adapter False ceiling plate Adjustable ceiling channel (ceiling plate not...

Product Information Guide
Page 1
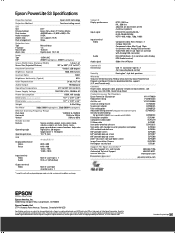
Epson PowerLite S3 Projector Projector Parts Lamp cover Control panel Focus ring Infrared receiver for remote control Foot Ventilation outlets Foot ... AC inlet Audio Speaker Infrared receiver for remote control input Air filter (air intake vent) Foot Foot lever Ceiling mount holes Projector Specifications General Type of display Poly-silicon Thin Film Transistor (TFT) active matrix with Micro Lens Array Size of liquid crystal ...135W Lamp life About 2000 hours (high brightness) About 3000 hours (low brightness) Part number V13H010L33 3/05 Epson PowerLite S3 Projector - 1
Epson PowerLite S3 Projector Projector Parts Lamp cover Control panel Focus ring Infrared receiver for remote control Foot Ventilation outlets Foot ... AC inlet Audio Speaker Infrared receiver for remote control input Air filter (air intake vent) Foot Foot lever Ceiling mount holes Projector Specifications General Type of display Poly-silicon Thin Film Transistor (TFT) active matrix with Micro Lens Array Size of liquid crystal ...135W Lamp life About 2000 hours (high brightness) About 3000 hours (low brightness) Part number V13H010L33 3/05 Epson PowerLite S3 Projector - 1
Product Information Guide
Page 2
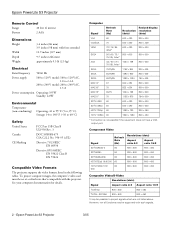
Epson PowerLite S3 Projector Remote Control Range 20 feet (6 meters) Battery 2 AAA Dimensions Height Width Depth Weight 3.4 inches (86 mm) 3.9 inches (98 mm) with the projector. See your computer documentation for details. Computer Signal Refresh Rate (Hz) Resolution (dots) Resized ...95° F (5 to 35° C), Storage: 14 to 140° F (-10 to project signals which are not listed above. Epson PowerLite S3 Projector 3/05 However, not all functions may be supported with such signals. 2 - Component Video Signal Refresh Rate (Hz) Resolutions (dots) Aspect ratio...
Epson PowerLite S3 Projector Remote Control Range 20 feet (6 meters) Battery 2 AAA Dimensions Height Width Depth Weight 3.4 inches (86 mm) 3.9 inches (98 mm) with the projector. See your computer documentation for details. Computer Signal Refresh Rate (Hz) Resolution (dots) Resized ...95° F (5 to 35° C), Storage: 14 to 140° F (-10 to project signals which are not listed above. Epson PowerLite S3 Projector 3/05 However, not all functions may be supported with such signals. 2 - Component Video Signal Refresh Rate (Hz) Resolutions (dots) Aspect ratio...
Product Information Guide
Page 3
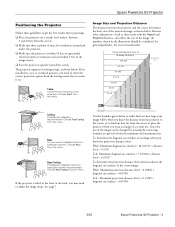
...0.09198 Tele : Maximum projection distance (feet) = 0.13285 × diagonal size (inches) - 0.09198 3/05 Epson PowerLite S3 Projector - 3 Distance from the screen to place the projector when you know the diagonal size (inches) of a certain size. Rear For permanent installation behind a translucent screen ...within 5 feet of the projected image, as shown below. Epson PowerLite S3 Projector Positioning the Projector Follow these guidelines to get the best results when projecting: ❏ Place the projector on . Image Size and Projection Distance The distance between ...
...0.09198 Tele : Maximum projection distance (feet) = 0.13285 × diagonal size (inches) - 0.09198 3/05 Epson PowerLite S3 Projector - 3 Distance from the screen to place the projector when you know the diagonal size (inches) of a certain size. Rear For permanent installation behind a translucent screen ...within 5 feet of the projected image, as shown below. Epson PowerLite S3 Projector Positioning the Projector Follow these guidelines to get the best results when projecting: ❏ Place the projector on . Image Size and Projection Distance The distance between ...
Product Information Guide
Page 4
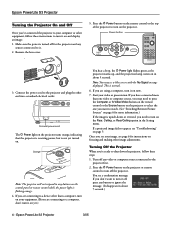
... the control panel or remote control while the power light is flashing orange. 4. Epson PowerLite S3 Projector 3/05 Connect the power cord to the projector and plug the other image adjustments. Turning Off the Projector When you're ready to shut down or reversed, you need to press the Computer... a projected image fails to turn on the Rear, Ceiling, or Rear/Ceiling option in the Setting menu. Epson PowerLite S3 Projector Turning the Projector On and Off Once you've connected the projector to your equipment. (If you are connecting to a computer, don't turn it on yet.) You hear a ...
... the control panel or remote control while the power light is flashing orange. 4. Epson PowerLite S3 Projector 3/05 Connect the power cord to the projector and plug the other image adjustments. Turning Off the Projector When you're ready to shut down or reversed, you need to press the Computer... a projected image fails to turn on the Rear, Ceiling, or Rear/Ceiling option in the Setting menu. Epson PowerLite S3 Projector Turning the Projector On and Off Once you've connected the projector to your equipment. (If you are connecting to a computer, don't turn it on yet.) You hear a ...

Product Information Guide
Page 5
...174; X: 1. It may have dual monitor support, you display on top of the projector to select your notebook's manual or online help for the projector to extend your screen.) 4. Click here 3/05 Epson PowerLite S3 Projector - 5 Caution: Do not disconnect the power cord while the power light is off.... Then press the P Power button. 4. To display the entire desktop on your Windows desktop in the lower corner of the other. Epson PowerLite S3 Projector 3. Unplug the power cord from the Apple® menu and click Displays. 2. If you don't see a blank screen or the ...
...174; X: 1. It may have dual monitor support, you display on top of the projector to select your notebook's manual or online help for the projector to extend your screen.) 4. Click here 3/05 Epson PowerLite S3 Projector - 5 Caution: Do not disconnect the power cord while the power light is off.... Then press the P Power button. 4. To display the entire desktop on your Windows desktop in the lower corner of the other. Epson PowerLite S3 Projector 3. Unplug the power cord from the Apple® menu and click Displays. 2. If you don't see a blank screen or the ...


