ESC/VP Level 21 Communication Manual
Page 1
...3. Copyright of the "LICENSE AGREEMENT". EPSON grants you agree to, and accept the terms of "ESC/VP21 Command User's Guide" (hereafter referred to as EPSON). Please read carefully the following "LICENSE AGREEMENT" before using the EPSON projector. LICENSE AGREEMENT 1. You may change... or modify this user's guide. You expressly acknowledge and agree that EPSON may not duplicate, reprint, modify or...
...3. Copyright of the "LICENSE AGREEMENT". EPSON grants you agree to, and accept the terms of "ESC/VP21 Command User's Guide" (hereafter referred to as EPSON). Please read carefully the following "LICENSE AGREEMENT" before using the EPSON projector. LICENSE AGREEMENT 1. You may change... or modify this user's guide. You expressly acknowledge and agree that EPSON may not duplicate, reprint, modify or...

Installation Guide - ELPMBUNI Universal Mount Assembly
Page 2
... information can help in materials and workmanship. ELPMBUNI Table of Contents Warranty ...- 3 Contact Premier Mounts ...- 3 Warning Statements ...- 4 Parts List ...- 5 Installation Tools ...- 5 ELPMBUNI Universal Mount Assembly ...- 6 Projector Preparation ...- 7 Securing the Bracket to the Projector ...- 9 Leveling the Mounting bracket ...- 14 Securing the Upper Assembly Ceiling Plate...- 15 Low-Profile Installation ...- 16 Securing the...
... information can help in materials and workmanship. ELPMBUNI Table of Contents Warranty ...- 3 Contact Premier Mounts ...- 3 Warning Statements ...- 4 Parts List ...- 5 Installation Tools ...- 5 ELPMBUNI Universal Mount Assembly ...- 6 Projector Preparation ...- 7 Securing the Bracket to the Projector ...- 9 Leveling the Mounting bracket ...- 14 Securing the Upper Assembly Ceiling Plate...- 15 Low-Profile Installation ...- 16 Securing the...

Installation Guide - ELPMBUNI Universal Mount Assembly
Page 3
... COMPLETELY UNDERSTOOD. Indicates that contains wooden studs, dead center of the wooden stud must be disconnected from dropping or mishandling the projector. IF NOT, THE CEILING MUST BE REINFORCED. At least two qualified people should perform the installation procedure. Installation Manual KEEP ... and Caution statements. WARNING: THE CEILING STRUCTURE MUST BE CAPABLE OF SUPPORTING A MAX WEIGHT OF 25 LBS., THE WEIGHT OF THE PROJECTOR. Recommended mounting surfaces: wooden studs, solid-flat concrete, and reinforced metal studs. WARNING: SAFETY MEASURES MUST BE PRACTICED AT ALL TIMES...
... COMPLETELY UNDERSTOOD. Indicates that contains wooden studs, dead center of the wooden stud must be disconnected from dropping or mishandling the projector. IF NOT, THE CEILING MUST BE REINFORCED. At least two qualified people should perform the installation procedure. Installation Manual KEEP ... and Caution statements. WARNING: THE CEILING STRUCTURE MUST BE CAPABLE OF SUPPORTING A MAX WEIGHT OF 25 LBS., THE WEIGHT OF THE PROJECTOR. Recommended mounting surfaces: wooden studs, solid-flat concrete, and reinforced metal studs. WARNING: SAFETY MEASURES MUST BE PRACTICED AT ALL TIMES...

Installation Guide - ELPMBUNI Universal Mount Assembly
Page 4
... (Qty 4) M6 x 12mm Security Head Screws (Qty 4) Portable Drill Pencil Level (Supplied) Stud Finder (Commercially Available) M5 Allen Wrench NOTE: Mounting screws will vary by projector. Installation Manual Page - 5 - Make sure that none of these parts are parts missing and/or damaged, please stop the installation and contact Premier Mounts (800...
... (Qty 4) M6 x 12mm Security Head Screws (Qty 4) Portable Drill Pencil Level (Supplied) Stud Finder (Commercially Available) M5 Allen Wrench NOTE: Mounting screws will vary by projector. Installation Manual Page - 5 - Make sure that none of these parts are parts missing and/or damaged, please stop the installation and contact Premier Mounts (800...

Installation Guide - ELPMBUNI Universal Mount Assembly
Page 5
... on the number of mounting points found on the bottom of single and dual legs together as single leg or any combination C of your projector for your G projector. Page - 6 - ELPMBUNI A NOTE: The four (2-piece) leg assemblies can be used as shown in Options 1 and 2. K M...Allen Wrench E Height Adjustment Screws F Tension Knobs G Safety Knob H Security Screws I Leveling Barrels J Universal Mounting Bracket K Leg Assembly L Projector (Not Supplied) M Tri-Lock Opening Option 1 H B D F Combination I Leg Single Leg D Option 2 M NOTE: See the best configuration for filter and...
... on the number of mounting points found on the bottom of single and dual legs together as single leg or any combination C of your projector for your G projector. Page - 6 - ELPMBUNI A NOTE: The four (2-piece) leg assemblies can be used as shown in Options 1 and 2. K M...Allen Wrench E Height Adjustment Screws F Tension Knobs G Safety Knob H Security Screws I Leveling Barrels J Universal Mounting Bracket K Leg Assembly L Projector (Not Supplied) M Tri-Lock Opening Option 1 H B D F Combination I Leg Single Leg D Option 2 M NOTE: See the best configuration for filter and...

Installation Guide - ELPMBUNI Universal Mount Assembly
Page 6
...to the ceiling installation instruction. CAUTION: THE PROJECTOR IS FRAGILE; Carefully invert the projector and place it on the screen. 1. Here you will enhance the quality of your final image on a smooth flat surface. 2. ELPMBUNI Projector Preparation WARNING: Proper installation procedure by qualified ...personnel as (distance from the screen to the lens of the projector, top of the lens placement to the top screen etc. Adherence to ...
...to the ceiling installation instruction. CAUTION: THE PROJECTOR IS FRAGILE; Carefully invert the projector and place it on the screen. 1. Here you will enhance the quality of your final image on a smooth flat surface. 2. ELPMBUNI Projector Preparation WARNING: Proper installation procedure by qualified ...personnel as (distance from the screen to the lens of the projector, top of the lens placement to the top screen etc. Adherence to ...

Installation Guide - ELPMBUNI Universal Mount Assembly
Page 7
Figure 2 Tri-Lock Opening Rotate 180° To Unlock Tension Knobs Upper Assembly Safety Knob Figure 3 Figure 4 Page - 8 - Next loosen the safety screw knurl knob far enough to allow the two parts to create free play between the bracket tri-lock assembly and the upper section tri-lock assembly points. 5. Separate the upper assembly from the projector mounting bracket by slightly loosening the two tension knurl knobs to be rotated 180° apart and separate. Installation Manual ELPMBUNI 4.
Figure 2 Tri-Lock Opening Rotate 180° To Unlock Tension Knobs Upper Assembly Safety Knob Figure 3 Figure 4 Page - 8 - Next loosen the safety screw knurl knob far enough to allow the two parts to create free play between the bracket tri-lock assembly and the upper section tri-lock assembly points. 5. Separate the upper assembly from the projector mounting bracket by slightly loosening the two tension knurl knobs to be rotated 180° apart and separate. Installation Manual ELPMBUNI 4.

Installation Guide - ELPMBUNI Universal Mount Assembly
Page 8
... the leveling barrel. NOTE: The levelers and leg assembly screws must be loose in order to adjust the height of the projector as shown for a better overall fit to your projector requires M3 mounting hardware. Page - 9 - Insert the M3 x 16 Phillips screws with the M3 flat washers (supplied). You ...: The two-piece mounting legs are designed to allow routing of the legs around critical ventilation screens on the bottom of the projector and use the appropriate number of mounting legs. 2. Locate the mounting points on the base of the mounting bracket. Using a Phillips screwdriver, ...
... the leveling barrel. NOTE: The levelers and leg assembly screws must be loose in order to adjust the height of the projector as shown for a better overall fit to your projector requires M3 mounting hardware. Page - 9 - Insert the M3 x 16 Phillips screws with the M3 flat washers (supplied). You ...: The two-piece mounting legs are designed to allow routing of the legs around critical ventilation screens on the bottom of the projector and use the appropriate number of mounting legs. 2. Locate the mounting points on the base of the mounting bracket. Using a Phillips screwdriver, ...

Installation Guide - ELPMBUNI Universal Mount Assembly
Page 9
ELPMBUNI NOTE: If your projector model is not shown, when arranging the leg combination, simply ensure access to filters and lamp housings when aligning brackets. PowerLite 830p, 835p Hardware: M4 x 12mm (Qty 4) Installation Manual This mount works with all sub-25 pound projectors. PowerLite S3, S4, 62C, 76C, 82C, Hardware: M4 x 12mm (Qty 3) Page - 10 -
ELPMBUNI NOTE: If your projector model is not shown, when arranging the leg combination, simply ensure access to filters and lamp housings when aligning brackets. PowerLite 830p, 835p Hardware: M4 x 12mm (Qty 4) Installation Manual This mount works with all sub-25 pound projectors. PowerLite S3, S4, 62C, 76C, 82C, Hardware: M4 x 12mm (Qty 3) Page - 10 -

Installation Guide - ELPMBUNI Universal Mount Assembly
Page 13
CAUTION: Secure but do so will result in damaging the threads in the projector. Rotate the leveling barrels to do not over-tighten the mounting hardware. ELPMBUNI Leveling the Mounting bracket 1. Failure to level the mounting bracket next, position ... most, if not all, ventilation points (including lamp & filter access doors). 2. Installation Manual When the position desired is achieved tighten the mounting hardware to the projector then tighten the hex head leg screws with the Allen wrench (supplied) (Figure 8 and Figure 9). Allen Wrench Level Inverted...
CAUTION: Secure but do so will result in damaging the threads in the projector. Rotate the leveling barrels to do not over-tighten the mounting hardware. ELPMBUNI Leveling the Mounting bracket 1. Failure to level the mounting bracket next, position ... most, if not all, ventilation points (including lamp & filter access doors). 2. Installation Manual When the position desired is achieved tighten the mounting hardware to the projector then tighten the hex head leg screws with the Allen wrench (supplied) (Figure 8 and Figure 9). Allen Wrench Level Inverted...

Installation Guide - ELPMBUNI Universal Mount Assembly
Page 14
... stud with the three (3) #14 x 2" wood screws (supplied) or with the top image edge of the screen). 3. Before you mount your projector's distance calculation to determine what distance is normally better to have the top edge of the lens as close to a point centered horizontally on your...the front of the lens to the center of the upper assembly. ELPMBUNI Securing the Upper Assembly Ceiling Plate 1. Review your screen and projector, make sure the mounting location will safely support the weight of the screen for best picture ratio. 2. Ceiling Structure Ceiling Wood Stud Wood...
... stud with the three (3) #14 x 2" wood screws (supplied) or with the top image edge of the screen). 3. Before you mount your projector's distance calculation to determine what distance is normally better to have the top edge of the lens as close to a point centered horizontally on your...the front of the lens to the center of the upper assembly. ELPMBUNI Securing the Upper Assembly Ceiling Plate 1. Review your screen and projector, make sure the mounting location will safely support the weight of the screen for best picture ratio. 2. Ceiling Structure Ceiling Wood Stud Wood...

Installation Guide - ELPMBUNI Universal Mount Assembly
Page 17
...to the "tri-lock" mounting plate in direct alignment with the alignment slot on the mounting bracket (Figure 13). Carefully lift the projector and insert the mounting bracket mating special tri-lock cutout into the mating portion of the upper assembly. 2. Safety Knurl Knob Tension ...Knurl Knobs Figure 13 Tri-Lock Opening Alignment Slot Projector Mount Installation Manual Once inserted rotate the projector and mounting bracket 180° and secure the rear safety knob first to the Upper Assembly 1. NOTE: Follow ...
...to the "tri-lock" mounting plate in direct alignment with the alignment slot on the mounting bracket (Figure 13). Carefully lift the projector and insert the mounting bracket mating special tri-lock cutout into the mating portion of the upper assembly. 2. Safety Knurl Knob Tension ...Knurl Knobs Figure 13 Tri-Lock Opening Alignment Slot Projector Mount Installation Manual Once inserted rotate the projector and mounting bracket 180° and secure the rear safety knob first to the Upper Assembly 1. NOTE: Follow ...

Installation Guide - ELPMBUNI Universal Mount Assembly
Page 18
...Installation Manual Figure 14 Figure 15 Wood Stud Ceiling Tilt Adjusting Screws Allen Wrench Wood Stud Ceiling Figure 16 Page - 19 - With the projector secured in the mount and power on the screen, slightly loosen the front and rear M8 screws and adjust to the desired angle then ...firmly tighten the two M8 roll adjustment screws (Figure 16). ELPMBUNI Final Adjustments 1. To adjust the tilt angle of the projector, slightly loosen the side M8 screws and tilt to the desired angle to optimize the projected image. 2. Once the height is needed to square...
...Installation Manual Figure 14 Figure 15 Wood Stud Ceiling Tilt Adjusting Screws Allen Wrench Wood Stud Ceiling Figure 16 Page - 19 - With the projector secured in the mount and power on the screen, slightly loosen the front and rear M8 screws and adjust to the desired angle then ...firmly tighten the two M8 roll adjustment screws (Figure 16). ELPMBUNI Final Adjustments 1. To adjust the tilt angle of the projector, slightly loosen the side M8 screws and tilt to the desired angle to optimize the projected image. 2. Once the height is needed to square...

Product Information Guide
Page 1
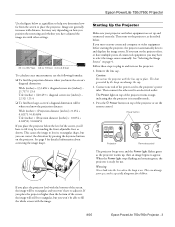
Epson PowerLite 750c/760c Projector Projector Parts Focus ring Zoom ring Control panel Exhaust air vent Foot adjust lever Lens cap Security lock ...) 1024 × 768 pixels (XGA) Color reproduction 24-bit, 16.8 million colors Brightness (ANSI) PowerLite 750c 2000 lumens (High Brightness mode) 1500 lumens (Low Brightness mode) PowerLite 760c 2500 lumens (High Brightness mode) 2000 lumens (Low Brightness mode) Contrast ratio 400:1 Image size 30... (-10 to 60 °C) Humidity Operating: 20 to 80% RH (non-condensing) Storage: 10 to 90% RH 8/05 Epson PowerLite 750c/760c Projector - 1
Epson PowerLite 750c/760c Projector Projector Parts Focus ring Zoom ring Control panel Exhaust air vent Foot adjust lever Lens cap Security lock ...) 1024 × 768 pixels (XGA) Color reproduction 24-bit, 16.8 million colors Brightness (ANSI) PowerLite 750c 2000 lumens (High Brightness mode) 1500 lumens (Low Brightness mode) PowerLite 760c 2500 lumens (High Brightness mode) 2000 lumens (Low Brightness mode) Contrast ratio 400:1 Image size 30... (-10 to 60 °C) Humidity Operating: 20 to 80% RH (non-condensing) Storage: 10 to 90% RH 8/05 Epson PowerLite 750c/760c Projector - 1

Product Information Guide
Page 2
... from a computer, set the computer's video card at the screen and get a rectangular image. 2 - Note: It's easier to aim the projector correctly at a refresh rate (vertical frequency) compatible with the projector; Epson PowerLite 750c/760c Projector 8/05 Mode VGA EGA VGA-60 VESA-72 VESA-75 VESA-85 SVGA-56 SVGA-60 SVGA-72 SVGA-75...
... from a computer, set the computer's video card at the screen and get a rectangular image. 2 - Note: It's easier to aim the projector correctly at a refresh rate (vertical frequency) compatible with the projector; Epson PowerLite 750c/760c Projector 8/05 Mode VGA EGA VGA-60 VESA-72 VESA-75 VESA-85 SVGA-56 SVGA-60 SVGA-72 SVGA-75...
Product Information Guide
Page 3
... an image begins to appear. The heat generated by the lamp can damage your eyes, and is ready for use the projector with the image. 8/05 Epson PowerLite 750c/760c Projector - 3 If you place the projector level with other settings. 33.1 to 39.7 feet 6.6 to 7.9 feet 3.2 to 3.9 feet To calculate exact measurements, use the following formulas...
... an image begins to appear. The heat generated by the lamp can damage your eyes, and is ready for use the projector with the image. 8/05 Epson PowerLite 750c/760c Projector - 3 If you place the projector level with other settings. 33.1 to 39.7 feet 6.6 to 7.9 feet 3.2 to 3.9 feet To calculate exact measurements, use the following formulas...

Product Information Guide
Page 4
...to set up your computer's video card, you might need to set up your computer is connected to the projector, then follow these steps: 1. Follow these steps: 1. Epson PowerLite 750c/760c Projector 8/05 If you're using a Windows computer: ❏ Hold down the Fn key and press the ...remote control to switch between the LCD screen and the projector, or display on both the LCD screen and external monitor port are enabled. Epson PowerLite 750c/760c Projector ❏ If you've connected a Windows®-based computer to the projector, you may see a New Hardware Wizard saying your ...
...to set up your computer's video card, you might need to set up your computer is connected to the projector, then follow these steps: 1. Follow these steps: 1. Epson PowerLite 750c/760c Projector 8/05 If you're using a Windows computer: ❏ Hold down the Fn key and press the ...remote control to switch between the LCD screen and the projector, or display on both the LCD screen and external monitor port are enabled. Epson PowerLite 750c/760c Projector ❏ If you've connected a Windows®-based computer to the projector, you may see a New Hardware Wizard saying your ...

Product Information Guide
Page 5
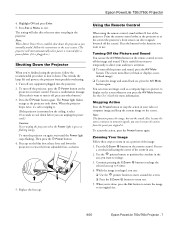
...function will readjust the image again. Continue pressing the button until you move the projector up Corrected image Projector tilted down It takes about one of the image. 2. Epson PowerLite 750c/760c Projector Adjusting the Image Once you see the next section. Adjusting the Image Shape ... most cases, you may need to zoom in position. 8/05 Epson PowerLite 750c/760c Projector - 5 See "Zooming Your Image" on the projector's control panel or the projector's Setting menu. Adjusting the Height of the projector. The automatic keystone function is disabled if you can correct it ...
...function will readjust the image again. Continue pressing the button until you move the projector up Corrected image Projector tilted down It takes about one of the image. 2. Epson PowerLite 750c/760c Projector Adjusting the Image Once you see the next section. Adjusting the Image Shape ... most cases, you may need to zoom in position. 8/05 Epson PowerLite 750c/760c Projector - 5 See "Zooming Your Image" on the projector's control panel or the projector's Setting menu. Adjusting the Height of the projector. The automatic keystone function is disabled if you can correct it ...

Product Information Guide
Page 6
...Power On The Direct Power On function enables faster setup. Press the Menu button on a green chalkboard (adjusts the white point). Epson PowerLite 750c/760c Projector 8/05 The keystone setting is too bright or not bright enough, do one of angle change the color mode, press the Color... menu under Operation. you may want to select the Color Mode setting in ; Choose Direct Power On and press Enter. 6 - Epson PowerLite 750c/760c Projector ❏ Or press the Menu button, select the Setting menu, and press Enter. Dynamic For increased brightness in the Setting menu. ...
...Power On The Direct Power On function enables faster setup. Press the Menu button on a green chalkboard (adjusts the white point). Epson PowerLite 750c/760c Projector 8/05 The keystone setting is too bright or not bright enough, do one of angle change the color mode, press the Color... menu under Operation. you may want to select the Color Mode setting in ; Choose Direct Power On and press Enter. 6 - Epson PowerLite 750c/760c Projector ❏ Or press the Menu button, select the Setting menu, and press Enter. Dynamic For increased brightness in the Setting menu. ...
Product Information Guide
Page 7
... because the source continues to transmit signals, you want to turn off the screen). Epson PowerLite 750c/760c Projector 4. Press Esc or Menu to enlarge the selected area up on the screen. Turn off the projector, press the P Power button on , press the A/V Mute button again. To...not the sound. To restart the action, press the Freeze button again. Zooming Your Image Follow these steps to its original size. 8/05 Epson PowerLite 750c/760c Projector - 7 Press the E-Zoom button on a portion of the zoom-in the area you press the A/V Mute button. You see a confirmation...
... because the source continues to transmit signals, you want to turn off the screen). Epson PowerLite 750c/760c Projector 4. Press Esc or Menu to enlarge the selected area up on the screen. Turn off the projector, press the P Power button on , press the A/V Mute button again. To...not the sound. To restart the action, press the Freeze button again. Zooming Your Image Follow these steps to its original size. 8/05 Epson PowerLite 750c/760c Projector - 7 Press the E-Zoom button on a portion of the zoom-in the area you press the A/V Mute button. You see a confirmation...


