
Technical Brief (Multimedia Projectors)
Page 2
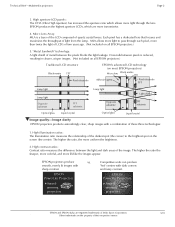
... of quartz crystal lenses. EPSON PowerLite Projectors EPSON Powerlite Projectors ➤ Awardwinning projectors ➤ Awardwinning projectors EPSON Sales Training EPSON and EPSON Stylus are registered trademarks of Seiko Epson Corporation. 3/01 Other trademarks are more light to the brightest spot on all EPSON projectors.) TraTdraitdioitnioanlaLlCLDCDstsrturcutcutruere Black matrix TFT Pixel electrode EPS(OoNn 'msUaoHdsvtAaEnPLcCSeODdNLsCtprDurocjtteeuccrtheonros)logy Micro lens Black matrix ITO Adhesive...
... of quartz crystal lenses. EPSON PowerLite Projectors EPSON Powerlite Projectors ➤ Awardwinning projectors ➤ Awardwinning projectors EPSON Sales Training EPSON and EPSON Stylus are registered trademarks of Seiko Epson Corporation. 3/01 Other trademarks are more light to the brightest spot on all EPSON projectors.) TraTdraitdioitnioanlaLlCLDCDstsrturcutcutruere Black matrix TFT Pixel electrode EPS(OoNn 'msUaoHdsvtAaEnPLcCSeODdNLsCtprDurocjtteeuccrtheonros)logy Micro lens Black matrix ITO Adhesive...
Technical Brief (Multimedia Projectors)
Page 3
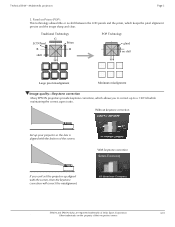
... or no shift between the LCD panels and the prism, which allows you can't set the projector up your projector so the lens is a lig n m e n t Image quality-Keystone correction Many EPSON projectors provide keystone correction, which keeps the pixel alignment precise and the image sharp and clear. Without keystone correction Set up...
... or no shift between the LCD panels and the prism, which allows you can't set the projector up your projector so the lens is a lig n m e n t Image quality-Keystone correction Many EPSON projectors provide keystone correction, which keeps the pixel alignment precise and the image sharp and clear. Without keystone correction Set up...

Installation Guide - ELPMBUNI Universal Mount Assembly
Page 6
... surface Installation Manual Page - 7 - ELPMBUNI Projector Preparation WARNING: Proper installation procedure by qualified personnel as (distance from the screen to the lens of the projector, top of mounting points and screw thread (pitch) size. 3. HANDLE WITH CARE AT ALL TIMES. Carefully invert the projector... and place it on the screen. 1. Identify the number of the lens placement to the projector. CAUTION: THE PROJECTOR IS FRAGILE; Failure to do so could result in thread size (Figure 1). Here you will...
... surface Installation Manual Page - 7 - ELPMBUNI Projector Preparation WARNING: Proper installation procedure by qualified personnel as (distance from the screen to the lens of the projector, top of mounting points and screw thread (pitch) size. 3. HANDLE WITH CARE AT ALL TIMES. Carefully invert the projector... and place it on the screen. 1. Identify the number of the lens placement to the projector. CAUTION: THE PROJECTOR IS FRAGILE; Failure to do so could result in thread size (Figure 1). Here you will...

Installation Guide - ELPMBUNI Universal Mount Assembly
Page 14
... on the screen and no higher then the top image edge of the wood stud. NOTE: Make sure to measure from the front of the lens to determine the proper placement of the center of the screen for best picture ratio. 2. Page - 15 - It is recommended from the center of the... screen and projector, make sure the mounting location will safely support the weight of the screen as close to have the top edge of the lens as well. 4. Secure the ceiling assembly into a solid wood ceiling stud with the three (3) #14 x 2" wood screws (supplied) or with the top image edge of...
... on the screen and no higher then the top image edge of the wood stud. NOTE: Make sure to measure from the front of the lens to determine the proper placement of the center of the screen for best picture ratio. 2. Page - 15 - It is recommended from the center of the... screen and projector, make sure the mounting location will safely support the weight of the screen as close to have the top edge of the lens as well. 4. Secure the ceiling assembly into a solid wood ceiling stud with the three (3) #14 x 2" wood screws (supplied) or with the top image edge of...
Product Brochure
Page 1
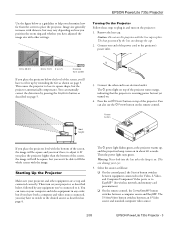
...aperture EPSON LCDs with Micro Lens Array, for rich color saturation across the screen • XGA (1024 x 768) resolution for sharp, vivid detail • 400:1 contrast ratio for blacker blacks and whiter whites Easy setup and operation • Easy-to date, the 4.4 lb EPSON PowerLite® 735c ... HDTV-ready • Optical zoom • Start Here Kit gets first time users projecting in any situation. EPSON® EPSON PowerLite® 735c Wireless Presentation at its newly improved EasyMP™ technology enables convenient PC-free presentations with 802.11b wireless technology.
...aperture EPSON LCDs with Micro Lens Array, for rich color saturation across the screen • XGA (1024 x 768) resolution for sharp, vivid detail • 400:1 contrast ratio for blacker blacks and whiter whites Easy setup and operation • Easy-to date, the 4.4 lb EPSON PowerLite® 735c ... HDTV-ready • Optical zoom • Start Here Kit gets first time users projecting in any situation. EPSON® EPSON PowerLite® 735c Wireless Presentation at its newly improved EasyMP™ technology enables convenient PC-free presentations with 802.11b wireless technology.

Product Brochure
Page 2
... / 5.5W at sleep mode Maximum Dimensions D x W x H (includes lens and feet) (excludes lens and feet) 7.5" x 10.9" x 3.1" 7.5" x 10.9" x 2.7" Weight 4.4 lbs/1.9kg Fan Noise 39db Effective Scanning Frequency Range Pixel Clock Horizontal Vertical 13.5MHz to 162MHz 15KHz to 92KHz 50Hz to change without notice. EPSON PowerLite 735c Specifications Projection System EPSON original LCD prism technology Projection Method Front...
... / 5.5W at sleep mode Maximum Dimensions D x W x H (includes lens and feet) (excludes lens and feet) 7.5" x 10.9" x 3.1" 7.5" x 10.9" x 2.7" Weight 4.4 lbs/1.9kg Fan Noise 39db Effective Scanning Frequency Range Pixel Clock Horizontal Vertical 13.5MHz to 162MHz 15KHz to 92KHz 50Hz to change without notice. EPSON PowerLite 735c Specifications Projection System EPSON original LCD prism technology Projection Method Front...

Product Information Guide
Page 1
EPSON PowerLite 735c Projector Card reader access light Card slot Control panel Security lock Air filter Focus ring Lens cover Zoom ring Foot release lever RC receiver Adjustable foot Computer/ Component Video...General Type of display Poly-silicon Thin Film Transistor (TFT), active matrix Size of LCD panels Diagonal: 0.9 inch (22.9 mm) Lens F=1.9 to 2.1, f=31 to 36 mm Resolution 1024 × 768 pixels (native format) Color reproduction 24 bit, 16.8 million... Operating: 20 to 80% RH, non-condensing Storage: 10 to 90% RH, non-condensing 2/03 EPSON PowerLite 735c Projector - 1
EPSON PowerLite 735c Projector Card reader access light Card slot Control panel Security lock Air filter Focus ring Lens cover Zoom ring Foot release lever RC receiver Adjustable foot Computer/ Component Video...General Type of display Poly-silicon Thin Film Transistor (TFT), active matrix Size of LCD panels Diagonal: 0.9 inch (22.9 mm) Lens F=1.9 to 2.1, f=31 to 36 mm Resolution 1024 × 768 pixels (native format) Color reproduction 24 bit, 16.8 million... Operating: 20 to 80% RH, non-condensing Storage: 10 to 90% RH, non-condensing 2/03 EPSON PowerLite 735c Projector - 1
Product Information Guide
Page 3
... S-Video source and standard composite video source. 2/03 EPSON PowerLite 735c Projector - 3 The heat generated by any order, but if you have both a computer and video source connected, you won 't be able to fill the whole screen with the lens cap in about 40 seconds. The P power light.... If you place the projector higher than the bottom of the projector. Warning: Never look into the lens when the lamp is receiving power but the projector automatically compensates. EPSON PowerLite 735c Projector Use the figure below as a guideline to help you won 't have to adjust it. Then...
... S-Video source and standard composite video source. 2/03 EPSON PowerLite 735c Projector - 3 The heat generated by any order, but if you have both a computer and video source connected, you won 't be able to fill the whole screen with the lens cap in about 40 seconds. The P power light.... If you place the projector higher than the bottom of the projector. Warning: Never look into the lens when the lamp is receiving power but the projector automatically compensates. EPSON PowerLite 735c Projector Use the figure below as a guideline to help you won 't have to adjust it. Then...
Product Information Guide
Page 4
...the LCD screen and external monitor port are connected correctly. ❏ Make sure the power light is green and not flashing and the lens cover is off. ❏ Try restarting your EasyMP presentation, see "Projecting Wirelessly in the Windows® Control Panel to make sure... You may be labeled CRT/LCD. Drag one monitor icon on top of the Simulscan resolution settings: 1. Click here Select a Simulscan resolution 2. EPSON PowerLite 735c Projector 2/03 Allow a few seconds for help. See your laptop's manual or online help for details. Click the Monitor icon if necessary. Check...
...the LCD screen and external monitor port are connected correctly. ❏ Make sure the power light is green and not flashing and the lens cover is off. ❏ Try restarting your EasyMP presentation, see "Projecting Wirelessly in the Windows® Control Panel to make sure... You may be labeled CRT/LCD. Drag one monitor icon on top of the Simulscan resolution settings: 1. Click here Select a Simulscan resolution 2. EPSON PowerLite 735c Projector 2/03 Allow a few seconds for help. See your laptop's manual or online help for details. Click the Monitor icon if necessary. Check...
Product Information Guide
Page 5
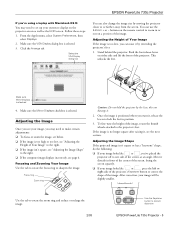
... 2. Stand behind the projector. Follow these steps: 1. Focusing and Zooming Your Image Use the tab to rotate the focus ring to correct distortion EPSON PowerLite 735c Projector - 5 After correction, your image looks like or , press the left or right side of the projector's Keystone button to the projector's ...feet. Make sure the VGA Display dialog box is positioned where you can also change the image size by the lens; Select the VGA Display dialog box You can raise it . 2. Once the image is selected. 3. Adjusting the Height of the image...
... 2. Stand behind the projector. Follow these steps: 1. Focusing and Zooming Your Image Use the tab to rotate the focus ring to correct distortion EPSON PowerLite 735c Projector - 5 After correction, your image looks like or , press the left or right side of the projector's Keystone button to the projector's ...feet. Make sure the VGA Display dialog box is positioned where you can also change the image size by the lens; Select the VGA Display dialog box You can raise it . 2. Once the image is selected. 3. Adjusting the Height of the image...
Product Information Guide
Page 6
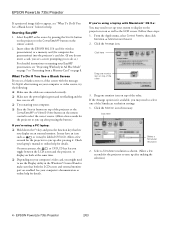
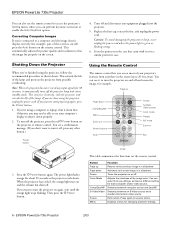
... the lamp. Press again to start projecting again, press the Power button. 1. Menu Displays menus for each computer and/or video source. EPSON PowerLite 735c Projector 2/03 Shutting Down the Projector When you want to turn the projector on the remote control. This conserves electricity, cools the projector, ... lamp and enters standby mode. Turn off , press any input signals for about 90 seconds as the projector cools down first. Replace the lens cap, retract the feet, and unplug the power cord. This extends the life of the screen is green or flashing orange. 6. Note:...
... the lamp. Press again to start projecting again, press the Power button. 1. Menu Displays menus for each computer and/or video source. EPSON PowerLite 735c Projector 2/03 Shutting Down the Projector When you want to turn the projector on the remote control. This conserves electricity, cools the projector, ... lamp and enters standby mode. Turn off , press any input signals for about 90 seconds as the projector cools down first. Replace the lens cap, retract the feet, and unplug the power cord. This extends the life of the screen is green or flashing orange. 6. Note:...

Product Information Guide
Page 11
... and damage the projector. 1. Turn off the projector, allow it to remove or if the filter is not cleaned periodically, it on the lens, use . Caution: To prevent dust from falling into place. 2/03 EPSON PowerLite 735c Projector - 11 If you clean the case, first turn off automatically. If you replace the lamp. 4. Contact...
... and damage the projector. 1. Turn off the projector, allow it to remove or if the filter is not cleaned periodically, it on the lens, use . Caution: To prevent dust from falling into place. 2/03 EPSON PowerLite 735c Projector - 11 If you clean the case, first turn off automatically. If you replace the lamp. 4. Contact...
Start Here Card
Page 1
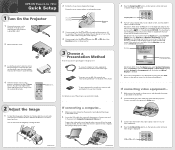
...at an angle. Connect one end to lock the feet in about 40 seconds. Connect the other end into a grounded outlet. 2 Remove the lens cover. 3 Locate the projector's remote control. The Power light flashes green and the projector lamp comes on each side of this option isn't ...the LCD screen and the external monitor port. Release the buttons to the projector's Video port. 3 Connect the other ; If this sheet. EPSON® PowerLite® 735c Quick Setup 2 Rotate the focus ring to the projector? For details on any of the screen at left . 2 Locate the RCA-style ...
...at an angle. Connect one end to lock the feet in about 40 seconds. Connect the other end into a grounded outlet. 2 Remove the lens cover. 3 Locate the projector's remote control. The Power light flashes green and the projector lamp comes on each side of this option isn't ...the LCD screen and the external monitor port. Release the buttons to the projector's Video port. 3 Connect the other ; If this sheet. EPSON® PowerLite® 735c Quick Setup 2 Rotate the focus ring to the projector? For details on any of the screen at left . 2 Locate the RCA-style ...

User Manual
Page 2
... is on. Never let children look into the lens when it is designed only for use with SEIKO EPSON CORPORATION's operating and maintenance instructions. EPSON is turned on the projector, except the lamp and filter covers. SEIKO EPSON CORPORATION shall not be reproduced, stored in a ...cover on ; Important Safety Information WARNING: Never look into the projector lens when the lamp is not responsible for any use of SEIKO EPSON CORPORATION. Caution: When you . and PrivateLine, Presenters Club, and PowerLite are service marks; Copyright © 2003 by the oil on recycled...
... is on. Never let children look into the lens when it is designed only for use with SEIKO EPSON CORPORATION's operating and maintenance instructions. EPSON is turned on the projector, except the lamp and filter covers. SEIKO EPSON CORPORATION shall not be reproduced, stored in a ...cover on ; Important Safety Information WARNING: Never look into the projector lens when the lamp is not responsible for any use of SEIKO EPSON CORPORATION. Caution: When you . and PrivateLine, Presenters Club, and PowerLite are service marks; Copyright © 2003 by the oil on recycled...

User Manual
Page 5
... EMP Monitor 86 Registering a Projector 86 Monitoring and Controlling Your Projectors 88 Using a Browser to Monitor Your Projector 90 Maintaining the Projector 93 Cleaning the Lens 94 Cleaning the Projector Case 94 Cleaning and Replacing the Air Filter 95 Replacing the Lamp 96 Resetting the Lamp Timer 98 Transporting the Projector...
... EMP Monitor 86 Registering a Projector 86 Monitoring and Controlling Your Projectors 88 Using a Browser to Monitor Your Projector 90 Maintaining the Projector 93 Cleaning the Lens 94 Cleaning the Projector Case 94 Cleaning and Replacing the Air Filter 95 Replacing the Lamp 96 Resetting the Lamp Timer 98 Transporting the Projector...

User Manual
Page 16
... source after you 're projecting from overheating. this lets the projector automatically detect the image source. Shutting down the projector, see page 20. Remove the lens cap. 2. Then follow the instructions below . note To shut down the projector correctly prevents premature lamp failure and possible damage from computer or video equipment...
... source after you 're projecting from overheating. this lets the projector automatically detect the image source. Shutting down the projector, see page 20. Remove the lens cap. 2. Then follow the instructions below . note To shut down the projector correctly prevents premature lamp failure and possible damage from computer or video equipment...

User Manual
Page 17
... using either the Source button on the projector, or the Comp/EasyMP and S-Video/Video buttons on the remote control. warning Never look into the lens when the lamp is especially dangerous for help. Press the red P Power button on .
... using either the Source button on the projector, or the Comp/EasyMP and S-Video/Video buttons on the remote control. warning Never look into the lens when the lamp is especially dangerous for help. Press the red P Power button on .
User Manual
Page 20
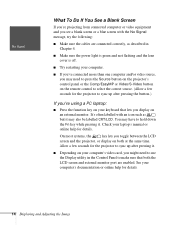
... CRT/LCD. You may need to use the Display utility in Chapter 4. ■ Make sure the power light is green and not flashing and the lens cover is off. ■ Try restarting your computer. ■ If you've connected more than one computer and/or video source, you may have to...
... CRT/LCD. You may need to use the Display utility in Chapter 4. ■ Make sure the power light is green and not flashing and the lens cover is off. ■ Try restarting your computer. ■ If you've connected more than one computer and/or video source, you may have to...
User Manual
Page 26
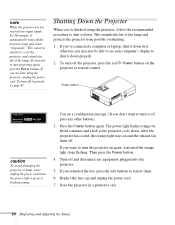
... it down . If you want to shut it off sleep mode, see your computer's display to start projecting again, press the Power button. Replace the lens cap and unplug the power cord. 7. If you 've connected a computer or laptop, shut it automatically turns off the projector, press the red P Power button...
... it down . If you want to shut it off sleep mode, see your computer's display to start projecting again, press the Power button. Replace the lens cap and unplug the power cord. 7. If you 've connected a computer or laptop, shut it automatically turns off the projector, press the red P Power button...
User Manual
Page 99
.... Maintaining the Projector Your projector needs little maintenance. You also need to do on a regular basis is keep the lens clean. Any dirt or smears on the lens may show up on your dealer or a qualified servicer. If any other servicing to qualified service personnel. Never open... filter on the side of the projector, turn it off and unplug the power cord. This chapter covers the following: ■ Cleaning the lens ■ Cleaning the projector case ■ Cleaning and replacing the air filter ■ Replacing the lamp ■ Transporting the projector Maintaining the...
.... Maintaining the Projector Your projector needs little maintenance. You also need to do on a regular basis is keep the lens clean. Any dirt or smears on the lens may show up on your dealer or a qualified servicer. If any other servicing to qualified service personnel. Never open... filter on the side of the projector, turn it off and unplug the power cord. This chapter covers the following: ■ Cleaning the lens ■ Cleaning the projector case ■ Cleaning and replacing the air filter ■ Replacing the lamp ■ Transporting the projector Maintaining the...
