
Technical Brief (Multimedia Projectors)
Page 5
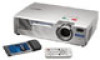
...control buttons to : 1. Volume + Remote Control Infrared Receiver Connecting Block EPSON Projector Typical installation out of presentation room EPSON Sales Training EPSON and EPSON Stylus are registered trademarks of Seiko Epson Corporation. 3/01 Other trademarks are the property of the presentation room or ...image gamma Create a user logo Versatility-Flexible installation EPSON PowerLite projectors can be installed in a variety of ways: Front projection Rear projection Ceiling mount Ceiling mount LL L L LLL Many EPSON projectors can also be installed outside of their respective...
...control buttons to : 1. Volume + Remote Control Infrared Receiver Connecting Block EPSON Projector Typical installation out of presentation room EPSON Sales Training EPSON and EPSON Stylus are registered trademarks of Seiko Epson Corporation. 3/01 Other trademarks are the property of the presentation room or ...image gamma Create a user logo Versatility-Flexible installation EPSON PowerLite projectors can be installed in a variety of ways: Front projection Rear projection Ceiling mount Ceiling mount LL L L LLL Many EPSON projectors can also be installed outside of their respective...

Installation Guide - ELPMBUNI Universal Mount Assembly
Page 2
... 368-9700 Technical Support - ELPMBUNI Table of the installation. Premier Mounts is not liable for improper installation that results in materials and workmanship. Contact Premier Mounts In the event of missing and/or damage equipment, or technical questions...the completion of Contents Warranty ...- 3 Contact Premier Mounts ...- 3 Warning Statements ...- 4 Parts List ...- 5 Installation Tools ...- 5 ELPMBUNI Universal Mount Assembly ...- 6 Projector Preparation ...- 7 Securing the Bracket to the Projector ...- 9 Leveling the Mounting bracket ...- 14 Securing the Upper Assembly Ceiling Plate...
... 368-9700 Technical Support - ELPMBUNI Table of the installation. Premier Mounts is not liable for improper installation that results in materials and workmanship. Contact Premier Mounts In the event of missing and/or damage equipment, or technical questions...the completion of Contents Warranty ...- 3 Contact Premier Mounts ...- 3 Warning Statements ...- 4 Parts List ...- 5 Installation Tools ...- 5 ELPMBUNI Universal Mount Assembly ...- 6 Projector Preparation ...- 7 Securing the Bracket to the Projector ...- 9 Leveling the Mounting bracket ...- 14 Securing the Upper Assembly Ceiling Plate...

Installation Guide - ELPMBUNI Universal Mount Assembly
Page 3
...and reinforced metal studs. IF NOT, THE CEILING MUST BE REINFORCED. At least two qualified people should perform the installation procedure. If the mount is commercially available). Page - 4 - WARNING: PRIOR TO THE INSTALLATION OF THIS PRODUCT, THE INSTALLATION INSTRUCTIONS SHOULD BE READ AND COMPLETELY ... 25 LBS., THE WEIGHT OF THE PROJECTOR. KEEP THESE INSTALLATION INSTRUCTIONS IN AN EASILY ACCESSIBLE LOCATION FOR FUTURE REFERENCE. Contact Premier Mounts with any other than wooden studs, use suitable hardware (which is to installation. USE PROPER SAFETY GEAR AND TOOLS FOR THE...
...and reinforced metal studs. IF NOT, THE CEILING MUST BE REINFORCED. At least two qualified people should perform the installation procedure. If the mount is commercially available). Page - 4 - WARNING: PRIOR TO THE INSTALLATION OF THIS PRODUCT, THE INSTALLATION INSTRUCTIONS SHOULD BE READ AND COMPLETELY ... 25 LBS., THE WEIGHT OF THE PROJECTOR. KEEP THESE INSTALLATION INSTRUCTIONS IN AN EASILY ACCESSIBLE LOCATION FOR FUTURE REFERENCE. Contact Premier Mounts with any other than wooden studs, use suitable hardware (which is to installation. USE PROPER SAFETY GEAR AND TOOLS FOR THE...

Installation Guide - ELPMBUNI Universal Mount Assembly
Page 4
If there are missing and/or damaged before beginning installation. Upper Assembly (Qty 1) Mounting Bracket (Qty 1) Plastic Barrel Caps (Qty 4) M3 Flat Washers (Qty 4) Note: Must be used with all proper installation hardware and components. Please ...Security Head Screws (Qty 4) Portable Drill Pencil Level (Supplied) Stud Finder (Commercially Available) M5 Allen Wrench NOTE: Mounting screws will vary by projector. Installation Manual Page - 5 - ELPMBUNI Parts List NOTE: This mount is not required for model specific hardware: Pages 10, 11, 12, and 13. Make sure that none of these...
If there are missing and/or damaged before beginning installation. Upper Assembly (Qty 1) Mounting Bracket (Qty 1) Plastic Barrel Caps (Qty 4) M3 Flat Washers (Qty 4) Note: Must be used with all proper installation hardware and components. Please ...Security Head Screws (Qty 4) Portable Drill Pencil Level (Supplied) Stud Finder (Commercially Available) M5 Allen Wrench NOTE: Mounting screws will vary by projector. Installation Manual Page - 5 - ELPMBUNI Parts List NOTE: This mount is not required for model specific hardware: Pages 10, 11, 12, and 13. Make sure that none of these...

Installation Guide - ELPMBUNI Universal Mount Assembly
Page 5
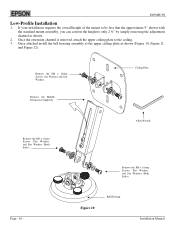
... C Ceiling Plate D Allen Wrench E Height Adjustment Screws F Tension Knobs G Safety Knob H Security Screws I Leveling Barrels J Universal Mounting Bracket K Leg Assembly L Projector (Not Supplied) M Tri-Lock Opening Option 1 H B D F Combination I Leg Single Leg D Option 2 M NOTE: See the best configuration for filter and lamp access....be used as single leg or any combination C of your projector for your G projector. The number of legs E may vary depending on the number of mounting points found on the bottom of single and dual legs together as shown in Options 1 and 2.
... C Ceiling Plate D Allen Wrench E Height Adjustment Screws F Tension Knobs G Safety Knob H Security Screws I Leveling Barrels J Universal Mounting Bracket K Leg Assembly L Projector (Not Supplied) M Tri-Lock Opening Option 1 H B D F Combination I Leg Single Leg D Option 2 M NOTE: See the best configuration for filter and lamp access....be used as single leg or any combination C of your projector for your G projector. The number of legs E may vary depending on the number of mounting points found on the bottom of single and dual legs together as shown in Options 1 and 2.

Installation Guide - ELPMBUNI Universal Mount Assembly
Page 6
Mounting Points Inverted Projector Blanket, soft cloth etc Figure 1 Flat surface Installation Manual Page - 7 - Identify the number of ...find important reference information regarding installation dimensions such as outlined in thread size (Figure 1). Most projectors have either three or four mounting points and are M4 in the installation instructions must be adhered to. Adherence to the top screen etc. CAUTION: THE ... of the lens placement to these recommendations during your installation will enhance the quality of mounting points and screw thread (pitch) size. 3.
Mounting Points Inverted Projector Blanket, soft cloth etc Figure 1 Flat surface Installation Manual Page - 7 - Identify the number of ...find important reference information regarding installation dimensions such as outlined in thread size (Figure 1). Most projectors have either three or four mounting points and are M4 in the installation instructions must be adhered to. Adherence to the top screen etc. CAUTION: THE ... of the lens placement to these recommendations during your installation will enhance the quality of mounting points and screw thread (pitch) size. 3.

Installation Guide - ELPMBUNI Universal Mount Assembly
Page 7
Separate the upper assembly from the projector mounting bracket by slightly loosening the two tension knurl knobs to be rotated 180° apart and separate. ELPMBUNI 4. Next loosen the safety screw knurl knob far enough to allow the two parts to create free play between the bracket tri-lock assembly and the upper section tri-lock assembly points. 5. Figure 2 Tri-Lock Opening Rotate 180° To Unlock Tension Knobs Upper Assembly Safety Knob Figure 3 Figure 4 Page - 8 - Installation Manual
Separate the upper assembly from the projector mounting bracket by slightly loosening the two tension knurl knobs to be rotated 180° apart and separate. ELPMBUNI 4. Next loosen the safety screw knurl knob far enough to allow the two parts to create free play between the bracket tri-lock assembly and the upper section tri-lock assembly points. 5. Figure 2 Tri-Lock Opening Rotate 180° To Unlock Tension Knobs Upper Assembly Safety Knob Figure 3 Figure 4 Page - 8 - Installation Manual

Installation Guide - ELPMBUNI Universal Mount Assembly
Page 8
... the M3 x 16 Phillips screws with the M3 flat washers (supplied). ELPMBUNI Securing the Bracket to the Projector NOTE: The two-piece mounting legs are designed to allow routing of the legs around critical ventilation screens on the bottom of the projector and use the appropriate number of... the mounting bracket. Select the mounting hardware that your projector requires and loosely install the universal mount to a one-piece leg as shown. You may also reduce the two-piece leg to your...
... the M3 x 16 Phillips screws with the M3 flat washers (supplied). ELPMBUNI Securing the Bracket to the Projector NOTE: The two-piece mounting legs are designed to allow routing of the legs around critical ventilation screens on the bottom of the projector and use the appropriate number of... the mounting bracket. Select the mounting hardware that your projector requires and loosely install the universal mount to a one-piece leg as shown. You may also reduce the two-piece leg to your...

Installation Guide - ELPMBUNI Universal Mount Assembly
Page 9
This mount works with all sub-25 pound projectors. PowerLite 830p, 835p Hardware: M4 x 12mm (Qty 4) Installation Manual PowerLite S3, S4, 62C, 76C, 82C, Hardware: M4 x 12mm (Qty 3) Page - 10 - ELPMBUNI NOTE: If your projector model is not shown, when arranging the leg combination, simply ensure access to filters and lamp housings when aligning brackets.
This mount works with all sub-25 pound projectors. PowerLite 830p, 835p Hardware: M4 x 12mm (Qty 4) Installation Manual PowerLite S3, S4, 62C, 76C, 82C, Hardware: M4 x 12mm (Qty 3) Page - 10 - ELPMBUNI NOTE: If your projector model is not shown, when arranging the leg combination, simply ensure access to filters and lamp housings when aligning brackets.

Installation Guide - ELPMBUNI Universal Mount Assembly
Page 13
... screws with the Allen wrench (supplied) (Figure 8 and Figure 9). ELPMBUNI Leveling the Mounting bracket 1. When the position desired is achieved tighten the mounting hardware to do not over-tighten the mounting hardware. Allen Wrench Level Inverted Projector DOWN UP Adjusting the Mount Figure 8 Leveling Barrels Page - 14 - Rotate the leveling barrels to level the...
... screws with the Allen wrench (supplied) (Figure 8 and Figure 9). ELPMBUNI Leveling the Mounting bracket 1. When the position desired is achieved tighten the mounting hardware to do not over-tighten the mounting hardware. Allen Wrench Level Inverted Projector DOWN UP Adjusting the Mount Figure 8 Leveling Barrels Page - 14 - Rotate the leveling barrels to level the...

Installation Guide - ELPMBUNI Universal Mount Assembly
Page 14
...Wood Stud Wood Screws Upper Assembly Installation Manual Knurl Knobs (3ea) Figure 9 Secure the ceiling mount to a point centered horizontally on your screen and projector, make sure the mounting location will safely support the weight of the screen as well. 4. Locate the inverted projectors top...for best picture ratio. 2. NOTE: Make sure to measure from the front of the lens to the ceiling or wall. 5. Before you mount your installation environment (Figure 9). Page - 15 - ELPMBUNI Securing the Upper Assembly Ceiling Plate 1. NOTE: If installing the security kit (ELPMBSEC...
...Wood Stud Wood Screws Upper Assembly Installation Manual Knurl Knobs (3ea) Figure 9 Secure the ceiling mount to a point centered horizontally on your screen and projector, make sure the mounting location will safely support the weight of the screen as well. 4. Locate the inverted projectors top...for best picture ratio. 2. NOTE: Make sure to measure from the front of the lens to the ceiling or wall. 5. Before you mount your installation environment (Figure 9). Page - 15 - ELPMBUNI Securing the Upper Assembly Ceiling Plate 1. NOTE: If installing the security kit (ELPMBSEC...
Installation Guide - ELPMBUNI Universal Mount Assembly
Page 15
... 2 ½" by simply removing the adjustment channel as shown (Figure 10, Figure 11, and Figure 12). If your installation requires the overall height of the mount to be less that the approximate 9" shown with the standard mount assembly, you can convert the height to the ceiling. 3.
... 2 ½" by simply removing the adjustment channel as shown (Figure 10, Figure 11, and Figure 12). If your installation requires the overall height of the mount to be less that the approximate 9" shown with the standard mount assembly, you can convert the height to the ceiling. 3.

Installation Guide - ELPMBUNI Universal Mount Assembly
Page 17
... rotation of the bracket in the base of the upper assembly. 3. The alignment slot must be in direct alignment with the alignment slot on the mounting bracket (Figure 13). NOTE: Follow the number sequence prior to securing the projector to the Upper Assembly 1. Safety Knurl Knob Tension Knurl Knobs Figure ... in the upper assembly. 4. ELPMBUNI Securing the Projector to the upper assembly. Carefully lift the projector and insert the mounting bracket mating special tri-lock cutout into the mating portion of the upper assembly. 2. Make sure the three-knurl knobs are loosened to fully ...
... rotation of the bracket in the base of the upper assembly. 3. The alignment slot must be in direct alignment with the alignment slot on the mounting bracket (Figure 13). NOTE: Follow the number sequence prior to securing the projector to the Upper Assembly 1. Safety Knurl Knob Tension Knurl Knobs Figure ... in the upper assembly. 4. ELPMBUNI Securing the Projector to the upper assembly. Carefully lift the projector and insert the mounting bracket mating special tri-lock cutout into the mating portion of the upper assembly. 2. Make sure the three-knurl knobs are loosened to fully ...

Installation Guide - ELPMBUNI Universal Mount Assembly
Page 18
With the projector secured in the mount and power on the screen, slightly loosen the front and rear M8 screws and adjust to the screen and firmly tighten the two M8 tilt ...
With the projector secured in the mount and power on the screen, slightly loosen the front and rear M8 screws and adjust to the screen and firmly tighten the two M8 tilt ...
Product Brochure
Page 2
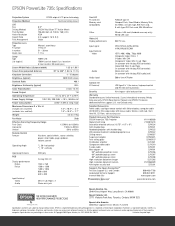
..., FL 33126 Specifications and terms are trademarks and/or registered trademarks of Seiko Epson Corporation. EPSON PowerLite 735c Specifications Projection System EPSON original LCD prism technology Projection Method Front/rear/ceiling mount LCD Size Driving Method Pixel Number Native Resolution Aspect Ratio Pixel Arrangement 0.9" EPSON Poly-Silicon TFT Active Matrix 786,432 dots x3 (1024 x 768) LCDs...
..., FL 33126 Specifications and terms are trademarks and/or registered trademarks of Seiko Epson Corporation. EPSON PowerLite 735c Specifications Projection System EPSON original LCD prism technology Projection Method Front/rear/ceiling mount LCD Size Driving Method Pixel Number Native Resolution Aspect Ratio Pixel Arrangement 0.9" EPSON Poly-Silicon TFT Active Matrix 786,432 dots x3 (1024 x 768) LCDs...

Product Information Guide
Page 1
EPSON PowerLite 735c Projector Card reader access light Card slot Control panel Security lock Air filter Focus ring Lens cover ...size 30 to 300 inches Projection distance 3.2 to 38.5 feet (0.96 to 11.7 meters) Projection methods Front, rear, upside-down front (ceiling mount), and upside-down rear Internal sound system 1 W monaural Optical aspect ratio 4:3 (horizontal:vertical) Zoom ratio 1:1.16 Noise level 39 dB Keystone ...(-10 to 60 °C) Humidity Operating: 20 to 80% RH, non-condensing Storage: 10 to 90% RH, non-condensing 2/03 EPSON PowerLite 735c Projector - 1
EPSON PowerLite 735c Projector Card reader access light Card slot Control panel Security lock Air filter Focus ring Lens cover ...size 30 to 300 inches Projection distance 3.2 to 38.5 feet (0.96 to 11.7 meters) Projection methods Front, rear, upside-down front (ceiling mount), and upside-down rear Internal sound system 1 W monaural Optical aspect ratio 4:3 (horizontal:vertical) Zoom ratio 1:1.16 Noise level 39 dB Keystone ...(-10 to 60 °C) Humidity Operating: 20 to 80% RH, non-condensing Storage: 10 to 90% RH, non-condensing 2/03 EPSON PowerLite 735c Projector - 1
Product Information Guide
Page 12
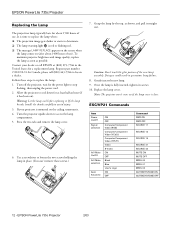
...(You can't remove these steps to avoid injury. 3. Turn off the projector, wait for the power light to locate a dealer. Contact your projector is mounted on (after about 1500 hours of use ). Use a screwdriver to deteriorate. ❏ The lamp warning light is time to replace the lamp when: &#... darker or starts to loosen the two screws holding the lamp in premature lamp failure. 8. Grasp the lamp by the top, as possible. EPSON PowerLite 735c Projector Replacing the Lamp The projection lamp typically lasts for about 1400 hours of use . It is red or flashing red. ❏ The...
...(You can't remove these steps to avoid injury. 3. Turn off the projector, wait for the power light to locate a dealer. Contact your projector is mounted on (after about 1500 hours of use ). Use a screwdriver to deteriorate. ❏ The lamp warning light is time to replace the lamp when: &#... darker or starts to loosen the two screws holding the lamp in premature lamp failure. 8. Grasp the lamp by the top, as possible. EPSON PowerLite 735c Projector Replacing the Lamp The projection lamp typically lasts for about 1400 hours of use . It is red or flashing red. ❏ The...
Product Information Guide
Page 13
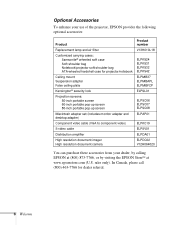
...to component video) ELPKC19 S-video cable ELPSV01 Macintosh adapter set (includes monitor adapter and desktop adapter) ELPAP01 Ceiling mount Suspension adapter False ceiling plate ELPMB37 ELPMBAPL ELPMBFCP Portable projection screens: 50-inch screen 60-inch pop-up screen 80... these accessories from your dealer, by calling EPSON at (800) 873-7766, or by visiting the EPSON StoreSM at www.epsonstore.com (U.S. Related Documentation CPD-15675 CPD-15676 EPSON PowerLite 735c User's Guide EPSON PowerLite 735c Quick Setup sheet 2/03 EPSON PowerLite 735c Projector - 13 In Canada, please call ...
...to component video) ELPKC19 S-video cable ELPSV01 Macintosh adapter set (includes monitor adapter and desktop adapter) ELPAP01 Ceiling mount Suspension adapter False ceiling plate ELPMB37 ELPMBAPL ELPMBFCP Portable projection screens: 50-inch screen 60-inch pop-up screen 80... these accessories from your dealer, by calling EPSON at (800) 873-7766, or by visiting the EPSON StoreSM at www.epsonstore.com (U.S. Related Documentation CPD-15675 CPD-15676 EPSON PowerLite 735c User's Guide EPSON PowerLite 735c Quick Setup sheet 2/03 EPSON PowerLite 735c Projector - 13 In Canada, please call ...
User Manual
Page 12
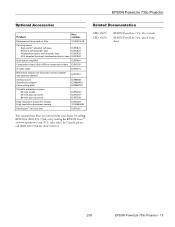
sales only). In Canada, please call (800) 463-7766 for projector/notebook Ceiling mount Suspension adapter False ceiling plate Kensington® security lock Projection screens: 50-inch portable screen 60-inch portable pop-up screen 80-... ELPMB37 ELPMBAPL ELPMBFCP ELPSL01 ELPSC06 ELPSC07 ELPSC08 ELPAP01 ELPKC19 ELPSV01 ELPDA01 ELPDC02 V12H064020 You can purchase these accessories from your use of the projector, EPSON provides the following optional accessories: Product Replacement lamp and air filter Customized carrying cases: Samsonite® wheeled soft case Soft shoulder bag Notebook/...
sales only). In Canada, please call (800) 463-7766 for projector/notebook Ceiling mount Suspension adapter False ceiling plate Kensington® security lock Projection screens: 50-inch portable screen 60-inch portable pop-up screen 80-... ELPMB37 ELPMBAPL ELPMBFCP ELPSL01 ELPSC06 ELPSC07 ELPSC08 ELPAP01 ELPKC19 ELPSV01 ELPDA01 ELPDC02 V12H064020 You can purchase these accessories from your use of the projector, EPSON provides the following optional accessories: Product Replacement lamp and air filter Customized carrying cases: Samsonite® wheeled soft case Soft shoulder bag Notebook/...
User Manual
Page 14
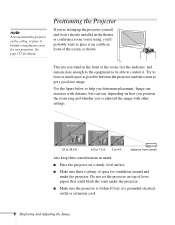
... yourself and it isn't already installed in mind: ■ Place the projector on the ceiling, or place it . Image size increases with distance, but can mount the projector on a sturdy, level surface. ■ Make sure there is plenty of space for ventilation around and under the projector. ■ Make sure the...
... yourself and it isn't already installed in mind: ■ Place the projector on the ceiling, or place it . Image size increases with distance, but can mount the projector on a sturdy, level surface. ■ Make sure there is plenty of space for ventilation around and under the projector. ■ Make sure the...

